Configure Object Synchronization
Prerequisites
-
Review Replication Overview.
There are three basic steps to configure FlexSync to replicate your data.
- Step 1: Configure a Hostgroup
- Step 2: Configure a Host
- Step 3: Configure a Task

To configure an object synchronization task from the FlexSync dashboard, complete the following steps.
The hostgroup is a container for the hosts that you assign as a source and as a target system. If you have multiple systems you want to replicate, you can configure multiple Hostgroups. To configure a replication task, you must first add a hostgroup.
-
Log in to the FlexSync Dashboard.
 Access the FlexSync Dashboard
Do the following to access your FlexSync dashboard.
Prerequisites
- You will need a FlexSync user account before you can create a replication task. See Step 4: Manage FlexSync Users.
- In order to access the FlexSync GUI, the appliance host name must be resolvable through a DNS name or IP address. If you use a DNS name, it must be resolvable on the DNS or it must have a local entry in the local appliance /etc/hosts file.
-
Access the StorNext User Interface (new UI introduced in StorNext 7.0.1).
-
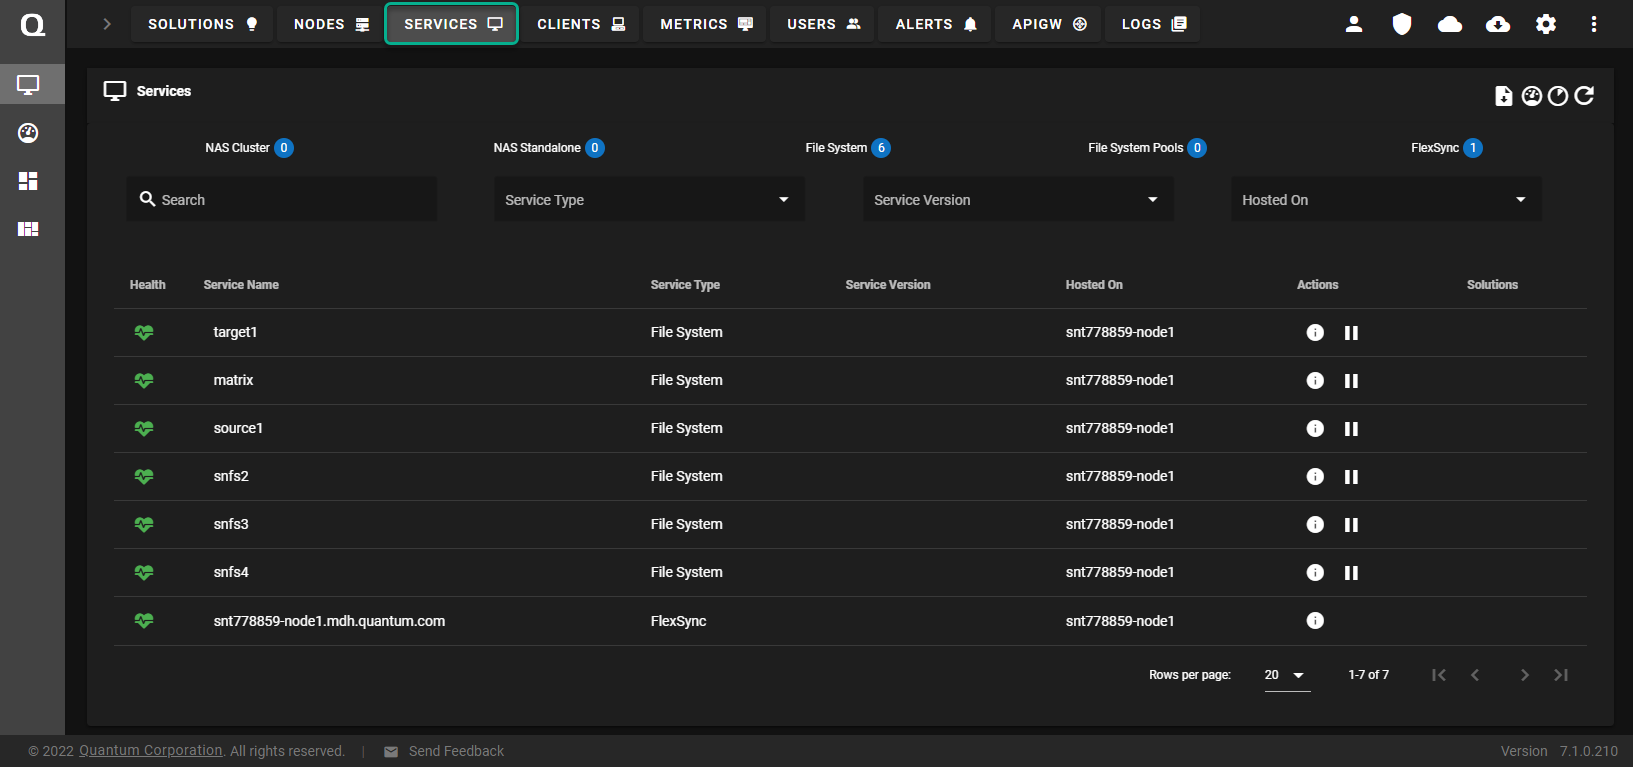
On the top navigation, click Services. The Services page appears.
-
Under the Service Name heading, click the service name that corresponds with your FlexSync service.
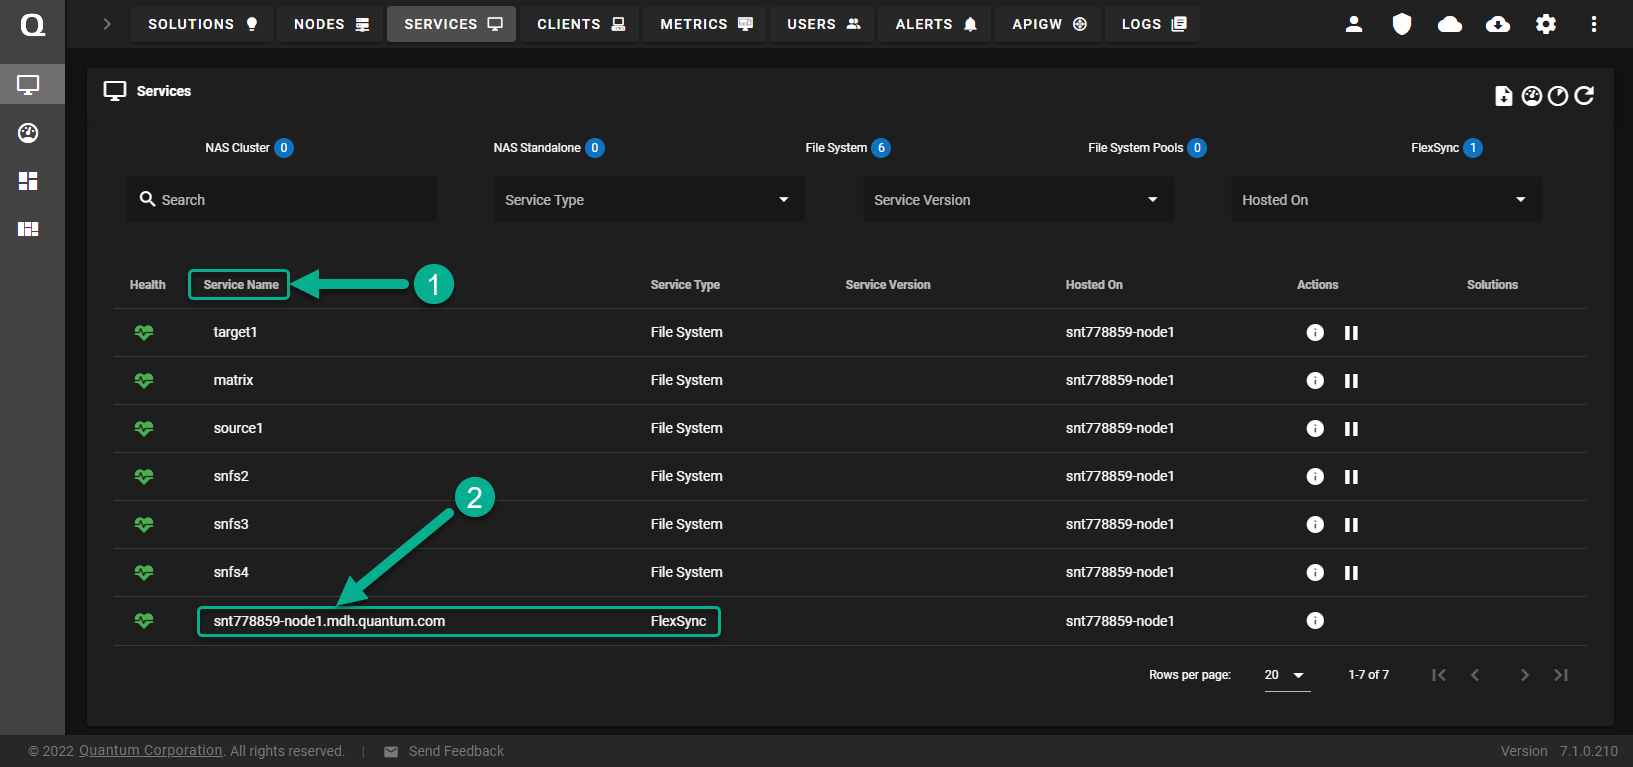
The FlexSync dashboard appears.
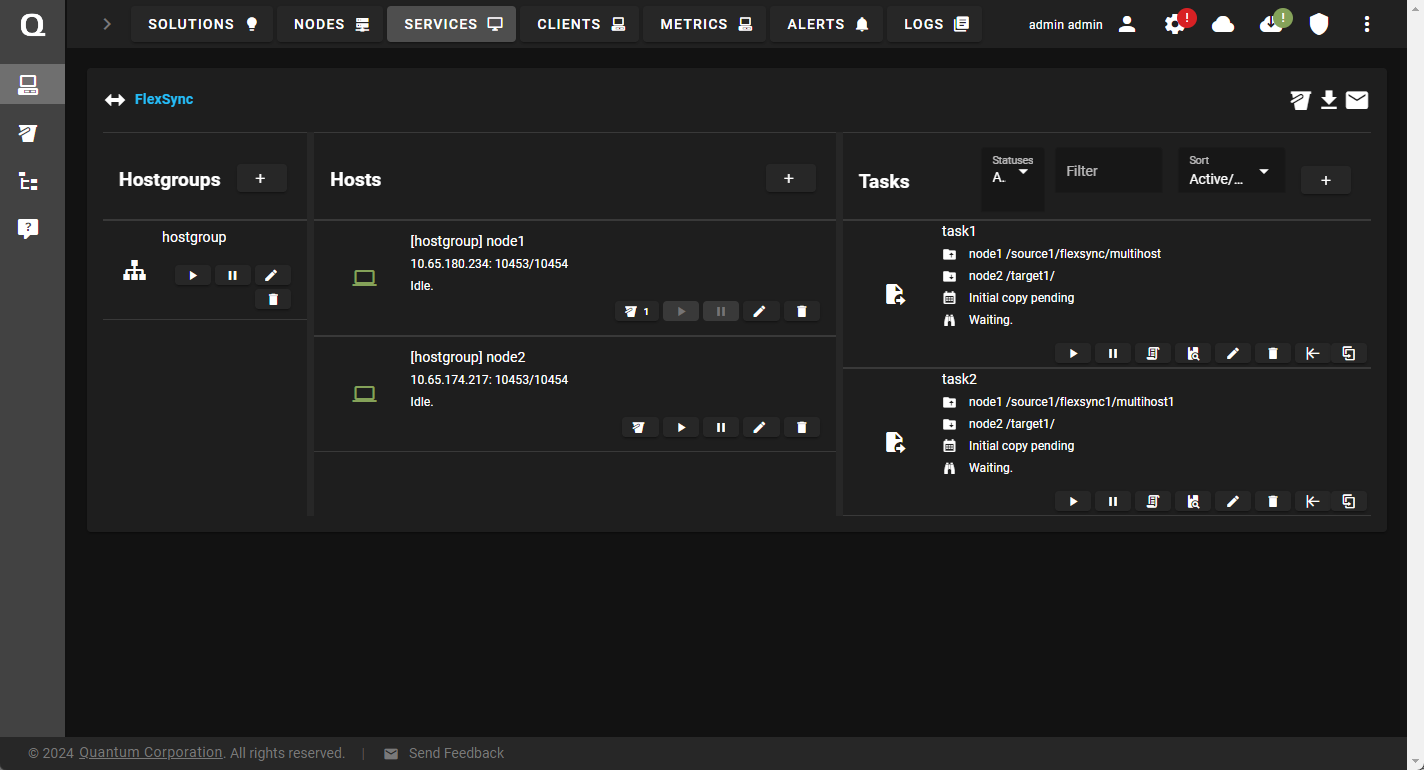
- In the Hostgroups column, click Add a hostgroup to display the Hostgroup configuration dialog box.
- In the Name field, enter a label for the hostgroup.
- Click Apply to add the hostgroup, or click Cancel to abort the operation and return to the previous page.
Note: Click the Edit icon to change the name of your hostgroup.
You can now add one or more hosts to your hostgroup. A host is what you assign as either a source or target system.
Note: The host's flexsyncd daemon must be running and reachable at its configured DNS name or IP address to successfully complete this task.
-
Log in to the FlexSync Dashboard.
 Access the FlexSync Dashboard
Do the following to access your FlexSync dashboard.
Prerequisites
- You will need a FlexSync user account before you can create a replication task. See Step 4: Manage FlexSync Users.
- In order to access the FlexSync GUI, the appliance host name must be resolvable through a DNS name or IP address. If you use a DNS name, it must be resolvable on the DNS or it must have a local entry in the local appliance /etc/hosts file.
-
Access the StorNext User Interface (new UI introduced in StorNext 7.0.1).
-
On the top navigation, click Services. The Services page appears.

-
Under the Service Name heading, click the service name that corresponds with your FlexSync service.

The FlexSync dashboard appears.

-
In the Hosts column, click Add a host to display the Host configuration dialog box.
 Basic Tab
- In the Name field, enter a label for the host.
- In the Hostgroup field, select a hostgroup.
-
In the Hostname field, enter the DNS name or IP address for the replication transport.
-
In the Admin port field, update the port number, as needed. The default port is 10453.
-
In the Data port field, update the port number, as needed. The default port is 10454.
-
In the SSL port field, update the port number, as needed. The default port is 10554.
-
In the Username field, enter your FlexSync user name.
-
In the Password field, enter your FlexSync password.
 Advanced Tab
If needed, select Bandwidth Throttling.
This option restricts the bandwidth across all of the active tasks for the selected host, to the specified value.
-
By default, bandwidth throttling is disabled. To enable:
- Select Bandwidth Throttling.
-
In the Bandwidth limit field, enter a value.
Note: The minimum bandwidth limit value is 1 MiB per second (MiB/s).
- Select a data transfer rate from the list.
- Enter 0 to disable bandwidth throttling.
Note: If you enable bandwidth throttling, the rate I/O is not guaranteed. Initially, your data transfers might experience a bit of variation where the host’s transfer rate, as shown in the GUI, can be slightly higher or lower than the requested transfer rate. The transfer rate eventually settles in to the requested transfer rate. Also, the transfer rate shown by the GUI is an average across the running time of all active tasks. If you update the bandwidth limit mid-stream, then FlexSync throttles up or down to that limit immediately, but it might take an extended period of time for the average to reflect the updated bandwidth limit.
Caution: Use caution if you attempt to mix Bandwidth Throttling and Storage Manager. If you run FlexSync on a throttled link or if the link is substantially slower than the minimum tape drive read speed, see Considerations for Low Network Bandwidth Tape Retrieval for configuration options.
-
Click Apply to add the host, or click Cancel to abort the operation and return to the previous page.
Note: Click the Edit icon to change the name of your host.
- (Optional) Repeat the procedure for each host participating in data replication.
When you initialize a repository, the process:
-
Adds FlexSync components to the S3 repository.
-
This includes the first HEAD object of the repository.
-
This includes some configuration information.
-
If you select the Use Existing option, then this step is not performed; new information is not added to the repository but it is queried to get information for the local updates.
-
-
On your local system, the process:
-
Creates the database entries for the repository (configuration information).
-
Registers the repository to the root user on the host.
-
Do the following to initialize access to your S3 repository:
-
Log in to the FlexSync Dashboard.
 Access the FlexSync Dashboard
Do the following to access your FlexSync dashboard.
Prerequisites
- You will need a FlexSync user account before you can create a replication task. See Step 4: Manage FlexSync Users.
- In order to access the FlexSync GUI, the appliance host name must be resolvable through a DNS name or IP address. If you use a DNS name, it must be resolvable on the DNS or it must have a local entry in the local appliance /etc/hosts file.
-
Access the StorNext User Interface (new UI introduced in StorNext 7.0.1).
-
On the top navigation, click Services. The Services page appears.

-
Under the Service Name heading, click the service name that corresponds with your FlexSync service.

The FlexSync dashboard appears.

-
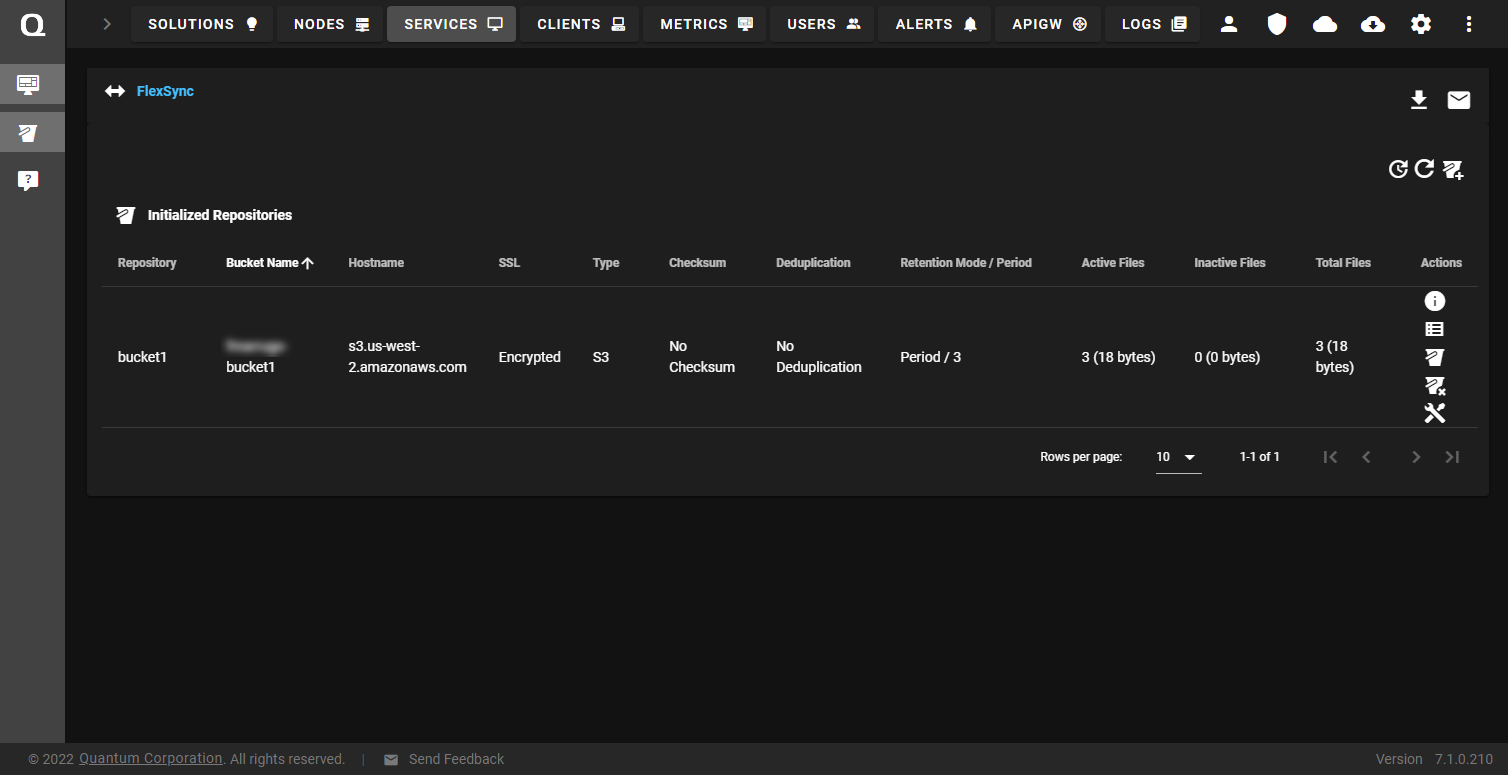
Click the Manage Initialized Repositories icon.
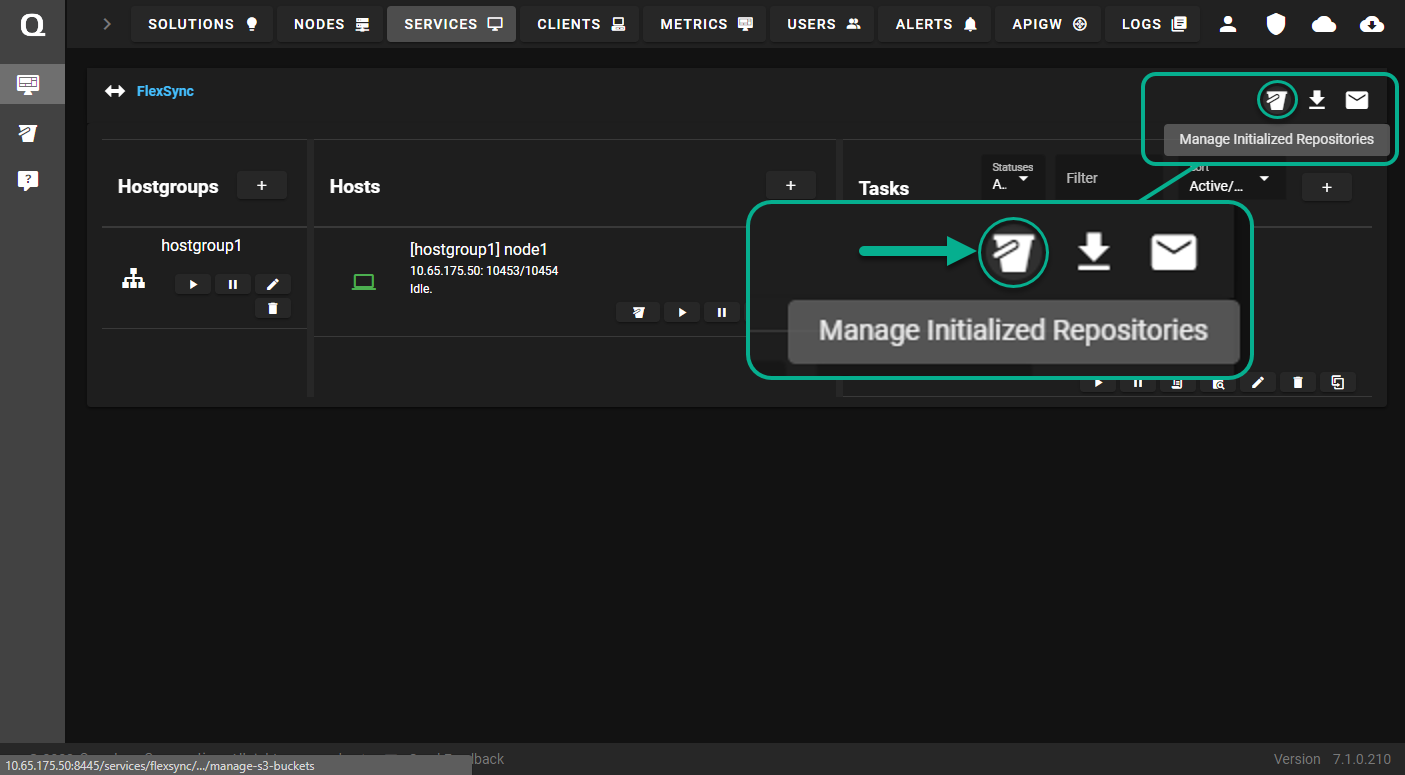
The Initialized Repositories page appears.
-
Click the Initialize New Repository icon.
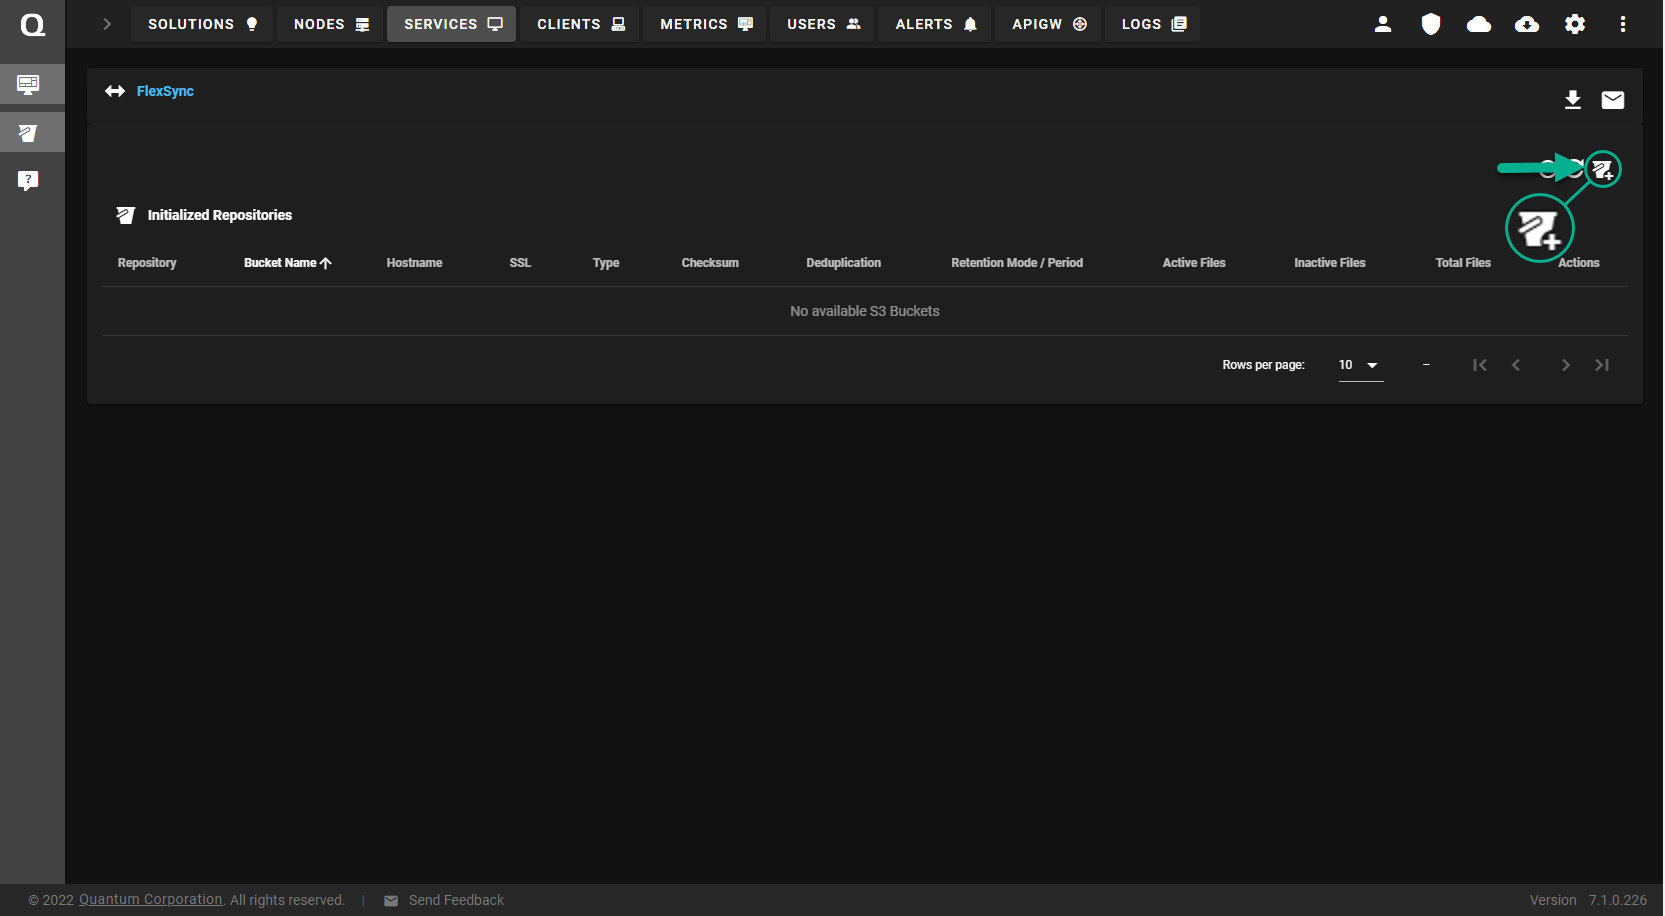
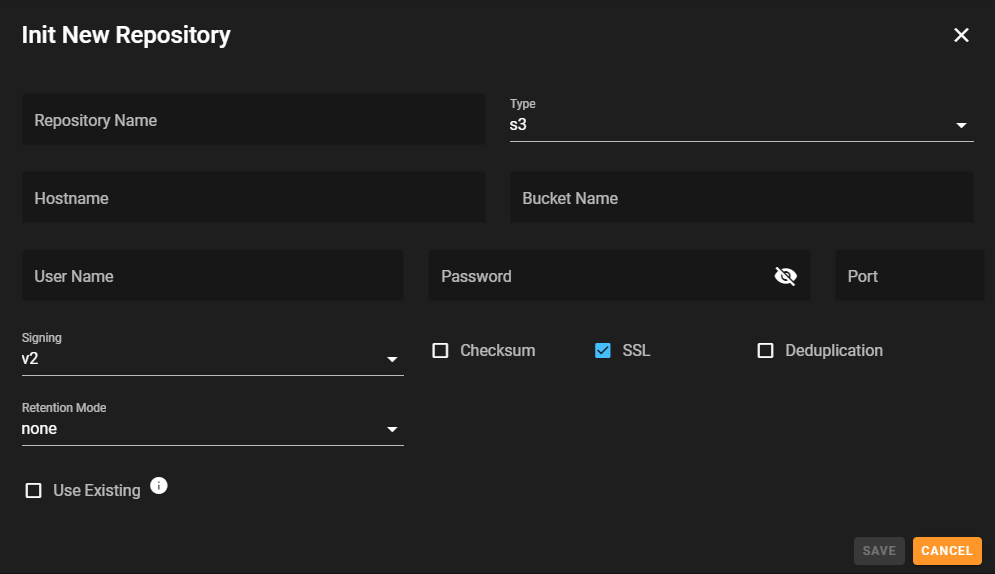
The Initialize New Repository dialog appears.
-
In the Initialize New Repository dialog, complete the information:
Parameter
Description
Repository Name Enter a name to assign to the repository.
Note: You cannot edit the repository name after you create it.
Type Select the type of repository.
The default is S3.
Hostname Enter the Uniform Resource Identifier (URI) of the S3 endpoint being used for the repository (for storage and retrieval of an object).
For example:
s3.us-west-2.amazonaws.comBucket Name Enter the name of the S3 bucket in which to store the repository's content. User Name Enter the user name or access key ID of your repository, assigned during creation of your S3 bucket. Password Enter the password or secret access key of your repository, assigned during creation of your S3 bucket. Port Enter the port on which the S3 endpoint is available. Signing Specifies the type of signing to use on S3 requests. Click V2 or V4.
The default is V2.
Checksum This option allows you to enable or disable file checksum verification. SSL This option allows you to enable or disable the SSL protocol. Deduplication This option allows you to enable or disable file deduplication.
For more information, see Best Practices for File Replication.
Retention Mode Specify the retention period for an old commit.
-
Permanent: This option indefinitely retains an old commit.
-
None: This option does not retain an old commit.
Note: If you want to remove an old commit, then perform the clean operation (see Clean Your Initialized Repository).
-
Days: This option allows you to specify the number of days to keep an old commit.
Note: After the time period is met, if you want to remove an old commit, then perform the clean operation (see Clean Your Initialized Repository).
Use Existing This option allows you to use a previously initialized repository. If you want to allow access to a repository from multiple systems, then you must only initialize the repository one time. The initialization process places specific items in the S3 repository to use for replication. When you configure a subsequent system, then select the Use Existing option to take advantage of a repository that is already initialized.
Note: You must use the same Repository Name label that is associated with the repository you previously initialized.
Enable this option if you receive the error:
Failed to initialize repository: Repository named <repository name> already exists in bucket. -
-
Click Save. If successful, the initialized repository appears in the Initialized Repositories page.

After you Initialize a Repository, a user with the proper credentials can use the repository. Rather than providing credentials with every command, there is a one-time registration process per user on a host to provide the required credentials. You must complete the registration for any individual host in which a user plans to use the repository. The registration information is retained for the user on the host for any subsequent commands issued to the repository by the user.
Do the following to register an initialized repository:
-
Log in to the FlexSync Dashboard.
 Access the FlexSync Dashboard
Do the following to access your FlexSync dashboard.
Prerequisites
- You will need a FlexSync user account before you can create a replication task. See Step 4: Manage FlexSync Users.
- In order to access the FlexSync GUI, the appliance host name must be resolvable through a DNS name or IP address. If you use a DNS name, it must be resolvable on the DNS or it must have a local entry in the local appliance /etc/hosts file.
-
Access the StorNext User Interface (new UI introduced in StorNext 7.0.1).
-
On the top navigation, click Services. The Services page appears.

-
Under the Service Name heading, click the service name that corresponds with your FlexSync service.

The FlexSync dashboard appears.

-
In the Hosts column, click the Registered Repositories icon.

The Registered Repositories page appears.

-
Click the Register New Repository icon.

The Register New Repository dialog appears.

-
In the Register New Repository dialog, complete the information:
Parameter
Description
Repository Name Select the name of the repository to associate with your registered repository.
Type Select the type of repository.
The default is S3.
Hostname Enter the Uniform Resource Identifier (URI) of the S3 endpoint being used for the repository (for storage and retrieval of an object).
For example:
s3.us-west-2.amazonaws.comBucket Name Enter the name of the S3 bucket. User Name Enter the user name or access key ID of your repository, assigned during creation of your S3 bucket. Password Enter the password or secret access key of your repository, assigned during creation of your S3 bucket. Port Enter the port on which the S3 endpoint is available. Signing Specifies the type of signing to use on S3 requests. Click V2 or V4.
The default is V2.
SSL Displays if the SSL protocol is enabled or disabled on your repository. Register Hostgroup Select the hostgroup to associate with your registered repository.
Register Host Select the host to associate with your registered repository.
Register User Enter the user account on your host system to associate with your registered repository. The user account you enter is used to identify who performs a commit process to the repository.
Note: The user must already exist on the host system; if you have access to the S3 credentials, you cannot register an initialized repository unless the user account you are attempting to register with already exists on the host system. The user does not imply ownership of the S3 repository. By default, the root user is registered.
-
Click Save. If successful, the registered repository appears in the Registered Repositories page.

After you register an initialized repository, you can download the content of the repository to your local workstation.
Prerequisites
-
You must have an initialized repository (see Initialize a Repository).
-
You must have a registered repository (see Register an Initialized Repository).
You can perform a checkout process to download part or all of the contents of an existing repository. The contents are used to create a working directory that you can update, change, and commit.
Do the following to download the content of a repository to your local system.
Note: To perform this action, the owner of the file system directory must be a registered user (see Register an Initialized Repository).
-
Log in to the FlexSync Dashboard.
 Access the FlexSync Dashboard
Do the following to access your FlexSync dashboard.
Prerequisites
- You will need a FlexSync user account before you can create a replication task. See Step 4: Manage FlexSync Users.
- In order to access the FlexSync GUI, the appliance host name must be resolvable through a DNS name or IP address. If you use a DNS name, it must be resolvable on the DNS or it must have a local entry in the local appliance /etc/hosts file.
-
Access the StorNext User Interface (new UI introduced in StorNext 7.0.1).
-
On the top navigation, click Services. The Services page appears.

-
Under the Service Name heading, click the service name that corresponds with your FlexSync service.

The FlexSync dashboard appears.

-
In the left navigation, click the File System Browser icon.
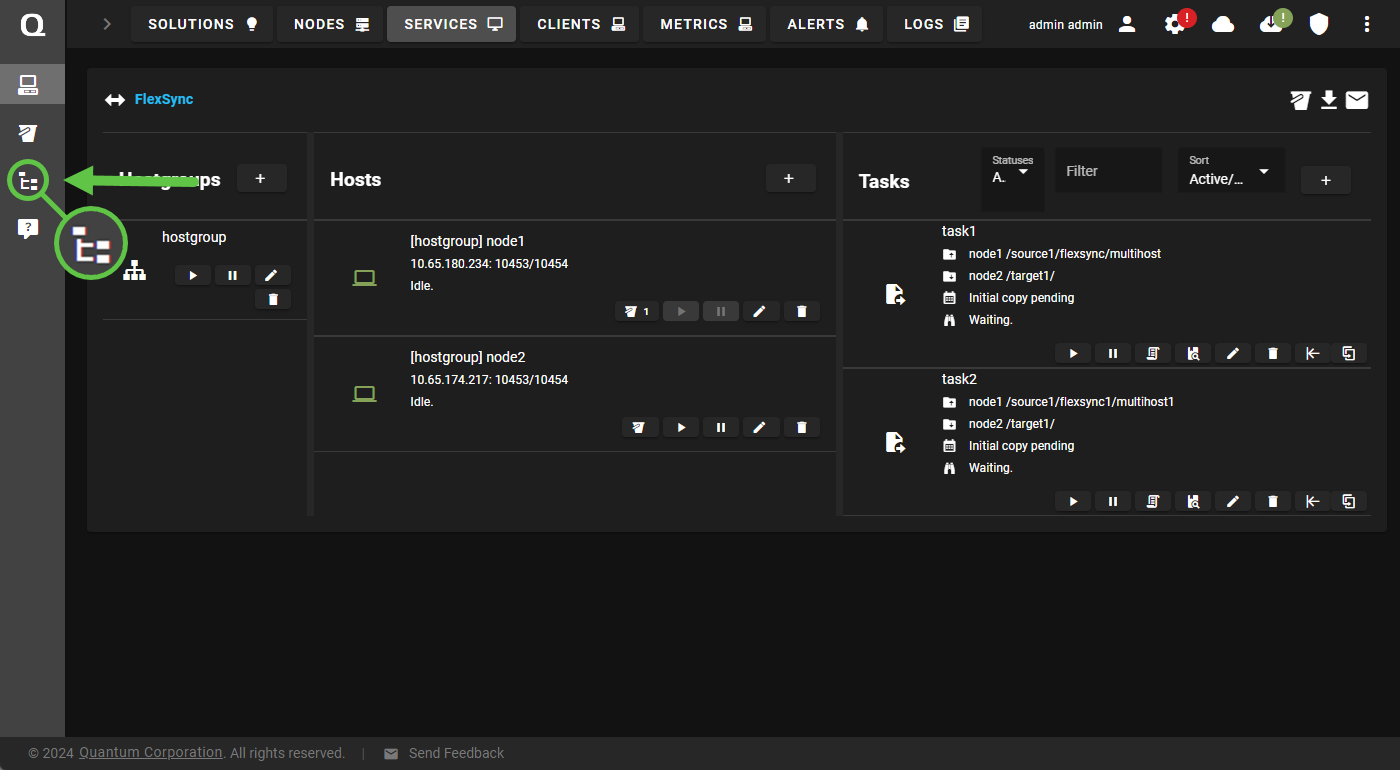
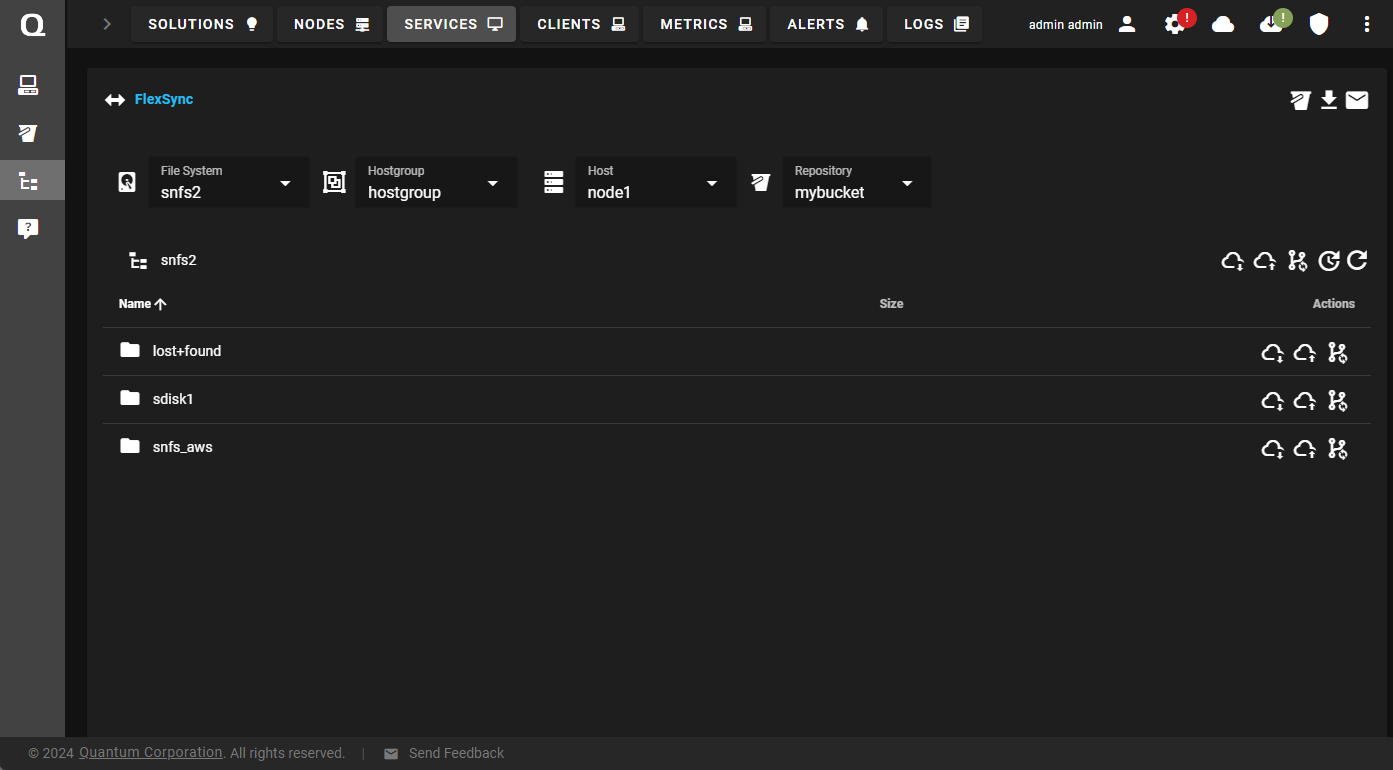
The File System Browser page appears.
-
On the File System Browser page, do the following:
-
Select your file system, hostgroup, host, and repository.
-
You can checkout the contents of a repository to a directory that appears on the file browser page, or click a directory to display its sub-directories.
-
Click the Checkout to this folder icon.
Note: To checkout to the root folder of the file system, click the Checkout to root folder icon.
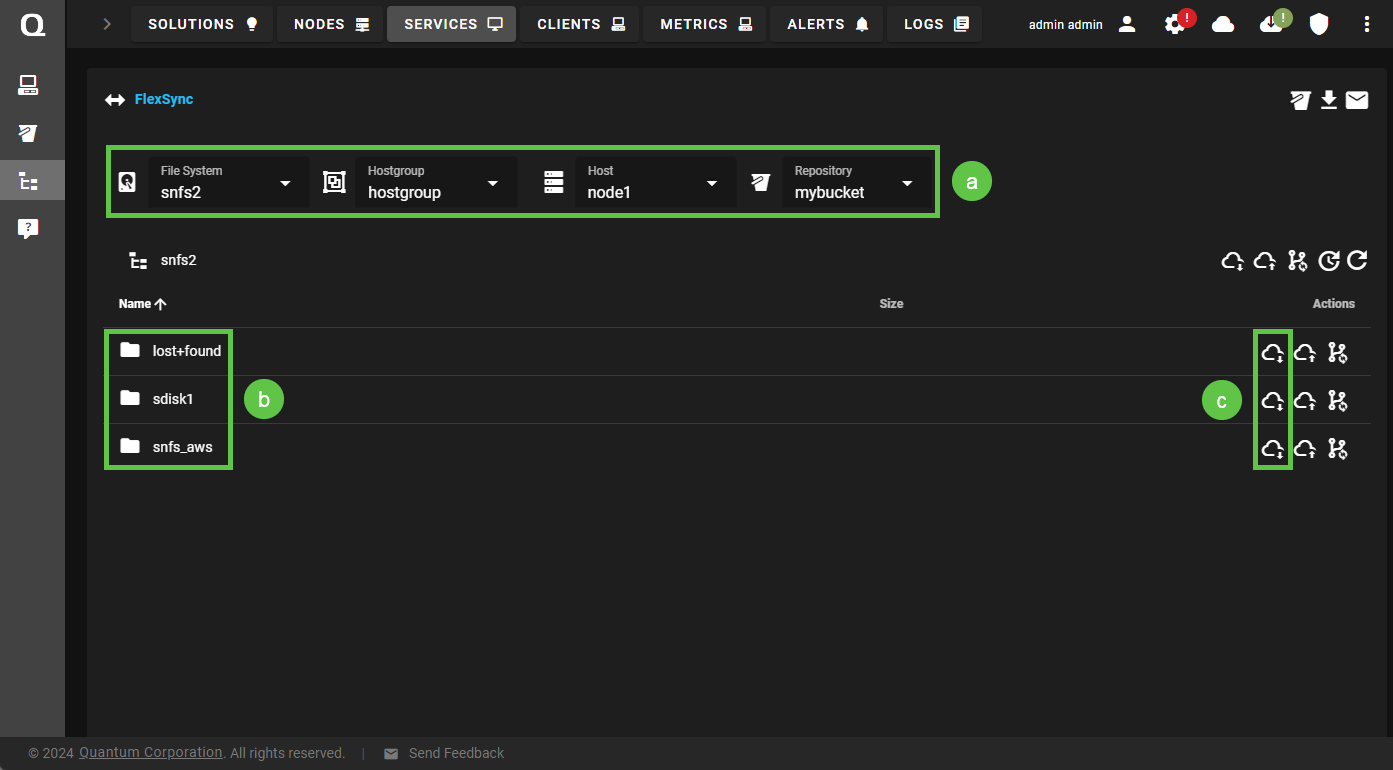
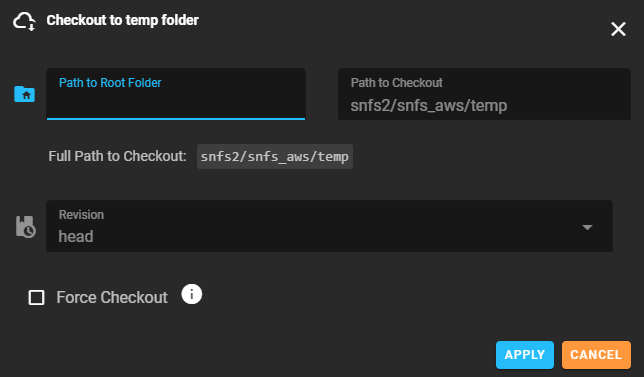
The Checkout to <name of folder> folder dialog appears.
-
-
In the Checkout to <name of folder> folder dialog, enter the path to your root folder in the Path to Root Folder field.
Note: If you want to checkout to an already existing directory, click Force Checkout and then specify the conflict resolution in the Conflict Resolution Mode field.
-
Click Apply. If successful, Checkout completed successfully appears on the page.

-
Proceed to Step 6: Add a Task.
A task defines what files and directories to replicate from your source system to your target S3 repository.
This process allows you to automatically synchronize your local directory to your S3 repository according to the configured task schedule.
Note: If you do not want to automatically synchronize your local directory to your S3 repository, then you can manually perform the process (see Manually Commit a Local Update).
-
Log in to the FlexSync Dashboard.
 Access the FlexSync Dashboard
Do the following to access your FlexSync dashboard.
Prerequisites
- You will need a FlexSync user account before you can create a replication task. See Step 4: Manage FlexSync Users.
- In order to access the FlexSync GUI, the appliance host name must be resolvable through a DNS name or IP address. If you use a DNS name, it must be resolvable on the DNS or it must have a local entry in the local appliance /etc/hosts file.
-
Access the StorNext User Interface (new UI introduced in StorNext 7.0.1).
-
On the top navigation, click Services. The Services page appears.

-
Under the Service Name heading, click the service name that corresponds with your FlexSync service.

The FlexSync dashboard appears.

-
In the Tasks column, click Add a task to display the Task Configuration dialog box.
- On the Basic tab, complete the information to define the source path and the target repository.
 Basic Tab
- In the Task name field, enter a label for the task.
- In the Task Type list, select object.
- In the Hostname list, select a source host.
In the /source/path field, enter the file system mount and relation path of the source host to replicate, such as /stornext/snfs1/data.
- In the Object Repo list, select the destination repository.
- On the Schedule tab, modify the default task schedule, as needed.
 Schedule Tab
Edit the following values, as needed:
Value
Description
Scheduled Replication
By default, an automatic replication pass is scheduled every 15 minutes.
To configure the synchronization schedule, you can modify the following parameters:
- Minutes
- Hourly
- Daily
- Weekly
- Monthly
Advanced (You can optionally input a cron expression in the Schedule Cron Expression field in the Schedule > Advanced tab. See Construct a Cron Expression).
Note: If the current replication runs beyond the next scheduled pass, the next pass starts immediately after the current pass ends.
Expire Logs
The amount of time before a replication pass log is deleted.
- The default is 30 days.
- Enter 0 to keep logs indefinitely.
The amount of time for a file to remain on disk before it is replicated.
- The default is 5 minutes.
- Enter 0 to disables this option.
Force Rescanning
The number of days to force file system scans. FlexSync does not scan the file system with every replication pass.
- The default is 7 days.
- Enter 0 to disable file system scans.
- On the Attributes tab, modify the default values, as needed.
 Attributes Tab
If needed, select Preserve extended attributes. This option allows you to copy an extended attribute to the destination. When the source and the destination both use native Linux file systems such as ext4, enabling this option might preserve Posix ACLs as a side effect.
Note: This option is recommended for macOS clients.
- On the Advanced tab, modify the default values, as needed.
 Advanced Tab
Select a check box to enable a setting or clear a check box to disable a setting, as needed:
Check Box
Description
Dry Run
Click to enable dry-run mode. When you enable dry-run mode and then run your task, it performs an estimation pass to determine the following:
The number of files to replicate.
The number of truncated files to retrieve and replicate, and the total amount of data associated with the files.
The number of on disk files to replicate, and the total amount of data associated with the files.
The number of metadata-only file changes to replicate.
The number of non-data files to replicate.
The number of directories to replicate.
Note: To access the estimated data, click Task Report for your task, and then click Show Log Content.
To disable dry-run mode for your task, click Edit Task, click Advanced, clear the Dry Run option, and then click Apply to save your changes to your task.
Ignore non UTF8
Enable this option to ignore non-UTF8 files and not report an error if this type of file is found on your system.
Be default, if non-UTF8 files are found on your system, an error is reported.
If a conflict exists between a file in your local directory and the same file in your repository, you need to manage the conflict before you can commit a change.
Select one of the following resolutions to manage the conflict:
Discard: This option discards your local changes to the file and replaces the file with the updated version.
Keep: This option ignores the remote changes and retains your local changes to the file.
Rename-local: This option renames the local file by adding .local to the end of its name. It then downloads the remote version of the file and creates it with its correct name.
Rename-repo: This option retains the local file and creates a new file to contain the remote version. The new file’s name ends in a period followed by the remote file’s VersionID.
Abort: This option aborts the conflict resolution operation. Your file remains as it was before the update was executed. If you select this option, you must manually update your local directory with the current version of the repository before you can commit a local change.
Ask: If you select this option, then you are prompted to select how to resolve the conflict.
In the Exclusions field, you can specify an exclusion list of glob patterns, separated by a space, describing files the task should exclude.
Note: You cannot use a leading space, an ending space, a file name that contains a space, and/or a directory that contains a space.
Note: The pattern is applied in the order it is specified.
The example below excludes all files whose names end with ".tmp" and ".pdf", respectively.
Example
*.tmp *.pdf
You can also exclude a full path directory.
Note: All paths are relative to the source path of the task to exclude.
For example, to exclude the following directories:
/stornext/source/group1/dir0
/stornext/source/group1/dir01
/stornext/source/group2/dir0
/stornext/source/group2/dir01
Where the task source path is:
/stornext/sourceIn the Exclusions field, enter the pattern:
group?/dir*The pattern explicitly excludes any directory labeled group followed by a single character, along with any sub directory beginning with dir.
The pattern does not exclude the following directory:
/stornext/source/group3/media -
Click Apply to add the task. The configured object replication task appears on the FlexSync dashboard.
-
Click Start task to begin the replication process (see Manage an Object Synchronization Task).
