 minute read
Advanced Tasks
This page provides information about advanced procedures for FlexSync.
You can configure FlexSync to deliver an email notification to an email recipient (or multiple email recipients) which provides the status of your FlexSync configuration at a specified time (per a specified schedule).
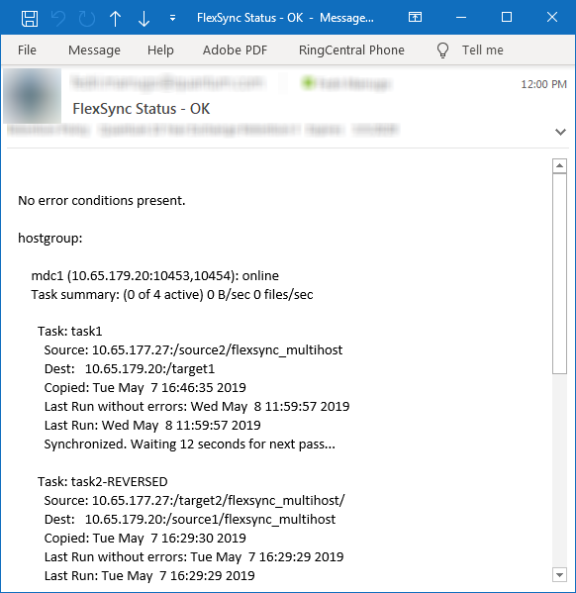
Below is an example of a FlexSync status email notification:
You can configure the following parameters using both the GUI and the CLI:
- Sender Email Address
- Recipient Email Address(es)
- SMTP Hostname
- SMTP Port
- SMTP Username
- SMTP Password
- TLS Protocol
- Email Notification Delivery Schedule
The information contained within the body of the email notification is identical to the output from the flexsyncadmin status command:
Note: The timezone displayed is in local time.
Example
/opt/quantum/flexsync/bin/flexsyncadmin -U admin -P password status
No error conditions present.
myhostgroup:
mdc1 (10.12.345.678:10453,10454): online
Task summary: (0 of 1 active) 0 bytes/sec 0 files/sec
mdc2 (10.12.345.679:10453,10454): online
Task summary: (0 of 1 active) 0 bytes/sec 0 files/sec
Task: project1
Source: 10.12.345.678:/stornext/snfs1/data
Dest: 10.12.345.679:/stornext/snfs2/backup
Copied: Thu Jun 8 12:28:42 2026
Versioned: Thu Jun 8 12:28:42 2026
Synchronized. Waiting 45 seconds for next pass...
Important Considerations
- If an issue occurs with the delivery of an email notification, then the issue is logged to syslog by the flexsyncadmind daemon.
- If the flexsyncadmind daemon is not operational or is down, then an email notification is not delivered.
- You cannot configure the type of email notification to deliver or under what conditions; the email recipient receives an email notification per the email notification delivery schedule.
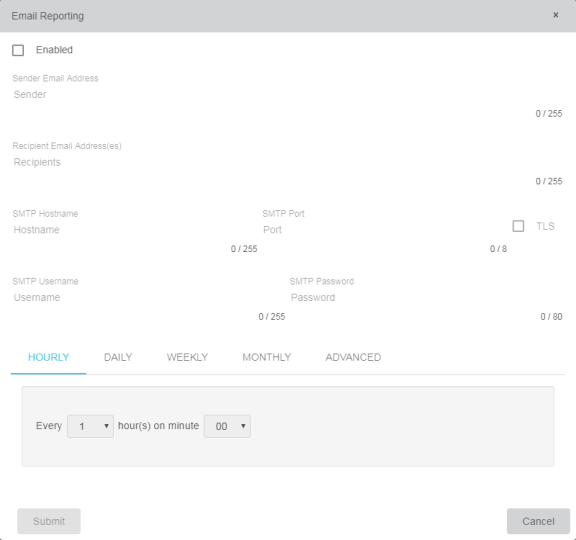
To configure (enable) or disable email reporting from the FlexSync Dashboard, complete the following tasks, respectively.
To configure (enable) email reporting from the FlexSync Dashboard, complete the following steps.
- Log in to the FlexSync Dashboard. See Advanced Tasks.
-
Click the Hamburger icon, and then click Email Reporting. The Email Reporting dialog appears.
-
Select the Enabled check box.
-
Complete the Email Reporting form.
Note: To add multiple recipient email addresses, separate each email address with a comma.
Note: You can optionally input a cron expression in the Schedule (Cron Expression) field in the Advanced tab. See Construct a Cron Expression.
- Click Submit, or click Cancel to abort the operation and return to the previous page.
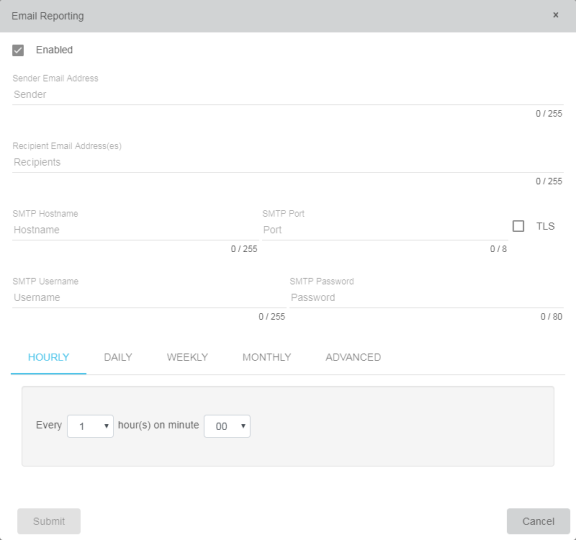
To disable email reporting from the FlexSync Dashboard, complete the following steps.
- Log in to the FlexSync Dashboard. See Advanced Tasks.
-
Click the Hamburger icon, and then click Email Reporting. The Email Reporting dialog appears.
-
Clear the Enabled check box.
- Click Submit, or click Cancel to abort the operation and return to the previous page.
To configure (enable) or disable email reporting from the FlexSync CLI, use the flexsyncadmin command.
To configure (enable) email reporting from the FlexSync CLI, use the flexsyncadmin command.
- Log on to an SSH client, and connect to your system.
- At the prompt, enter the following command to configure email reporting:
/opt/quantum/flexsync/bin/flexsyncadmin -U <username> -P <password> set-email-reporting <enabled|disabled> <smtp_hostname> <smtp_port> <tls|none> <none|username:password> <sender address> <recipient_address,recipient_address> 'cron expression'
Example
/opt/quantum/flexsync/bin/flexsyncadmin -U admin -P password set-email-reporting enabled smtphostname.mycompany.com 25 tls smtpuser:smtppassword sender-email@mycompany.com recipient-email1@mycompany.com,recipient-email2@mycompany.com '0 0 * * *'
Command Parameters
<username>User name for flexsyncadmind.
<password>Password for flexsyncadmind.
<enabled|disabled>Enable or disable email reporting.
<smtp_hostname>The SMTP hostname. <smtp_port>The SMTP port number. <tls|none>Enable or disable TLS protocol. <none|username:password>The SMTP user name and the SMTP password. <sender address>Sender email address. <recipient_address,recipient_address>Recipient email address(es).
Note: To add multiple recipient email addresses, separate each email address with a comma.
'cron expression'A cron expression gives you more control over the frequency, compared to the default schedules available using the GUI.
For example, you could define a cron expression to notify you at 8:15 AM on the second Friday of every month.
Task Scheduling Time Zone Behavior
FlexSync task schedules use Coordinated Universal Time (UTC) when interpreting cron expressions.
-
All cron expressions configured for sync_schedule (whether created in the CLI or UUI) are evaluated in UTC/GMT, not the system’s local time zone.
-
When you specify a time in a schedule, you must enter the time you want in UTC.
-
Example: To run a task at 06:00 local time in GMT‑6, configure the schedule for 12:00 UTC.
-
Upgrade impact from FlexSync 2.3.x to 3.x
FlexSync 2.3.x evaluated task schedules using the local system time zone. Starting with FlexSync 3.0.0, schedules are evaluated in UTC. Existing task definitions are not automatically adjusted during upgrade.
-
After upgrading from 2.3.x to 3.x, any existing schedules will continue to show the same cron expression (for example, 0 0 6 ? * MON-FRI), but that expression will now be treated as 06:00 UTC instead of 06:00 local time.
-
As a result, tasks may begin running at a different local clock time (shifted by your local system's offset from UTC).
Recommended action after upgrade from 2.3.x:
Review all existing FlexSync task schedules and, if you need them to run at the same local time as before the upgrade, manually adjust the cron expressions to the equivalent UTC time.
A cron expression is a string of fields separated by spaces. The following table displays the fields of a cron expression, in the order that they must be specified (from left to right):
| Second | Minute | Hour | Day-of-month | Month | Day-of-week | |
|---|---|---|---|---|---|---|
| Allowed values | 0-59
|
0-59
|
0-23
|
1-31
|
1-12 or JAN-DEC |
1-7 or SUN-SAT |
| Allowed special characters | , - * /
|
, - * /
|
, - * /
|
, - * / ?
|
, - * /
|
, - * / ?
|
Note: Cron expressions are not case-sensitive.
For example:
The above expression literally translates to 0 second, 15 minute, 8 hour, any day of the month, January.
In other words, this represents 8:15 AM on every Monday during January.
Note: The ? character means "no particular value".
In this example, the Day-of-month is set to no particular value. We do not need to specify it, as we have specified a Day-of-week value. See Special Characters for more information about special characters.
See Examples of Cron Expressions for more examples of cron expressions and their explanations.
| Special Character | Usage |
|---|---|
,
|
Specifies a list of values. For example, in the Day-of-week field, 'MON,WED,FRI' means 'every Monday, Wednesday, and Friday'. |
-
|
Specifies a range of values. For example, in the Day-of-week field, 'MON-FRI' means 'every Monday, Tuesday, Wednesday, Thursday and Friday'. |
*
|
Specifies all possible values. For example, in the Hour field, '*' means 'every hour of the day'. |
/
|
Specifies increments to the given value. For example, in the Minute field, '0/15' means 'every 15 minutes during the hour, starting at minute zero'. |
?
|
Specifies no particular value. This is useful when you need to specify a value for one of the two fields Day-of-month or Day-of-week, but not the other. |
| Cron Expression | Description |
|---|---|
|
0 15 20 ? * * |
Every day at 8:15 PM. |
|
0 15 8 * * ? |
Every day at 8:15 AM. |
|
0 * 14 * * ? |
Every minute starting at 2:00 PM and ending at 2:59 PM, every day. |
|
0 0/5 14 * * ? |
Every 5 minutes starting at 2:00 PM and ending at 2:55 PM, every day. |
|
0 0/5 14,18 * * ? |
Every 5 minutes starting at 2:00 PM and ending at 2:55 PM, AND every 5 minutes starting at 6:00 PM and ending at 6:55 PM, every day. |
|
0 0-5 14 * * ? |
Every minute starting at 2:00 PM and ending at 2:05 PM, every day. |
|
0 0/10 * * * ? * |
Every 10 minutes, forever. |
|
0 10,44 14 ? 3 WED |
2:10 PM and 2:44 PM every Wednesday in the month of March. |
|
0 15 8 ? * MON-FRI |
8:15 AM every Monday, Tuesday, Wednesday, Thursday, and Friday. |
|
0 15 8 15 * ? |
8:15 AM on the 15th day of every month. |
To disable email reporting from the FlexSync CLI, use the flexsyncadmin command.
- Log on to an SSH client, and connect to your system.
- At the prompt, enter the following command to disable email reporting:
/opt/quantum/flexsync/bin/flexsyncadmin -U <username> -P <password> set-email-reporting <enabled|disabled>
Example
/opt/quantum/flexsync/bin/flexsyncadmin -U admin -P password set-email-reporting disabled
Command Parameters
<username>User name for flexsyncadmind.
<password>Password for flexsyncadmind.
To display the email reporting configuration from the FlexSync CLI, use the flexsyncadmin command.
- Log on to an SSH client, and connect to your system.
- At the prompt, enter the following command to display the email reporting configuration:
/opt/quantum/flexsync/bin/flexsyncadmin -U <username> -P <password> show-email-reporting
Example
/opt/quantum/flexsync/bin/flexsyncadmin -U admin -P password show-email-reporting
Command Parameters
<username>User name for flexsyncadmind.
<password>Password for flexsyncadmind.
Below is an example of the show-email-reporting command output if email reporting is enabled and configured:
SMTP Server: smtphostname.mycompany.com
SMTP Port: 25
TLS: true
SMTP Authentication: plain
SMTP Username: smtpuser
SMTP Password: <hidden>
Email Sender: sender-email@mycompany.com
Email Receipient(s): recipient-email1@mycompany.com,recipient-email2@mycompany.com
Schedule: 0 0 0 * * *
Below is an example of the show-email-reporting command output if email reporting is disabled:
This section provides information about how to prepare for a FlexSync host's network reconfiguration, when the host in question is already acting a source/destination for replication tasks.
Quantum recommends you do the following if you need to change an interface when both the old and the new interface are available:
- Verify connectivity between the new interface and the other hosts by using ping.
- Suspend the host that is to be reconfigured.
- Edit the host with the new IP address.
- Resume the host.
If you change the network interfaces for a host and the old interface must be removed before the new interface is available, you cannot edit the host after the old interface is no longer available. In this case, do the following:
- Before you remove the old network interface, save the configuration for that host using the flexsyncadmin config-backup command so that you can examine the resulting json file, if necessary.
- Delete the host.
- After the new network interface is available, recreate the host with the new network interface.
If you need to restore your FlexSync configuration to its original state, use the FlexSync configuration backup file.
Note: Beginning with FlexSync 2.2, you can only restore a FlexSync configuration from a configuration backup file that you generated using FlexSync 1.1.3 (or later).
FlexSync allows you to protect your FlexSync configuration with a backup file. This section describes the general process.
Using either the FlexSync Dashboard (see FlexSync Dashboard: Generate a FlexSync Configuration Backup File) or CLI (see FlexSync CLI: Generate a FlexSync Configuration Backup File), you must first create the FlexSync configuration to use for your backup file. After you have completed your FlexSync configuration, you can save it as the backup file in the backup_pathname directory of the flexsyncadmin daemon.
File Format
When generated, the FlexSync configuration backup file is in JSON format.
Example File
flexsync-backup.15-25-06-06-06-2017.json
The 15-25-06-06-06-2017 represents the time (hh-mm-ss) and date (mm-dd-yyyy) when the configuration backup file was generated.
You must use the FlexSync Admin console of the FlexSync CLI to restore your configuration from the backup file. See FlexSync CLI: Restore a FlexSync Configuration.
- Log in to the FlexSync Dashboard. See Advanced Tasks.
- Click the cogwheel to display the Save configuration menu option.
- Click Save configuration to display the Configuration backup file dialog box.
- Click Download file to automatically create and download a FlexSync configuration backup file.
- Transfer the file to the backup_pathname directory.
- Log on to an SSH client, and connect to your system.
- At the prompt, enter the following command to access the FlexSync Admin console:
/opt/quantum/flexsync/bin/flexsyncadmin -U <username> -P <password>
- At the prompt, enter the following command to generate the backup file and save it in the
backup_pathnamedirectory.config-backup [<hostgroup_name>] [<host_name>] backup_pathname
Command Parameters
<username>User name for flexsyncadmind.
<password>Password for flexsyncadmind.
[<hostgroup_name>](Optional) Label for the hostgroup for which to generate the backup file.
[<host_name>](Optional) Label for the host for which to generate the backup file.
Below is a summary of the config-restore command.
- What is restored? The flexsyncadmind(8) and flexsyncd(8) configuration is restored. You can create a backup or properly restore your configuration if all necessary hosts are online. If your host is OFFLINE during the config-restore process (whether you include the
[--wipe]option or not), then the host is not included in the configuration restore even after it returns ONLINE; the host rejoins the configuration with its preconfig-restore configuration. Once the host is ONLINE, you can perform the config-restore operation on the host. Quantum recommends you perform a config-restore operation when all your hosts are ONLINE. - How do you perform a partial restore? You can perform a partial restore when you specify a
[<host_name>]and/or a[<hostgroup_name>]. - You can use the
[--wipe]option perform additional operations (see[--wipe]below).
Use the CLI and do the following to restore the flexsyncadmind(8) and flexsyncd(8) configuration from a specified backup file/directory (backup_pathname).
- Log on to an SSH client, and connect to your system.
- At the prompt, enter the following command to access the FlexSync Admin console:
/opt/quantum/flexsync/bin/flexsyncadmin -U <username> -P <password>
- At the prompt, enter the following command to restore a FlexSync configuration from the specified backup file/directory (
backup_pathname).config-restore [--wipe] [<hostgroup_name>] [<host_name>] backup_pathname
Command Parameters
<username>User name for flexsyncadmind.
<password>Password for flexsyncadmind.
[--wipe]Caution: (Optional) If you include this parameter, the following occurs before the restore operation begins:
- All of your existing tasks are deleted, including the respective destination content.
- If applicable, any versions are deleted.
- Any audit and task configuration parameters are deleted.
[<hostgroup_name>](Optional) Label for the hostgroup from which the backup file was generated.
[<host_name>](Optional) Label for the host from which the backup file was generated.
You can restore files or versions using tools such as Windows Explorer, Apple Finder, or CLI utilities like rcp. For example, you can use Windows Explorer, or Apple Finder to drag-and-drop the files being restored.
The file(s) being restored can have an alternate path (different from the original location), or can be placed back into the source using the same path.
Note: Typical directory and file access permissions apply – your local administrator is responsible for setting the permissions on the source and destination targets.
If you are concerned that the contents of your destination are out of sync with your source, then your local administrator can copy all of the files (on a per copy tasks basis) from the destination to the source. Your administrator can do this by using the FlexSync Dashboard, or the FlexSync CLI.
Do the following to migrate your FlexSync configuration to a different system.
Note: Beginning with FlexSync 2.2, you can only restore a FlexSync configuration from a configuration backup file that you generated using FlexSync 1.1.3 (or later).
- Log in to an SSH client, and connect to the system that you want to migrate from.
-
Generate a FlexSync configuration backup file (see FlexSync CLI: Generate a FlexSync Configuration Backup File).
-
Edit the configuration backup file as follows:
-
For any file systems that were migrated to the new host, delete the entire FSID entries for the dest_fsid and/or source_fsid fields that match the moved file systems. Otherwise, the tasks fail on the system you want to migrate to, since the parameters are not recognized.
Note: Multiple start-scan runs might be necessary if you do not correctly perform this step, to clear the FSID check errors.
Example (before)
"config": {
"dest_fsid": [
-1700978317,
-1553524400
],
"dest_host": {
"admin_port": 10453,
"data_port": 10454,
"data_ssl_port": 10554,
"hostname": "192.168.1.11",
"uuid": "55a37bfc-88ed-47eb-a086-ea902b5dca81"
},
"destination": "/target2",
"name": "task2",
Example (after)
"config": {
"dest_host": {
"admin_port": 10453,
"data_port": 10454,
"data_ssl_port": 10554,
"hostname": "192.168.1.11",
"uuid": "55a37bfc-88ed-47eb-a086-ea902b5dca81"
},
"destination": "/target2",
"name": "task2",
-
Edit the entries for the name fields to update the name from the old host to the new host. The nameentry exists in several locations depending on your configuration and number of tasks, so you must validate that all entries are updated; you can skip this step if the name is identical in both hosts.
Example (before, assuming the name is changing from mdc1 to mdc2)
},
"name": "mdc1",
"online": true,
Example (after)
},
"name": "mdc2",
"online": true
-
Edit the IP address entries for the hostname fields to reflect the IP address of the system you want to migrate to; otherwise, the task validation fails when you attempt to restore the configuration file on the system you want to migrate to. The hostname entry exists in several locations depending on your configuration and number of tasks, so you must validate that all entries are updated; you can skip this step if the IP address is identical in both hosts.
Example updating IP address (before)
"dest_host": {
"admin_port": 10453,
"data_port": 10454,
"data_ssl_port": 10554,
"hostname": "192.168.1.11",
"uuid": "c9cda13a-3156-44ad-968c-aa12c33b5dea"
},
Example (after)
"dest_host": {
"admin_port": 10453,
"data_port": 10454,
"data_ssl_port": 10554,
"hostname": "192.168.1.33",
"uuid": "c9cda13a-3156-44ad-968c-aa12c33b5dea"
},
-
Edit the path entries for the source and destination fields to reflect the replication paths of the system you want to migrate to. Verify the paths of your replication tasks exist on the system you want to migrate to; otherwise, the task validations fail when you attempt to restore the configuration file on the system you want to migrate to. You can skip this step if the paths are identical on the new host.
-
(Optional) Edit the entries for the email_reporting fields to reflect the parameters of the system you want to migrate to; however, you can edit these fields after the migration.
-
-
Install FlexSync on the system you want to migrate to (see Install, Upgrade, or Uninstall FlexSync).
-
Activate the FlexSync daemon(s) on the system you want to migrate to (see Activate the FlexSync Daemon(s)).
-
Add the FlexSync users on each host (see Add a FlexSync User).
-
On the system you want to migrate to, update the credentials for the admin daemon (see Update a FlexSync User's Password).
Note: Use the credentials from the system you want to migrate from.
-
-
Copy the configuration file to the system you want to migrate to, and then restore the configuration file (see FlexSync CLI: Restore a FlexSync Configuration) on that system.
-
Start your replication task (see Advanced Tasks); you might need to use start-scan more than once to clear the FSID check errors. In the GUI, click Repair a Destination.
To perform a factory reset of your FlexSync configuration, use the reset-factory-defaults command.
Note: You can only perform this operation using the CLI.
Caution: This operation is not reversible. The following occurs if you perform this procedure:
- All of your existing tasks are deleted, including the respective destination content.
- If applicable, any versions are deleted.
- Any audit and task configuration parameters are deleted.
- Log in to an SSH client, and connect to your system.
- At the prompt, enter the following command:
/opt/quantum/flexsync/bin/flexsyncadmin -U <username> -P <password> reset-factory-defaults
Example
/opt/quantum/flexsync/bin/flexsyncadmin -U admin -P password reset-factory-defaults
Command Parameters
<username>User name for flexsyncadmind.
<password>Password for flexsyncadmind.
--force(Optional) This option allows you to bypass the prompt to confirm the factory reset of your FlexSync configuration and proceeds with the operation.
-
You are prompted to confirm that you want to proceed with the factory reset of your FlexSync configuration.
Note: If you include the
--forceoption in Step 2, you are not prompted to confirm the factory reset of your FlexSync configuration.
If you configured an API gateway and need to reload changes from your API gateway configuration, product key, or license without restarting your flexsyncadmind daemon, use the config-reload command.
Note: Your API gateway configuration parameters define the URLs and credentials you can use to register and unregister the API gateway. To configure your API gateway parameters, use the command /usr/cvfs/bin/snrest. See the snrest command in the StorNext Man Pages Reference Guide for details.
Note: You can only perform this operation using the CLI.
- Log in to an SSH client, and connect to your system.
- At the prompt, enter the following command:
/opt/quantum/flexsync/bin/flexsyncadmin -U <username> -P <password> config-reload
Example
/opt/quantum/flexsync/bin/flexsyncadmin -U admin -P password config-reload
Command Parameters
<username>User name for flexsyncadmind.
<password>Password for flexsyncadmind.
config-reloadThis option allows you to reload changes from your API gateway configuration, product key, or license without restarting your flexsyncadmind daemon.
-
If the command succeeds and the changes from your API gateway configuration are reloaded, then the following output appears:
Flexsyncadmind has reloaded config successfully.
If identical data exists on both your source and destination file systems, then you must verify the following to avoid resynchronization of your data:
-
The modification time of a file must be identical on both your source and destination.
-
The directory structure must be identical on both your source and destination.
-
The metadata attribute of a file and directory must be identical on both your source and destination. For example, you must preserve ACLs, extended attributes, set the mtime accordingly, and so on, to verify the metadata is identical.
Note: If the metadata is not identical, then FlexSync must read the entire file on your source and destination, exchange hashes in order to verify that the data is identical, and then update the metadata. This operation does not transmit the actual file data over a network pipe; however, the operation requires work and data to transmit.
-
If you enable the Versioning feature, FlexSync might duplicate data if the metadata is not identical. For example, if you use rsync to replicate your data and you do not preserve ACLs, then you must configure a FlexSync replication task that indicates versions and preserve ACLs. FlexSync might duplicate your data since the original copy does not contain ACLs and it cannot be changed if it is part of a version "snapshot".
Note: To avoid this issue, you must initially synchronize without the Versioning feature and then enable the Versioning feature after your replication tasks are operating successfully.
-
If Storage Manager contains a truncated file, then your configuration becomes complicated. This causes your file to be re-duplicated since delta compression from tape is not possible. In this case FlexSync transmits the entire file.
-
If your source and destination are both local to the same host, then your data is duplicated again since FlexSync does not perform delta compression.
