 minute read
NAS Summary
The NAS Summary page allows you to manage NAS shares on the DXi. You can view information about existing shares, add or edit shares, and delete shares.
To access the NAS Summary page, on the NAS page, click the Summary tab.
Tasks
Use the NAS page to perform the following tasks:
- View information about existing NAS shares. See NAS Shares List.
- Add a new NAS share to the system. See Adding a NAS Share.
- Edit properties for an existing NAS share. See Editing a NAS Share.
- Delete a NAS share from the system. See Deleting a NAS Share.
The NAS Shares List section displays the following information for all NAS shares on the DXi:
| Shares | The number of shares that have been added to the system. |
| Maximum | The maximum number of shares that can be added to the system. |
| NFS | The number of existing shares configured to use the NFS protocol (for Linux networks). |
| CIFS/SMB | The number of existing shares configured to use the CIFS/SMB protocol (for Windows networks). |
| Application Specific | The number of existing shares configured to use Oracle Recovery Manager (RMAN) or AccentFS. |
| Share Name | The name of the share. |
| Protocol |
The protocol (CIFS/SMB or NFS) that the share is configured to use. For NFS shares, the Protocol column displays the commit type of the share (sync for synchronous or async for asynchronous). For information about changing the commit type of NFS shares, see the Command Line Interface (CLI) Guide. |
| Export Path | The export path of the share (different for CIFS/SMB, NFS, and Application Specific (RMAN) shares). |
| Permissions | The permissions in use on the share (Read & Write or Read Only). |
| Access | All hosts or Allowed hosts for NFS shares and All users or Allowed users for CIFS/SMB shares joined to a Windows workgroup. |
| Deduplication | The data deduplication state of the share (Enabled or Disabled). |
| Replication |
The current state of replication for the share:
|
| Targets | The targets the share is configured to replicate to. |
| Secure Snapshots |
Enabled, Disabled, or NA to show the snapshot state for the share. Note: The row for the snapshot may also read Error. If so, the word Error is linked to the Secure Snapshots section of Admin Alerts. |
| Snapshot Retention (days) | The number of days set for the retention of snapshots for this share. |
| Retention Lock | Indicates if file retention lock is enable or disabled on the share. This feature is currently available on NAS shares using the NFS protocol with deduplication enabled only. |
| Description | A brief description of the NAS share (if available). |
Additional Information
- Click a column heading to sort the rows in the table by that column. Click the column heading again to reverse the sort order.
- Click the Information button (
 ) next to a share to display detailed information about the share and recent replication activity.
Add a NAS share to present the storage capacity of the DXi as a NAS share that is compatible with standard backup applications. You can add up to 128 shares. When you add a share, you must specify whether it uses the NFS protocol (for Linux networks) or the CIFS/SMB protocol (for Windows networks).
Note: The CIFS/SMB share can be added, but will be unused until attached to a Windows domain or a Windows workgroup is created. See Windows Domain.
To add a NAS share:
-
Click Add.
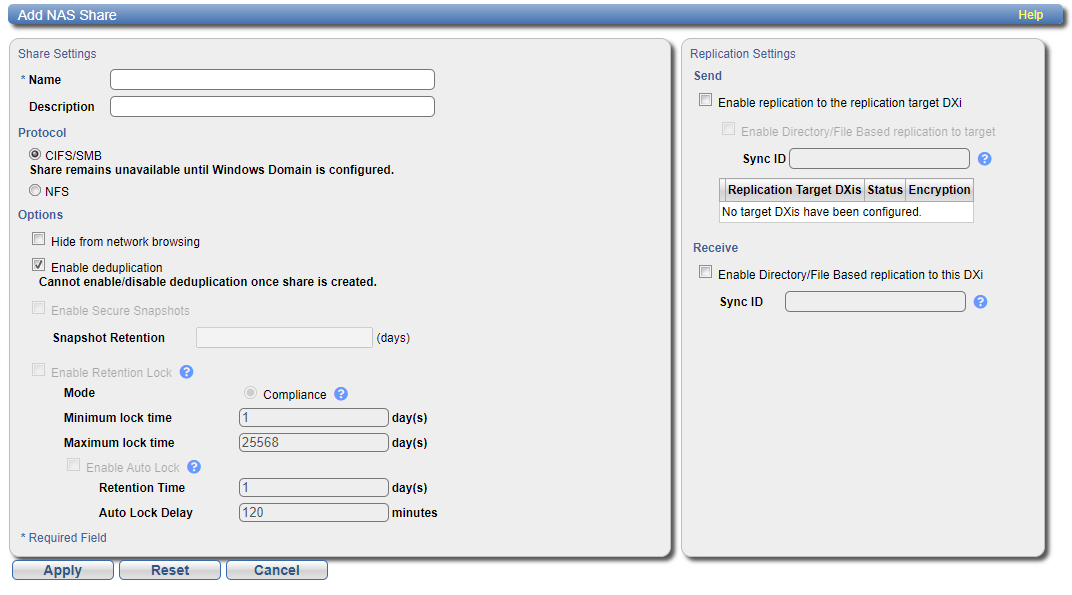
The Add NAS Share page displays.
-
Under NAS Share Settings, enter information about the share:
Name Enter the name of the NAS share.
Additional Information
- NAS share names are not case-sensitive. For example, if you create a share named nas1, you cannot create another share named NAS1 because the system considers the names to be the same.
-
For DAE, a NAS (CIFS/SMB or NFS) share named 'VM' (upper case), non-deduplicated, must be created before DAE is enabled.
Description (Optional) Enter a brief description of the share. Protocol Select the export protocol for the share:
- CIFS/SMB - Select the CIFS/SMB option to use the share on a Windows network.
- NFS - Select the NFS option to use the share on a UNIX or Linux network.
Hide from network browsing (CIFS/SMB shares only) Select the check box to hide the share from network browsing. If selected, you cannot see the share when browsing the network. Enable deduplication (CIFS/SMB/NFS shares only) Select the check box to enable data deduplication. Quantum recommends that you enable data deduplication to optimize disk usage.
Additional Information
- Data deduplication is enabled by default. You cannot enable or disable data deduplication after the share is added.
- For DAE VM shares, VM NAS shares must have deduplication disabled.
Enable Secure Snapshots Check this box to enable Secure Snapshots for this share. See Immutable Storage, Enabling Systemwide Secure Snapshots and Enabling Secure Snapshots for Individual Shares.
Note: Deduplication must be enabled in order to enable Secure Snapshots.
Snapshot Retention (days) When snapshots have been enabled for this share, enter the number of days to retain each snapshot for this share.
Note: Any change to the share retention will affect only new snapshots. The retention for existing snapshots can be extended but never reduced.
Enable Retention Lock Select the check box to enable Retention Lock on NFS shares.
Note: Deduplication and Secure Clock must be enabled in order to enable Retention Lock (see Enable Secure Clock).
Note: Retention Lock cannot be disabled until all retention locks on all files in the share have expired.
For more information regarding file retention lock, refer to the DXi File Retention Lock Best Practices Guide.
Mode Compliance enabled by default. Retention locks on files cannot be reversed or altered until the retention lock expires. Minimum Lock Time Enter minimum retention lock time allowed for retention lock on selected files in the NAS NFS share. Minimum is 1 day. Maximum Lock Time
Enter maximum retention lock time allowed for retention lock on selected files in the NAS NFS share. Maximum is 25568 days. Enable Auto Lock Auto lock automatically adds a file retention lock to a file that has been created in the NAS share and closed by an ISV.
Retention Time Enter the number of days a file is automatically locked. Auto Lock Delay Enter the number of minutes between 5 minutes and 7 days when the last modification on a file occurs and the file is automatically locked. The default auto lock delay is 120 minutes.
Set this value to give the ISV time to finish all backup job processing.
Note: Each time a file is modified the lock delay will be reset.
-
(Optional) Under Replication Settings, specify replication settings.
For more information about configuring replication for a share, or to set up replication for the share at a later time, see Replication.
- Click Apply.
Additional Information
When you create a CIFS/SMB share and are joined to an Active Directory domain, the initial permissions are the same as the default permissions for a share with the addition of an ACE (Access Control Entry) that permits full access to the share for all authenticated users. Administrators can choose to remove this full access ACE, set up custom permissions, or leave the ACL (Access Control List) as it is if the server is set up in a fully trusted environment.
Edit a NAS share to modify the settings for the share, for example, to change the description of the share or to select different options.
To edit a NAS share:
-
Select the share and click Edit.
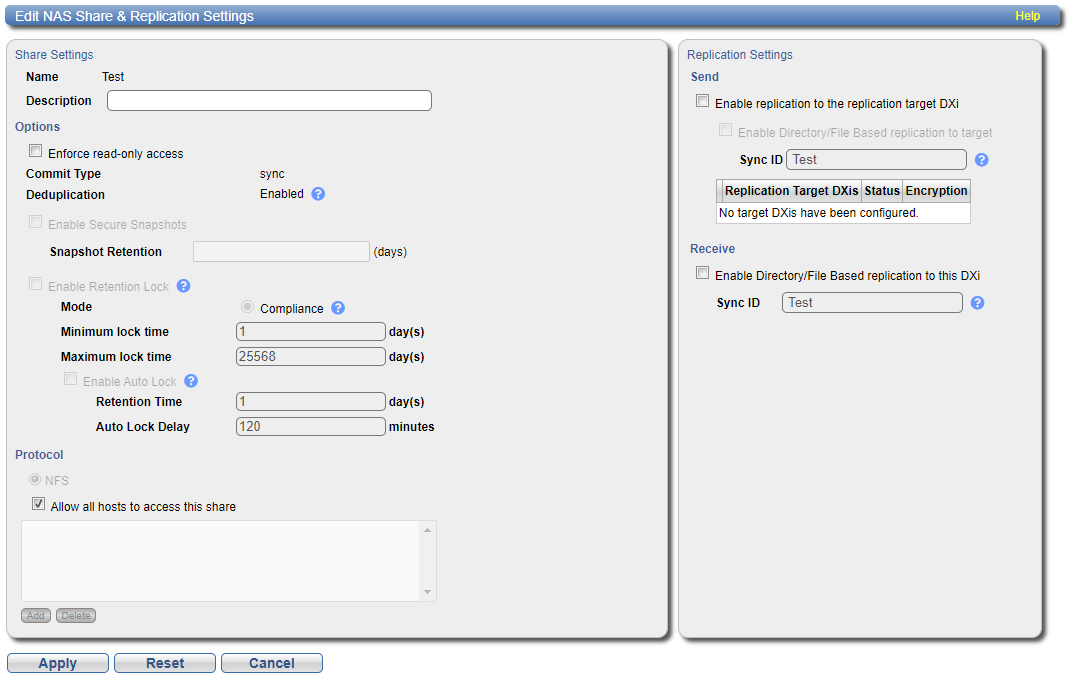
The Edit NAS Share & Replication Settings page displays.
-
Under Share Settings, enter information about the share:
Note: If you are editing a share, only the Description, Enforce read-only access, Hide from network browsing. and Allow all users to access this share options can be changed.
Description (Optional) Enter a brief description of the share. Enforce read-only access (CIFS/SMB and NFS shares only) Select the check box to make the share read only. If selected, you cannot write to the share. Hide from network browsing (CIFS/SMB shares only) Select the check box to hide the share from network browsing. If selected, you cannot see the share when browsing the network. Enable Secure Snapshots Check this box to enable or disable Secure Snapshots for this share. See Immutable Storage, Enabling Systemwide Secure Snapshots and Enabling Secure Snapshots for Individual Shares. Snapshot Retention (days) When snapshots have been enabled for this share, enter the number of days to retain each snapshot for this share.
Note: Any change to the share retention will affect only new snapshots. The retention for existing snapshots can be extended but never reduced.
Enable Retention Lock Select the check box to enable Retention Lock on NFS shares.
Note: Deduplication and Secure Clock must be enabled in order to enable Secure Snapshots (see Enable Secure Clock).
Note: Retention Lock cannot be disabled until all retention locks on all files in the share have expired.
Mode Compliance enabled by default. Retention locks on files cannot be reversed or altered until the retention lock expires. Minimum Lock Time Enter minimum retention lock time allowed for retention lock on selected files in the NAS NFS share. Minimum is 1 day. Maximum Lock Time
Enter maximum retention lock time allowed for retention lock on selected files in the NAS NFS share. Maximum is 25568 days. Enable Auto Lock Auto lock automatically adds a file retention lock to a file that has been created in the NAS share and closed by an ISV.
Retention Time Enter the number of days a file is automatically locked. Auto Lock Delay Enter the number of minutes between 5 minutes and 7 days when the last modification on a file occurs and the file is automatically locked. The default auto lock delay is 120 minutes.
Set this value to give the ISV time to finish all backup job processing.
Note: Each time a file is modified the lock delay will be reset.
Allow all hosts to access this share (NFS shares only) Do one of the following:
- Select this check box to allow all hosts (NFS shares) to access the share.
- Clear the check box to allow only specified hosts to access the share.
To add a host to the access list, click Add. Specify the Hostname or IP Address (NFS shares) and the associated permissions (Read Only or Read & Write), and then click Apply.
Note: Using uppercase letters in the hostname is acceptable but will not be preserved after entry. For that reason, Quantum recommends using lowercase letters in the Hostname or IP Address box.
Additional Information
After you add a host to the access list, you cannot change its permissions. Instead, select the host in the access list and click Delete to remove it from the list. Then add the host again with the correct permissions.
Allow all users to access this share (CIFS/SMB in a Windows workgroup only) Do one of the following:
- Select this check box to allow all users to access the share.
- Clear the check box to allow only specified users to access the share. To add a user to the access list, click Add. Specify the Hostname or IP Address and the associated permissions (Read Only or Read & Write), and then click Apply.
Additional Information
- To modify the users that are available in the Workgroup User list, see Share Access.
- After you add a user to the access list, you cannot change their permissions. Instead, select the user or host in the access list and click Delete to remove them from the list. Then add the user again with the correct permissions.
-
Using uppercase letters in the hostname is acceptable but will not be preserved after entry. For that reason, Quantum recommends using lowercase letters in the Hostname or IP Address box.
-
(Optional) Under Replication Settings, specify replication settings.
For more information about configuring replication for a share, or to set up replication for the share at a later time, see Replication.
- Click Apply.
Additional Information
If you modify a NAS share that uses the CIFS/SMB protocol, you must restart the CIFS/SMB service for the changes to take effect. To restart the CIFS/SMB service, first disjoin the Windows workgroup, then join it again. See Windows Domain. Restarting the CIFS/SMB service will close all active connections to the share. Most Windows workstations will automatically reconnect, but some applications may be affected.
Delete a NAS share if it is no longer needed. When you delete a share, all data stored on the share is lost, and any schedules associated with the share are deleted.
Additional Information
- If you delete a share configured for Directory/File Based Replication on the source system, the share is not automatically deleted on the target system. If you do not want to retain the share on the target system, you can manually delete it.
- NAS shares that contain files with retention lock enabled cannot be deleted until all file retention locks expire in share.
To delete a NAS share:
-
Select the share and click Delete. You can select multiple shares to delete at once.
- Click Yes to confirm the deletion.
