Scheduler
The Scheduler page allows you to manage scheduled events on the DXi, including replication and replication throttling, e-mail reports, healthchecks, and space reclamation. With schedules, you specify when certain events should occur, and the system automatically performs those events at the specified time. Events can be one-time only, or they can reoccur at defined intervals.
To access the Scheduler page, click the Configuration menu, and then click the Scheduler tab.
Note: Replication throttling is not enabled on virtual DXis at this time so this setting has no effect.

Your view of scheduled replication for shares, partitions, and other events like Secure Snapshots, etc., may be limited as it is controlled by your role and the access granted for your group in the Users screen. See the Manage Users' Server and Share Access section in the Configuration > System > Security topic.
Note: Any scheduling of Secure Snapshots scheduling will not be displayed on the Scheduler until Secure Snapshots have been enabled on the DXi server.
Tasks
Use the Scheduler page to perform the following tasks:
- View currently scheduled events. See Viewing Scheduled Events.
- Add a new scheduled event or edit an existing event. See Adding or Editing a Scheduled Event.
- Configure NAS shares for scheduled replication. See Scheduling a Share for Replication.
- Configure the DXi to send status and configuration reports. See Scheduling E-mail Reports.
- Configure the DXi to run healthchecks. See Scheduling Healthchecks.
- Configure the DXi to run space reclamation. See Scheduling Space Reclamation.
- Specify when and how often an event reoccurs. See Setting Recurrence for a Scheduled Event.
- Remove an event occurrence or event series from the schedule. See Deleting a Scheduled Event.
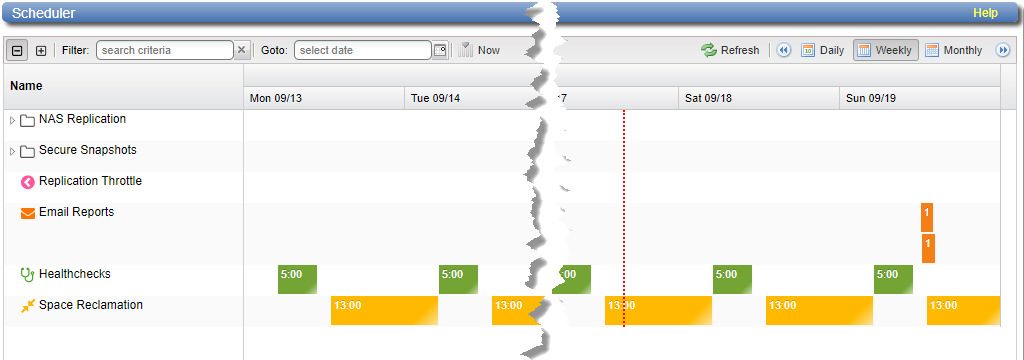
The Scheduler page displays all replication, e-mail reports, healthchecks, Secure Snapshots (if enabled at the server level), and space reclamation events scheduled to occur in a selected time period. To view scheduled replication events for NAS shares, click the arrow next to the folder to display all shares.
Tasks
Use the following toolbar controls to adjust the schedule view:
- To show or hide all shares, click the plus [ + ] or minus [ - ] icons.
- To filter shares based on name, begin typing in the Filter box. Click the x to clear the filter.
- To view the schedule for a specific day, select it in the Go to pop-up calendar.
- To view the schedule for today, click Now.
- To update the schedule view with the latest data, click the Refresh icon.
- To move the view backward or forward in time, click the arrows.
- To change the number of days displayed at a time, click Daily, Weekly or Monthly.
Note: The thickness of the bars on the schedule view varies based on the type of event and the selected time frame. Healthcheck events have an estimated span of 6 hours. Space Reclamation events have an estimated span of 16 hours. All other open-ended events have a default span of 2 hours.
Scheduler Toolbar

Note: When creating or editing an event on the Configuration > Scheduler page, all times are relative to the workstation from which the GUI is accessed, rather than the DXi. If the DXi is in a different time zone than the workstation used to access the GUI, make sure to account for the time zone differences when scheduling events.
To add or edit a scheduled event:
-
On the Scheduler page, adjust the schedule view to display the time period when the event will occur, then complete one of the following actions:
Add a New Event
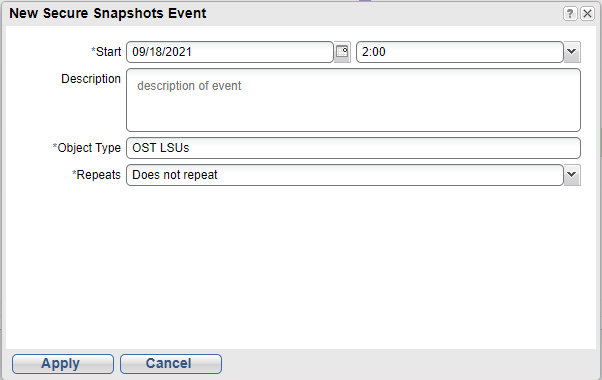
- To add a new event, click and drag on the schedule in the row for the type of event to add. When you complete the New Secure Snapshots Event dialog, a new event will be added where you dragged the cursor and if needed, further adjusted the date and time for the event in the dialog.
- To schedule replication for NAS shares, click the arrow next to the folder to display all shares. Then click and drag in the row for the share to schedule.
- The new event must begin after the current time, which is indicated by the dotted vertical line.
Edit an Existing Event
- To edit an existing event, double-click the event. If the event is recurring, select Open this occurrence to edit only the one instance of the event, or select Open the series to edit the entire recurring series, and then click OK.
- You cannot edit an event that occurred in the past.
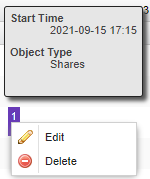
- You can also right-click an existing event to see options for editing an event.

-
Define the start and, if applicable, the end of the event. Specify the Start Date and Start Time using the pop-up calendar and drop-down box.
Note: For a new event, you can click and drag to adjust the start and end time. For an existing event, you can drag the event to change when it occurs. You can also drag the left or right edge of the event to adjust the start or end time.
- Enter a brief description of the event in the Description box. (This description will display on the schedule view.)
-
Specify options specific to the type of event. See the following sections:
- (Required for healthchecks and space reclamation) Specify when and how often the event reoccurs. See Setting Recurrence for a Scheduled Event.
- Click Apply.
- Refresh the browser window to make sure the event settings are applied.
Caution: When adding multiple events of the same type, make sure the events do not overlap. If two events of the same type overlap, the earlier-scheduled event takes precedence over the later-scheduled event.
Note: After a system reboot, all open-ended events (for example, replication) will restart at their next scheduled time. Events with end times (for example, replication throttle) that are past their start time will have their end action occur.
Configure a replication schedule for a NAS share to automatically replicate the share data to the target system at regular intervals. Disable scheduled replication if you do not want to automatically replicate the share data to the target.
Additional Information
- To schedule a share for replication, you must first add one or more replication targets. In addition, you must add one or more shares with deduplication enabled and at least one target selected. See Replication Configuration and NAS Summary.
- Disabling replication for a share, or deleting a share, does not delete any scheduled replication events for that share. If you no longer want to schedule the share for replication, manually delete the schedule. See Deleting a Scheduled Event.
To configure a replication schedule for a share:
- On the Scheduler page, add or edit an event in the NAS Replication row. See Adding or Editing a Scheduled Event.
- In the (Undefined variable: User_Guide_Online_Help.Share) drop-down box, select the share to schedule for replication.
- In the Target drop-down box, select the replication target you want to replicate the share to.
- Click OK.
- (Optional) Specify when and how often the event reoccurs. See Setting Recurrence for a Scheduled Event.
- Click Apply.
Only shares that are enabled for deduplication appear in the drop-down box.
Note: Scheduling a share that has replication disabled will automatically enable replication.
The DXi can automatically generate a report with system status data or with configuration data and send it to all configured e-mail recipients.
Note: To enable the DXi to send e-mail, you must specify an outgoing e-mail server. In addition, you must specify one or more recipients. See Server and Email Reports.
To configure a schedule for e-mail reports:
- On the Scheduler page, add or edit an event in the Email Reports row. See Adding or Editing a Scheduled Event.
- In the Report Type drop-down box, select the type of e-mail report to schedule (Status or Configuration).
- (Optional) Specify when and how often the event reoccurs. See Setting Recurrence for a Scheduled Event.
- Click Apply.
During healthchecks, the DXi performs tests to verify the health and integrity of the data deduplication blockpool. Schedule healthchecks regularly to make sure the system is healthy and operating correctly. When you schedule healthchecks, only the healthchecks that are currently enabled are run.
Note: For more information about enabling healthchecks, see Healthchecks.
To configure a schedule for healthchecks:
- On the Scheduler page, add or edit an event in the Healthchecks row. See Scheduling Healthchecks.
- Specify when and how often the event reoccurs. See Adding or Editing a Scheduled Event.
- Click Apply.
Caution: For correct system operation, healthchecks must be run at regular intervals (at least once a week). You can schedule healthchecks to occur daily or weekly but not monthly or yearly. Also, recurrence is required.
During space reclamation, the DXi deletes unneeded tags from the blockpool to free up disk space. Schedule space reclamation regularly to make sure there is enough disk space to store data.
Caution: Because space reclamation can affect system performance, avoid running space reclamation during known backup periods.
Note: For more information about space reclamation, see Space Reclamation.
To configure a schedule for space reclamation:
- On the Scheduler page, add or edit an event in the Space Reclamation row. See Scheduling Space Reclamation.
- Specify when and how often the event reoccurs. See Setting Recurrence for a Scheduled Event.
- Click Apply.
Caution: For correct system operation, space reclamation must be run at regular intervals (at least once a week). You can schedule space reclamation to occur daily or weekly but not monthly or yearly. Also, recurrence is required.
To specify when and how often the event reoccurs:
- On the Scheduler page, add or edit an event. See Setting Recurrence for a Scheduled Event.
- In the Repeats drop-down box, select Does not repeat to disable recurrence. Or to enable recurrence, select how often the event reoccurs:
- For recurring events, specify how long the recurrence continues (forever, or a certain number of occurrences, or until a specific date).
- Click Apply.
Note: Healthchecks and space reclamation must occur at least every seven days or once a week.
| Daily | Specify the recurrence interval in days. |
| Weekly | Specify the recurrence interval in weeks, and select the days when the event will occur. |
Note: For healthchecks and space reclamation, recurrence is always forever.
To delete an event occurrence or event series.
- On the Scheduler page, right-click an event and select Delete.

The event or series is deleted from the schedule and will no longer occur.
