Share Access
The Share Access page allows you to manage workgroup users when the DXi is joined to a Windows workgroup, or manage share administrators when the DXi is joined to a Windows domain using Active Directory. You can add users or administrators, change user privileges, and delete users or administrators. Available users or administrators can be granted access to NAS shares configured for the CIFS
Note: You must join a Windows workgroup (or create a new workgroup by naming it on the DXi) or domain before you can add workgroup users or share administrators. See Windows Domain. The Share Access page is different depending on whether the system is joined to a workgroup or domain.
To access the Share Access List, on the NAS page, click the Share Access tab.
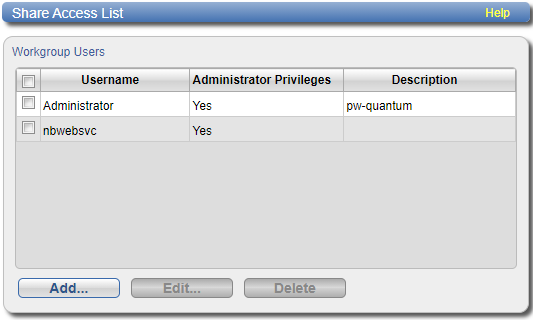
Share Access Page (Windows Workgroup)

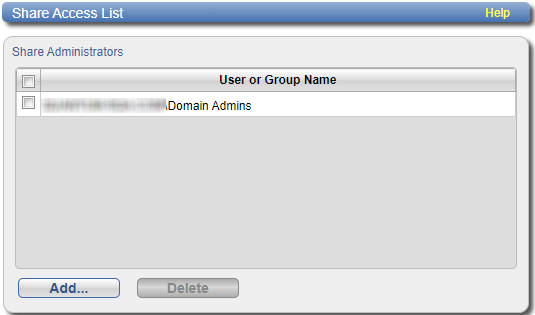
Share Access Page (Active Directory)

Tasks
Use the Share Access page to perform the following tasks:
- View information about workgroup users or share administrators. See Workgroup Users or Share Administrators.
- Add a workgroup user or a share administrator. See Adding a Workgroup User or Share Administrator.
- Edit a workgroup user. See Editing a Workgroup User.
- Delete a workgroup user or a share administrator. See Deleting a Workgroup User or Share Administrator.
If the DXi is joined to a Windows workgroup, the Workgroup Users section displays the following information about workgroup users:
| Username | The name of the workgroup user. |
| Administrator Privileges | The privileges of the workgroup user (Yes if the user has administrator privileges, No if they do not.) |
| Description | A brief description of the workgroup user (if available). |
If the DXi is joined to a Windows domain using Active Directory, the Share Administrators section displays the following information about share administrators:
| User or Group Name | The fully qualified name of the user or group. |
Add a workgroup user or share administrator to be able to grant that user or administrator access to CIFS/SMB shares.
To add a workgroup user for a Windows workgroup:
-
Click Add.
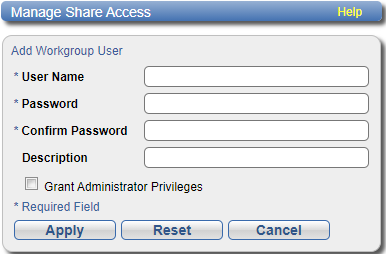
The Manage Share Access page displays.

-
Enter information about the workgroup user:
User Name Enter the name of the workgroup user. Password Enter the password for the workgroup user. Confirm Password Enter the password again to confirm it. Description (Optional) Enter a brief description of the workgroup user. Grant Administrator Privileges Select the check box to add the workgroup user to the Windows Administrators group.
This allows the workgroup user to override certain permissions settings and prevents the workgroup user from being locked out of shares or directories.
- Click Apply.
Edit a workgroup user to change the user's password or description, or to change the user's administrator privileges.
Note: You cannot edit a share administrator. Instead, delete the share administrator, then add a new share administrator.
To edit a workgroup user:
-
Select the user and click Edit.
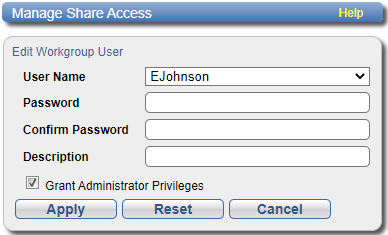
The Manage Share Access page displays.

-
Enter information about the workgroup user:
Note: If you are editing a workgroup user, you cannot change the User Name.
User Name (Optional) Select a different workgroup user to edit. Password Enter the password for the workgroup user. Confirm Password Enter the password again to confirm it. Description (Optional) Enter a brief description of the workgroup user. Grant Administrator Privileges Select the check box to add the workgroup user to the Windows Administrators group.
This allows the workgroup user to override certain permissions settings and prevents the workgroup user from being locked out of shares or directories.
- Click Apply.
Delete a workgroup user or share administrator if the user or administrator no longer needs to access CIFS/SMB shares.
To delete a workgroup user or share administrator, select the user or administrator and click Delete, then click on Yes in the Confirmation dialog. You can select multiple users or administrators to delete at once.
To manage user access to CIFS/SMB shares when the DXi is joined to a Windows domain, use the MMC (Microsoft Management Console). Log onto the MMC on the domain controller and access a share's properties to set share permissions for users.
Additional Information
In some cases, when you view file permissions on a Windows system, you will not see the user and group information. Instead you will see the SID (security ID) which appears as a series of numbers. This occurs when you move files (for example, using a backup utility or DOS xcopy) from one system to another system, and the user and group from the source system do not exist on the target system.
Often users and groups are unique to a particular scope, such as a Windows system or an ADS domain. As a result, some assigned permissions might not be available on the target system because the associated user and group do not exist there. However, common groups (for example, Administrators, Users, and Everyone) are recognized on most Windows systems and domains.
