
|
How to Create a PDF |
Use the VS-Settings Menu
Note: This topic assumes that the VS1110-A is initially configured. See Perform Initial Configuration in the VS1110-A Installation topic for configuration details.
The VS-Settings.sh script on the VS product is a text-based menu interface to all configuration and monitoring of various components in the Host Operating System (OS) portion of the VS product. The X Windows desktop (Windows VS console) includes an icon that launches the VS-Settings.sh script in a terminal window. The VS-Settings interface can also be run from an SSH connection to the server by logging in as the admin user, and then running the /opt/quantum/scripts/VS-Settings.sh file.
To access the VS-Settings Menu:
- Launch the Host OS console.
-
Double-click VS-Settings to open the VS-Settings Menu.


Use this option to initially configure your system. The Setup Wizard configures settings for the items below. You can also change some of these items after initial configuration through the Advanced Menu.
- VS password
- Management network
- Email proxy and email notification recipients (optional)
- Time zone
- System time (optional)
- Default BMC IP address and password (optional)
- Windows VMs
With this menu, you can create and remove a VM, start and stop a VM, and move (force a fail over or fail back) an high availability (HA) VM.
For more information, see Monitor and Manage a VM.
With this option, you can assign a number to a node, and cluster a multi-node configuration for high availability. For more information, see Cluster a Multi-Node Configuration.
You can also monitor the cluster's status. For more information, see Monitor a Cluster's Status.
You can change the password for the user admin account in the Host OS. The default password for the user account is admin. It should be changed to your company's preferred string after installation. You will be prompted for the old password, followed by the new password.

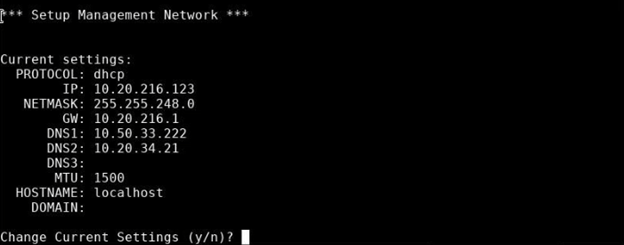
Use this option to change the settings for the management network for the server. This is the IP address information for the management port (Ethernet port 0). It is used to connect to your LAN and Internet. By default, this port is configured as DHCP, and it is recommended that you change this to a static IP address at installation time. The current settings and a prompt to change the settings will display.
Note: You will be prompted for the information above if you select a “manual” (static IP) configuration instead of the default DHCP. Note that changes to the MTU setting may require an equivalent change on your network switch where the system is connected.
-
Review the default settings. To keep them, type n at the Change Current Settings prompt, then press Enter. To change them, type y, press Enter, and then enter your changes at the prompts that follow.
-
Press Enter to accept the default (DHCP) protocol, or type static and press Enter if you want to configure a static IP address for the system.
-
If you selected a static IP configuration, enter the management network settings for your system that are listed below; then press Enter. If you want to accept a setting's default, just press Enter.
- IP address
- Network Mask
- Gateway
- DNS1
- DNS2
- DNS3

-
Enable jumbo frames ONLY if jumbo frames are enabled in the switch for the port; otherwise, communications issues between the server and destination will result. If you want to enable jumbo frames, and if they are supported by the switch, enter y at the Enable Jumbo Frames prompt, then press Enter.
-
Enter the new hostname, then press Enter.
-
Enter the new domain name, then press Enter.

-
When you finish entering the management network settings, the Agree to New Settings prompt appears; press y to confirm your changes, then press Enter.
Note: Changes to network settings are applied when you exit the menu.
Enter the fully-qualified domain name or IP address of the mail server that will send email notifications about RAS tickets and alerts, then the email addresses that will receive them.
-
At the Change email settings prompt, type y, then press Enter.

-
At the Email relay host prompt, type the fully qualified domain name or the IP address for your relay host email server, then press Enter.
-
At the Type a list of 1 or more space separated email addresses prompt, type email addresses that will receive RAS tickets and alerts, then press Enter. Quantum Support will also receive tickets and alerts.
Use option 3 to set the time zone for the system. By default, the system time and time zone are based on UTC. It is recommended to change the time zone to the local time zone for the system.
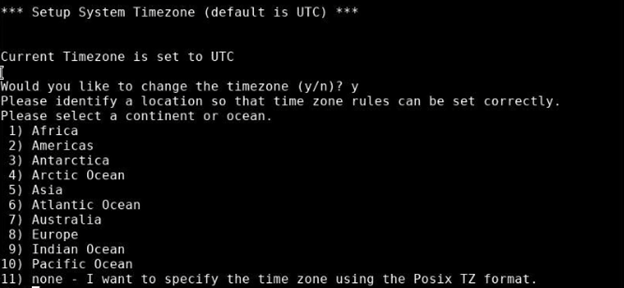
- At the Would you like to change the timezone prompt, type y, then press Enter.
-
Enter the number for the applicable continent or ocean (1 though 10), then press Enter.
-
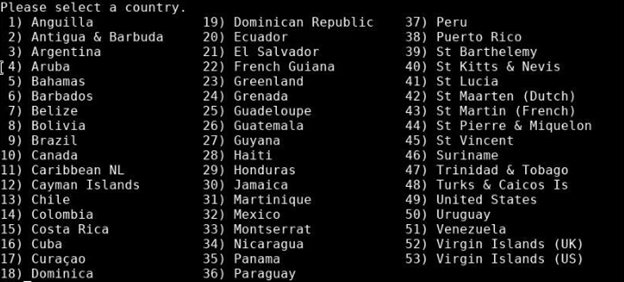
Enter the number for the applicable country, then press Enter.
-
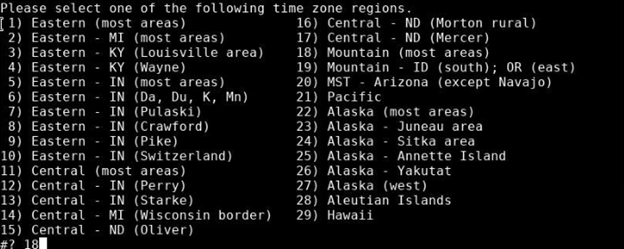
Enter the number for the appropriate state (or region), then press Enter.
-
The system confirms your time zone selections; if they are correct, type 1, then press Enter. If they are incorrect, type 2, then press Enter. You will be prompted again to enter the number for the applicable continent or ocean (see Step 2).

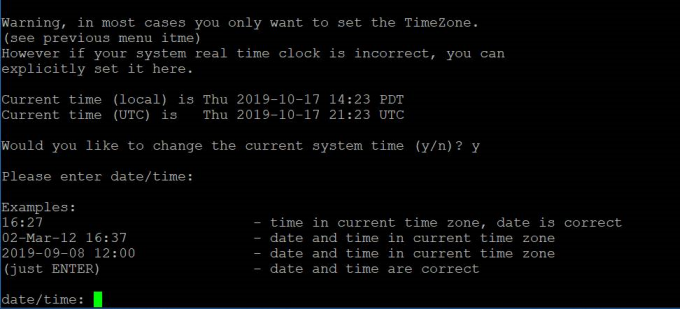
Use option 4 to override the local time on the system with a manual time setting. By default, NTP services are enabled using standard internet NTP servers.
Note: It is recommended that the default time is accepted, and that you do not change the system's time. If it is necessary to change the system’s local time, various formats can be specified for the manual time.
You can change the date and time as shown in the menu instructions. To change the system time, enter the desired time in 24-hour format, then press Enter.
Use option 5 to change the IP address settings for the BMC management interface on the server.
!You can change the default BMC IP address to an IP that matches your local subnet, if needed. You might want to do this to access a console connection through the BMC without having to connect directly with a laptop. You can also change the password for the default ADMIN user account on the BMC.
Note: If you are connected to the BMC, changing these settings will disconnect you from your session, and you will need to reconnect using the new settings.
-
The current BMC port settings display. At the Would you like to change the BMC settings prompt, type y, then press Enter.
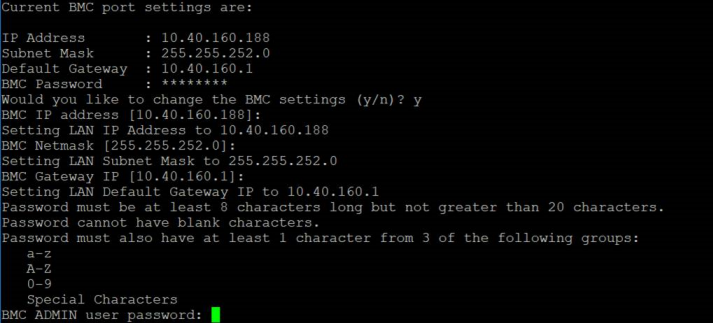
- Type the new BMC network settings, pressing Enter after every change:
- BMC IP address
- BMC Netmask
- BMC Gateway IP
To accept a current setting, just press Enter.
-
Type a new BMC Admin password twice to change the password from “BMCadmin1.”
You can use the system to collect data about to the following in a .zip file to assist in diagnosing an issue:
- Host Operating System (OS)
- Windows VM log files
- Metasys log files
- System hardware
- Network
For more information, see Generate Data Collect Logs.
After you create a data collect .zip file with the system, you must download it to your laptop or to a USB drive to forward it to Quantum Customer Support for assistance.
For more information, see Download Data Collect Logs.
You can reboot the server using a “fast” reboot feature in the Host OS. This restarts the OS without unloading the kernel, or going through the HW POST portion of a normal slow reboot.
Note: Both slow and fast system reboots will attempt a clean shutdown of the running Windows VM.
You can reboot the server using a “slow” reboot feature in the Host OS. This fully restarts the Host OS.
Note: Both slow and fast system reboots will attempt a clean shutdown of the running Windows VM.
You can view the current, overall status of the RAID volumes in the system. If background initialization is still in progress, that status also displays.
This option is not available.
This option provides a status of a single node, or of the nodes in a cluster. Online means that the cluster software is functioning.

It also provides the ability to do the following:
- Remove a node from a cluster.
- Enter Maintenance mode, where the both nodes in a cluster will not be automatically managed. In this mode, you can stop a VM without initiating an automatic failover, and a VM will not start automatically. This is useful for making updates to a VM.
- Exit Maintenance mode, where the both nodes will be automatically managed by the clustering software. This enables automatic startup and failover of a VM.
- Enter Standby mode, where the node will not be able to communicate with other nodes. Use this option to service or upgrade a node without affecting its VM or other nodes in the cluster.
- Exit Standby mode, where the node will be able to communicate with other nodes.
You can return the node to factory defaults and settings. This will:
- Remove high availability settings
- Remove the node from the cluster
- Remove the VM
- Reset networking information to defaults
You can elect to retain BMC network information, or reset it to factory defaults.
To reset factory defaults:
-
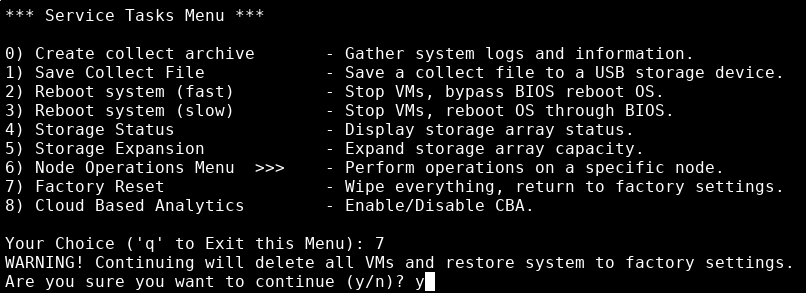
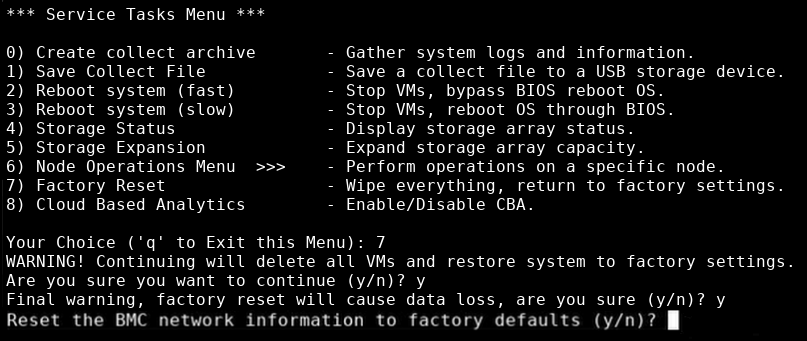
Type 7 for Factory Reset in the Service Tasks menu, then press Enter.

-
A message notifies you that all VMs will be deleted, and the factory settings will be restored. At the Are you sure you want to continue? prompt, type y, then press Enter.
-
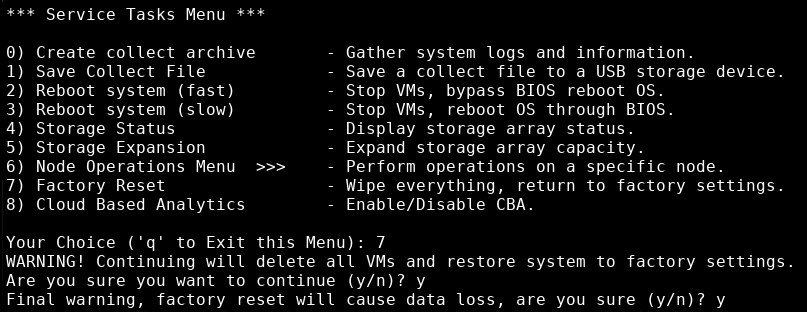
At the Final warning, factory reset will cause data loss, are you sure? prompt, type y, then press Enter.
-
At the Reset the BMC network information to factory defaults, type y or n, then press Enter.
-
The system notifies you of its progress. When it is finished, it reboots, then displays the following:
baseos.sh end.
With this option, you can enable or disable Cloud-Based Analytics, a feature that allows the VS1110-A to collect data about appliance and environment performance. The collected data is bundled and uploaded to the remote Cloud-Based Analytics server for analysis.
For more information, see Enable and Disable Cloud-Based Analytics.
