 minute read
Application-Specific Shares Configuration
The Application Specific Shares page allows you to manage application-specific shares on the DXi. You can view information about existing shares, add or edit shares, and delete shares.
To access the Application Specific Shares page, from the DXi Home page, click the Configuration menu on the left side of the screen, then click the Application Specific tab.
Tasks
Use the Application Specific page to perform the following tasks:
- View information about existing Application Specific shares. See Application Specific Shares List.
- Add a new Application Specific share to the system. See Adding an Application Specific Share.
- Edit properties for an existing Application Specific share. See Editing an Application Specific Share.
- Delete a Application Specific share from the system. See Deleting an Application Specific Share.
The Application Specific Shares List displays the following information for all application-specific shares on the DXi:
| Shares | The number of shares that have been added to the system. |
| Maximum | The maximum number of shares that can be added to the system. |
| NFS | The number of existing shares configured to use the NFS protocol (for Linux networks). |
| CIFS/SMB | The number of existing shares configured to use the CIFS/SMB protocol (for Windows networks). |
| Application Specific | The number of existing shares configured to use Oracle Recovery Manager (RMAN) or AccentFS. |
| Share Name | The name of the share. |
| Protocol |
Application Specific is the default protocol for application-specific shares. |
| Export Path | The export path of the share. |
| Permissions | The permissions in use on the share (Read & Write or Read Only). |
| Access | The access type of the share (all hosts or specific users). |
| Deduplication | The data deduplication state of the share, always Enabled. |
| Replication |
The current state of replication for the share:
|
| Targets | The destinations (targets) where the share is configured to replicate. |
| Secure Snapshots |
Check this box to enable Secure Snapshots for this share. See Immutable Storage, Enabling Systemwide Secure Snapshots and Enabling Secure Snapshots for Individual Shares. Note: Deduplication must be enabled in order to enable Secure Snapshots. |
| Snapshot Retention (days) |
When Secure Snapshots have been enabled for this share, enter the number of days to retain each snapshot for this share. Note: Any change to the share retention will affect only new snapshots. The retention for existing snapshots can be extended but never reduced. |
| Retention Lock | Indicates if file retention lock is enable or disabled on the share. This feature is currently available on NAS shares using the NFS protocol with deduplication enabled only. |
| Description | A brief description of the Application Specific share (if available). |
Additional Information
- Click a column heading to sort the rows in the table by that column. Click the column heading again to reverse the sort order.
- Click the Information button (
 ) next to a share to display detailed information about the share and recent replication activity.
Add an application-specific share to present the storage capacity of the DXi as a share that is compatible with standard backup applications. You can add up to 128 shares.
To add an application-specific share:
-
Click Add.
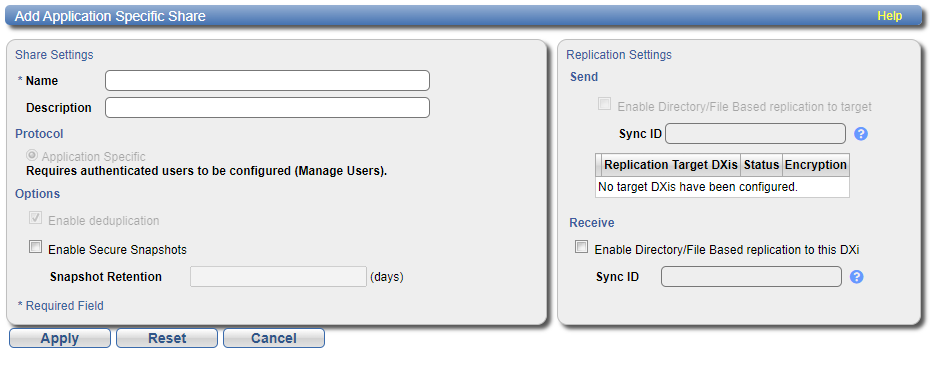
The Add Application Specific Share page displays.
-
Under Share Settings, enter information about the share:
Name Enter the name of the application-specific share.
Note: Application-specific share names are not case-sensitive. For example, if you create a share named Application Specific1, you cannot create another share named application specific1 because the system considers the names to be the same.
Description (Optional) Enter a brief description of the share. Protocol Select the export protocol for the share:
Application Specific is selected by default and is used to create an Oracle RMAN or AccentFS share.
Enable deduplication This is is selected by default to optimize disk usage.
Enable Secure Snapshots Check this box to enable Secure Snapshots for this share. See Immutable Storage, Enabling Systemwide Secure Snapshots and Enabling Secure Snapshots for Individual Shares.
Note: Deduplication must be enabled in order to enable Secure Snapshots.
Snapshot Retention (days) When snapshots have been enabled for this share, enter the number of days to retain each snapshot for this share.
Note: Any change to the share retention will affect only new snapshots. The retention for existing snapshots can be extended but never reduced.
-
(Optional) Under Replication Settings, specify replication settings.
For more information about configuring replication for a share, or to set up replication for the share at a later time, see Replication.
- Click Apply.
Edit an application-specific share to modify the settings for the share, for example, to change the description of the share or to select different replication settings.
To edit a Application Specific share:
-
Select the share and click Edit.
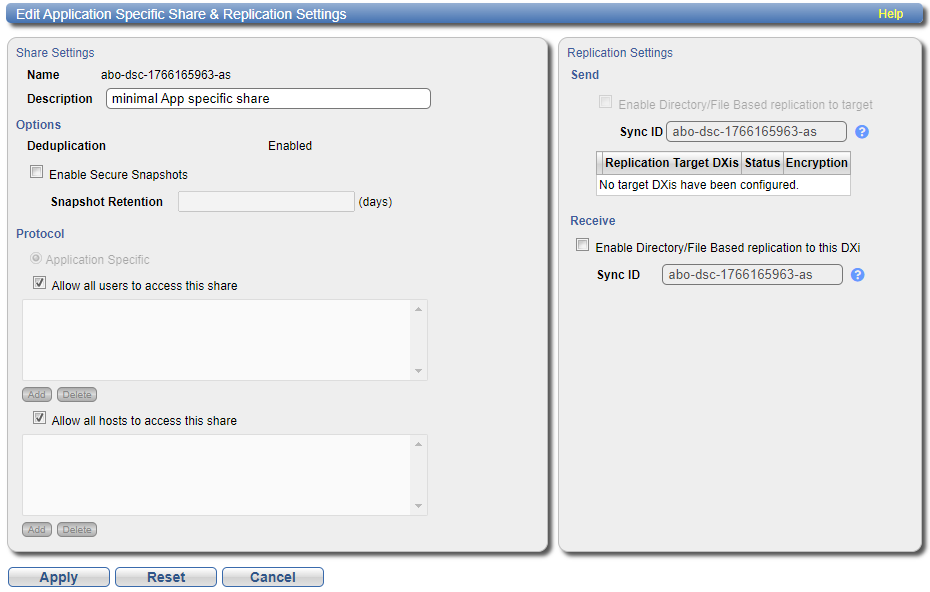
The Edit Application Specific Share & Replication Settings page displays.
-
Under Share Settings, add or modify information about the share:
Note: If you are editing a share, only the Description, Allow all users to access this share, and Allow all hosts to access this share options can be changed.
Description (Optional) Enter a brief description of the share. Enable Secure Snapshots Check this box to enable Secure Snapshots for this share. See Immutable Storage, Enabling Systemwide Secure Snapshots and Enabling Secure Snapshots for Individual Shares. Snapshot Retention (days) When snapshots have been enabled for this share, enter the number of days to retain each snapshot for this share.
Note: Once the retention period has been set, it can be extended but never reduced.
Allow all users to access this share Do one of the following:
- Check this box to allow all users to access the share then click Apply.
- Clear the check box to allow only specified users or hosts to access the share. To add a user or host to the access list, click Add. Select the Authenticated User from the dropdown, then click Apply.
Additional Information
- To add an authenticated user who can access the selected share, see Adding an Application Access User .
- To modify the users that are available for the selected share, see Editing an Application Access User .
- After you add a user or host to the access list, you cannot change their permissions. Instead, select the user or host in the access list and click Delete to remove them from the list. Then add the user or host to the access list again with the correct permissions.
Allow all hosts to access this share Do one of the following:
- Check this box to allow all hosts to access the share then click Apply.
- Clear the check box to allow only specified users or hosts to access the share. To add a user or host to the access list, click Add. Specify the Hostname or IP Address then click Apply.
-
(Optional) Under Replication Settings, specify replication settings.
For more information about configuring replication for a share, or to set up replication for the share at a later time, see Replication.
- Click Apply.
Delete an application-specific share if it is no longer needed.
WARNING: When you delete a share, all data stored on the share is lost, and any schedules associated with the share are deleted.
Additional Information
If you delete a share configured for Directory/File Based Replication on the source system, the share is not automatically deleted on the target system. If you do not want to retain the share on the target system, you can manually delete it.
To delete an application-specific share:
-
Select the share and click Delete. You can select multiple shares to delete at once.
- Click Yes to confirm the deletion.
