V5000 Capacity Expansion
Overview
You can expand your
The minimal DXi VM needs 2 CPUs. Adding more CPUs is a simple way to get better performance from your VM. Quantum recommends using at least 4 CPUs on a licensed system used in a production environment.
However, there is a cut-off point, where adding CPUs does not really provide any benefits. That number on modern (Xeon) CPUs is around 10-12 CPUs. We also have seen use cases with VMware, where adding more CPUs to the DXi cause it to work more slowly. One reason is that the more CPUs that are active, the more emulation work required by the hypervisor. You can see this when, for example, the CPU usage in the hypervisor is roughly 90%, yet the CPU usage inside the VM is approximately 30%.
See V5000 Configurations and Stream Counts for recommended CPU counts. Measure and observe your DXi CPU usage to make an informed decision what number works for your usage model.
Faster CPUs often yield better performance, versus more CPU cores. On the other hand, if you use Veeam and lots of streams, more CPU cores may show better benefits.
It is easy to add and remove CPUs, opening the way for you to experiment. Changing the number of CPUs requires a reboot, but no other interaction is required.
Another consideration is if the CPUs for the V5000 are shared with other VMs, or are the CPUs “pinned” to be used exclusively for the DXi? Here too, your actual setup and infrastructure matter. Experiment and use the hypervisor tools to analyze your CPU usage.
Note: Quantum strongly recommends that your DXi VM is not shared with other VMs.
IMPORTANT NOTES:
-
Use DXi Advanced Reporting (DAR) to see CPU utilization over long time periods.
-
The DXi does not use any specialized CPU or GPU instructions.
Note: See the System Overview topic's System Profiles table for all possible system profile sizes. Available profile options for your system are based on your storage capacity and will appear in your VM. See your VM's user
In all but the Tiny profile, it is assumed the OS/kernel needs 6 GiB (2 GiB for the Tiny profile). The remaining memory is then used for deduplication and optionally for Veeam.
A Medium or Large system profile will allow more parallel streams, at the cost of more memory. But if you do not need many IO connections into the DXi, you may benefit from a smaller profile and use the memory for another function.
Is Veeam functionality required? If using the Veeam Data Mover Service (VDMS) a full 16 GiB more memory is required.
While it is simple to add memory to a VM, you cannot reduce the memory size. If you reduce it, the DXi will change to Diagnostic Mode, because the system was sized to match the larger memory. Reducing memory will cause, for example, the blockpool index to no longer fit in memory.
If memory is added to the VM and the VM is rebooted, a desktop dialog may display depending on your hypervisor, asking you what to do with the newly found memory:

In this example, the VM had Veeam enabled. See DXi Veeam Installation. The new memory can be assigned to:
-
OS/kernel. Essentially the memory is left as-is and will be used by the OS and kernel.
-
The new memory could allow for a different model (more streams) or perhaps for a different system profile for a larger capacity.
-
Or the additional memory could be assigned to be used for more Veeam streams. (If Veeam was not enabled, the dialog would not show this as an option)
Caution: If you want to use the memory for a different system profile, for example to use a larger bulk capacity, you must consider the order of the expansions. If a different profile is selected for more capacity, you need to make sure you have that larger capacity in your VM settings, especially for your metadata. A larger-capacity profile will expand the blockpool index, and the index needs metadata space. While you can use a smaller bulk size than the profile supports, the metadata sized disk space must be available.
Example: You are using the Medium profile with 16 TB bulk capacity. The System Profiles table it shows that you need 101 GB of metadata space for the blockpool. Then you add memory, so you can use 16 TB. But 16 TB requires 150 GB metadata, As soon as you select that profile, the blockpool index will grow from 101 to 150, regardless of whether or not you actually have 16 TB bulk. In other words, you need to have that 150 GB metadata space at the time of the memory expansion, so set your storage expansion first, then memory expansion.
It is better you first expand your storage, keep the system profile as is. Simply expand storage to match the medium 16 TB table entry. Then reboot, and add more memory, and switch to the medium 16 TB profile.
Note: You can always expand your VM's storage, even if that new storage is not going to be used due to capacity license or system profile restrictions.
If you choose to change your system profile, you are prompted with the following dialog. Only the profiles that would work in your configuration are shown. In this example a 32 GiB VM, with a maximum 256 TB capacity license:
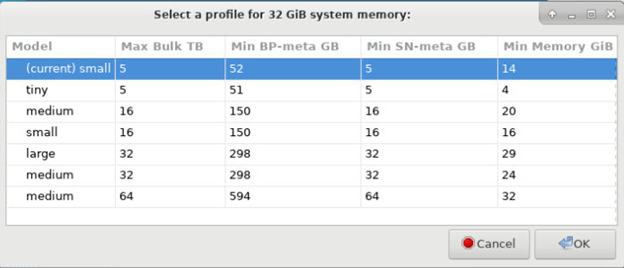
Following is a complete table of available DXi system profiles, including incoming replication, or fan-in:
| Model | Max bulk (TB/GiB) |
Min BP-meta (GB/GiB) |
Min SN-meta (GB/GiB) |
Min Memory (GB/GiB) |
Recommended Min CPU Cores |
Fan-in |
| tiny (Community) | 5/4657 | 51/48 | 5/5 | 4/4096 | 2 | 1 |
| small | 5/4657 | 52/49 | 5/5 | 14/14336 | 4 | 1 |
| small | 16/14902 | 150/140 | 16/15 | 16/16384 | 4 | 1 |
| medium | 16/14902 | 150/140 | 16/15 | 20/20480 | 6 | 5 |
| medium | 32/29803 | 298/278 | 32/30 | 24/24576 | 6 | 5 |
| medium | 64/59605 | 594/554 | 64/60 | 32/32768 | 6 | 5 |
| medium | 128/119210 | 1185/1104 | 128/120 | 47/48128 | 6 | 5 |
| medium | 256/238419 | 2360/2198 | 256/239 | 77/78848 | 6 | 5 |
| large | 32/29803 | 298/278 | 32/30 | 29/29696 | 8 | 10 |
| large | 64/59605 | 594/554 | 64/60 | 37/37888 | 8 | 10 |
| large | 128/119210 | 1185/1104 | 128/120 | 52/53248 | 8 | 10 |
| large | 256/238419 | 2360/2198 | 256/23 | 82/83968 | 8 | 10 |
It may be possible to change disk sizes before your initial system startup. After completing your initial V5000 setup, only new disks can be used to expand the system's storage capacity.
Caution: Do not change existing disk sizes! The expansion process works only with new disks.
Note: Images in this section are examples. Your hypervisor screens used to modify your storage capacity and disk usage may vary.
Use your hypervisor's instructions to expand your DXi storage capacity. The following sites will guide you for each of the following Quantum-tested hypervisors used where you can create/deploy your DXi.
Note: Single-disk systems are not eligible for upgrade from 5 TB Community Edition systems to Licensed Subscription Edition installations.
-
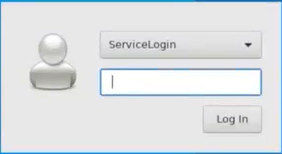
Log on to your DXi system from your hypervisor:
-
In your hypervisor's VM Manager for your DXi installation, use the available disks and space to modify your installation.
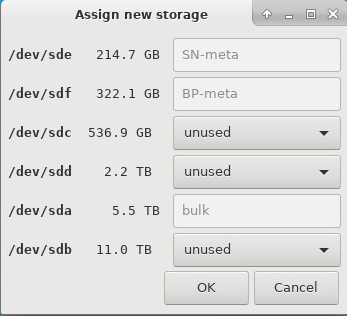
In the following example, using the default boot plus 3 or more SCSI disks DXi setup, new SCSI disks are detected at boot, and you need to select which new disk is to be used for bulk, SN-meta or BP-meta disks.
NOTES:
-
SCSI disks smaller than 1 GiB will be ignored. It does not make practical sense to work with such small disks.
-
In Hyper-V, a Key Storage device may show up as a (42 MB) SCSI disk, which is also ignored for V5000 storage expansion.
Newly Discovered (Unused) Storage
The following example shows drop-down options for you to select and assign newly discovered, or unused storage. The bulk, SN-meta, and BP-meta disk options are inactive (grayed). Those capacities cannot be changed.
Disks Assigned to Newly Discovered Storage
In the following example you can see the options selected in the third and fourth disks, /dev/sdc and /dev/sdd, and in the last disk in the list, /dev/sdb.
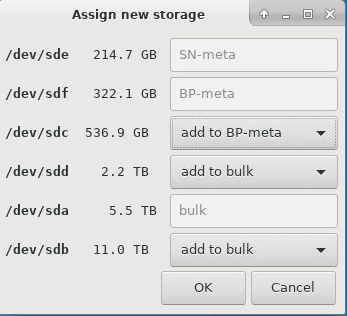
When you click OK, your storage will be expanded as you have specified.
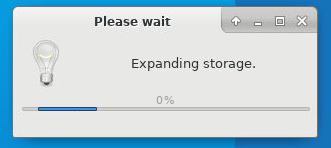
The DXi does not have hard limits on the number of disks supported. Your hypervisor will have limits for the maximum disk size, the number of disks per SCSI controller, and the practical limit of managing many disks in both the hypervisor and in the VM.
If you have the space and you plan to grow your VM over time, consider expanding the metadata to its maximum size in one step. If you use thin provisioning it will grow as you need it:
-
SN-meta maximum required: 256 GB
-
BP meta maximum required: 2360 GB
Then add bulk disks as you need more capacity. Having 10 x 25 TB bulk disks is better than having to deal with, for example, 25 x 10 TB disks. Or, you could at least use a 256 GB expansion for SN-meta as one step. Then only expand BP-meta and bulk as you need it. This will reduce the number of disks to manage by 1/3. See System Profiles for required disk sizes.
Note: Do not reuse virtual disks. Delete and recreate them even though they are on the same physical disk. Virtual disks reused between DXi VMs can cause unexpected issues.
-
Either contact Quantum Sales or from your fully installed V5000 Home page, below the left-side menu options, click on the Upgrade License button and complete the form at https://www.quantum.com/dxi-upgrade to purchase subscription licenses and service contract options for your V5000. See Licensing Your DXi V5000 for instructions on installing licenses in your V5000.
You can expand your VM storage regardless of any license, but you can only use up to the licensed
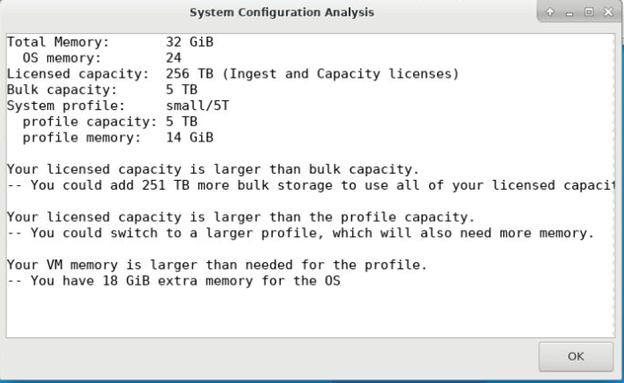
As shown in the VM Desktop Tools sections in and , the Information icon opens a Hardware Information window containing an Analyze button. When you click Analyze, The System Configuration Analysis window displays both system information and some recommendations for improving your configuration.
-
If your licensed capacity is larger than your bulk capacity, you could add storage disks.
-
If your licensed capacity is smaller than your bulk capacity, you could add capacity licenses.
-
If your licensed capacity is larger than your system profile, you could switch to a larger profile.
-
If your VM memory (minus Veeam memory) is larger than the system profile requires show the extra memory for the OS.
-
If your system profile capacity is less than the bulk capacity, you could switch to a larger profile.
-
If your system profile capacity is larger than the bulk capacity, you could add more storage.
Note: Capacity differences less than 2 TB and memory size differences of less than 2 GiB are ignored.
Confirming Your Expanded DXi Storage Capacity
You can expand your system's storage capacity at any time with both the storage available and the applicable Quantum license. After you have configured your expanded storage capacity in your hypervisor, use your V5000 system to confirm (as applicable for your system):
-
Expanded storage
-
Increased memory
-
Your purchased and installed license(s).
To confirm licenses and capacity:
-
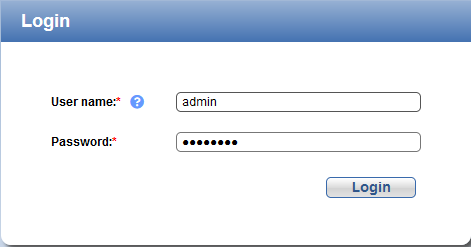
Log into your DXi.
-
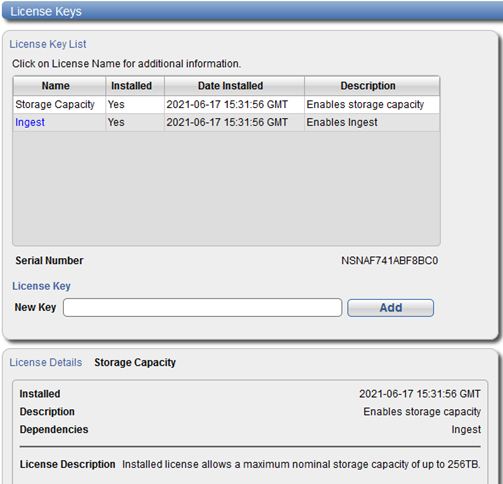
To access the License Keys page, click the Utilities menu, and then click the License Keys tab.
Note: Adding license keys through the DXi GUI using the License Keys page, RestAPI or CLI commands is disabled for the DXi. That page is now read-only and displays all currently installed licenses in your system. If you try to add a license key using the License Keys page, the system returns an error message stating that the operation is not allowed.
-
Click on a linked license in the Name column to display the License Details section, which describes the ingest license or storage capacity details for each particular license.
In the following example, the Storage Capacity license details are displayed. If you clicked the Ingest link, you would see License Description: Installed license enables ingest. The license will expire in <x> days on <full calendar date and time>.
Note: You can also see your disk usage and details as illustrated in the Disk Usage section on your DXi Home page and Disk Usage, which displays your system's available free and used disk space on the system, as well as data reduction statistics
