DXi Veeam Installation
Overview
This document provides instructions for installing and configuring a Veeam™ Linux Repository on Quantum DXi V5000 systems.
Note: A license is not required to install Veeam on the Quantum DXi V5000.
Veeam
The Veeam feature on the DXi allows the system to perform backup and replication with Veeam software on VMware vSphere and Microsoft Hyper-V virtual environments.
The Veeam Agent runs in the DXi process space with direct access to DXi resources, providing better performance than Veeam running against a DXi NAS share as a shared folder.
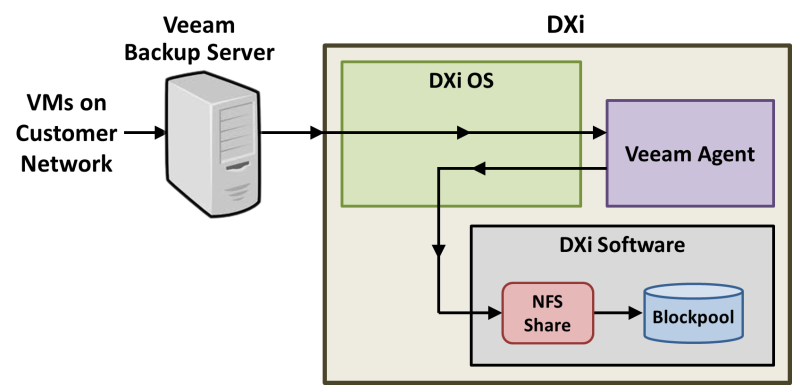
The simplified block diagram below shows the data flow in a typical Veeam installation. Management communication is omitted for simplicity. The VMs on the Customer Network are identified by the Veeam Backup Server. The backups can be full or incremental using the Veeam Agent changed block tracking. At the scheduled backup, the Veeam Agent works with the Veeam Backup Server to facilitate the data movement from the backup sources to the DXi. The backup data is sent by the Veeam Agent to the NFS Share for deduplication and storage in the Blockpool.
Preparing for the Installation
Note: Please review the Veeam Backup and Replication Best Practices Guide, downloadable from the Best Practices page for your DXi product.
Before you begin the Veeam installation, make the following preparations:
The following items are required to successfully install and configure Veeam on a DXi system.
| Requirement | Description |
|---|---|
|
CLI Admin User |
Optional - The CLI Admin (cliadmin) account must be enabled on the DXi if you wish to configure Veeam support using the CLI. |
|
DXi Software |
DXi systems using:
|
| Memory | Veeam requires a minimum of 32 GB memory. |
| GUI Admin User | You must have the GUI Administrator user account password. |
|
NAS Support |
The DXi must have NAS support. |
Make sure the following conditions are met before you continue with Veeam installation:
- All backup jobs are completed and there is no pending I/O.
- All replication jobs are completed, and replication is paused (Replication > Actions page).
- All space reclamation tasks are completed without errors (Utilities > Space Reclamation page).
- All healthchecks are completed without errors (Utilities > Space Reclamation page).
- All components in the system display Normal status (Status > Hardware page).
- All outstanding administration alerts are deleted (Alerts > Admin Alerts page).
- All service tickets are closed (Alerts > Service Tickets page).
Note: VDMS cannot be enabled if a "veeam" account is defined on a connected or disconnected windows workgroup. Delete the "Veeam" account from the windows workgroup.
For more information, click Help in the remote management console to display the DXi online help. To access remote management, see Accessing Remote Management).
To access the remote management console, do the following:
-
Launch a supported Web browser on a workstation that has network access to the DXi.
The DXi GUI is compatible with Chromium-based web browsers. Quantum-tested Chromium-based browsers include Brave, Google Chrome, Microsoft Edge, Opera and Vivaldi. Mozilla Firefox is also compatible with the DXi GUI.
-
In the browser address box, type the IP address of the DXi, and then press Enter.
The Login window displays.
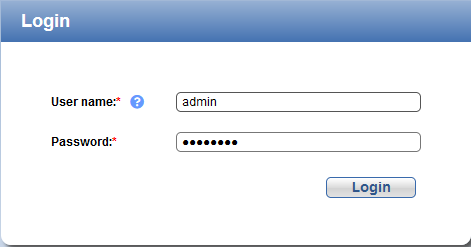
If the Login window does not display, verify that the IP address is correct and that the network path to the DXi system is valid. Also verify that you are using a supported Web browser. Then try again. If you are still unable to access the Login window, contact the DXi GUI administrator.
- Select Administrator and enter the GUI Administrator user password.
- Click Login.
-
If a security banner message has been specified for theDXi, click Accept.
The Home page displays.
To perform the Veeam configuration on the DXi system, complete the following steps in order:
| Step | Description | Procedure to Complete |
|---|---|---|
| 1 | Create a NAS share on the DXi. | Go to DXi Configuration - Create a NAS Share. |
| 2 | Enable the Veeam feature on the DXi. | Go to DXi Configuration - Enable VDMS. |
| Step | Description | Procedure to Complete |
|---|---|---|
| 1 | Create a NAS share on the DXi. | Go to DXi Configuration - Create a NAS Share. |
| 2 | Enable the Veeam feature on the DXi. | Go to DXi Configuration - Enable VDMS. |
DXi Configuration - Create a NAS Share
You must create a Veeam NAS share to present the storage capacity of the DXi.
To add a
-
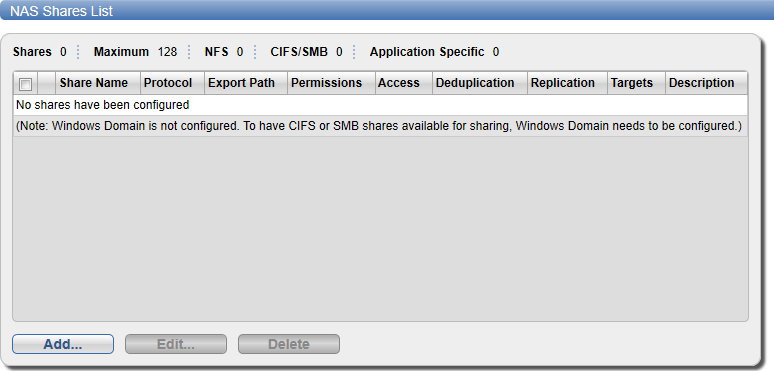
In the DXi remote management console, select Configuration > NAS. The NAS Summary page displays.
-
Click Add.
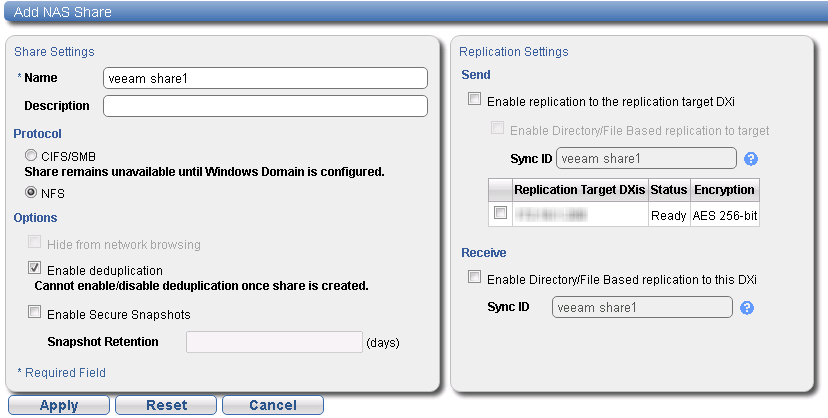
The Add NAS Share page displays.
-
Under NAS Share Settings, enter information about the share:
Name Enter the name of the DXi NAS share.
Description (Optional) Enter a brief description of the share. Protocol Select the NFS option to use the share on a UNIX or Linux network.
Note: CIFS/SMB is not currently supported for Veeam NAS shares.
Hide from network browsing Do not select. This is for CIFS/SMB shares only.
Enable deduplication Select the check box. Veeam NAS shares must have deduplication enabled.
- Click Apply.
DXi Configuration - Enable VDMS
Once a VM NAS share has been created, enable VDMS (Veeam Data Mover Service) on the DXi.
In the DXi remote management console, select Configuration > System > App Environment. The Application Environment page displays.
Important Information
-
A reboot is required when first enabling the VDMS connection or any Veeam 13 EDM connections. A reboot is required when all connections are disabled.
- When enabling Veeam for the first time, a password will be required.
- Public SSH keys cannot be configured until after Veeam has been enabled and the system has been rebooted.
- When enabling any additional VDMS connection or additional Veeam 13 EDM connections, a password will be required if no public SSH keys have been configured.
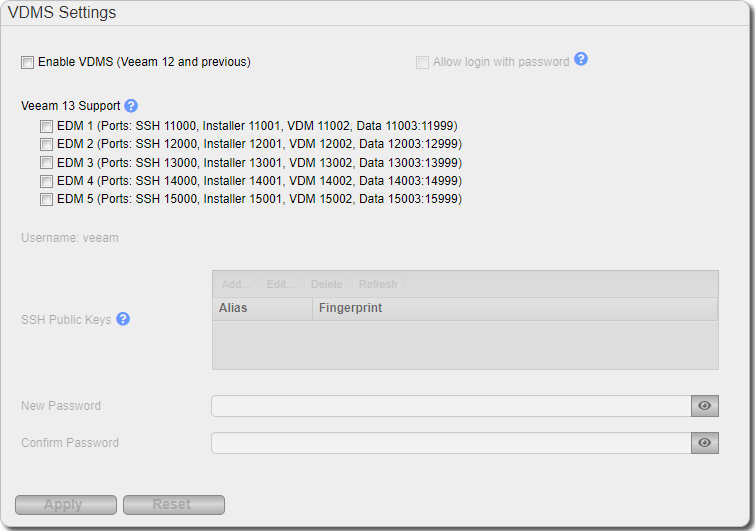
WARNING: Enabling Veeam creates a local account named 'veeam'. If the associated LDAP/AD server has a user defined as ‘veeam’, you must first disjoin from the AD domain and/or disable LDAP (See LDAP/AD).
-
Select one or more of the following check boxes.
Veeam 12 and Below
-
Select the Enable VDMS check box if you are using Veeam 12 or any prior version below Veeam 12.
- Select the Allow login with password check box. Before disabling this option, an SSH key must first be added to the user. SSH keys cannot be added until Veeam has been enabled and the system is rebooted.
Veeam 13 and Above
-
Under Veeam 13 Support, use the check boxes select one or more Veeam 13 connections. You can select up to five connections.
This allows connections from Veeam 13 and later with Veeam Backup & Replication (VBR) for the Enhanced Data Mover (EDM) on the noted ports. When adding a Linux Server in VBR use the ports listed for SSH connection and the Network Settings Components ports.
-
-
Enter the following information:
New Password Enter the new password.
Confirm Password Enter the new password again to confirm it. Additional Information
-
Passwords can be up to 64 characters. Alphanumeric characters and special characters are allowed.
-
If you are enabling Veeam for the first time, you must enter a user password.
-
If Veeam is already enabled, you are adding additional Veeam connections, and you have a SSH Public Key configured, you do not need to re-enter a password.
-
If Veeam is already enabled, you are adding additional Veeam connections, and no SSH Public Key configurations are available, you will need to re-enter a password.
-
-
Click Apply.
If this is the initial enabling of Veeam, a A Save Changes dialog box appears stating that the system will require a reboot.
Select one of the following options.
Option Description Defer Reboot Defers the system reboot. A Reboot Required alert message will appear in the GUI banner until the system is rebooted.
Deferring a reboot is only recommended if additional system changes that require a reboot need to be made (Network, Application Environment, Data Encryption changes) or ingest (backup jobs) are currently in progress on the system.
Note: Once a reboot is in a deferred state, the applied changes cannot be reset.
Reboot Now Starts the system reboot. A system reboot can take up to 15 minutes.
Cancel No reboot occurs and the Application Environment page reappears. Changes made to the settings remain but are not applied. Click the Veeam Settings Reset to reset settings to their original state. Note: If this is not the first Veeam connection to be enabled, clicking Apply will enable the selected connection, and no system reboot will be required.
-
After a system reboot is completed, log back into the DXi.
-
Navigate back to the App Specific page (Configuration > System > App Specific). Your selected Veeam connection options will now be enabled with a status of Running or Not Running.
Note: If you had to disjoin from the AD domain and/or disable LDAP before enabling Veeam, you can now rejoin the AD domain and/or enable LDAP. (See LDAP/AD).
If Veeam is not running, refer to the Troubleshooting Veeam section below.
If you encounter problems when enabling the Veeam feature, see the table below for troubleshooting steps:
| Problem | Corrective Action |
|---|---|
| System alerts | Review any Admin Alerts or Service Tickets that were generated when enabling Veeam. See Admin Alerts and Service Tickets. |
| System memory | Depending on the current system configuration, additional memory may be required to run Veeam, or the additional memory was installed incorrectly. |
Veeam Configuration
Once Veeam has been configured enabled on the DXi system, the Linux server within the Veeam Backup and Replication software must be configured. Do the following on the Veeam Backup and Replication server:
- Select Backup Repositories.
- Right-click on Backup Repositories and select Add Backup Repository.
-
The Add Backup Repository dialog appears.

-
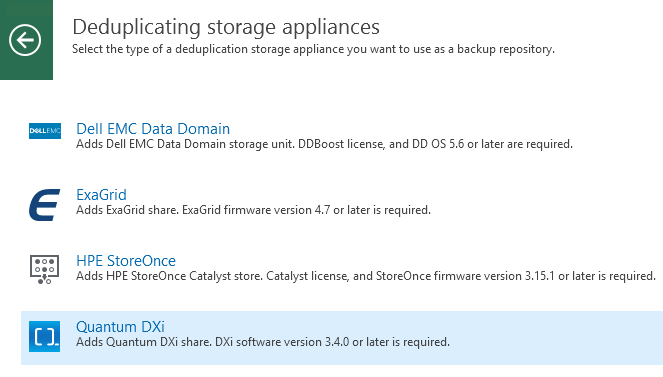
Select Deduplicating storage appliance.
The Deduplicating storage appliances dialog appears.
-
Select Quantum DXi.
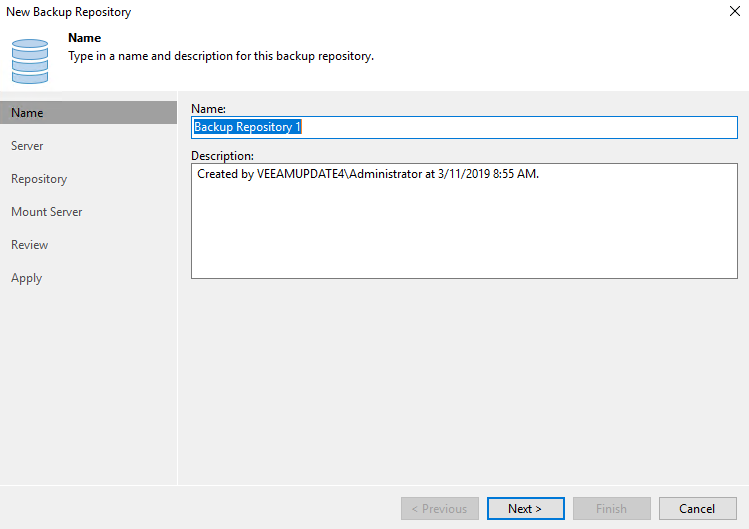
The New Backup Repository dialog appears.
-
In the Name box, type a unique name for the new backup repository.
- In the Description box, type a unique description for the repository, then click Next.
-
Click Add New.
The New Linux Server dialog appears.
Note: If you are creating an additional repository to an existing DXi, you may employ an existing repository server here. If this is a new configuration you must add a new repository server.

- In the DNS name or IP address box, type the DNS name or IP address of the server.
- In the Description box, type a unique description for the server, then click Next.
-
Click Add and select SSH Credentials from the dropdown.
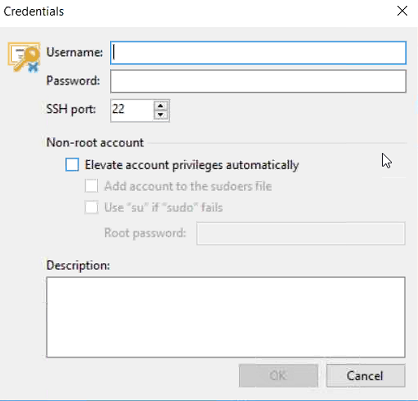
The Credentials dialog appears.
-
In the Username box, type veeam (all lowercase).
-
In the Password box, type the password for the server.
-
Check the Elevate account privileges automatically box, then click OK.
WARNING: This box should be checked by default. If this box is not checked Veeam will misuse DXi resources during data protection operations and it will not perform as expected.

The New Linux Server - SSH Connection dialog reappears.
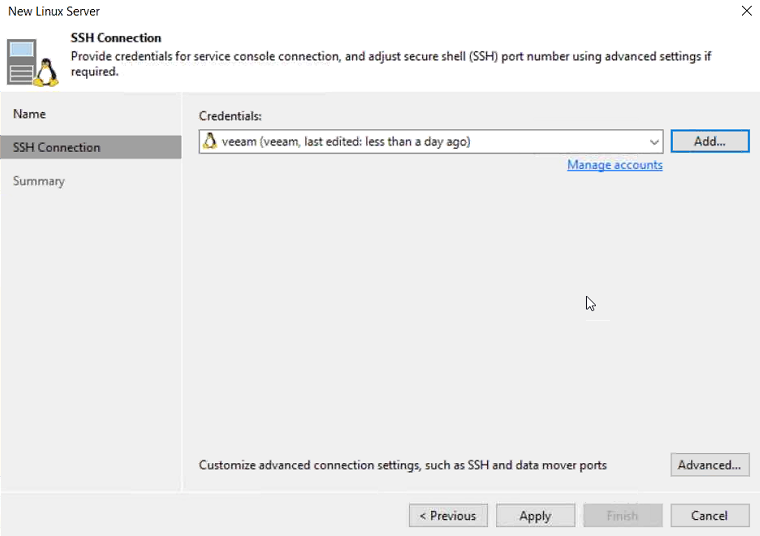
- Click Advanced.
-
Under Data transfer options, change the top-end of the Port range from 3300 to 3090 and click OK to return to the SSH Connection dialog.
-
Click Next. The New Linux Server - Review dialog appears, allowing you to review your settings before applying changes.
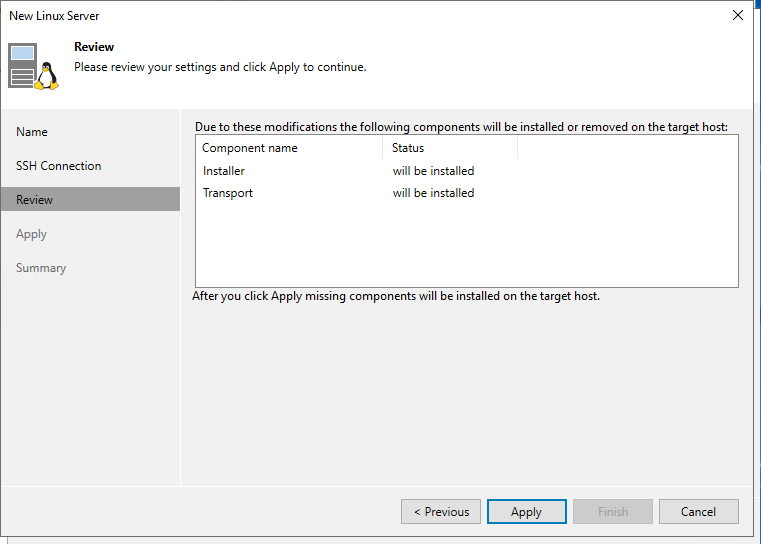
-
Click Apply, the configuration progress will appear under the Message box.
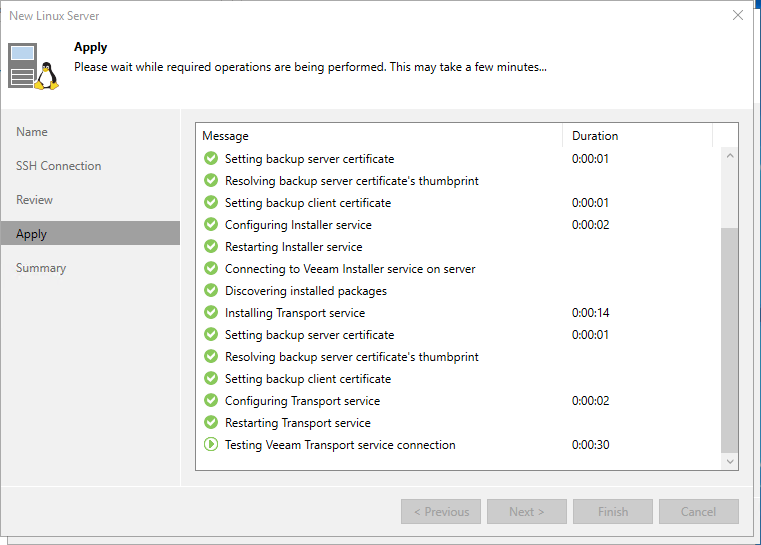
- Click Finish, then click Next at the New Backup Repository - Server dialog. The New Backup Repository - Repository dialog appears.
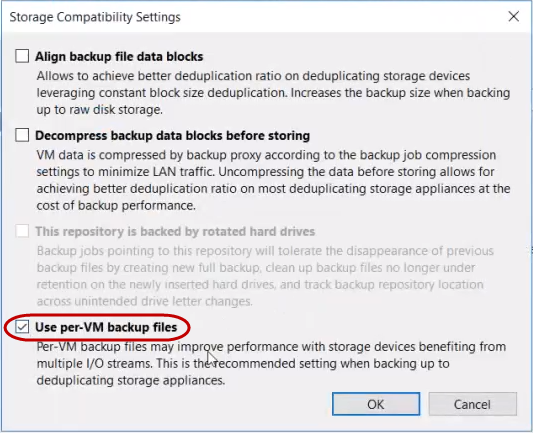
Click Advanced and confirm that only the following boxes are checked in the Storage Compatibility Settings dialog:
- Align backup file data blocks
- Decompress backup data blocks before storing
- Use per-VM backup files
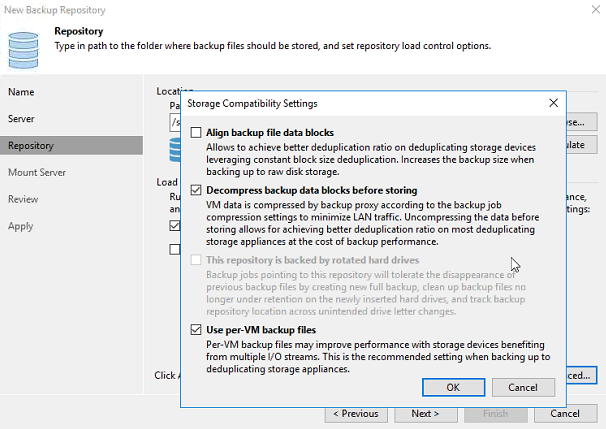
- Confirm that only the checkboxes noted and shown above are checked, then click OK.
Check the Use fast cloning on XFS volumes box.
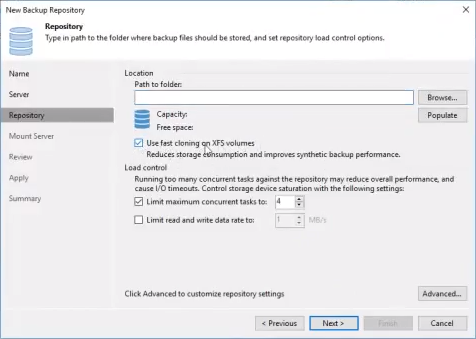
Under Location, next to the Path to folder box, click Browse.
In the Select Folder dialog, click the dropdown arrow to the left of the IP address, then click the dropdown arrow next to the Shares folder.
- With the Veeam folder highlighted, click OK.
- Click Next, then click Next again at the New Backup Repository - Mount Server screen, to see the New Backup Repository - Review dialog.
- Click Apply to apply all new backup repository settings.
After Backup repository has been added successfully appears in the message list, click Next to review the summary.
Click Finish. At the prompt that asks, Change the configuration backup location to the newly created repository? click Yes ONLY if you want to backup the Veeam software configuration to the new repository. Otherwise, click No.
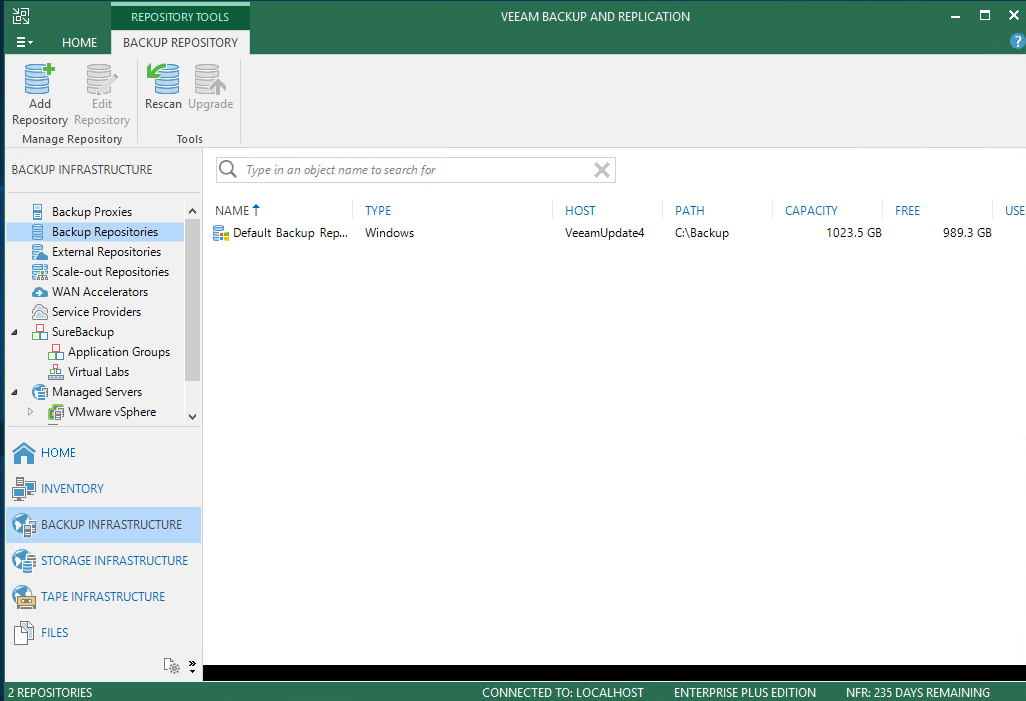

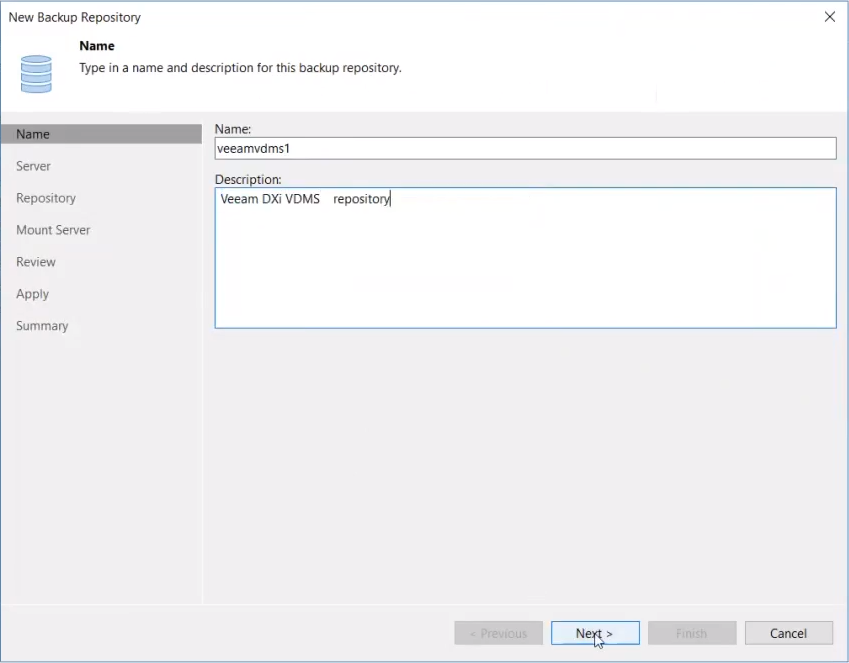
The New Backup Repository - Server dialog appears.

For example, Server = DXi.
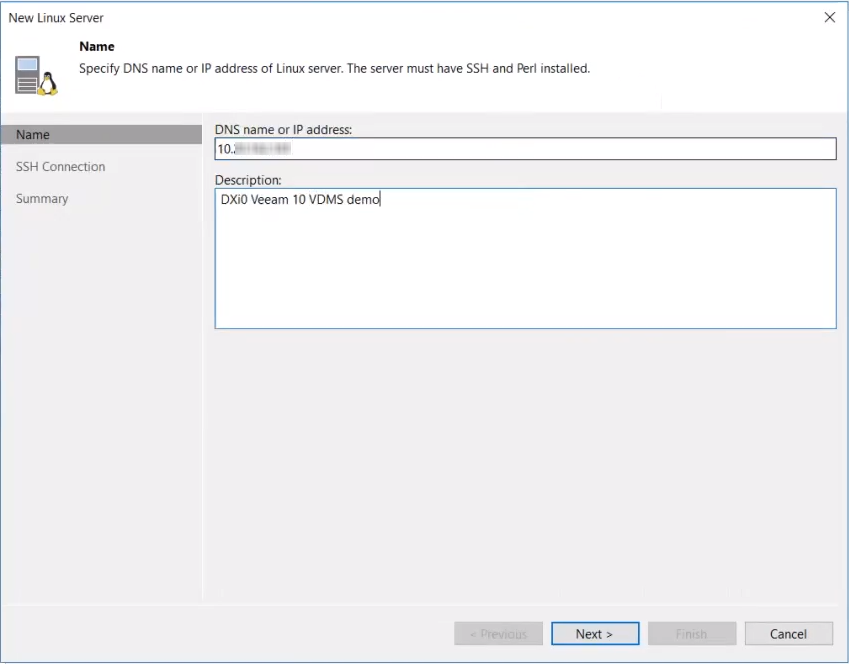
The New Linux Server - SSH Connection dialog appears, allowing Veeam to deploy the Veeam Data Mover Service on the DXi.

The Network Settings dialog appears

Note: The data transfer range of 2500 to 3090 is the port range allocated for Veeam. Other services use ports outside of this range.

When the configuration settings are saved in the system and complete, click Next. The configuration summary appears.
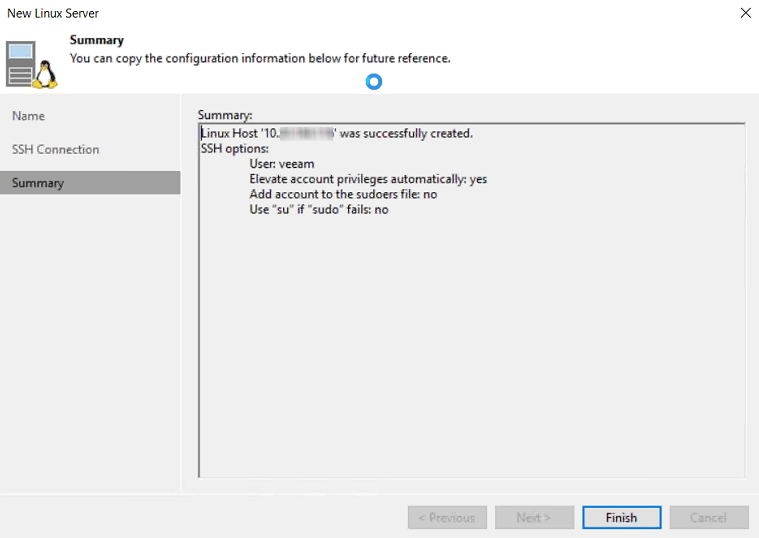
Note: The Location: Path to folder dropdown in the Repository dialog dropdown will display ONLY shares created by the user via DXi GUI. (See DXi Configuration - Create a NAS Share.) It will display ALL your named NAS shares and you will need to identify the share you created in DXi Configuration - Create a NAS Share and use that share in this step.
Note: This may take a few minutes. Do not leave this dialog until the path appears in the box.
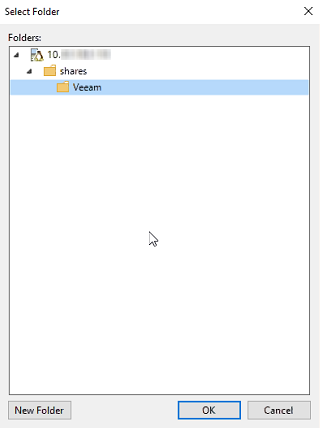
WARNING: DO NOT create new shares using the New Folder button OR ADD/MODIFY/DELETE FOLDERS in this dialog! These actions will incorrectly create/delete/modify shares and the system will not function correctly and will not deduplicate data. Any resulting system failures caused by creating or modifying shares outside of the Veeam software interface will not be supported by Quantum.

Note: For instructions on increasing the maximum concurrent job setting, see the DXi-Series Configuration and Best Practices Guide for Veeam Backup & Replication, available from the Documentation Center for your DXi system. From the dropdown options at the top of the Documentation Center, select Best Practices for the DXi Best Practice Guides page.
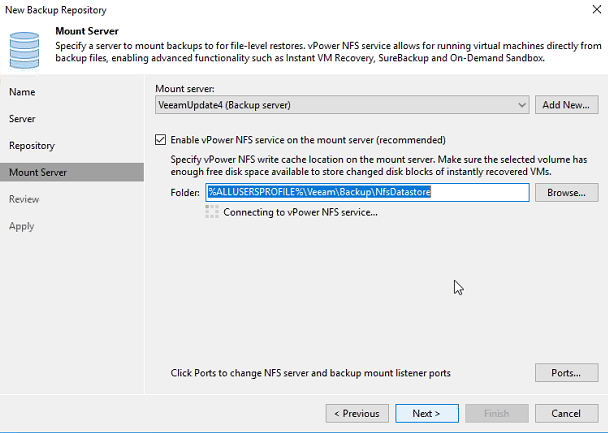
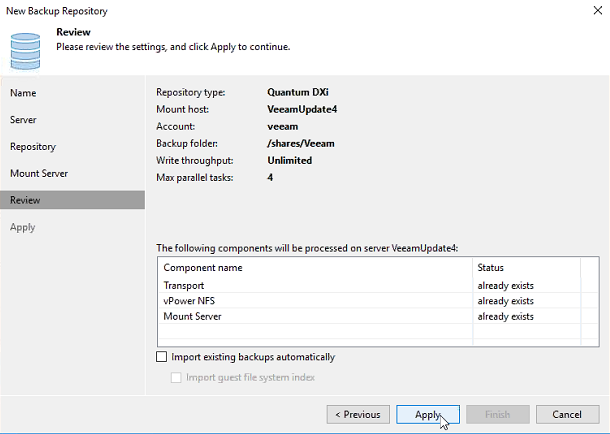
The New Backup Repository - Apply dialog appears. This screen populates with all saved settings, as the backup repository is created and saved as configured.

Note: In the Message list, Backup repository has been added successfully appears last, to indicate that configuration has completed.
The repository is now ready for backup and restoration operations.
-
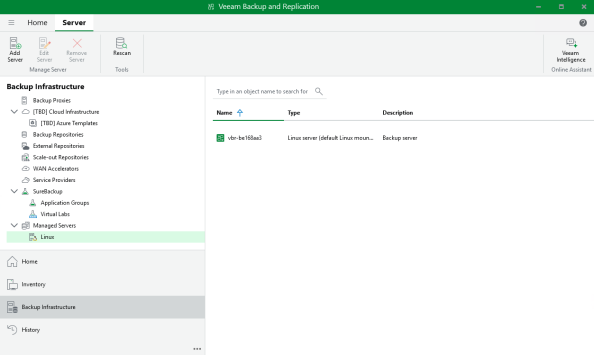
Select Linux.
-
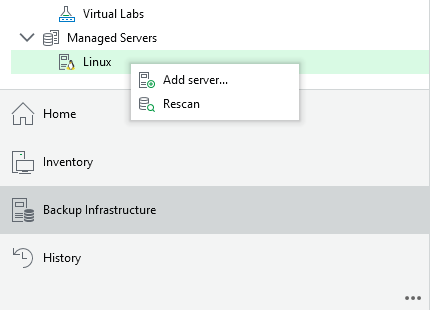
Right-click on Linux and select Add Server.
-
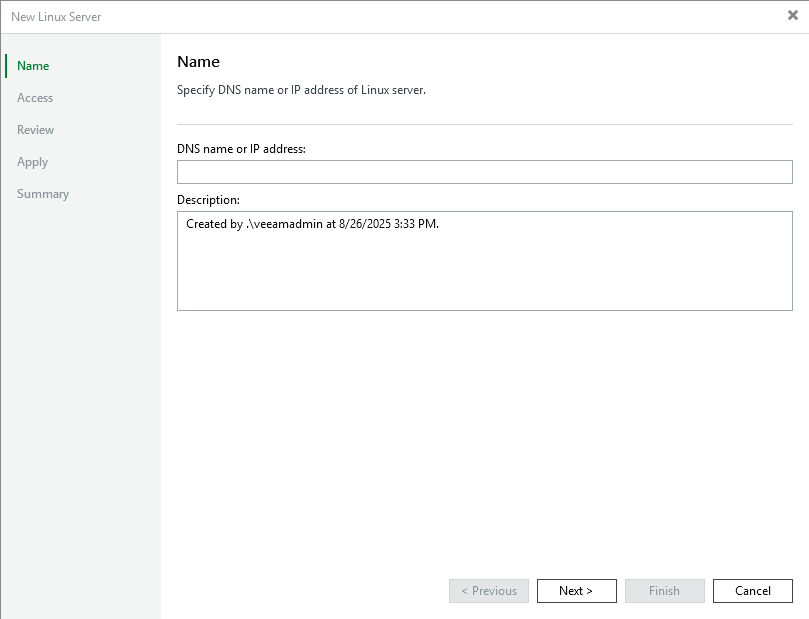
The New Linux Server dialog appears.
-
In the Name box, specify the DNS or IP address of the Linux Server.
-
In the Description box, type a unique description for the server, then click Next.
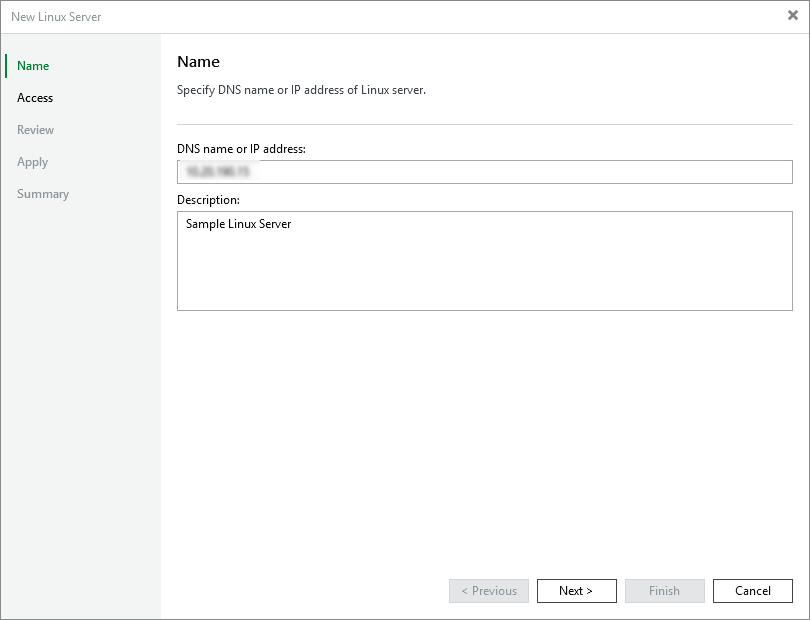
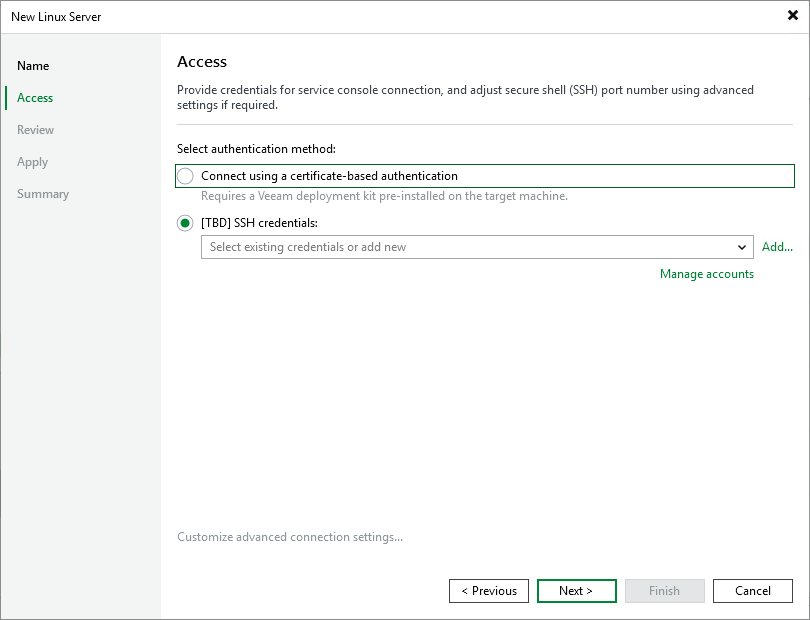
The New Linux Server - Access dialog appears.
-
Select the SSH Credentials radio button.
-
Click Add and select SSH Credentials from the dropdown.
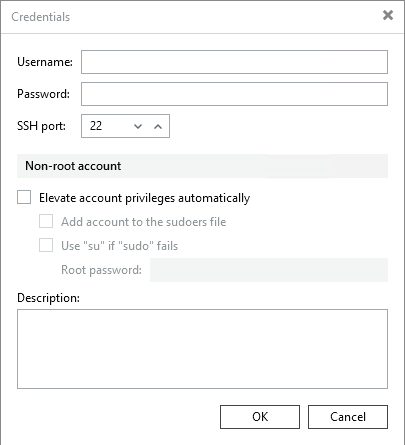
The Credentials dialog appears.
-
In the Username box, type veeam (all lowercase).
-
In the Password box, type the password for the server.
-
Enter the SSH Port for the EDM you have enabled:
EDM SSH EDM 1 11000 EDM 2 12000 EDM 3 13000 EDM 4 14000 EDM 5 15000 -
Check the Elevate account privileges automatically box, then click OK.
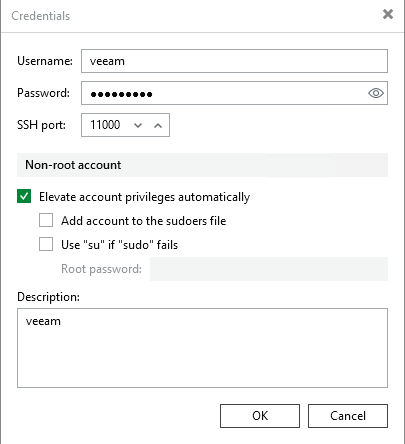
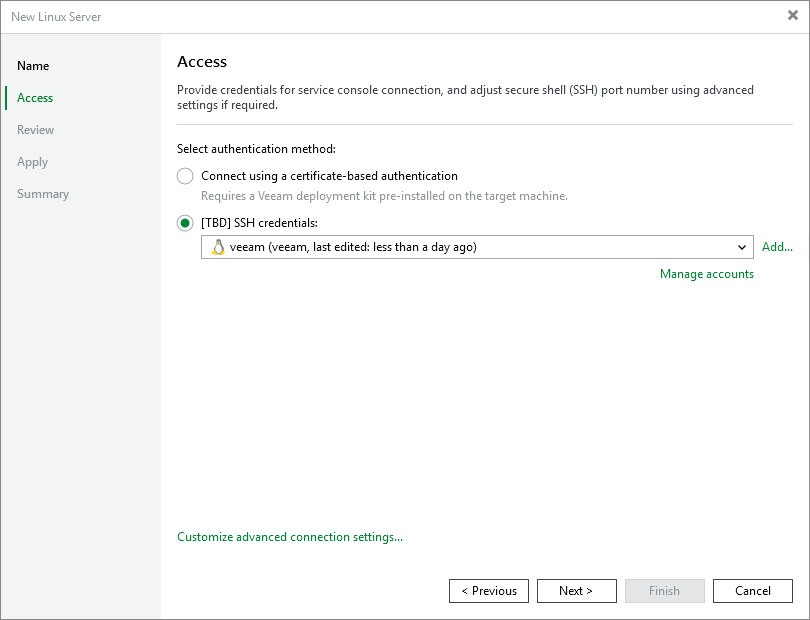
The New Linux Server - Access dialog reappears.
-
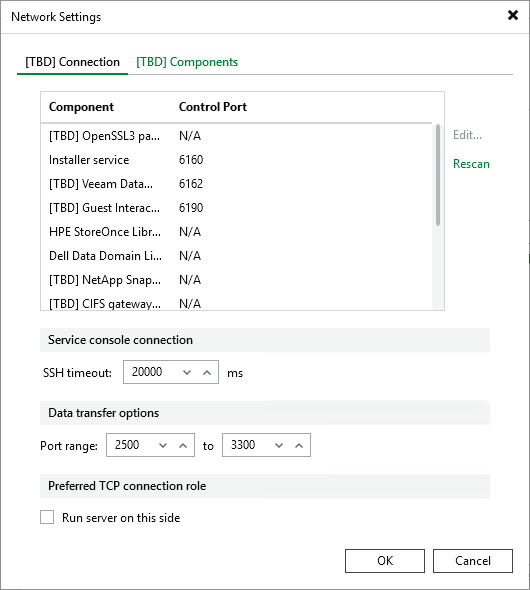
Select Customize advanced connections settings... The Network Settings dialog appears.
-
Under the Connection tab, use the Edit link to update the following components to the EDM you are configuring.
Installer Service
-
EDM 1 - 11001
-
EDM 2 - 12001
-
EDM 3 - 13001
-
EDM 4 - 14001
-
EDM 5 - 15001
Veeam Data Mover Service
-
EDM 1 - 11002
-
EDM 2 - 12002
-
EDM 3 - 13002
-
EDM 4 - 14002
-
EDM 5 - 15002
-
-
Under Data Transfer Options, set the port range for the EDM you are configuring:
-
EDM 1 -11003 - 11999
-
EDM 2 - 12003 - 12999
-
EDM 3 - 13003 - 13999
-
EDM 4 - 14003 - 14999
-
EDM 5 - 15003 -15999
-
-
Click OK.
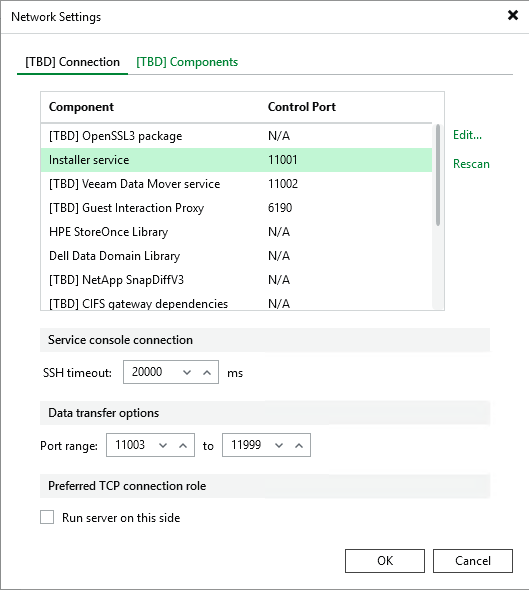
The New Linux Server - Access dialog reappears.

-
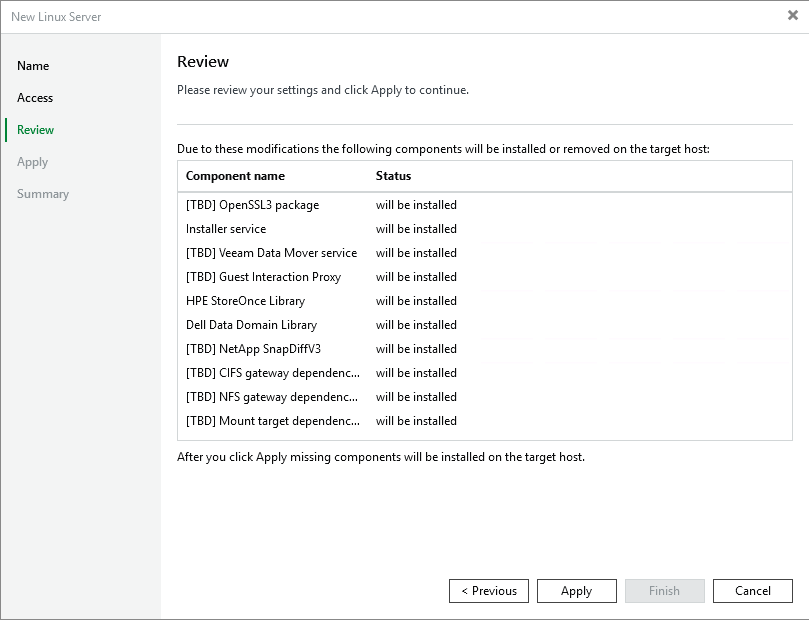
Click Next. The New Linux Server - Review dialog appears, allowing you to review your configurations before applying the changes.
-
Click Apply, the configuration progress will appear under the Message box.
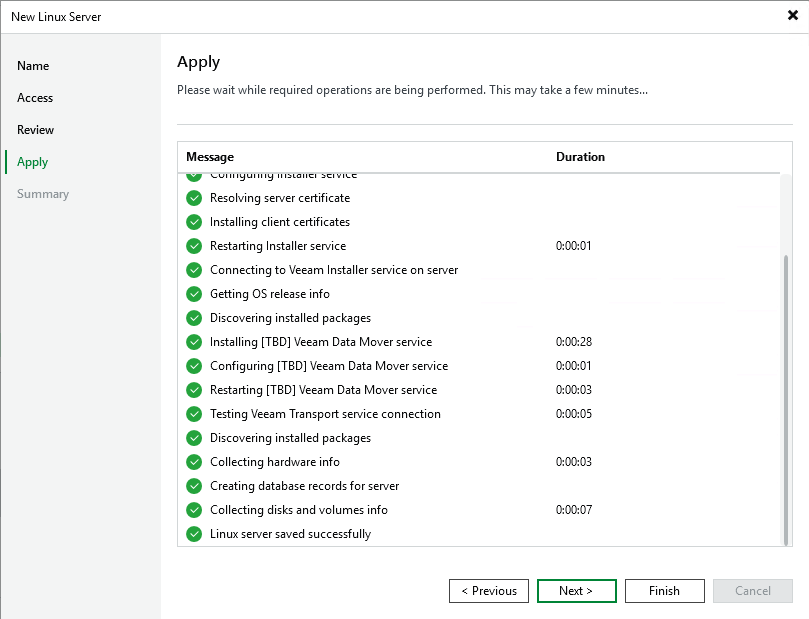
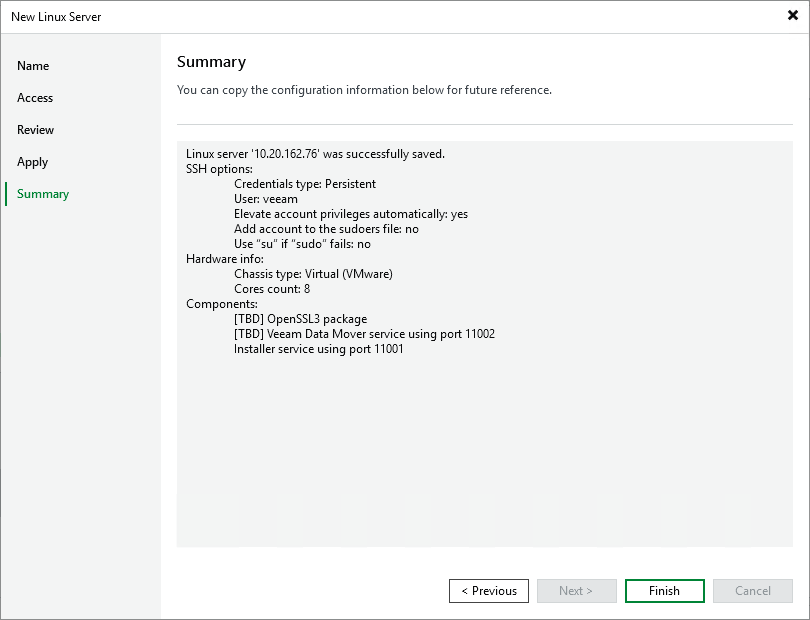
When the configuration settings are saved in the system and complete, click Next. The configuration summary appears.
-
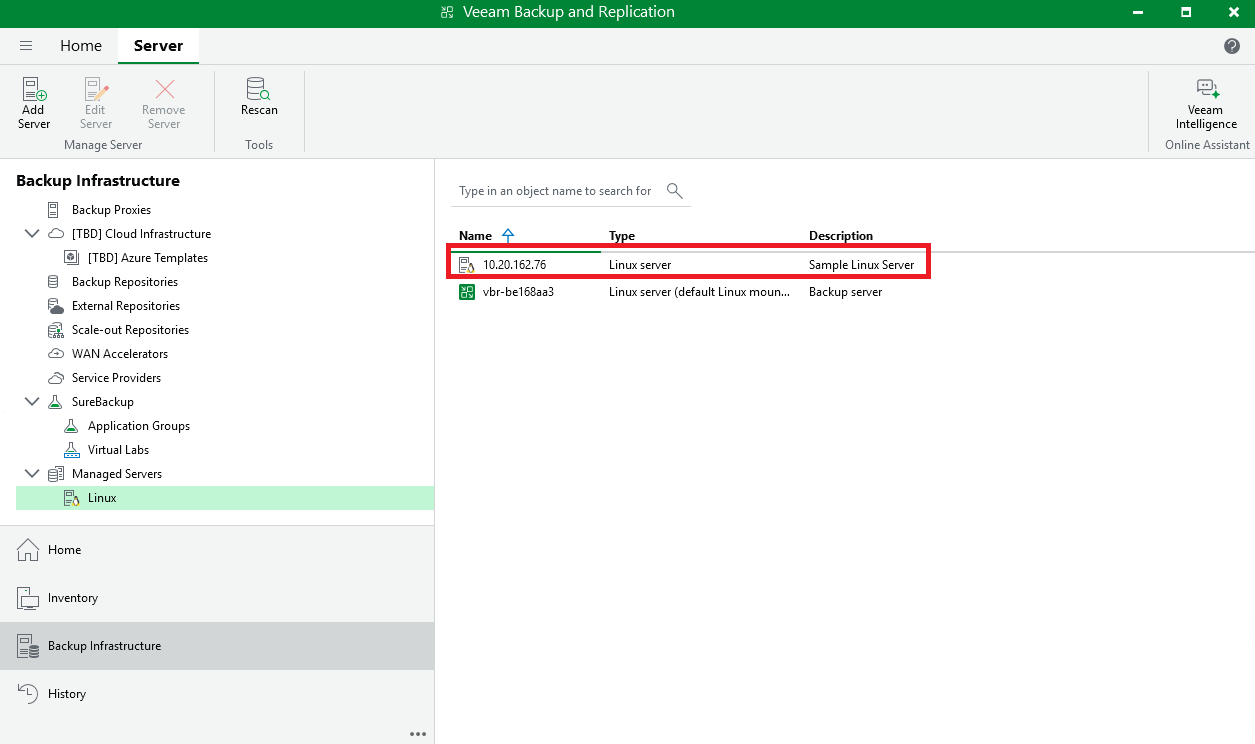
Click Finish to return to the Veeam Backup and Replication Server page. The Linux server now appears.
- Select Backup Repositories.
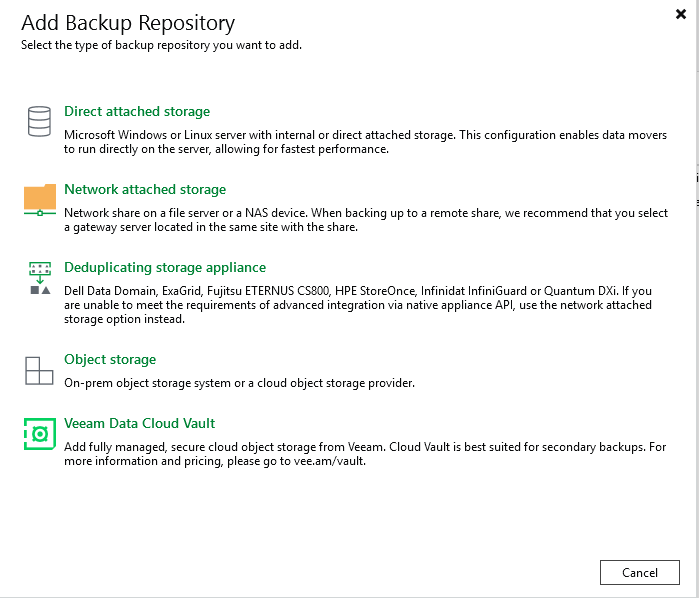
- Right-click on Backup Repositories and select Add Backup Repository.
-
The Add Backup Repository dialog appears.
-
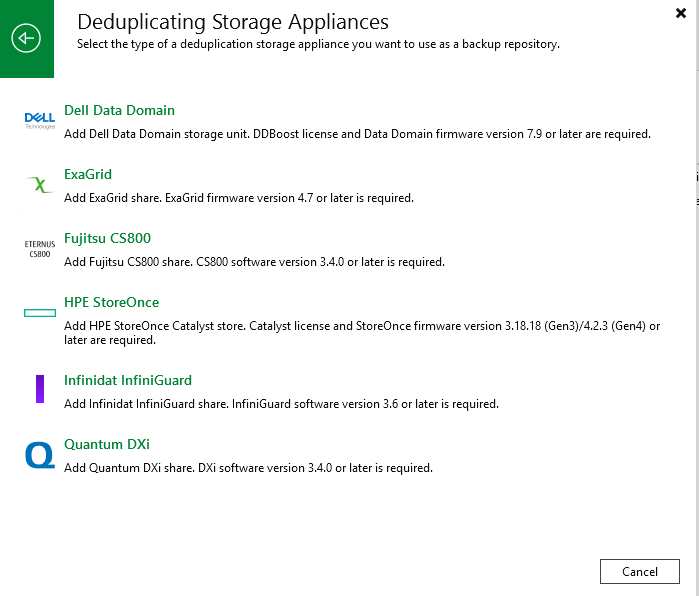
Select Deduplicating storage appliance.
The Deduplicating storage appliances dialog appears.
-
Select Quantum DXi.
The New Backup Repository dialog appears.
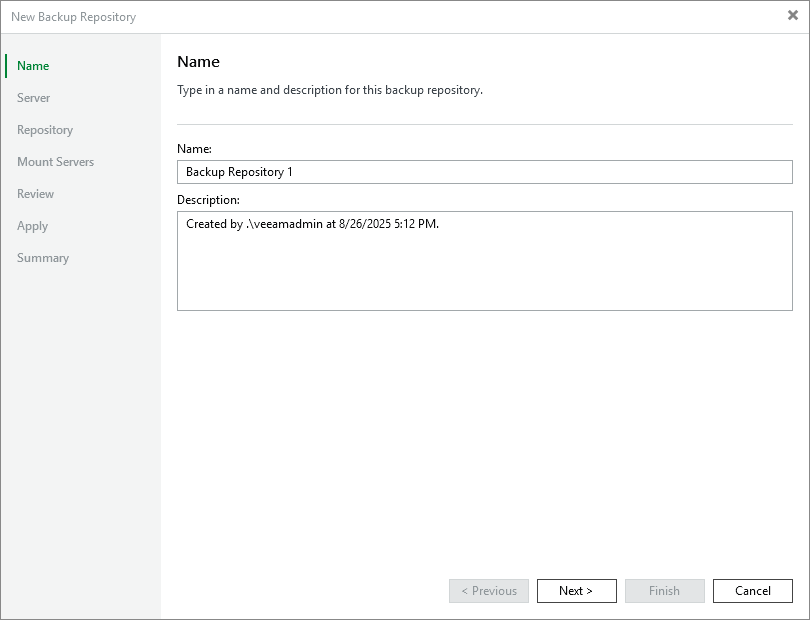
-
In the Name box, type a unique name for the new backup repository.
- In the Description box, type a unique description for the repository, then click Next.
-
Select the Linux server you configured from the Repository Server drop-down.
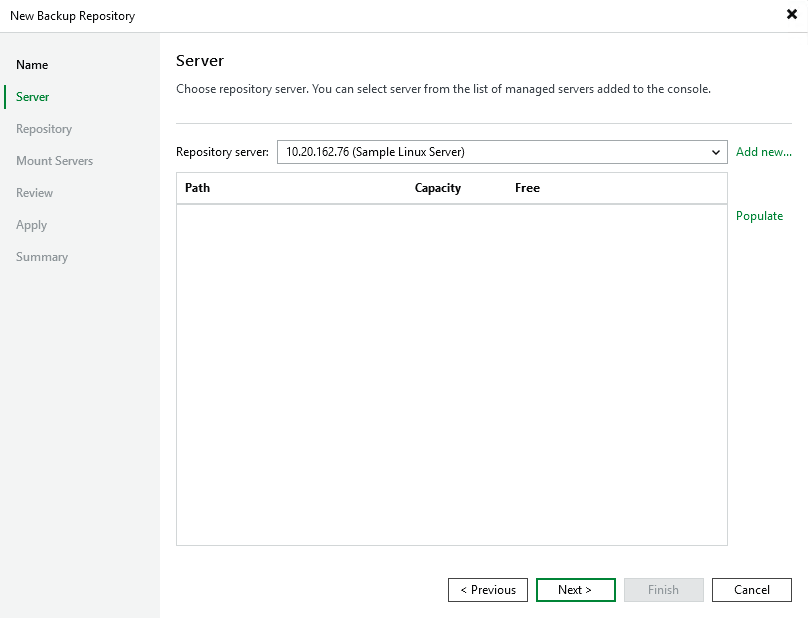
-
Select Populate. Veeam will connect to the server.
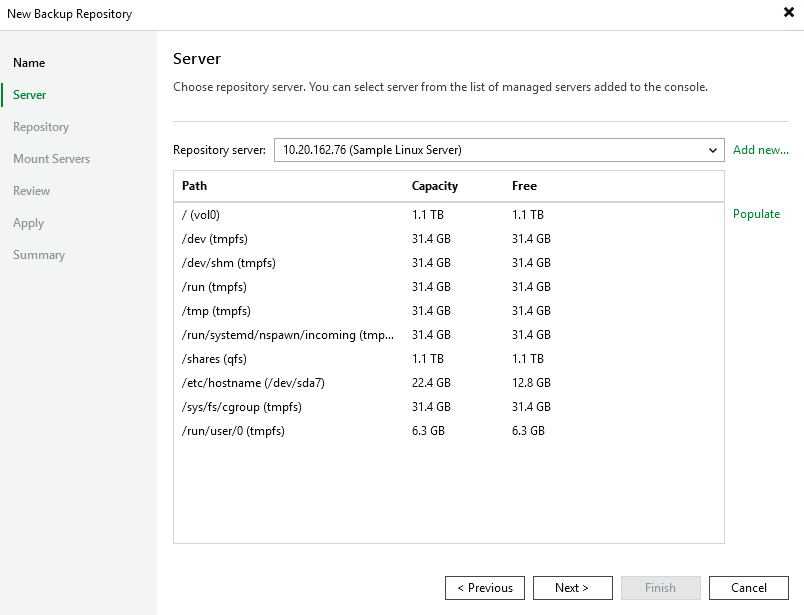
-
Click Next. The New Backup Repository - Repository dialog appears.
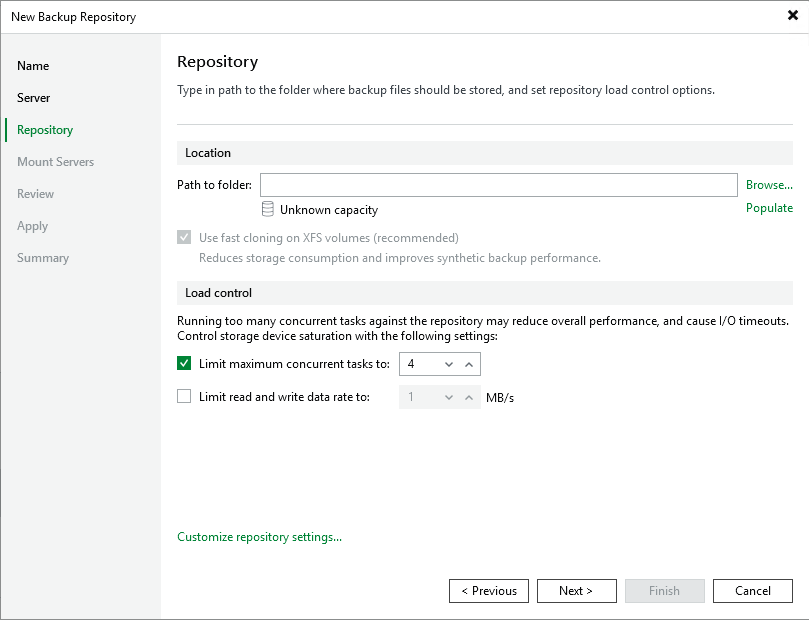
Under Location, next to the Path to folder box, click Browse.
In the Specify Folder dialog, click the dropdown arrow to the left of the IP address, then click the dropdown arrow next to the Shares folder.
- With the Veeam folder highlighted, click OK.
- Select Populate to review the share capacity.
- Click Next, then click Next again at the New Backup Repository - Mount Server screen, to see the New Backup Repository - Review dialog.
- Click Apply to apply all new backup repository settings.
After Backup repository has been added successfully appears in the message list, click Next to review the summary.
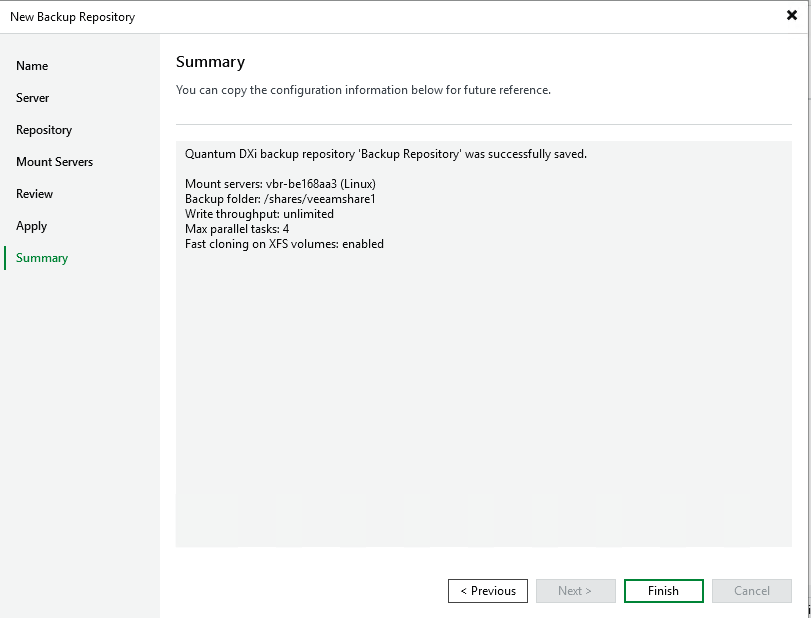
Click Finish.
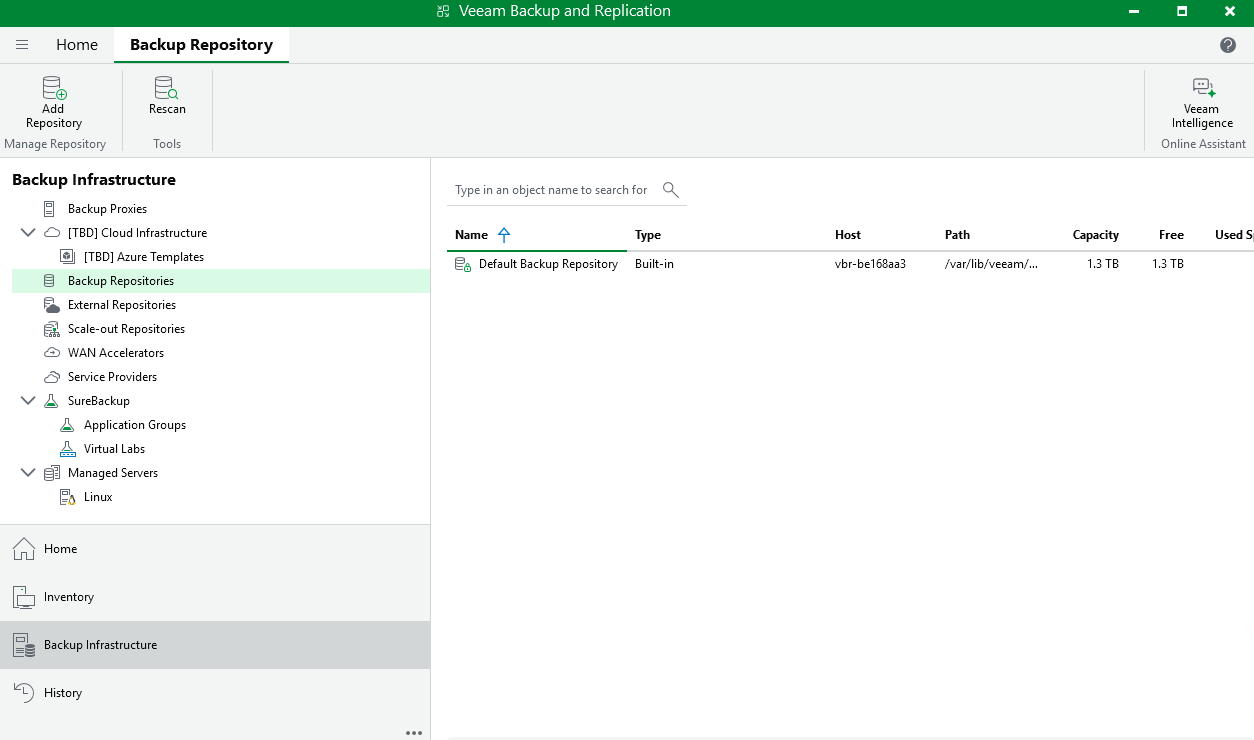
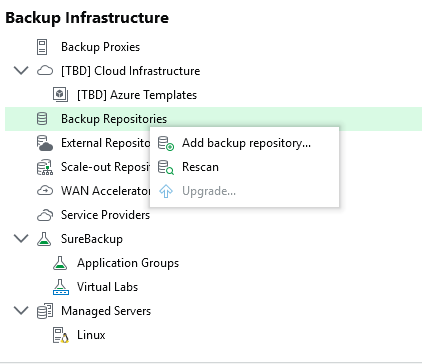
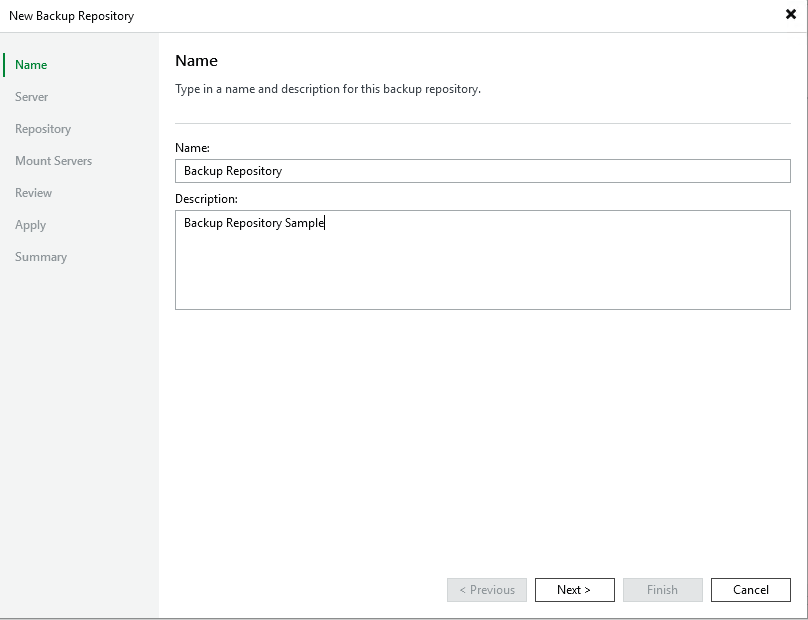
The New Backup Repository - Server dialog appears.
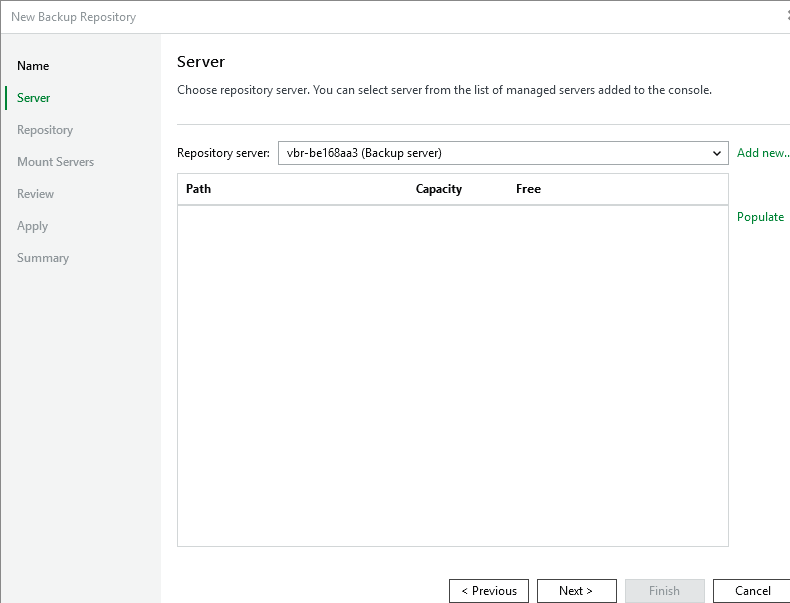
Note: The Location: Path to folder dropdown in the Repository dialog dropdown will display ONLY shares created by the user via DXi GUI. (See DXi Configuration - Create a NAS Share.) It will display ALL your named NAS shares and you will need to identify the share you created in DXi Configuration - Create a NAS Share and use that share in this step.
Note: This may take a few minutes. Do not leave this dialog until the path appears in the box.
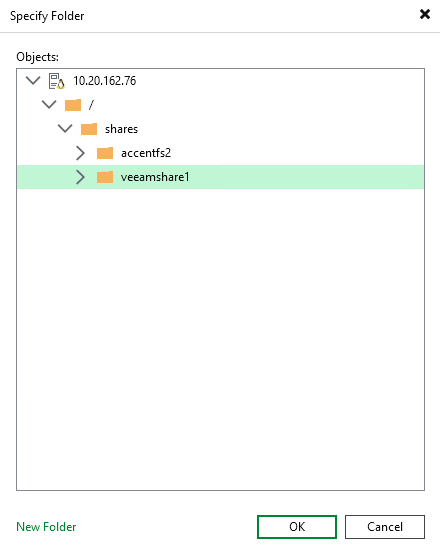
WARNING: DO NOT create new shares using the New Folder button OR ADD/MODIFY/DELETE FOLDERS in this dialog! These actions will incorrectly create/delete/modify shares and the system will not function correctly and will not deduplicate data. Any resulting system failures caused by creating or modifying shares outside of the Veeam software interface will not be supported by Quantum.
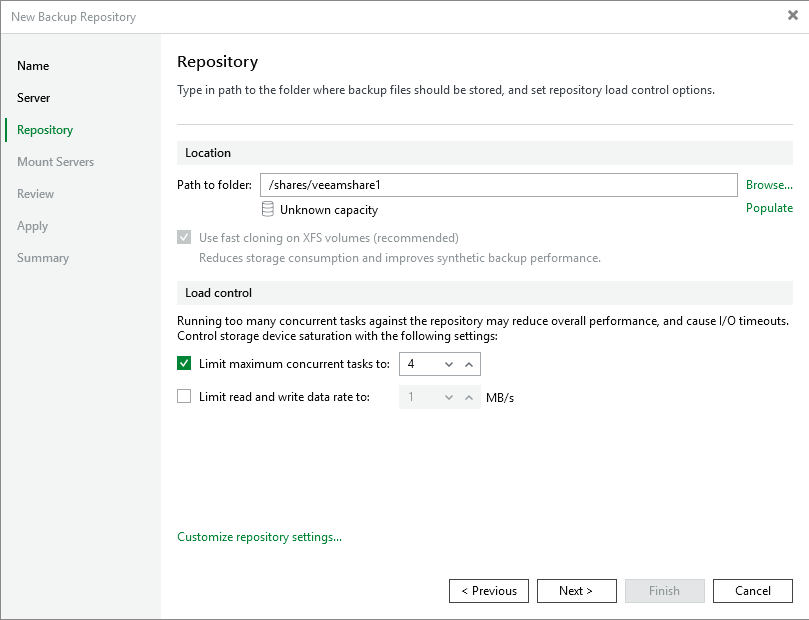
Note: For instructions on increasing the maximum concurrent job setting, see the DXi-Series Configuration and Best Practices Guide for Veeam Backup & Replication, available from the Documentation Center for your DXi system. From the dropdown options at the top of the Documentation Center, select Best Practices for the DXi Best Practice Guides page.
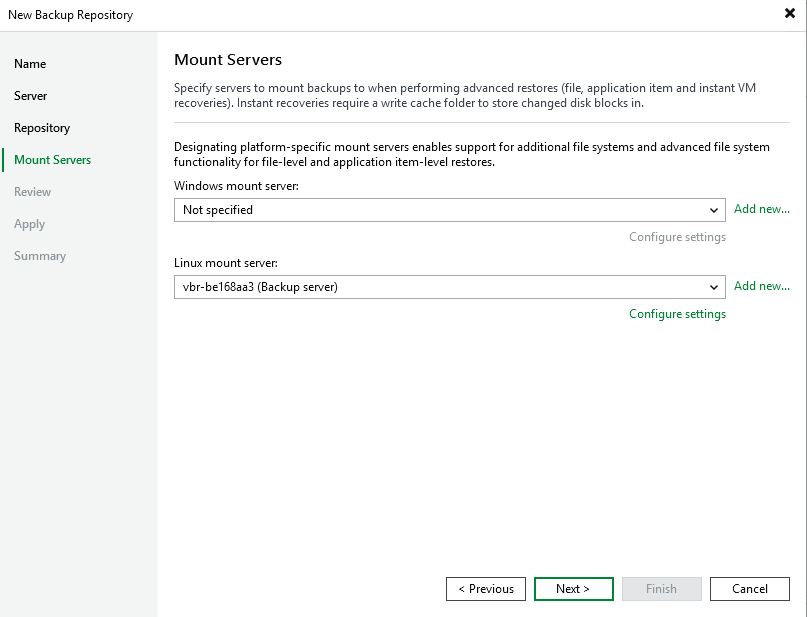
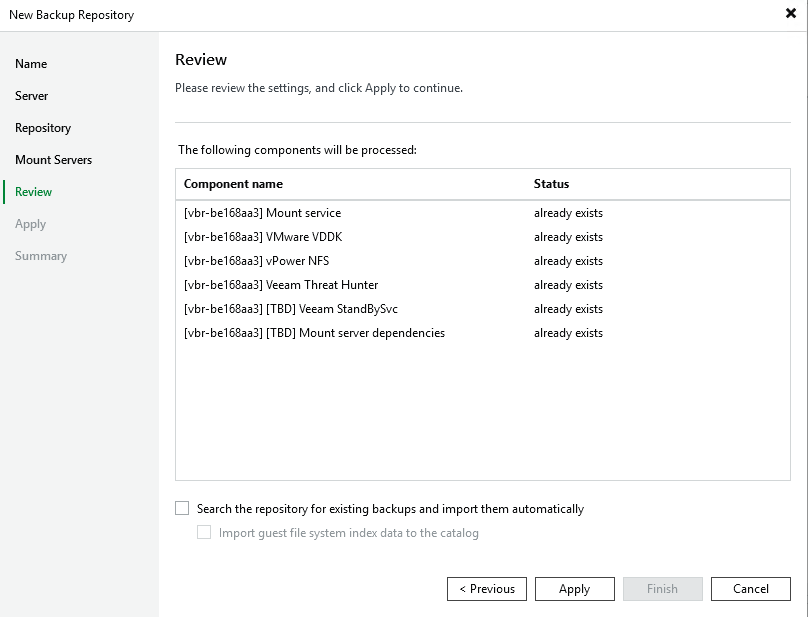
The New Backup Repository - Apply dialog appears. This screen populates with all saved settings, as the backup repository is created and saved as configured.
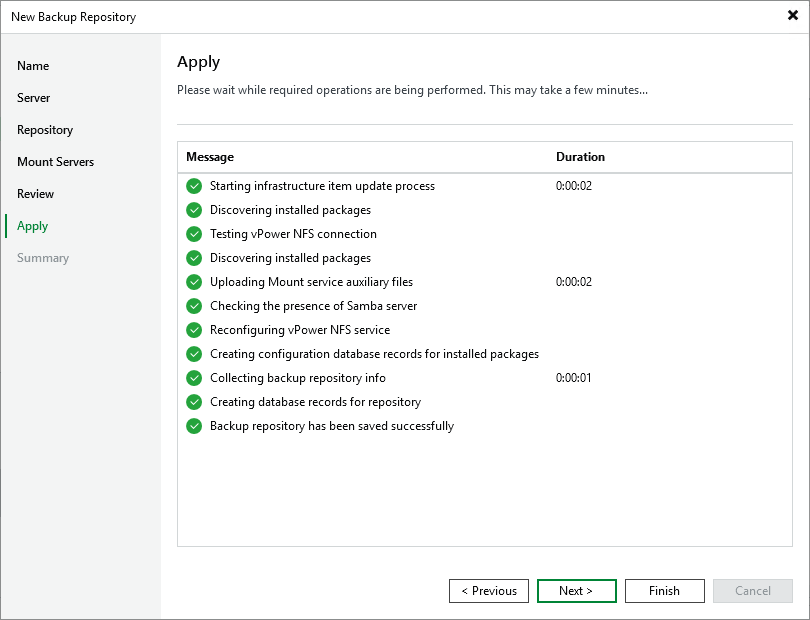
Note: In the Message list, Backup repository has been added successfully appears last, to indicate that configuration has completed.
The repository is now ready for backup and restoration operations.
Installing AccentFS for Veeam 12 and 13
The Accent File System (AccentFS) includes your servers in the deduplication process, to minimize bandwidth and send only unique data over the network. Since the Accent File System appears as a native file system on the client, or backup host, any program that can write to a file system can use AccentFS.
Note: Installing AccentFS for Veeam is an option. It is not a required part of Veeam installation.
Using Veeam 12 and 13 with the AccentFS Plugin requires you to first install the plugin, create an application-specific share and mount the AccentFS share on the client server.
Note: The client server is a supported Linux Virtual Machine (VM), created on VMWare Hypervisor, which must exist prior to installing the AccentFS plugin.
- Use AccentFS Plug-in Installation to complete and mount the AccentFS installation.
Complete the steps in the following sections in that topic:
- Download and Install the AccentFS Plug-in.
- Configure the DXi Server.
- Create the AccentFS Share and User Account Via the DXi CLI OR Create the AccentFS Share and User Account Via the DXi GUI.
- Mount the AccentFS Share.
- If applicable, Configure TLS.
Note: Configuring secure communications with Transport Layer Security (TLS) is an advanced and optional configuration option. Your company may require using TLS for added security.
- Continue with Enable Veeam 12 and 13 for use with AccentFS.
Complete the following steps in the Veeam Console on the Veeam Backup and Replication server:
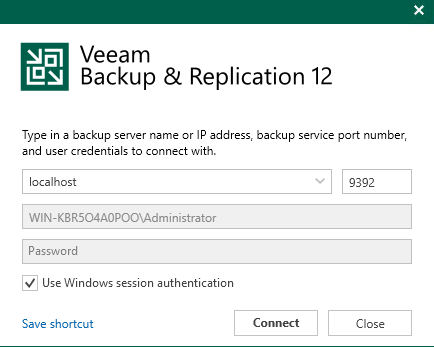
- Log on using the backup server name or IP address, backup service port number and user credentials.
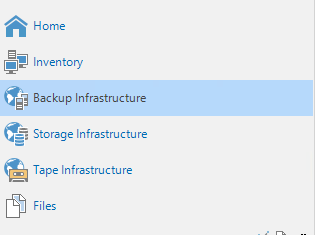
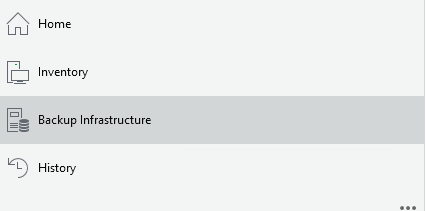
- To add a backup repository, select Backup Infrastructure.
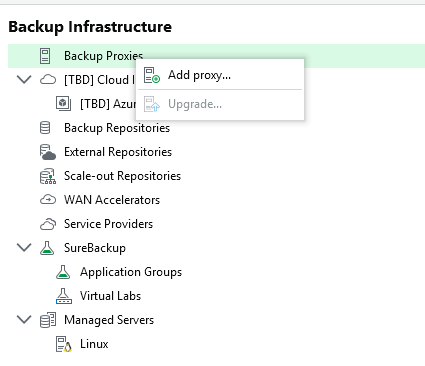
- Under Backup Infrastructure, select Backup Proxies.
- Right-click in the object section of the screen and select Add proxy...
- Click Add New.
-
Select Linux in the Add Server dialog to add a new Linux proxy server.
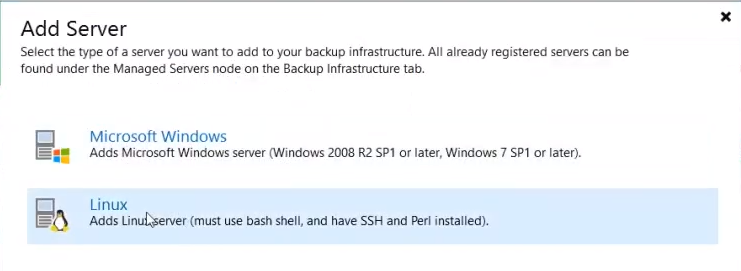
The New Linux Server dialog appears.
- Type the IP address of the Linux machine where you installed the AccentFS plugin under DNS name or IP address.
-
Type a description for the Linux server in the Description box and click Next.
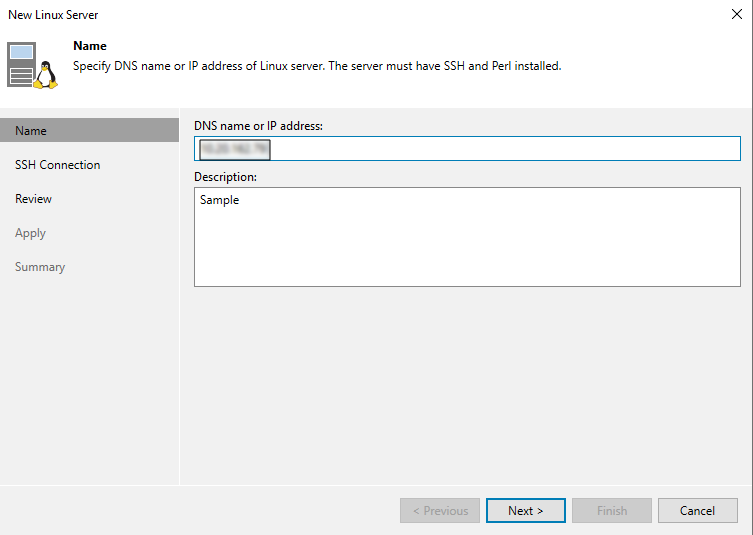
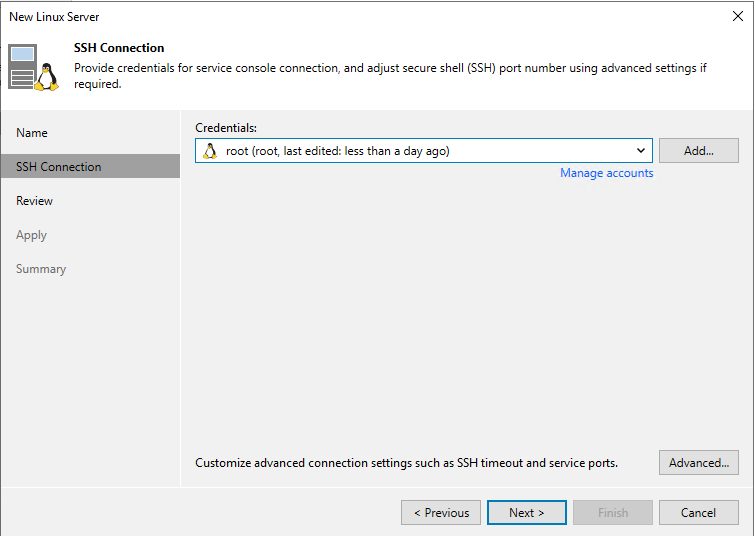
The New Linux - Server - SSH Connection dialog appears.
- Do one of the following to either select existing or create new credentials:
- To select previously created (existing) credentials:
- Click in the dropdown list and select your server access credentials in the New Linux Server dialog, under SSH Connection > Credentials.
- Click Apply to log on to the Linux server.
- To create and apply new credentials:
- Click Add and select SSH Credentials
- Enter a Username, Password and Description (optional but recommended) in the Credentials dialog, then click OK to save your settings.
Click in the drop-down list in the New Linux Server dialog, select your newly-created credentials and click Next.
The New Linux Server - Review dialog appears.


-
Review your settings click Apply to continue.
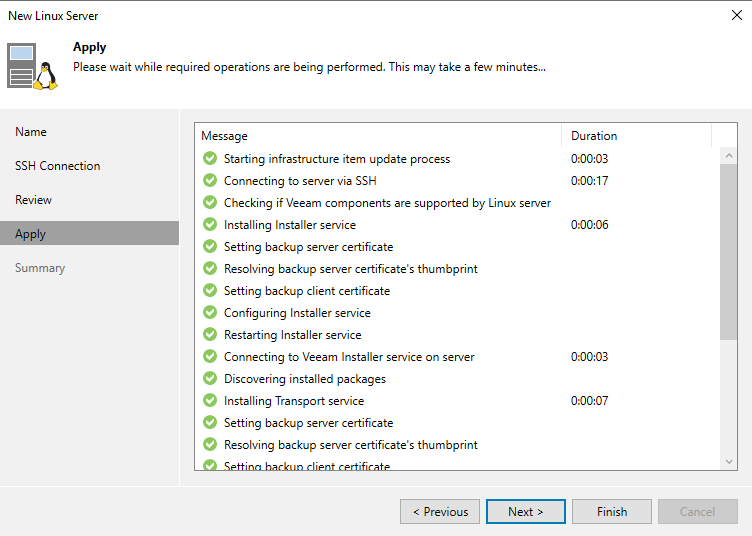
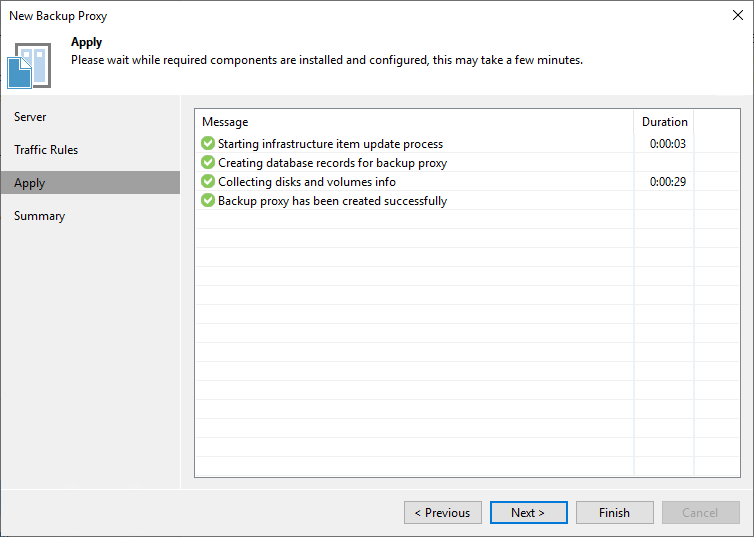
The New Linux Server dialog automatically moves to the Apply tab. This screen populates with all saved settings appearing in the Message box, as the backup repository is created and saved as configured.
The final message should say Linux server saved successfully.
- Click Finish. The New Backup Proxy dialog reappears, showing the newly created backup proxy.
-
Click Next.
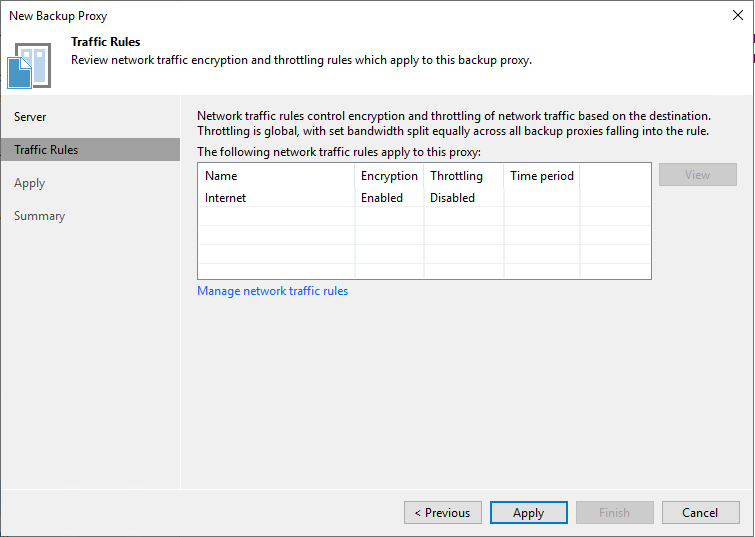
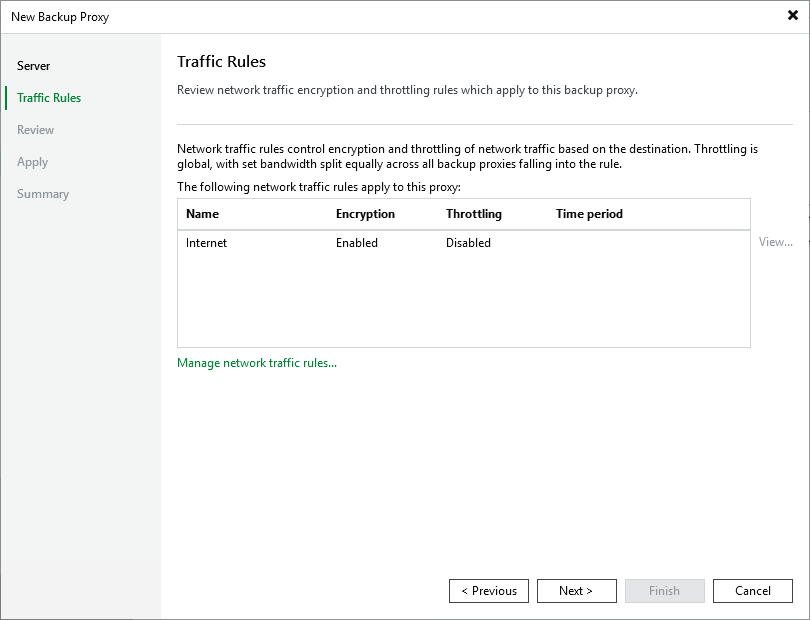
The New Backup Proxy - Traffic Rules dialog displays the Traffic Rules section, explaining network traffic encryption and throttling rules for the backup proxy.
- Click Apply to install and configure all required components.
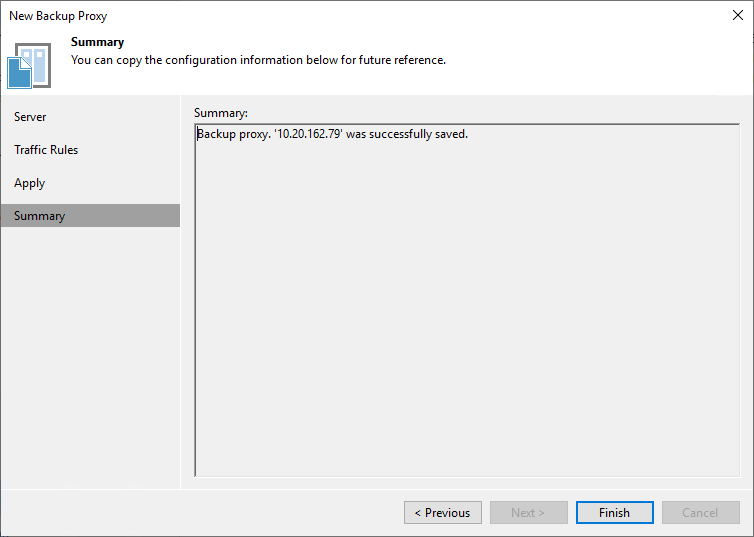
- Click Next to show the confirmation in the Summary section, that backup proxy creation was successful.
- Click Finish.
- At this point, you need to remount the AccentFS share. Complete step 2 in the Mount the AccentFS Share section in AccentFS Plug-in Installation.
- Continue with Create and Designate a Local Target Repository for AccentFS.
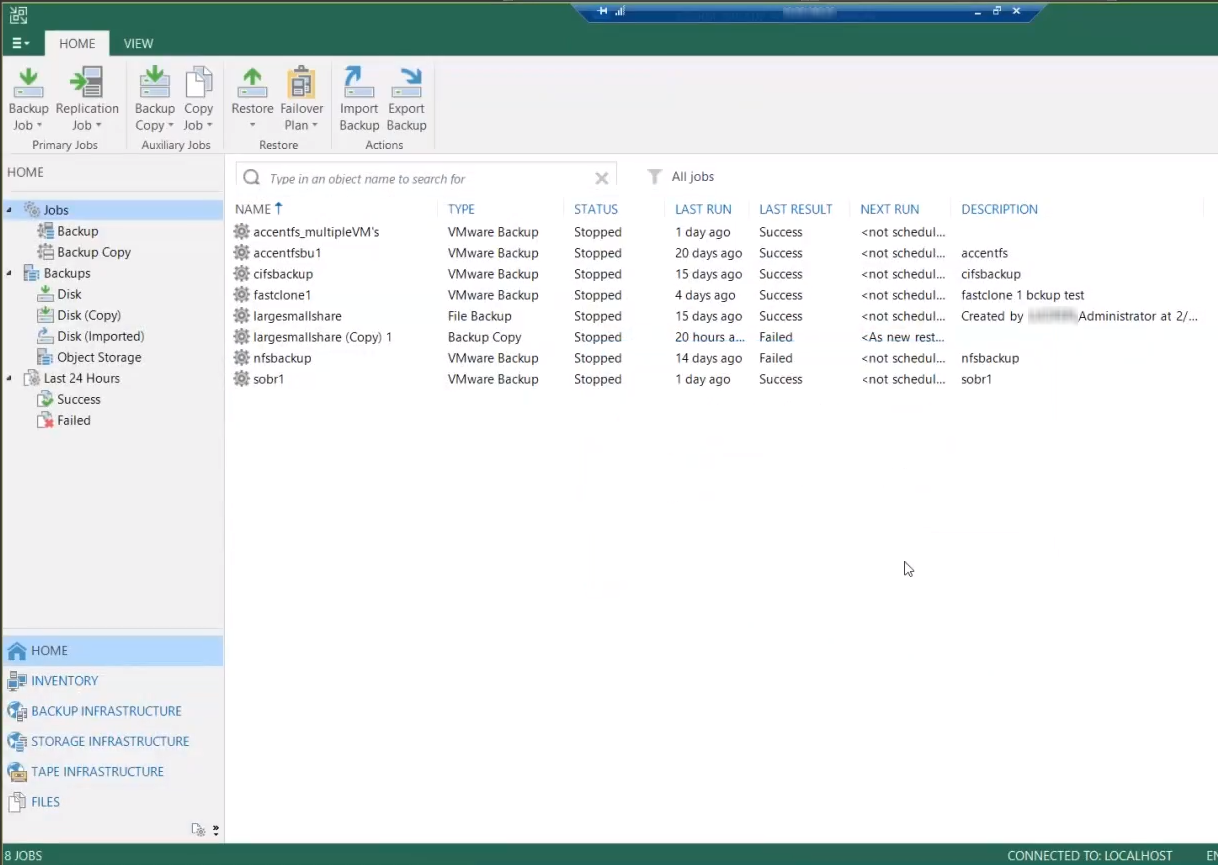
The Veeam Backup and Replication console appears.
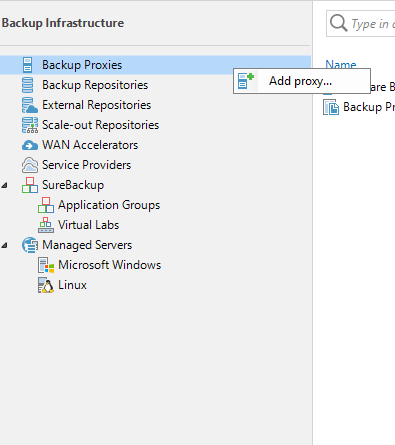
The New Backup Proxy dialog appears.
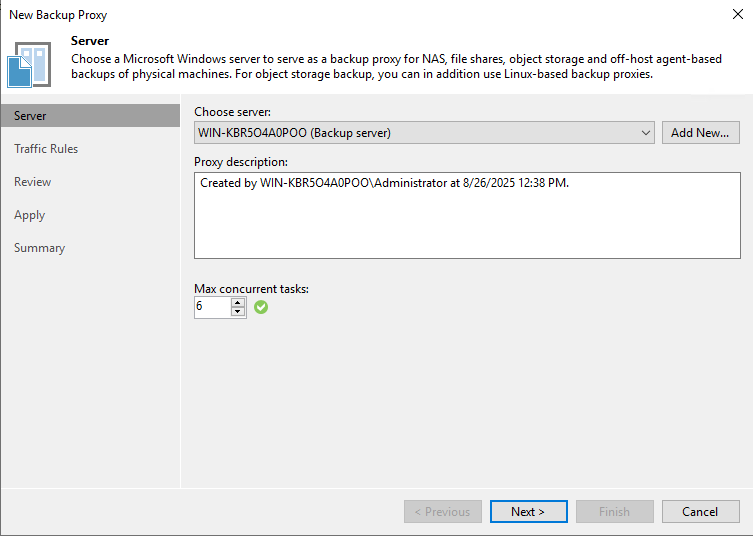
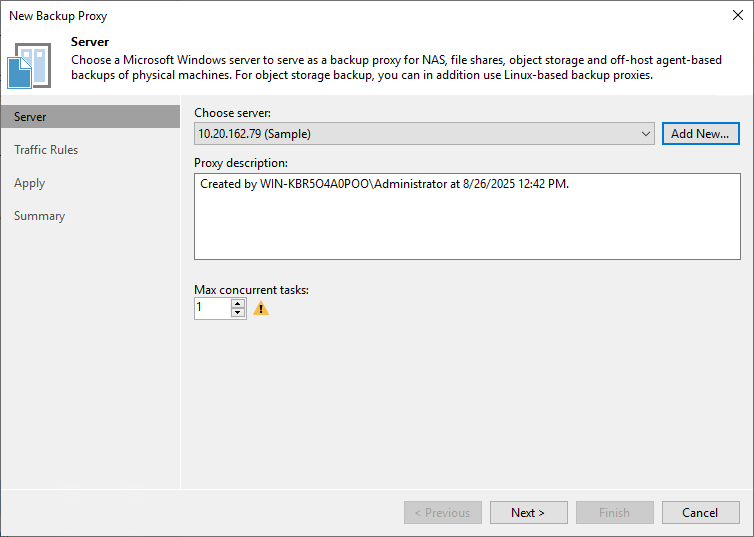
The Apply section shows the real-time system configuration steps as they take place. When complete, the Next button at the bottom of the dialog becomes active.
Note: there is no need to complete step 1 in this section as you have already created the credentials file for the VM.
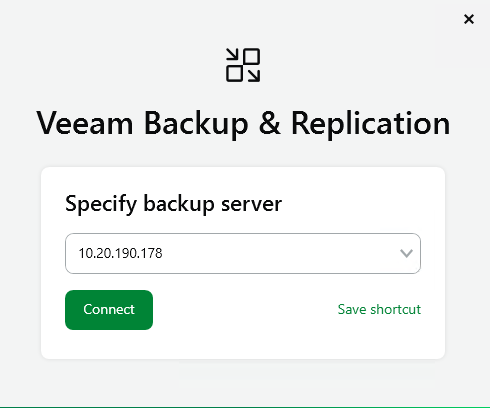
Complete the following steps in the Veeam Console on the Veeam Backup and Replication server:
-
Log on using the backup server name or IP address, and user credentials.
- To add a backup repository, select Backup Infrastructure.
- Under Backup Infrastructure, select Backup Proxies.
- Right-click in the object section of the screen and select Add proxy...
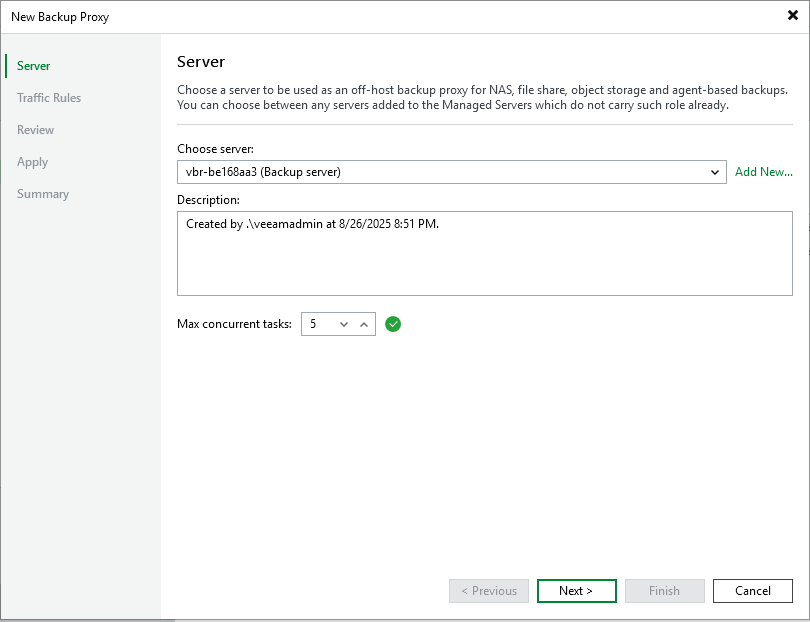
- Select a server from the Choose server drop-down.
-
Select Next.
The New Backup Proxy - Traffic Rules dialog appears.
-
Select Next.
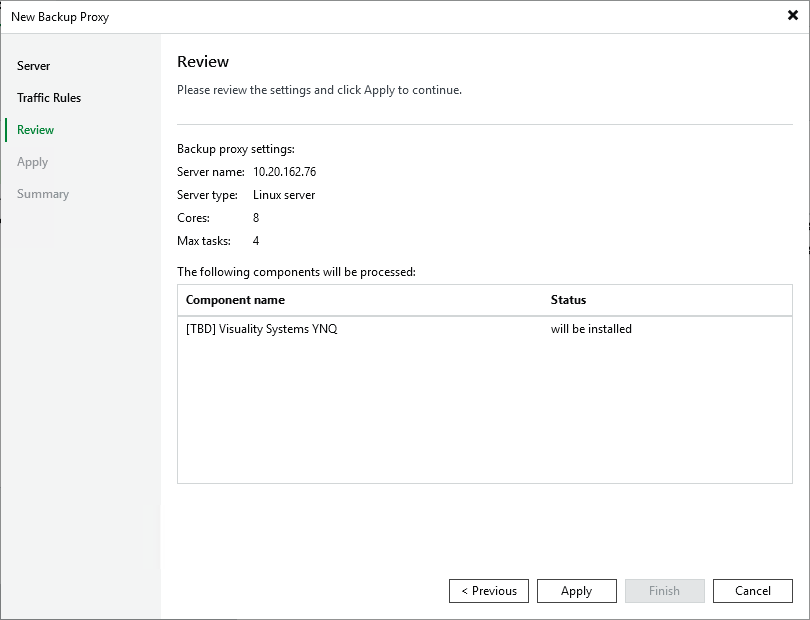
The New Backup Proxy - Review dialog appears.
.
-
Review your settings click Apply to continue.

The New Backup Proxy Server dialog automatically moves to the Apply tab. This screen populates with all saved settings appearing in the Message box, as the backup repository is created and saved as configure
- Click Next. The New Backup Proxy - Summay dialog appears.
- Click Finish.
- At this point, you need to remount the AccentFS share. Complete step 2 in the Mount the AccentFS Share section in AccentFS Plug-in Installation.
- Continue with Create and Designate a Local Target Repository for AccentFS.
The Veeam Backup and Replication console appears.
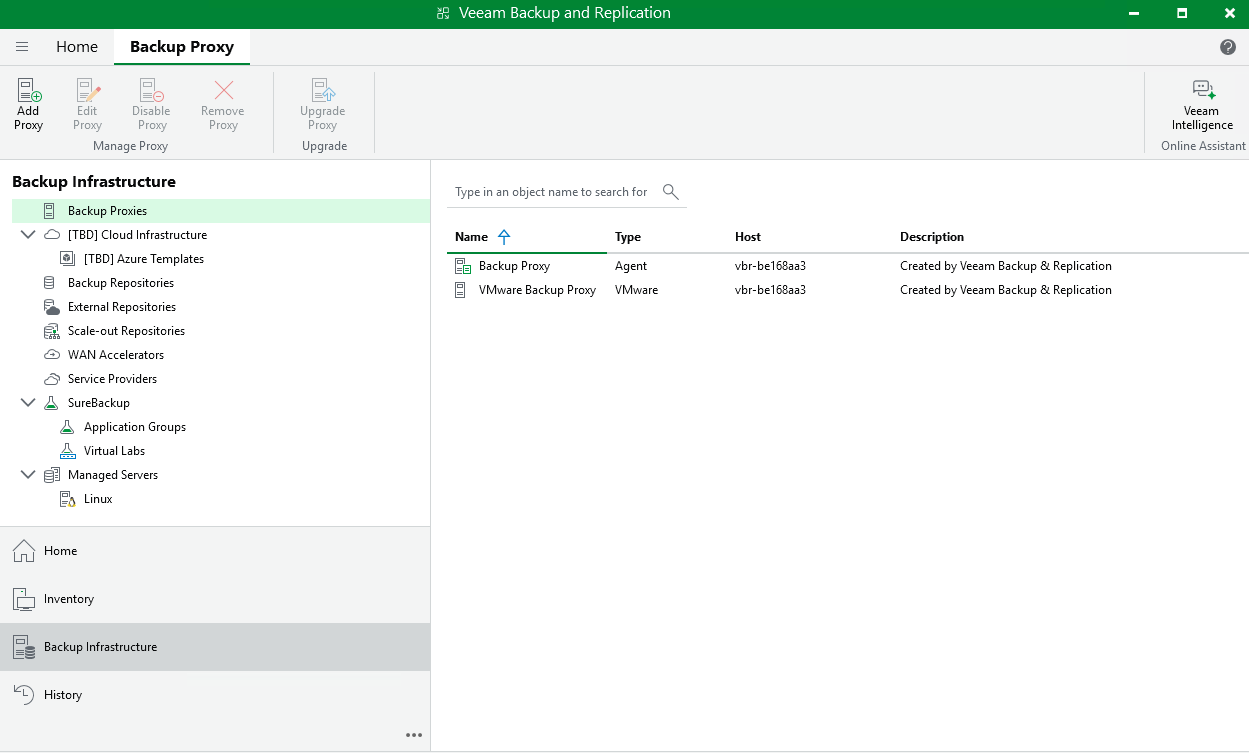
The New Backup Proxy dialog appears.
Note: there is no need to complete step 1 in this section as you have already created the credentials file for the VM.
Create and Designate a Local Target Repository for AccentFS
In the following section you will designate a local repository on the same Linux proxy server that has an AccentFS mount to the DXi, so that all data going from that particular Linux proxy, over the AccentFS link to the DXi will be deduplicated at the source and not the destination.
- In the Veeam Console, select Backup Repositories.
- Right-click in the object space and select Add backup repository.
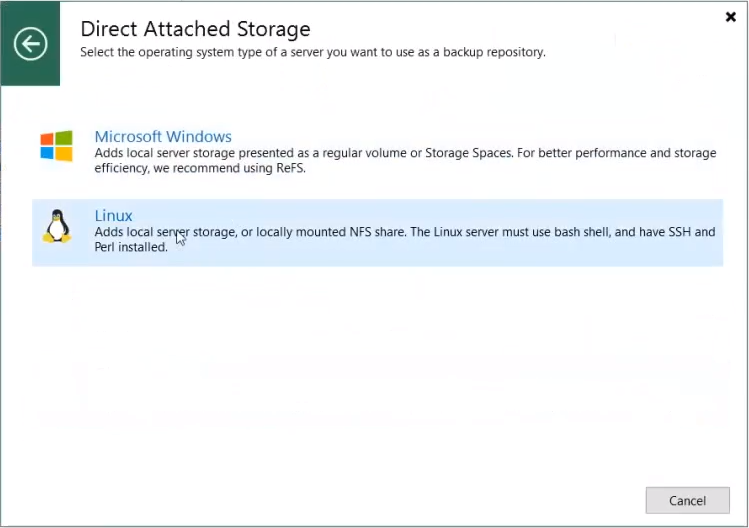
- Select Direct Attached Storage from the Add Backup Repository types.
- Select Linux from the Direct Attached Storage types.
- Enter a Name and Description for the target repository In the Name section of the New Backup Repository dialog and click Next.
- Click in the dropdown list and select the target server from the console list, then click Next.
-
Note: You can also click Add New in the Server section to add a new server to the console list using the New Linux Server dialog.
After a quick message appears while the system adds the selected server to the system configuration, the Repository section appears.
- Click Browse to find and select the repository in the file system.
- Under the server, expand mnt (for mount), then expand accentfs and click OK.
- Click Advanced and select Use per-VM backup files from the Storage Compatibility Settings dialog, then click OK.
- Click Next in the Repository section of the New Backup Repository dialog.
- Click Next in the Mount Server section.
- Confirm the components shown in the list and click Apply to continue.
- When the Message list shows Backup Repository has been added successfully, click Next to continue.
- Click Finish to complete the process.




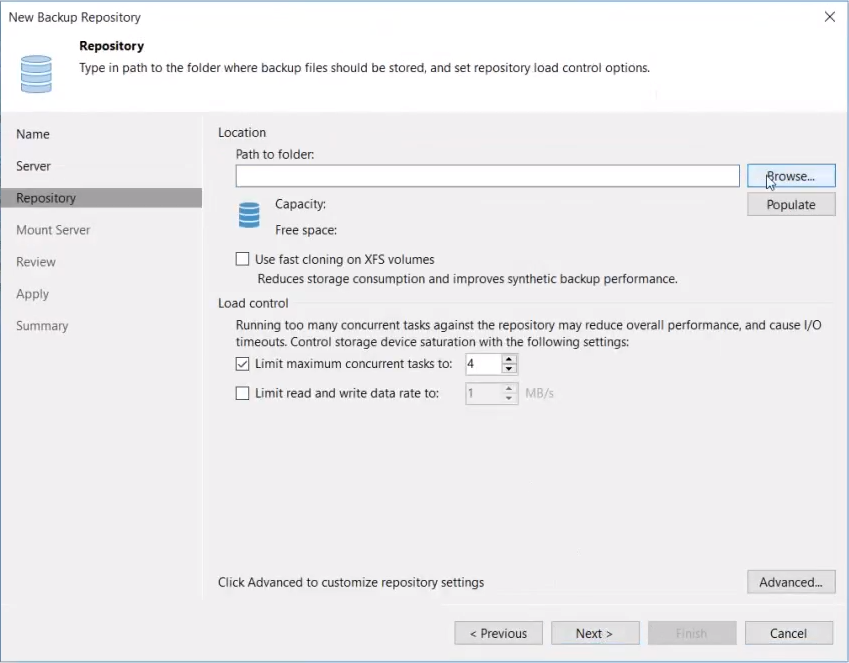
The Select Folder dialog appears where you can expand folders to show filenames and select the folder containing the server.
Note: Mnt in this step is used only as an example. Your choice of the folder location name for mounting the AccentFS share can be whatever you choose.
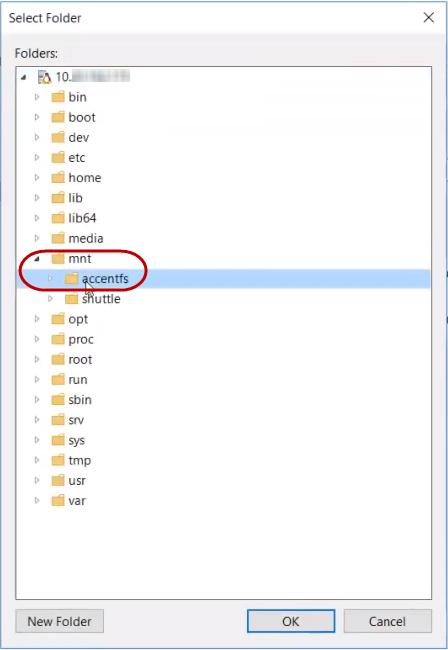
The Path to folder in the Repository section of the New Backup Repository dialog now shows the path and folder you selected.
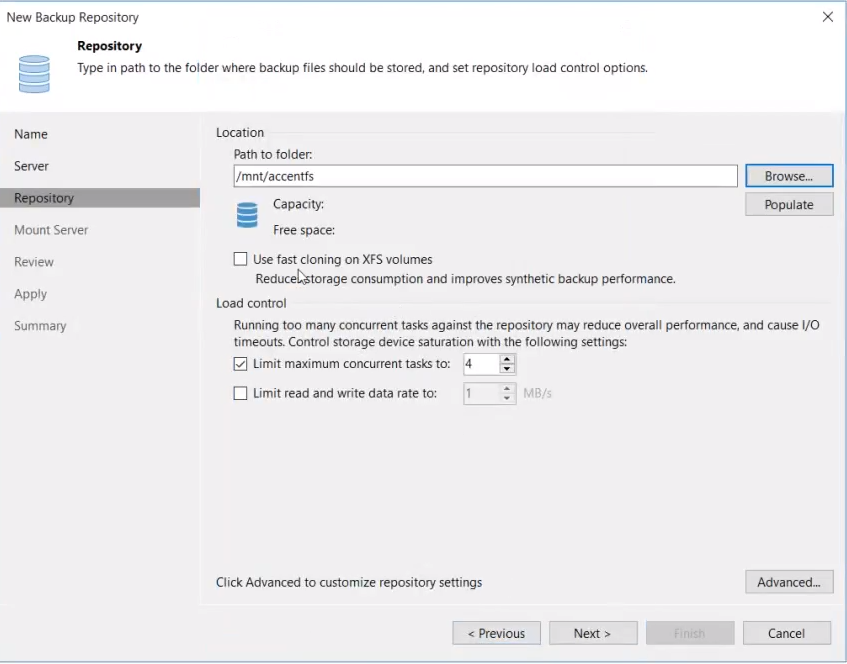

After a short processing notification, the Review section appears, showing the components to be processed on the target server.
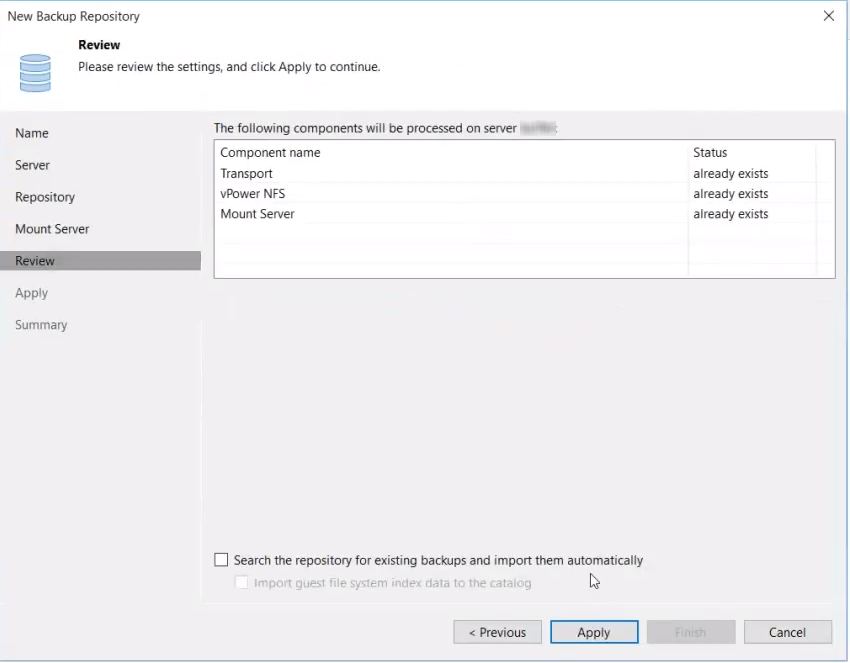
The Apply section shows a Message list of activity while the backup repository being configured and saved.

The Summary section shows the successful creation of the backup repository and details the backup folder, mount host and more.
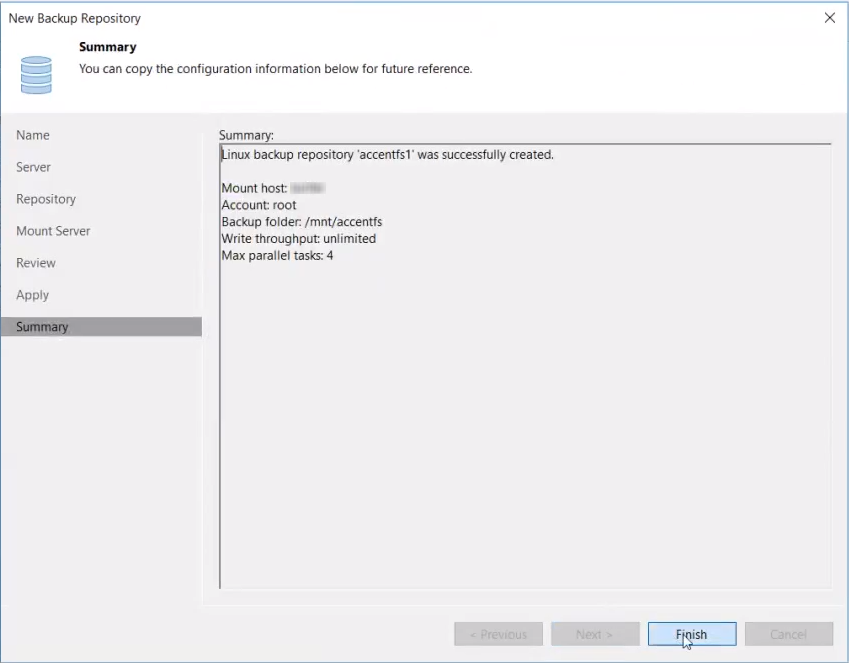
The newly created backup repository appears in the console list.
Manage Veeam
Use the following commands to manage Veeam agent integration.
Note: The CLI Admin (cliadmin) account must be enabled on the DXi. If you do not have the password for this account, contact the DXi administrator.
This command returns the current Veeam agent settings.
Command
syscli --get veeam
Example output
Output data:
AE state = aeDaeRunning
Enabled = disabled
Password is = locked
This command enables or disables access for the Veeam agent. Either the password and/or the key must be entered. The system will reboot if the enable state is changed. A reboot is not necessary for other options. The system will require a reboot if the access is enabled or disabled. A password change or a change of the memory threshold monitoring will not require a reboot.
Command
syscli --set veeam [--enable on|off] [--passwd lock|unlock] [--password <password>] [--enablememmon on|off] [--memthreshold <threshold>] [--cgroupslimit <limit>] [--containers <list>] [--deferreboot] [--sure]
Review the following attribute descriptions.
|
|
Enable access for the Veeam agent; either the password and or the key must be entered. The system will reboot if the enable state is changed. If only the password is changed, a reboot is not necessary. |
|
|
If specified, the Veeam agent login will be enabled or disabled. If the state is changed, the system will reboot. |
|
|
Specifies if a password access is allowed. |
|
|
If the password is not specified, the command will prompt for the password and it will not be echoed. |
--enablememmon on|off
|
Enables or disables memory threshold monitoring. Veeam must be enabled before the monitoring can be enabled. |
--memthreshold <threshold>
|
Specifies the memory threshold in bytes. |
--cgroupslimit <limit>
|
Amount of memory allocated for Veeam Concurrent Streams, value in GB. Must have DXi9000 with Enhanced CPU and Memory Configuration. If you need to determine if you DXi9000 can be enhanced for Veeam, open the System Management (GUI) status >hardware > Firmware Version and scroll until you see RAM information. The system must have 768 GB RAM to employ this feature. |
|
|
For Veeam 13, specifies which containers to start to handle access for VDMS. The parameter is a list of comma separated container indices. For example: "1,2"; "0" or "" to delete all containers. |
|
|
If specified, the reboot will be deferred until a time the user forces a reboot. |
|
|
If specified, this command will execute immediately without asking for confirmation. |
