|
|
The NAS App is compatible with Appliance Controller 2.0 and later. To install or update the NAS app, see Manage Applications for instructions about the App Store. |
You must configure StorNext NAS to authenticate users who will be accessing NAS shares. You can use the NAS app to configure the following authentication types for both non-clustered nodes and NAS clusters:
- Local authentication
- Microsoft Active Directory (AD)
- OpenLDAP with Kerberos (LDAP)
- OpenLDAP with Samba Schema (LDAPS)
Note: You cannot configure Apple OD authentication using the NAS app. However, if you configure this authentication type using the Appliance Controller Console, the app shows the configuration. See Apply Apple OD Authentication to NAS in the Appliance Controller Documentation Center.
When you create a NAS cluster using the NAS application, the app initially configures the cluster using local authentication with the default sysadmin user. If authentication has already been defined for nodes that will be part of a NAS cluster, the master node synchronizes its authentication configuration to all other nodes in the cluster.
We recommend configuring authentication once, before users access shares. If you change the authentication type later, users will be disconnected from shares and will need to reconnect. Files and folders created in the share could have incompatible owner, group, and permission settings between the new and previous authentication.
Reminder
If you change the administrator's password on the directory service server, remember to update the password in the NAS app to ensure seamless operation.
Also, any time you update the authentication configuration, the app requires you to reenter the password.
If you are not using a directory service to authenticate user access, you must configure local authentication.
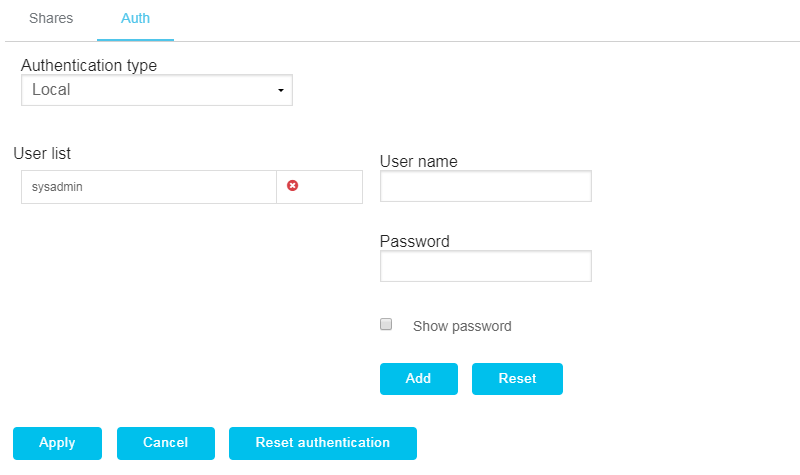
- Click the NAS cluster name hyperlink on the main page of the app to configure the authentication of a NAS cluster.
OR
Click the NAS node name hyperlink in the list of non-clustered nodes to configure the authentication of a single NAS node.
- Click the Auth tab.
- Select Local in the Authentication type list.
Note: If you are changing authentication to local from a directory service, you need to apply the authentication type change before you can add local users.
- Enter the user for whom to allow access to NAS shares in the User name field.
- Enter the password associated with the user name account in the Password field.
- Click Add.
The user is shown in the User list.
If needed, click
 to delete the user from the list.
 - Repeat steps 4–6 for each additional user.
- Click Apply.
- The NAS app communicates with the Appliance Controller, showing the steps of the configuration as it completes. Click OK when the configuration is complete to return to the main page of the app.
The authentication changes are applied.
If the configuration fails, you can review and copy the configuration details for troubleshooting.
You can apply your environment's existing Microsoft Active Directory (AD) authentication services to StorNext NAS. Through AD authentication, clients can access NAS shares only if they are authenticated by the AD server(s).
Note: If you configure AD to authenticate users accessing your NAS cluster, you must add your NAS VIP to the same DNS as your AD server. Otherwise, users authenticated through AD are unable to access the NAS shares through the NAS cluster.
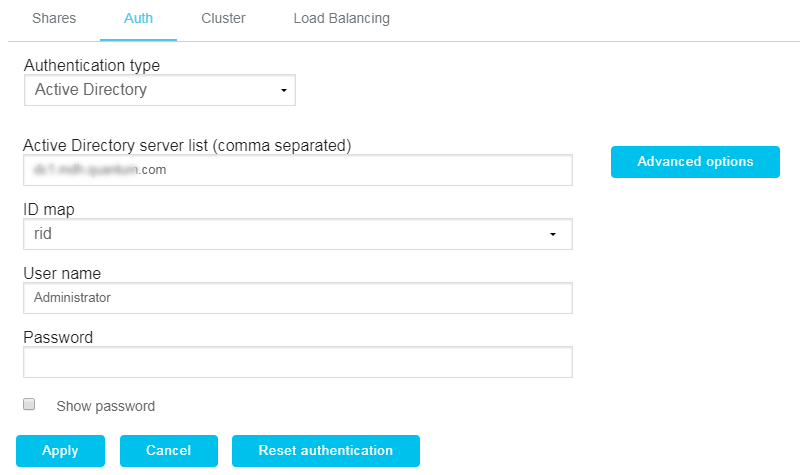
- Click the NAS cluster name hyperlink on the main page of the app to configure the authentication of a NAS cluster.
OR
Click the NAS node name hyperlink in the list of non-clustered nodes to configure the authentication of a single NAS node.
- Click the Auth tab.
- Select Active Directory in the Authentication type list.
- Enter the IP address or hostname where the Active Directory (AD) server is running in the Active Directory Server field.
Additional Information
If your AD server uses SSL, then the port defaults to 636. If your AD server does not use SSL, the port is set to 389.
If you are defining multiple IP addresses or hostnames, separate each item with a comma.
- Select the method used to map UNIX IDs from Active Directory user accounts in the ID map list.
Additional Information
 RFC2307
The RFC2307 ID map option uses the AD UNIX Attributes mechanism. This mechanism guarantees consistency in user IDs (UIDs) and group IDs (GIDs) when connecting to multiple gateways across your environment.
When you apply the configuration, StorNext NAS verifies whether RFC2307 has been configured on the AD server.
- If it has been configured, then StorNext NAS uses RFC2307 as the default ID map.
- If it has not been configured, then the authentication configuration returns an error.
To set up the RFC2307 extension for AD, see the following Microsoft instructions: https://technet.microsoft.com/en-us/library/cc754871(v=ws.11).aspx.
 RID
RIDThe Relative Identifier (RID) map option converts a Security Identifier (SID) to a RID. This method allows all Quantum appliances to see the same UID.
The following algorithm is used to calculate RIDs:
RID portion of the SID + 1000For example, User A has the following SID:
S-1-5-21-2500398869-2327988562-2535538314-1117By applying the algorithm, User A would then have the following RID:
uid=1217 TDB
TDBThe Trivial Database (TDB) ID map option tells Samba to generate UIDs and GIDs—within the given default range or custom range—locally on demand.
If you have trusted domain environments joined to AD, you can map users with TDB IDs. We recommend mapping non-trusted domain users with RID map options.
 Determine the Best ID Map for Your Environment
Use the following table to determine the appropriate ID map value, depending on whether you are running StorNext NAS on multiple nodes in your environment and whether the RFC2307 extension has been configured.
Multiple Gateways AD RFC2307 Extension ID Map Yes
Yes
RFC2307
No
Yes
RFC2307
Yes
No
RID or TDB
No
No
RID or TDB
If you change from your current mapping configuration to a new mapping configuration, you will also need to manually reconcile the mapping to any existing files within StorNext that users accessed under the original mapping. Otherwise, users may not be able to access these files.
- Enter the administrative user or user with admin privileges in the User name field.
- Enter the password associated with the user name account in the Password field.
- Optionally, click Advanced options to access additional AD options.
- Enter the AD machine organizational unit (OU) to which to limit authentication in the Organizational unit field.
Additional Information
OUs are containers within AD. Use them to organize users, groups, or machines into units to which to apply Group Policy settings or account permissions. For example, if you want to limit authentication to the NAS machine unit, which is contained in the Appliances location, you would enter Appliances/NAS as the AD OU.
- Enter the VIP of the NAS node or cluster to which to limit authentication in the Machine account field. If blank, the default is the master node's VIP.
- Enter a comma-separated list of AD domain controller server(s) to exclude from authentication services in the Domain exclude list field.
Specify servers by entering the server's DNS name or IP address. Keep in mind that if you enter an IP address, the NAS controller does not map it to a DNS entry.
- Select the Allow trusted domains check box to allow access from all domains in the Active Directory "forest."
Additional Information
The AD forest is the complete instance of AD for your organization. It is the top-level container for your organization's AD domains. If you allow trusted domains, users from all domains in the AD forest will be able to connect to NAS shares. However, depending on your organization, this could be a large list and firewalls might be in place, causing the authentication configuration to time out.
- Click OK to close the Advanced Active Directory Options box.
- Enter the AD machine organizational unit (OU) to which to limit authentication in the Organizational unit field.
- Click Apply.
- The NAS app communicates with the Appliance Controller, showing the steps of the configuration as it completes. Click OK when the configuration is complete to return to the main page of the app.
The authentication changes are applied.
If the configuration fails, you can review and copy the configuration details for troubleshooting.
You can apply your environment's existing OpenLDAP authentication services to StorNext NAS. Through this authentication configuration, clients can access NAS shares only if they are authenticated by the OpenLDAP service.
Note: If you configure OpenLDAP to authenticate users accessing your NAS cluster, you must add your NAS VIP to the same DNS as your LDAP server. Otherwise, users authenticated through OpenLDAP are unable to access the NAS shares through the NAS cluster.
When you configure OpenLDAP with Kerberos, the Kerberos server manages user-account passwords, and Samba relies on the Kerberos server to authenticate user accounts as follows:
- The Kerberos service principal—contained within the generated Kerberos keytab file—is set up as the authenticated user. StorNext NAS works behind the scenes to generate and supply the Kerberos keytab file for user authentication.
- The Kerberos keytab file enables LDAP authentication without needing to specify an administrator user and password.
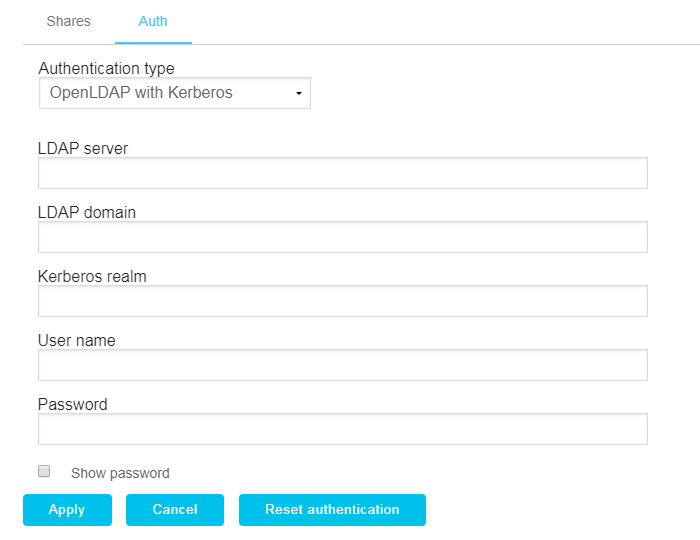
- Click the NAS cluster name hyperlink on the main page of the app to configure the authentication of a NAS cluster.
OR
Click the NAS node name hyperlink in the list of non-clustered nodes to configure the authentication of a single NAS node.
- Click the Auth tab.
- Select Open LDAP with Kerberos in the Authentication type list.
- Enter the IP address or hostname where the LDAP server is running in the LDAP server field.
Additional Information
The port is set to 636 to ensure encryption. If Appliance Controller cannot access port 636, it will redirect to port 389.
- Enter the domain of the LDAP server in the LDAP domain field.
- Enter your Kerberos realm. If blank, the LDAP domain value is used for the Kerberos realm.
- Enter the administrative user, user with admin privileges, or Kerberos service principal with admin privileges in the User name field.
- Enter the password associated with the user name account in the Password field.
- Click Apply.
- The NAS app communicates with the Appliance Controller, showing the steps of the configuration as it completes. Click OK when the configuration is complete to return to the main page of the app.
The authentication changes are applied.
If the configuration fails, you can review and copy the configuration details for troubleshooting.
You can apply your environment's existing OpenLDAP authentication services to StorNext NAS. Through this authentication configuration, clients can access NAS shares only if they are authenticated by the OpenLDAP service.
Note: If you configure OpenLDAP to authenticate users accessing your NAS cluster, you must add your NAS VIP to the same DNS as your LDAP server. Otherwise, users authenticated through OpenLDAP are unable to access the NAS shares through the NAS cluster.
If your remote OpenLDAP server supports Samba Version 3 LDAP schema extensions, then you can configure OpenLDAP with Samba extensions.
In this configuration, StorNext NAS uses Samba to manage attributes in the OpenLDAP remote server. Make sure to configure the OpenLDAP server to accommodate Samba extensions.
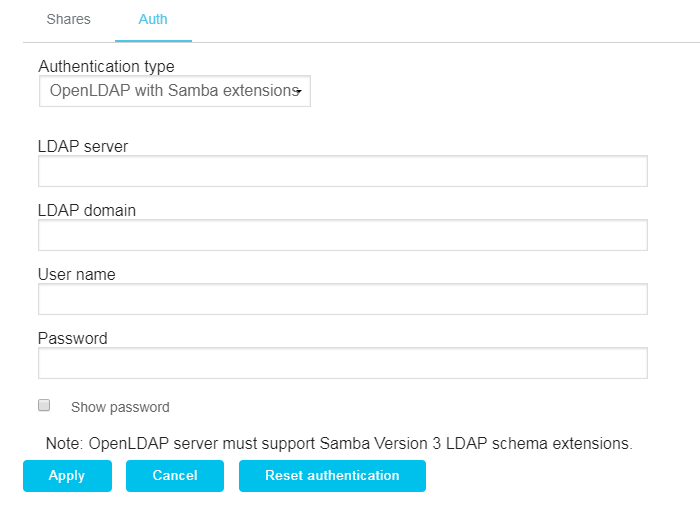
- Click the NAS cluster name hyperlink on the main page of the app to configure the authentication of a NAS cluster.
OR
Click the NAS node name hyperlink in the list of non-clustered nodes to configure the authentication of a single NAS node.
- Click the Auth tab.
- Select Open LDAP with Samba extensions in the Authentication type list.
- Enter the IP address or hostname where the LDAP server is running in the LDAP server field.
Additional Information
The port is set to 636 to ensure encryption. If Appliance Controller cannot access port 636, it will redirect to port 389.
- Enter the domain of the LDAP server in the LDAP domain field.
- Enter the administrative user or user with admin privileges in the User name field.
- Enter the password associated with the user name account in the Password field.
- Click Apply.
- The NAS app communicates with the Appliance Controller, showing the steps of the configuration as it completes. Click OK when the configuration is complete to return to the main page of the app.
The authentication changes are applied.
If the configuration fails, you can review and copy the configuration details for troubleshooting.
If needed, you can return the authentication type to the default local authentication.
- Click the NAS cluster name hyperlink on the main page of the app to configure the authentication of a NAS cluster.
OR
Click the NAS node name hyperlink in the list of non-clustered nodes to configure the authentication of a single NAS node.
- Click the Auth tab.
- Click Reset authentication.
- Click OK to confirm you want to reset the NAS authentication.
- The NAS app communicates with the Appliance Controller, showing the steps of the configuration as it completes. Click OK when the configuration is complete to return to the main page of the app.
The authentication type is local with the default sysadmin user.
If the configuration fails, you can review and copy the configuration details for troubleshooting.
What's Next?
If you are configuring a single node, the next step is to Configure NAS Shares.
If you are configuring a NAS cluster, the next step is to Configure NAS Failover and Load Distribution.
