|
|
The NAS App is compatible with Appliance Controller 2.0 and later. To install or update the NAS app, see Manage Applications for instructions about the App Store. |
We recommend configuring authentication once, before users access shares. If you change the authentication type later, users will be disconnected from shares and will need to reconnect. Files and folders created in the share could have incompatible owner, group, and permission settings between the new and previous authentication.

Note: The example above shows the NAS app for a single node. Additional tabs are available for a NAS cluster.
- Click the NAS cluster name hyperlink on the main page of the app to configure shares for a NAS cluster.
OR
Click the NAS node name hyperlink in the list of non-clustered nodes to configure shares for a single NAS node.
- If needed, click the Shares tab.
The view defaults to the Shares tab if authentication is configured.
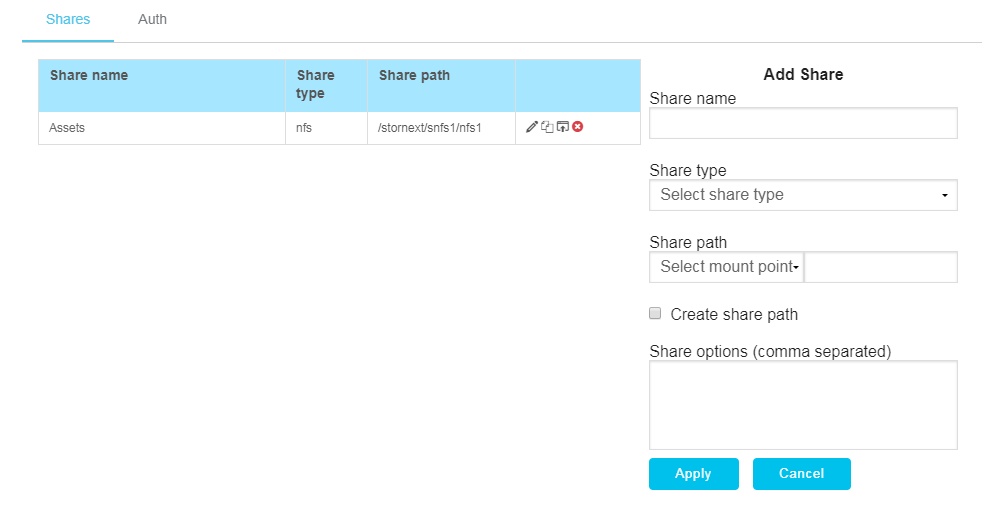
- Complete the Add Share form.
Share name
The name of the share visible to the users.
This value cannot be changed later. To change the name, you will need to delete the share and add it again using the new name.
Share type
SMB or NFS. This value cannot be changed later.
Share path
- Select the StorNext volume (file system) to which the share's directory is added or created.
This value cannot be changed after committing the share.
- Enter the path of the directory being exported or shared, relative to the StorNext volume (file system) you selected. Example: smb_share1
This value cannot be changed after committing the share.
- If the directory does not exist, you can select the Create share path check box to create it.
Creating the directory this way assigns default ownership settings. See Change Group and Permission Settings for a Share Directory for details.
Share options
If applicable, enter the options for the share. Generally, options are a way to grant or restrict access to the share. Separate multiple options by a comma. For options that can have multiple values, separate the values by a space. If you leave this field blank, the default options are used.
The
nfshostsoption specifies clients or networks that are authorized to mount the NFS file system. If you do not define clients or networks for thenfshostsoption, then all hosts will be able to mount the NFS share.See SMB Share Options or NFS Share Options in the Appliance Controller Documentation Center for more information about export options, including the current StorNext NAS default options and the
nfshostsoption. - Click Apply.
- The NAS app communicates with the Appliance Controller, showing the steps of the configuration as it completes. Click OK when the configuration is complete to return to the main page of the app.
The share changes are applied.
If the configuration fails, you can review and copy the configuration details for troubleshooting.
If you create share directories using the NAS application, default ownership settings are assigned. If you configure your NAS gateway to use Microsoft Active Directory, the share directory will have the UID and GID of the Active Directory administrative user. For all other authentication types, the directory created is owned by the sysadmin user.
If the authentication type is Active Directory, and StorNextis at version 5.3.1 and above, the admin user specified when setting up the NAS authentication can use the Windows Security tab for the directory to assign permissions.
For other authentication types, the sysadmin user can specify groups and assign permissions, using the command-line interface.
To change the group and permission settings for a directory using the command-line interface on the NAS node:
- Open an SSH connection to the appropriate server node and use the IP address assigned to the node on the Management or LAN Client network, or the IP assigned to the Service Port, depending on your access method.
- Log in to the command line using the following credentials:
- User name:
stornext - Password:
<stornext user account password>Note: "
password" is the default password for the stornext user account. If the password has been changed, use the current password. Beginning with StorNext 7.0.2, you must change the default password for the stornext user account. As of StorNext 7.0.2, the first time you log in, you will be prompted to change the password to a different one.
- User name:
- Enter
sudo rootshto gain root user access. - Enter the password for the
stornextuser account again.
- Enter df -h to see the existing mounted StorNext volumes (file systems) on the system. Press Enter.
- Enter cd /stornext/<StorNext_file_system_name> to change the directory to the StorNext file system(snfs) with the NAS share directory. Press Enter. For example:
cd /stornext/fs1 - Enter ls -l to list the file system's directories.
- Enter chgrp <group_name> <directory_name> to change the group ownership of a directory. Press Enter. For example:
chgrp Users smb_share1(the "Users" group is associated with the smb_share1 directory) - Enter chmod <directory_permissions> <directory_name> to change the directory permissions to the appropriate level. Press Enter. For example:
chmod 777 smb_share1Common directory permissions include:
- 777 specifies that everyone (Owner of the directory, Group assigned to the directory, all Other users) has read, write, and execute permissions. The directory can be accessed by direct-mounted clients.
- 775 specifies that the Owner and Group have permissions to read, write, and execute. Others can read and execute, but cannot make changes to the directory.
- 770 specifies that the Owner and Group have permissions to read, write, and execute. Others do not have permissions to the directory.
- 755 specifies that the Owner has permissions to read, write, and execute. Everyone else can read and execute, but cannot make changes to the directory.
- 750 specifies that the Owner has permissions to read, write, and execute. The Group has permissions to read and execute, but cannot make changes to the directory. Others do not have permissions to the directory.
- Enter ls -la to verify the directory and its permissions. Press Enter.
- Repeat the steps to change group and permission settings on other directories, as needed.
- Close the SSH session for the node.
- Click the NAS cluster name hyperlink on the main page of the app to configure shares for a NAS cluster.
OR
Click the NAS node name hyperlink in the list of non-clustered nodes to configure shares for a single NAS node.
- If needed, click the Shares tab.
The view defaults to the Shares tab if authentication is configured.
- Click
 in share's row to open the Edit Share form.
 - Edit the share options as needed.
- Click Apply.
- The NAS app communicates with the Appliance Controller, showing the steps of the configuration as it completes. Click OK when the configuration is complete to return to the main page of the app.
The share changes are applied.
If the configuration fails, you can review and copy the configuration details for troubleshooting.
- Click the NAS cluster name hyperlink on the main page of the app to configure shares for a NAS cluster.
OR
Click the NAS node name hyperlink in the list of non-clustered nodes to configure shares for a single NAS node.
- If needed, click the Shares tab.
The view defaults to the Shares tab if authentication is configured.
- Click
 in the share's row to open the Add Share form with the share type and share options copied.
 - Enter the share name and share path, and edit the share options as needed.
- Click Apply.
- The NAS app communicates with the Appliance Controller, showing the steps of the configuration as it completes. Click OK when the configuration is complete to return to the main page of the app.
The share changes are applied.
If the configuration fails, you can review and copy the configuration details for troubleshooting.
You can remove SMB and NFS shares from the StorNext NAS configuration, and in turn, prohibit the shares from being exported from StorNext NAS. Removing SMB and NFS shares from the configuration does not remove the share directory or any of its files.
- Click the NAS cluster name hyperlink on the main page of the app to configure shares for a NAS cluster.
OR
Click the NAS node name hyperlink in the list of non-clustered nodes to configure shares for a single NAS node.
- If needed, click the Shares tab.
The view defaults to the Shares tab if authentication is configured.
- Click
 in the share's row.
 - Click OK to confirm you want to delete the share.
- The NAS app communicates with the Appliance Controller, showing the steps of the configuration as it completes. Click OK when the configuration is complete to return to the main page of the app.
The share is removed from the StorNext NAS configuration.
If the configuration fails, you can review and copy the configuration details for troubleshooting.
The NAS app provides the following information for each share:
- Share name
- Access point: Hostname and IP address information. The following table shows how the app derives the access point information.
- Remote folder path: You can provide this information to users who need to connect to the share. SMB shares use the share name, while NFS shares use the share path.
| NAS Node or Cluster | Load Balancing | Share Type | Access Point |
|---|---|---|---|
|
Node |
N/A |
NFS |
Node hostname |
|
Node |
N/A |
SMB |
Node hostname |
|
Cluster |
Yes |
NFS |
NAS cluster hostname |
|
Cluster |
Yes |
SMB |
NAS cluster hostname |
|
Cluster |
No |
NFS |
Master node hostname for the NAS cluster (can be hostname of any node in the NAS cluster) (master VIP if NFSv4 configuration) |
|
Cluster |
No |
SMB |
Master VIP |
To view the access point and remote folder path:
- Click the NAS cluster name hyperlink on the main page of the app to configure shares for a NAS cluster.
OR
Click the NAS node name hyperlink in the list of non-clustered nodes to configure shares for a single NAS node.
- If needed, click the Shares tab.
The view defaults to the Shares tab if authentication is configured.
- Click
 in share's row to open the Remote Folder Path Information box.
 - Copy the information as needed.
- Click OK when you are done.


