|
|
Install Drives Into the QXS 12-Drive and 24-Drive Chassis |

Note: DO NOT install hard drives for Xcellis Foundation systems, since they are pre-installed in the QXS-312 RAID chassis. Instead, verify the drives are fully-seated in the chassis. For systems, continue to Connect the Power Cables and Power on the QXS Chassis.
The following applies to , , , and systems.
Prerequisites
Review the following information before populating the 12-drive or 24-drive chassis.
- Preventing electrostatic discharge. See Take ESD Precautions.
Installation Steps
- You will use the same processes for removing and installing the bezel for the 12- and 24-drive chassis:
- To install the drives, use the appropriate installation task for your chassis type.
- Step 2a: Install the LFF Drives into the 2U12 Chassis
- Step 2b: Install the Drives into the 2U24 Chassis
For both chassis types, the drives are located behind the bezel. The difference between the two is that the drives are installed horizontally in the 12-drive chassis but vertically in the 24-drive chassis.
Important Considerations
- For the 2U12 chassis, always install the first drive into slot 0, and then populate slots 1-11 sequentially with any additional drives.
- For the 2U24 chassis, always install the first drive into slot 0, and then populate slots 1-23 sequentially with any additional drives.
- For proper cooling of the chassis, populate any empty drive slots with an AMS insert.
- With the LEDs oriented to the left, slide the drive module into the drive slot as far as it will go. When the drive is inserted all the way, you should hear a "click."
Figure 1: Installing a drive module

- Verify that you have inserted the drive module into the slot as far as it will go.
This step is important to ensure that the module is firmly seated in the chassis midplane.
- Squeeze the latch release flanges together, and pull the latch while rotating it upward until it is fully open.
- With the LEDs oriented to the bottom, slide the drive module into the drive slot as far as it will go.
Figure 2: Installing a drive module
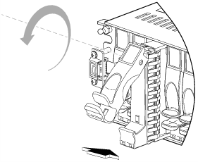
- Rotate the latch downward until it clicks closed to firmly seat the drive module in the chassis midplane.
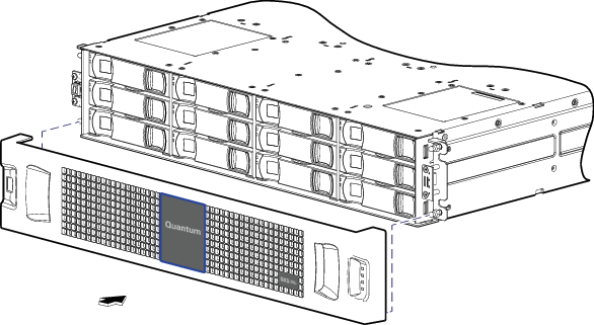
- Orient the bezel to align its back side with the front face of the chassis as shown in the figure below.
- Face the front of the chassis, and while supporting the base of the bezel, position it so that the mounting sleeves within the integrated ear caps align with the ball studs.
- Gently push-fit the bezel onto the ball studs to attach the bezel to the front of the chassis.
Figure 3: Installing the Bezel (2U 12-drive chassis shown in this example)
Continue to Install the QXS SFPs >>
* Back to Checklist: QXS Chassis Installation *
* Back to Xcellis Foundation Hardware Installation Overview and Checklist (for systems). *
*Back to Hardware Installation Overview and Checklist *
