|
|
Configure Network Settings for Your Laptop |

The following applies to , , , and systems.
The simplest way to access the is to configure the network settings on your laptop to use DHCP network settings (also known as the Zero-configuration networking [zeroconf] method) to create the direct, local link connection from the laptop to server node 2.
After completing the installation, you will want to reset your laptop's network settings, if it wasn't set to use DHCP originally, so it can reconnect to your network. See Reset Laptop Settings.
Use one of the following tasks, depending on your operating system, to configure your laptop.
Important Considerations
- Do not connect the Service Port (Eth0) to your network. Doing so may cause accessibility issues with your network.
- To use the Connect Install App, you MUST connect the Ethernet cable to the server node 2 Service Port. DO NOT connect the Ethernet cable to the server node 1 Service Port — the Connect Install App will not function from the Service Port of node 1.
- For macOS, beginning with macOS 10.12.6 and later, the default DHCP address assigns an IP address on a different 169. subnet than the 169. subnet used by the StorNext StorNext Connect Install App. If your laptop is running macOS 10.12.6 and later, do not configure the system with DHCP for the network connection, but instead use the Example: Configure Mac TCP / IPV4 Settings (static IP address) procedure instead.
- You may also use a static IP address when connecting from a Windows laptop. See Example: Configure Windows TCP / IPV4 Settings (static IP address).
Note: This procedure shows the steps for configuring DHCP on a laptop running macOS X 10.9.x. The steps may be different if you are using another version of macOS. There is also an issue using DHCP IP address settings with some macOS versions. See macOS DHCP issue in the Important Considerations section above. DO NOT use these steps for macOS 10.12.6 and later. Use the Example: Configure Mac TCP / IPV4 Settings (static IP address) procedure instead.
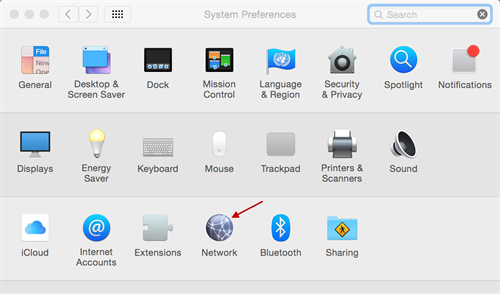
- In the macOS, select Apple menu > System Preferences > Network.
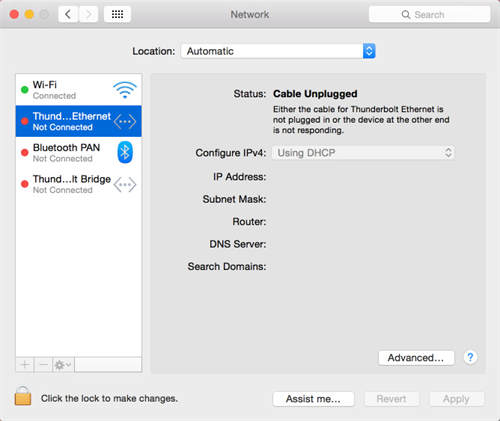
- Select the Ethernet connection interface.
- Capture the current selections displayed in the dialog box so you can reset the network connection with these options after configuring the system.
- From the list of network connection options available, select the Ethernet connection.
- If needed, click the lock icon in the lower lefthand corner of the dialog to unlock the network dialog.
- In the Configure IPv4 list, select Using DHCP (if not already selected).
- Click Apply.
- If needed, click the lock icon in the lower lefthand corner of the dialog to lock the network dialog again.
- Wait for the system to apply the above settings (may take a minute or two), and then verify the following:
- An IP address of 169.254.x.x has been assigned. If this is not correct, set the settings manually. See Configure Network Settings for Your Laptop.
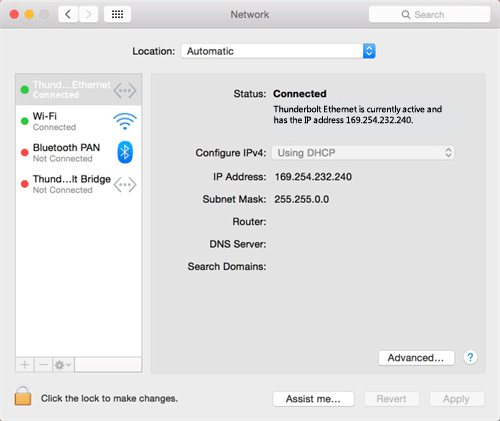
- When the Ethernet connection is enabled and is active, you will see its icon turn to green. When the ethernet cable is connected to a the laptop, the status on the right side of the dialog will display "Status: Connected".
- Close the Network dialog.
Keep in mind that you will need these settings to reset your laptop to connect to your network.
Note: This procedure shows the steps for configuring DHCP on a laptop running Windows 7. The steps will be different if you are using another operating system, or a different version of Windows.
- Access the Network Connects dialog box.
 Steps
Steps- Select the Start Menu.
- In the Search programs and files field, enter View Network Connections.
- From the displayed return list, select View network connections.
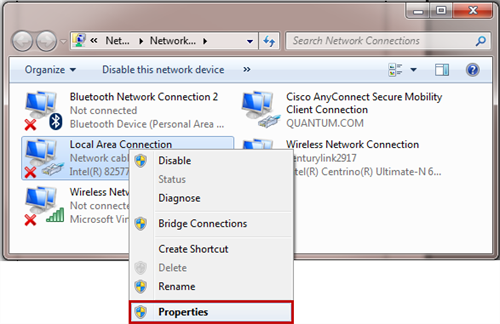
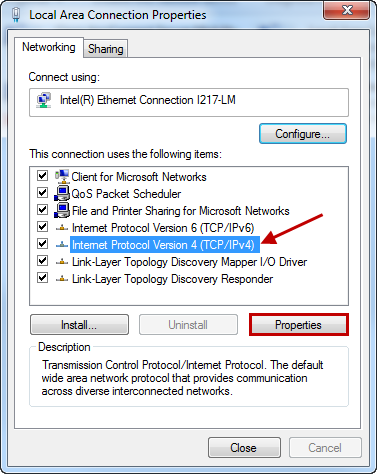
- From the Network Connections dialog, right-click on the Ethernet port network connection — typically Local Area Connection — and select Properties.
- Capture the current selections displayed in the Local Area Connection Properties dialog box so you can reset the network connection using these options after configuring the system.
Keep in mind that you will need these settings to reset your laptop to connect to your network.
- Select Internet Protocol Version 4 (TCP / IPv4) from the list of connections, and then click Properties.
- From the Internet Protocol Version 4 (TCP/IPv4) Properties dialog box, do the following:
Select the Obtain an IP address automatically radio button.
- Select the Obtain DNS server address automatically radio button.
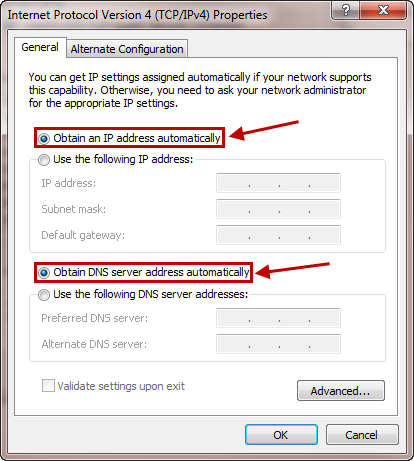
- Click OK, and then click Close.
Wait at least 2 minutes to ensure the laptop network connection is enabled.
- TCP/IPv4 address - 169.254.21.200
- Subnet mask - 255.255.255.0
Note: This procedure shows the steps for configuring DHCP on a laptop running macOS X 10.9.x. The steps may be different if you are using another version of macOS.
- In the macOS, select Apple menu > System Preferences > Network.
- Capture the current selections displayed in the dialog box so you can reset the network connection with these options after configuring the system.
- From the list of network connection options available, select the Ethernet connection.
- If needed, click the lock icon in the lower lefthand corner of the dialog to unlock the network dialog.
- In the Configure IPv4 list, select Manually.
- Enter the IP address to use for the network connection:
- TCP/IPv4 address - 169.254.21.200
- Subnet mask - 255.255.255.0
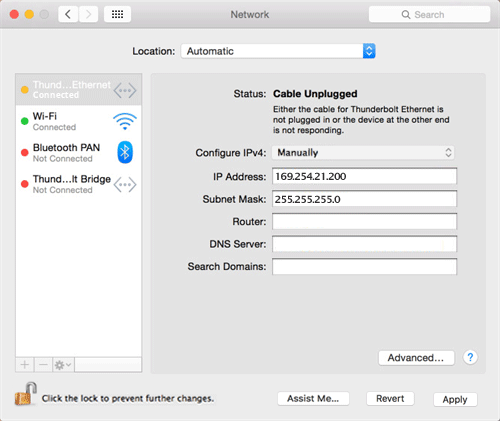
- Click Apply.
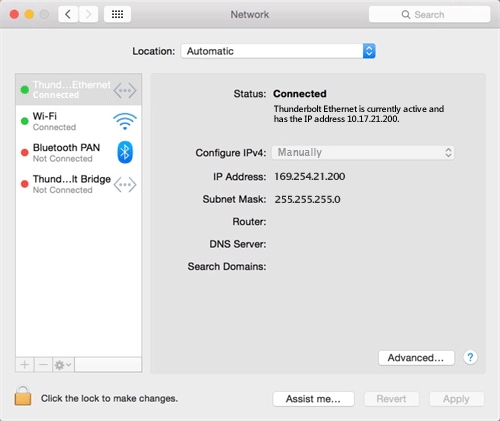
- Wait for the system to apply the above settings (may take a minute or two), and then verify the following:
- When the Ethernet connection has been enabled and is active, you will see its icon turn to green. After the network cable is connected, the status on the right side of the dialog will display "Status: Connected", as shown here:
- When the Ethernet connection has been enabled and is active, you will see its icon turn to green. After the network cable is connected, the status on the right side of the dialog will display "Status: Connected", as shown here:
- If desired, click the lock icon in the lower lefthand corner of the dialog to lock the network dialog again.
- Close the Network dialog.
Keep in mind that you will need these settings to reset your laptop to connect to your network.
The Network settings will be set.
Note: This procedure shows the steps for configuring a static network connection on a laptop running Windows 7. The steps will be different if you are using another operating system, or a different version of Windows.
The following steps may differ for your situation, depending on your version of Windows.
- Access the Network Connects dialog box.Steps
- Select the Start Menu.
- In the Search programs and files field, enter View Network Connections.
- From the displayed return list, select View network connections.
- From the Network Connections dialog, right-click on the Ethernet port network connection — typically Local Area Connection — and select Properties.
-
Capture the current selections displayed in the Local Area Connection Properties dialog box so you can reset the network connection using these options after configuring the system.
Keep in mind that you will need these settings to reset your laptop to connect to your network.
- Select Internet Protocol Version 4 (TCP / IPv4) from the list of connections, and then click Properties.
- From the list of connections, select Internet Protocol Version 4 (TCP/IPv4), and then click Properties to display the Internet Protocol Version 4 (TCP/IPv4) Properties dialog box.
We recommend writing down the settings in this dialog box before you change them. You can refer to this information when you set the the settings back to their original values — after you are finished using this local network connection.
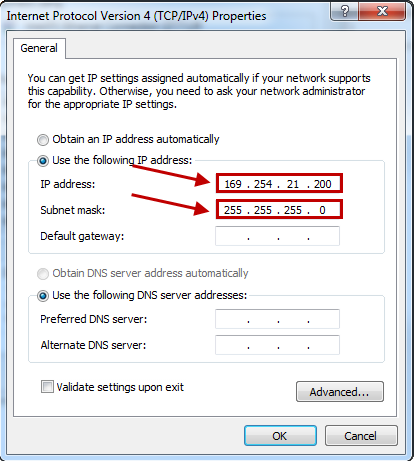
- Click the Use the following IP address radio button, and enter the appropriate IP address and Subnet mask values:
- TCP/IPv4 address - 169.254.21.200
- Subnet mask - 255.255.255.0
- Click OK.
- Click Close.
Wait at least two minutes for the laptop to enable the network connection.
Continue to Connect to the Service Port and Launch the StorNext Connect Install App >>
* Back to System Configuration: StorNext Connect Install App *
* Back to Xcellis Foundation Hardware Installation Overview and Checklist (for systems). *
* Back to Hardware Installation Overview and Checklist *
