Manage a File Replication Task
Use the following tasks to manage a file replication task.
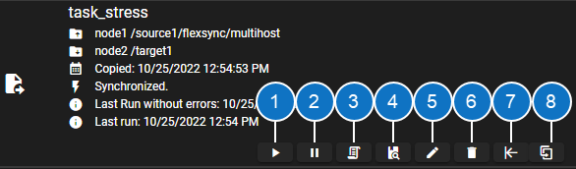
| Item | Description |
|---|---|
| 1 |
This button starts the task (see Start a Task). This process allows you to automatically replicate your local directory to your target directory according to the configured task schedule. |
| 2 |
This button suspends the task (see Suspend a Task). If the task is suspended, then click the button to resume the task (see Resume a Task). |
| 3 |
This button opens the task report dialog (see Work with a Task Report). |
| 4 |
This button initiates a scan of your entire source directory to locate any files that might have been missed and not copied to your repository, even if the task normally only examines recent activity (see Full Cross-check). |
| 5 |
This button edits the task (see Edit a Task). |
| 6 |
This button deletes the task (see Delete a Task). |
| 7 |
This button reverses the task (see Reverse a Task). |
| 8 |
This button clones the task (see Clone a Task). |
-
Log in to the FlexSync Dashboard.
 Access the FlexSync Dashboard
Do the following to access your FlexSync dashboard.
Prerequisites
- You will need a FlexSync user account before you can create a replication task. See Step 4: Manage FlexSync Users.
- In order to access the FlexSync GUI, the appliance host name must be resolvable through a DNS name or IP address. If you use a DNS name, it must be resolvable on the DNS or it must have a local entry in the local appliance /etc/hosts file.
-
Access the StorNext User Interface (new UI introduced in StorNext 7.0.1).
-
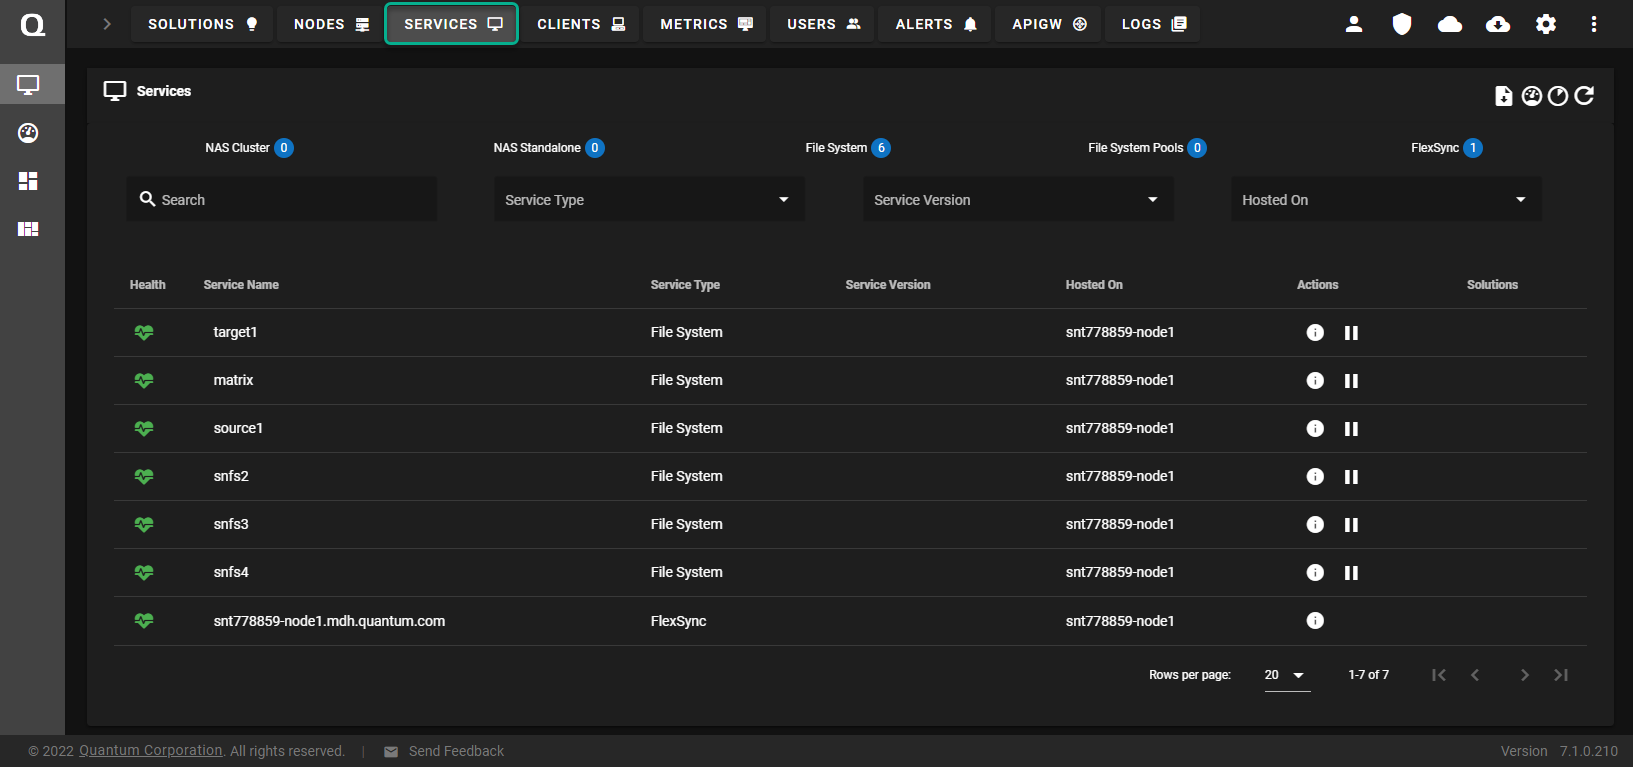
On the top navigation, click Services. The Services page appears.
-
Under the Service Name heading, click the service name that corresponds with your FlexSync service.
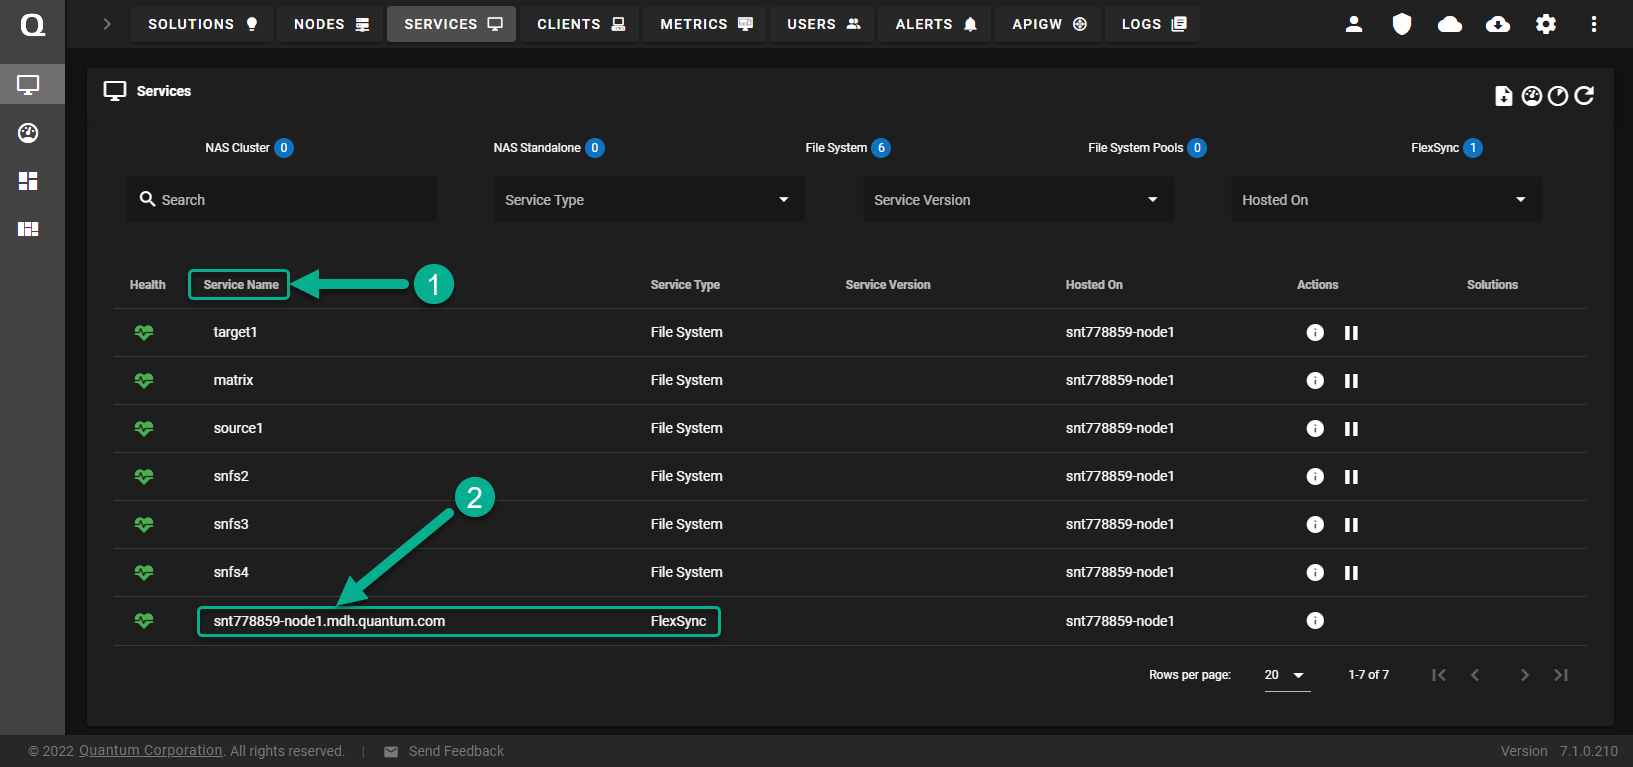
The FlexSync dashboard appears.
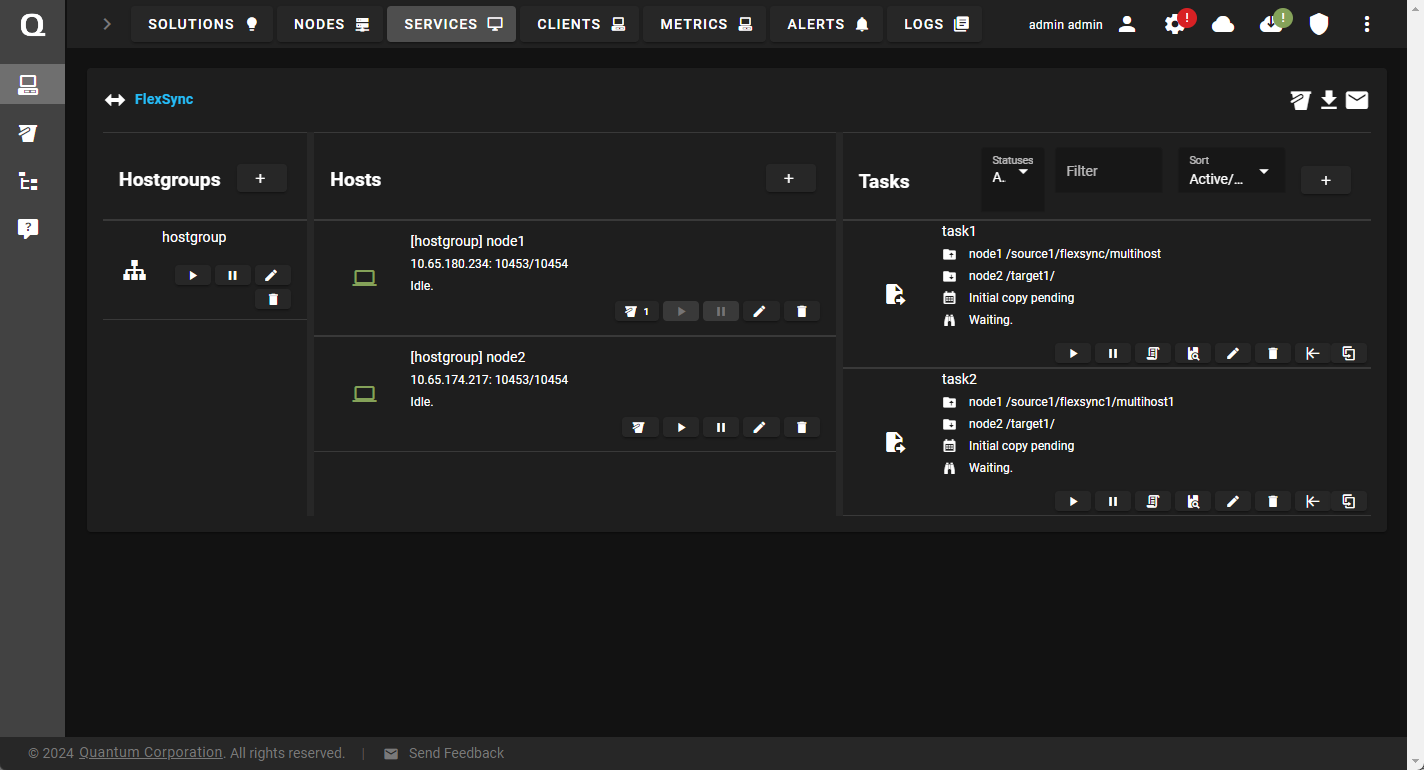
- In the Tasks column, click Start task to initiate the replication task.
-
Log in to the FlexSync Dashboard.
Access the FlexSync Dashboard
Do the following to access your FlexSync dashboard.
Prerequisites
- You will need a FlexSync user account before you can create a replication task. See Step 4: Manage FlexSync Users.
- In order to access the FlexSync GUI, the appliance host name must be resolvable through a DNS name or IP address. If you use a DNS name, it must be resolvable on the DNS or it must have a local entry in the local appliance /etc/hosts file.
-
Access the StorNext User Interface (new UI introduced in StorNext 7.0.1).
-
On the top navigation, click Services. The Services page appears.
-
Under the Service Name heading, click the service name that corresponds with your FlexSync service.
The FlexSync dashboard appears.
- In the Tasks column, click Suspend task to pause the replication task.
-
Log in to the FlexSync Dashboard.
Access the FlexSync Dashboard
Do the following to access your FlexSync dashboard.
Prerequisites
- You will need a FlexSync user account before you can create a replication task. See Step 4: Manage FlexSync Users.
- In order to access the FlexSync GUI, the appliance host name must be resolvable through a DNS name or IP address. If you use a DNS name, it must be resolvable on the DNS or it must have a local entry in the local appliance /etc/hosts file.
-
Access the StorNext User Interface (new UI introduced in StorNext 7.0.1).
-
On the top navigation, click Services. The Services page appears.
-
Under the Service Name heading, click the service name that corresponds with your FlexSync service.
The FlexSync dashboard appears.
- In the Tasks column, click Resume task to resume the replication task.
-
Log in to the FlexSync Dashboard.
Access the FlexSync Dashboard
Do the following to access your FlexSync dashboard.
Prerequisites
- You will need a FlexSync user account before you can create a replication task. See Step 4: Manage FlexSync Users.
- In order to access the FlexSync GUI, the appliance host name must be resolvable through a DNS name or IP address. If you use a DNS name, it must be resolvable on the DNS or it must have a local entry in the local appliance /etc/hosts file.
-
Access the StorNext User Interface (new UI introduced in StorNext 7.0.1).
-
On the top navigation, click Services. The Services page appears.
-
Under the Service Name heading, click the service name that corresponds with your FlexSync service.
The FlexSync dashboard appears.
- In the Tasks column, click Task Report.
The Task report for <task_name> dialog box appears.
- Review the displayed information for the task:
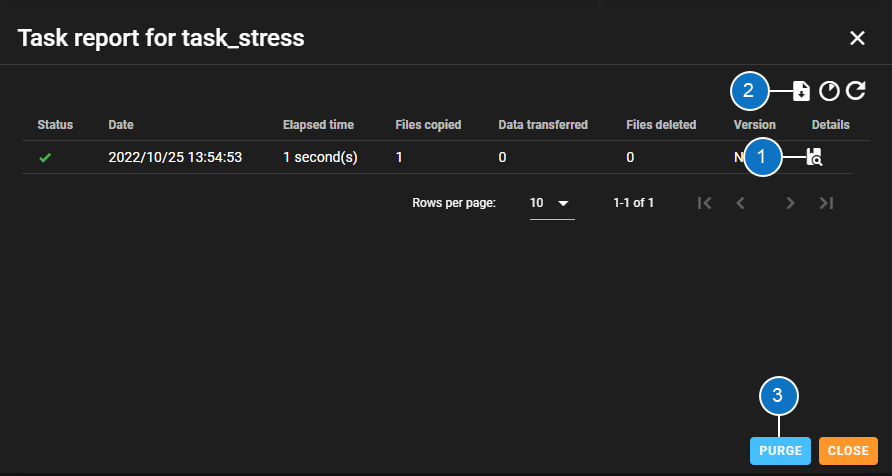
- Perform the following optional steps:
- Click Show Log Content to display the log content for a specific task entry.
- Click Purge to clear your entire task report.
- Click Export to CSV to download a .csv file of your entire task report.
- Click Close to return to the previous page.
-
Log in to the FlexSync Dashboard.
Access the FlexSync Dashboard
Do the following to access your FlexSync dashboard.
Prerequisites
- You will need a FlexSync user account before you can create a replication task. See Step 4: Manage FlexSync Users.
- In order to access the FlexSync GUI, the appliance host name must be resolvable through a DNS name or IP address. If you use a DNS name, it must be resolvable on the DNS or it must have a local entry in the local appliance /etc/hosts file.
-
Access the StorNext User Interface (new UI introduced in StorNext 7.0.1).
-
On the top navigation, click Services. The Services page appears.
-
Under the Service Name heading, click the service name that corresponds with your FlexSync service.
The FlexSync dashboard appears.
- In the Tasks column, click Full Cross-check to perform a full cross-check between the source and the destination directory.
-
Log in to the FlexSync Dashboard.
Access the FlexSync Dashboard
Do the following to access your FlexSync dashboard.
Prerequisites
- You will need a FlexSync user account before you can create a replication task. See Step 4: Manage FlexSync Users.
- In order to access the FlexSync GUI, the appliance host name must be resolvable through a DNS name or IP address. If you use a DNS name, it must be resolvable on the DNS or it must have a local entry in the local appliance /etc/hosts file.
-
Access the StorNext User Interface (new UI introduced in StorNext 7.0.1).
-
On the top navigation, click Services. The Services page appears.
-
Under the Service Name heading, click the service name that corresponds with your FlexSync service.
The FlexSync dashboard appears.
- In the Tasks column, click Suspend (as needed), and then click Edit.
The Task configuration - <task name> dialog appears.
- Update the task parameters, as needed (see Step 3: Add a Task).
-
Click Apply to apply your changes.
- Click Resume task to resume the replication task (as needed).
WARNING: If you attempt to delete a task and you select the Remove destination directory tree option, you must delete all of the Storage Manager policies for any relation points on the destination. If you do not remove the Storage Manager polices, then the operation results in a failure to delete the task.
WARNING: If a task attempts to delete directories because the Delete extraneous files on destination option is enabled on the task, you must delete all of the Storage Manager policies for any relation points on the destination for directories that were deleted on the source. If you do not remove the Storage Manager policies, then the operation results in an error when it attempts to delete the extraneous files.
-
Log in to the FlexSync Dashboard.
Access the FlexSync Dashboard
Do the following to access your FlexSync dashboard.
Prerequisites
- You will need a FlexSync user account before you can create a replication task. See Step 4: Manage FlexSync Users.
- In order to access the FlexSync GUI, the appliance host name must be resolvable through a DNS name or IP address. If you use a DNS name, it must be resolvable on the DNS or it must have a local entry in the local appliance /etc/hosts file.
-
Access the StorNext User Interface (new UI introduced in StorNext 7.0.1).
-
On the top navigation, click Services. The Services page appears.
-
Under the Service Name heading, click the service name that corresponds with your FlexSync service.
The FlexSync dashboard appears.
-
In the Tasks column, click Delete task to display a confirmation dialog that contains the following additional options:
-
Remove destination directory tree
WARNING: If you select the Remove destination directory tree option, your data is permanently deleted. This process cannot be undone.
-
Remove version directories
WARNING: If you select the Remove version directories option, your data is permanently deleted. This process cannot be undone.
-
Remove audit trail
-
- A dialog appears and you are prompted with the following message, Are you sure you would like to delete task task-name?. If you are sure you want to proceed with the operation, enter DELETEMYDATA.
- Click Delete to remove the selected task and its respective data, or click Back to abort the operation and return to the previous page.
-
Log in to the FlexSync Dashboard.
Access the FlexSync Dashboard
Do the following to access your FlexSync dashboard.
Prerequisites
- You will need a FlexSync user account before you can create a replication task. See Step 4: Manage FlexSync Users.
- In order to access the FlexSync GUI, the appliance host name must be resolvable through a DNS name or IP address. If you use a DNS name, it must be resolvable on the DNS or it must have a local entry in the local appliance /etc/hosts file.
-
Access the StorNext User Interface (new UI introduced in StorNext 7.0.1).
-
On the top navigation, click Services. The Services page appears.
-
Under the Service Name heading, click the service name that corresponds with your FlexSync service.
The FlexSync dashboard appears.
- In the Tasks column, click Reverse task to reverse the direction of the replication.
-
Log in to the FlexSync Dashboard.
Access the FlexSync Dashboard
Do the following to access your FlexSync dashboard.
Prerequisites
- You will need a FlexSync user account before you can create a replication task. See Step 4: Manage FlexSync Users.
- In order to access the FlexSync GUI, the appliance host name must be resolvable through a DNS name or IP address. If you use a DNS name, it must be resolvable on the DNS or it must have a local entry in the local appliance /etc/hosts file.
-
Access the StorNext User Interface (new UI introduced in StorNext 7.0.1).
-
On the top navigation, click Services. The Services page appears.
-
Under the Service Name heading, click the service name that corresponds with your FlexSync service.
The FlexSync dashboard appears.
- In the Tasks column, click Clone task.
- In the dialog box, enter a name for your task.
-
Click Clone to apply your changes, or click Cancel to abort the operation and return to the previous page.
- Click Start task to start the replication task (as needed).
