Replication Send
The Replication Send page allows you to manage outgoing replication activity for NAS or Application Specific shares. You can replicate shares on the V5000 to any other compatible DXi system. You can also schedule replication and view the status of current and recent replication jobs.
Note: Before you can replicate shares, you must specify a replication target. See Adding a Replication Target.
To access the Replication Send page, click the Replication menu, and then click the Send tab.

Tasks
Use the Replication Send page to perform the following tasks:
- View replication information for shares. See Replication Jobs List.
- Enable or disable replication for a share. See Enabling Share Replication.
- Configure Directory/File-based Replication for a share. See Configuring Directory/File-based Replication.
- Initiate replication for a share. See Replicating a Share.
- Synchronize a share configured for Directory/File-based Replication. See Synchronizing a Share.
- View replication statistics for a share configured for Directory/File-based Replication. See Directory/File-based Replication Queue.
- Schedule a share for replication. See Scheduling a Share For Namespace Replication.
- Manage replication targets. See Target Systems List.
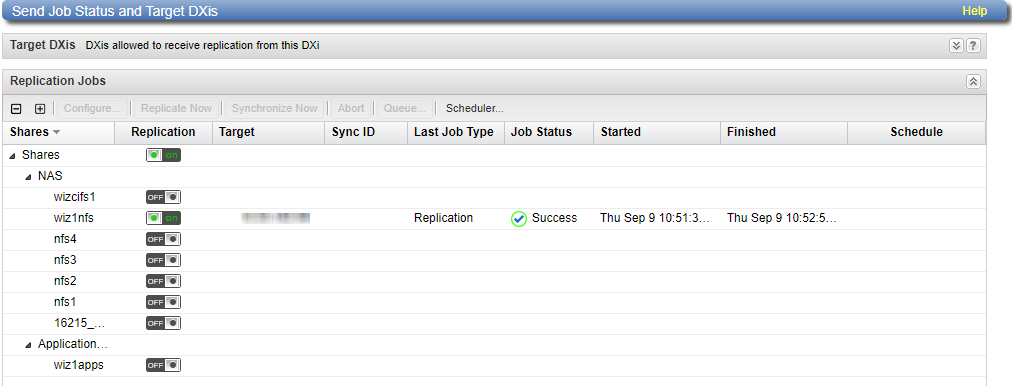
The Replication Jobs list displays replication statistics for all NAS shares on the V5000 that are eligible for replication. To be eligible for replication, a (Undefined variable: User_Guide_Online_Help.share) must have data deduplication enabled at the time it is created.
Note: For information about creating NAS shares, see Adding a NAS Share.
The Replication Jobs list displays the following information:
NAS - The name of the share. Hold the cursor over the name to display detailed information about the share.
Replication - The replication state (On or Off). Click the toggle switch to turn replication on or off for the (Undefined variable: User_Guide_Online_Help.share).
Additional Information
- Click the arrow next to Shares to display all shares in the list. Alternately, click the plus [ + ] or minus [ - ] icons to show or hide all shares.
- If multiple targets are configured for a share, click the arrow next to the share to view all targets.
- Clicking the toggle next to Shares will turn replication on or off for all shares.
| Replication Jobs Information | Description |
|---|---|
| Target | The hostname or IP address of the configured replication target. If the (Undefined variable: User_Guide_Online_Help.share) is configured to replicate to multiple targets, click the arrow next to the (Undefined variable: User_Guide_Online_Help.share) name to display all targets. |
| Sync ID | The Sync ID of the (Undefined variable: User_Guide_Online_Help.share) if Directory/File-based Replication is enabled. |
| Last Job Type | The type of the most recent replication job (Replication or Synchronization). |
| Job Status1 | The status of the most recent replication job. Hold the cursor over the job status to display detailed job statistics. See Replication and Synchronization Status. |
| Started | The time the most recent replication job was started. |
| Finished | The time the most recent replication job was completed. |
| Schedule | A watch icon displays if replication is scheduled for the share, as well as the next scheduled event. See Scheduling a Share For Namespace Replication. |
| 1Some chargeback reporting statistics are not maintained for failback operations. The Input Bytes for the failback operation can be viewed on the source for the failback operation. On the Replication > Send page. Hold the cursor over the Job Status and note the value displayed for Original Data Size. Note: After the failback operation is complete, chargeback reporting on the target for the failback operation will accurately report the User Data Size of the data replicated. |
|
Replication Jobs Customization
You can customize the appearance of the Replication Jobs list in the following ways:
Click the top banner row of the list to collapse or expand the list.
Click the up or down arrow to the right of a column heading to sort the rows in the table by that column in either ascending or descending order.
To show or hide a column, click the arrow to the right of a column heading, and then click Columns. Select the check box to show a column, or clear the check box to hide a column. (The following columns are hidden by default: Original Data Size, Actual Data Sent, and Average Data Sent.)
To filter content in a column, click the dropdown arrow to the right of a column heading, and then click Filters. Type or select the desired filter. (If one row for a share matches the filter, all rows for the share are displayed.)
A replication job can have one of the following statuses:
| In Progress | The replication job is in progress. |
| Partial | A replication job was partially completed. Generate a replication report to see the files that were not replicated. |
| Queued | The replication job is queued and will continue when the system is ready. |
| Success | The replication job was completed successfully. |
| Failed | The replication job was not completed. |
A synchronization job can have one of the following statuses:
| Queued | The synchronization job is queued and will continue when the system is ready. |
| Success | The synchronization job was completed successfully. |
| Recovering | The recover operation is in process. |
| Replicating | The replication operation is in process. |
| Failed | The synchronization job was not completed. |
Enable replication for a NAS share to allow the data on the share to be replicated to other DXi systems (the targets). Disable replication if you do not want to replicate the share to other DXi systems.
Note: To be eligible for replication, a (Undefined variable: User_Guide_Online_Help.share) must have data deduplication enabled at the time it is created.
To enable or disable replication for a (Undefined variable: User_Guide_Online_Help.share):
-
Select the share and click Configure.
The (Undefined variable: User_Guide_Online_Help.Share) Configure window displays.
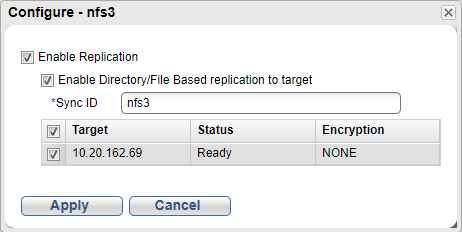
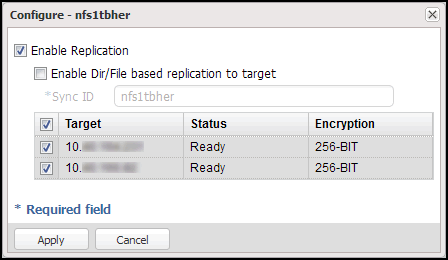
- Select the Enable Replication check box to enable replication for the share.
- Or clear the Enable Replication check box to disable replication for the share. Any jobs from that share that are in progress or queued will transition to failure. Also, all replication job history for that combination of target and share will be removed.
- Select the check box for each replication target you want to replicate the share to. (You must select at least one target.) When the share is replicated, its data will be sent to all selected targets.
- Click Apply.
Additional Information
- Quantum recommends scheduling replication to run after backups are complete. If you do not enable scheduled replication, replication will only occur if you manually replicate a share or if you configure Directory/File Based Replication. See Scheduling a Share For Namespace Replication, Replicating a Share), and Configuring Directory/File-based Replication.
- Disabling replication for a share does not delete any scheduled replication events for that share. If you no longer want to schedule the share for replication, manually delete the schedule. See Deleting a Scheduled Event.
- If replication is disabled and the re-enabled for a share or partition on the Replication > Send page, previously configured Directory/File-Based Replication settings are lost. This is expected behavior. When replication is disabled, all replication settings for the share or partition are cleared. To re-configure the share or partition for Directory/File- Based replication, select it and click Configure.
Note: You can disable or enable replication for all shares on the Replication > Actions page. This method preserves replication settings for all shares.
Configure a NAS share for Directory/File-based Replication to automatically replicate directories/files to other system systems (the targets). A file is automatically replicated when it is closed or a period of time after it is modified. After replication, the replicated directories/files are immediately available on the target systems. There is no need to recover the share to make the directories/files available. Disable Directory/File-based Replication if you do not want to automatically replicate directories/files.
When you configure a share for Directory/File-based Replication, you must specify a Sync ID. The Sync ID associates the share on the source system with the share on the target systems that will received the replicated data. The Sync ID for the source share must match the Sync ID for the target share. You can have multiple shares with SyncID, but each SyncID must be unique.
To configure a source share for Directory/File-based Replication:
- If you have not already done so, configure the target share on the target DXi. See Configuring a Target Share for Directory/File Based Replication.
-
On the source DXi, select the source share and click Configure.
The Configure - <Share or Partition> window displays.

- If it is not already selected, select the Enable Replication check box to enable replication for the share.
-
Select the Enable Directory/File-based Replication to target check box to enable Directory/File-based Replication for the share.
Or clear the Enable Directory/File-based Replication to target check box to disable Directory/File-based Replication for the share.
-
Enter a Sync ID in the box.
Additional Information
- The Sync ID is used to identify the target share that will receive replicated data from the source share. The Sync IDmust be identical to the Sync ID of the target share on the target system.
- All system Sync IDs must be unique. For example, replication source A wishes to replicate NAS share with a Sync ID of "NAS1". Replication source B also wishes to replicate using a Sync ID. In this instance, replication source B cannot use Sync ID "NAS1".
- The Sync ID must contain no more than 32 characters (NAS share) and can contain only alphanumeric characters, underscores, and hyphens. An underscore or hyphen must not be the first character.
-
Select the check box for each replication target you want to replicate the share to. (You must select at least one target.) When the share is replicated, its data will be sent to all selected targets.
Note: Directory/File-based Replication will be configured for all selected targets. You cannot configure one share for multiple replication types.
- Click Apply.
Note: After you configure a share for Directory/File-based Replication, you should synchronize it to ensure it is in sync with the target share. See Synchronizing a Share.
Replicate a NAS share with namespace type replication to send a snapshot of the share to the target systems. A snapshot is required to recover the data on the targets at a later time. If you have not configured a replication schedule for a share, replication only occurs when you manually initiate it.
To replicate a share:
-
Select the share to replicate.
If multiple targets are configured, click the arrow next to the share to display all targets, and then select the desired target.
- Click Replicate Now.
The status of the replication job displays in the Job Status column.
To cancel the replication job, select the share and click Abort.
Synchronize a NAS share to synchronize its contents with the corresponding share on the target systems. To synchronize a share, it must be configured for Directory/File-based Replication. See Configuring a Target Share for Directory/File Based Replication.
Synchronizing a share ensures that the contents of the source share are the same as the target share. The synchronization verifies that the same directories/files exist in both locations, and that no additional directories/files exist in either location.
You should perform a synchronization in any of the following situations:
- When Directory/File-based Replication is first enabled for a share.
- If a Directory/File-based Replication job fails.
- If Directory/File-based Replication is disabled for a time and then is re-enabled.
Manually performing a synchronization is not necessary except in the cases described above. When synchronization is manually initiated for a share, the replication queue for that share is cleared. All file write and delete requests are queued after the synchronization, and they are not processed until the synchronization is complete. This can cause replication to appear to be slow, especially for a share that is frequently accessed.
Caution: Before synchronizing a share, make sure there are no active backup jobs to the share. (After the synchronization reaches the Replicating state, backup jobs are allowed.)
Additional Information
- Even when replication is paused, the system continues to queue Directory/File-based Replication operations. Each time an operation is queued, the system logs an administration alert that reports the total number of queued Directory/File-based Replication requests.
- If a synchronization fails, make sure the target share is unlocked. See Configuring a Target Share for Directory/File Based Replication or Replication Configuration.
To synchronize a share:
-
Select the share to synchronize.
If multiple targets are configured, click the arrow next to the share to display all targets, and then select the desired target.
- Click Synchronize Now.
The status of the synchronization job displays in the Job Status column.
To cancel the synchronization job, select the share and click Abort.
The Directory/File-based Replication Queue displays replication statistics for shares or partitions that are configured for Directory/File-based Replication. See Configuring Directory/File-based Replication.
To view the Directory/File-based Replication Queue:
-
Select a share or partition that is configured for Directory/File-based Replication.
If multiple targets are configured, click the arrow next to the share or partition to display all targets, and then select the desired target.
-
Click Queue.
The Directory/File-based Replication Queue displays the following information for the share or partition:
File/Directory or Barcode The file/directory to be replicated. State The replication state for the file/directory. Progress The percentage complete for replication of the file/directory. Estimated Duration The estimated time it will take to complete replication for the file/directory.
Note: The estimated duration may display as unknown if replication has been very recently initiated. After the system has enough information to calculate a value, the estimated duration will display.
Additional Information
- The contents of the Directory/File-based Replication Queue are dynamic. Because of this, statistics are subject to change if items are added to the queue.
- The queue may show a large number of deletion entries after a single directory is deleted. This is expected behavior, and occurs because several recursive file or subdirectory deletions may be required.
When a share is enabled for namespace replication, it is important to regularly replicate the share to the target systems. Quantum recommends scheduling replication to run after backups are complete.
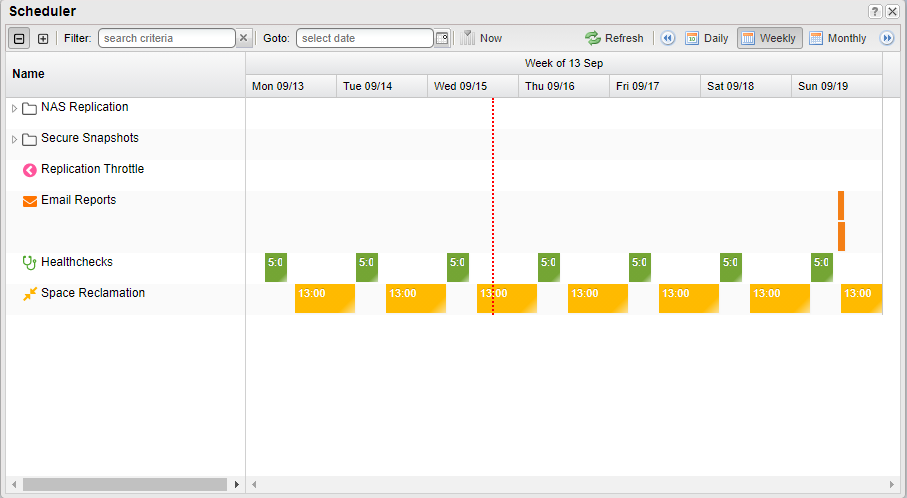
To schedule a share for replication, click Scheduler. The Scheduler window displays.
For details about using the Scheduler to add or edit a replication schedule, see Scheduler.

Note: Your view of scheduled replication for shares and other events like Secure Snapshots, throttling, etc., may be limited as it is controlled by your role and the access granted for your group in the Users screen. See the Manage Users' Server and Share Access section in the Configuration > System > Security topic. Any scheduling of Secure Snapshots will not be displayed on the Scheduler until Secure Snapshot has been enabled on the DXi server.
The Target Systems list allows you to configure and manage replication targets on the DXi. Click the arrows at the upper right, or click the top banner row, to expand or collapse the Target Systems list.

