Replication Configuration
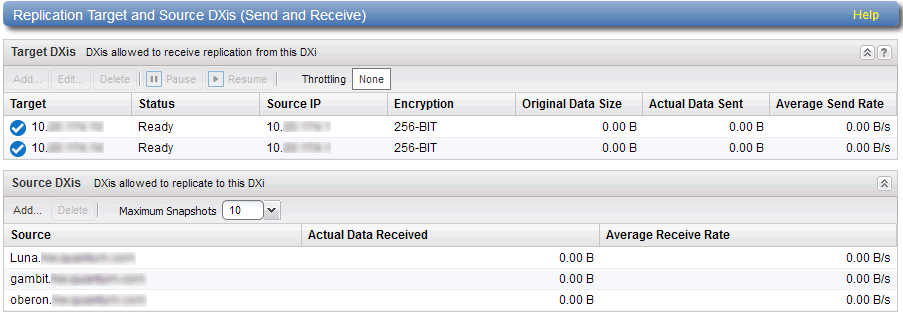
The Replication Configuration page allows you to configure and manage replication targets and allowed replication sources on the DXi9000 Series. A source sends replicated data to 1 or 2 targets, and a target receives replicated data from up to 10 sources.
Note: The network configuration of the source and target DXi9000 Series must be setup properly for data to be replicated to one or more DXi9000 Series. You can use Advanced Reporting to test the replication configuration and ensure that data is replicated across the Ethernet ports that suit your environment. You may wish to review Understanding Interface Routing for additional details regarding network setup.
Additional Information
- For more information about data replication, or to perform data replication, see Replication.
- If the DXi9000 Series is configured as a replication target and replication is performed across a public network, with the source and target located behind NAT-enabled routers, you must specify a NAT IP address for the DXi9000 Series on the Network page. See Configuring Interface IP Addresses.
To access the Replication Target and Source DXi page, click the Configuration menu, and then click the Replication tab.

Tasks
Use the Replication Configuration page to perform the following tasks:
- View information about configured replication target systems. See Target DXi List.
- Add, edit, or delete a replication target. See Adding a Replication Target,Editing a Replication Target, or Deleting a Replication Target.
- Pause or resume replication to a target. See Pausing or Resuming Replication to a Target.
- Configure a constant replication throttle. See Enabling System Throttling.
- View information about allowed replication source systems. See Source DXi List.
- Add or delete an allowed replication source. See Adding a Replication Source or Deleting a Replication Source.
- Specify the maximum number of received snapshots to retain for each source. See Changing the Maximum Number of Snapshots.
The Target DXis or Systems list displays the following information for each target DXi:
| Target | The IP address of the target system where the DXi9000 Series is configured to send data. |
| Status | The replication status of the DXi9000 Series. For a detailed description of all possible replication statuses, see Replication . |
| Source IP | The IP address that is used to uniquely identify the source DXi to the target. |
| Encryption |
The type of encryption used when sending replicated data to the target system (None, 128-bit, 256-bit, or TLS with AES 256). Important Information
|
| Original Data Size | The original, native size of data sent during replication or failback. This value does not represent the amount of data actually sent over the network during replication or failback because data is deduplicated and compressed before being sent. |
| Actual Data Sent | The amount of data actually sent over the network during replication or failback. This value is usually much less than the Original Data Size due to the benefits of data deduplication and compression. |
| Average Send Rate | The average send rate (in B/s) of data sent over the network during replication or failback (Actual Data Sent divided by the amount of time required to complete replication or failback). |
You can customize the appearance of the DXis or Systems list in the following ways:
- Click the top banner row of the list to collapse or expand the list.
- Click the arrow to the right of a column heading and select Sort Ascending or Sort Descending to sort the rows in the table by that column.
- To show or hide a column, click the arrow to the right of a column heading, and then click Columns. Select the check box to show a column, or clear the check box to hide a column.
Note: The statistics in the Target DXis or Systems list are for each target DXi rather than a cumulative total for all targets as is displayed on the Home page.
Add a replication target to configure the DXi9000 Series to send replicated data to that target. You can add up to two targets. After you add a target, you can enable replication to that target for a NAS share or VTL partition. When replication is enabled for a share or partition, replicated data is sent to the target system during scheduled or manual replication.
Additional Information
- Before you can add a replication target, you must add the DXi to the list of allowed replication sources on the target DXi. See Adding a Replication Source.
- To add a new target when two targets are already configured, first delete one target. Then add the new target. See Deleting a Replication Target.
- For more information about enabling and scheduling replication for a share or partition, see Replication Send.
To add a replication target:
-
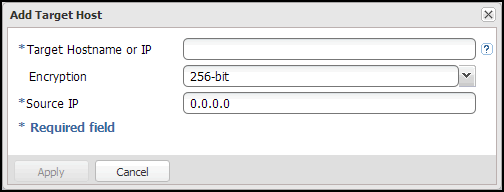
Under Target DXis or Systems, click Add.
The Add Target DXi window displays.

-
In the Target Hostname or IP box, enter the hostname or IP address of the system that will receive the replicated data.
Additional Information
- When entering IP addresses, never use an address that is in a reserved IP address range. To see a list of reserved IP address ranges, click the quick tip icon [?] located near the IP address field.
- To use hostname format, you must specify at least one DNS IP address on the Network page. See Network.
-
Using uppercase letters in the hostname is acceptable but will not be preserved after entry. For that reason, Quantum recommends using lowercase letters in the Hostname or IP Address box.
-
In the Encryption drop-down box, select the type of encryption to use when sending replication data to the target system (None, 128‑bit, 256-bit, or TLS with AES 256).
Important Information
- AES encryption options are available only if the Data-in-Flight license is installed. .
- If TLS with AES 256 is selected, the factory installed certificates are inadequate for security. The factory installed certificates should be considered public domain and are provided only for convenience. You must install new certificates for secure encryption.
- TLS with AES 256 must be enabled for this encryption option to appear. .
Caution: For encryption, select None or 128-bit if you are sending data to a DXi running a system software version prior to DXi 2.1 Software.
-
In the Source IP box, enter the IP address that is used to uniquely identify the source DXi to the target. This may be different than the actual network IP address of the source DXi.
If the target system is at DXi 2.1 Software or higher, the Source IP field is not required. If the target system is at DXi 2.0.1.x Software or below, then you must enter the IP address by which the target system recognizes the source system. The default value is 0.0.0.0.
Additional Information
- The Source IP field does not accept fully qualified domain names. You must enter a valid IP address. Make sure this IP address is configured in the allowable sources list on the target DXi.
- When configuring segmented network interfaces, if the source DXi replication, data, and management interfaces are on the same subnet, you must add a host route on the source DXi to make sure the replication interface is correctly selected when replicating data to the target DXi. See Understanding Interface Routing.
- Click Apply.
Note: The new target is not automatically added to existing replication schedules. You must add or edit scheduled events to schedule replication to the new target. See Scheduler.
Edit a replication target to change encryption options or the source IP address.
To edit a replication target:
-
Under Target DXis or Systems, select the target and click Pause to pause replication.
-
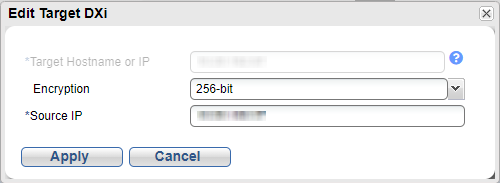
Select the target again and click Edit.
Note: If you are editing a target, you cannot change the Target Hostname or IP.

-
In the Encryption drop-down box, select the type of encryption to use when sending replication data to the target system (None, 128‑bit, 256-bit, or TLS with AES 256).
Important Information
- AES encryption options are available only if the Data-in-Flight license is installed.
- If TLS with AES 256 is selected, the factory installed certificates are inadequate for security. The factory installed certificates should be considered public domain and are provided only for convenience. You must install new certificates for secure encryption.
- TLS with AES 256 must be enabled for this encryption option to appear.
Caution: For encryption, select None or 128-bit if you are sending data to a DXi running a system software version prior to DXi 2.1 Software.
-
In the Source IP Address box, enter the IP address that is used to uniquely identify the source DXi to the target. This may be different than the actual network IP address of the source DXi.
If the target system is at DXi 2.1 Software or higher, the Source IP Address field is not required. If the target system is at DXi 2.0.1.x Software or below, then you must enter the IP address by which the target system recognizes the source system. The default value is 0.0.0.0.
Additional Information
- The Source IP Address field does not accept fully qualified domain names. You must enter a valid IP address. Make sure this IP address is configured in the allowable sources list on the target DXi.
- When configuring segmented network interfaces, if the source DXi replication, data, and management interfaces are on the same subnet, you must add a host route on the source DXi to make sure the replication interface is correctly selected when replicating data to the target DXi. See Understanding Interface Routing.
- Click Apply.
- Under Target DXis or Systems, select the target and click Resume to pause replication.
Delete a replication target if the DXi9000 Series no longer needs to send replicated data to that target. After the target system is deleted, the DXi9000 Series will no longer send replicated data to that system.
When a target is deleted:
- All replication jobs to that target that are in progress or queued will transition to failed.
- All replication job history for that combination of target and share or partition is removed.
- All share or partition will be reconfigured to no longer replicate to that target.
To delete a replication target:
- Under Target DXis or Systems, select one or more targets to delete.
- Click Pause to pause replication to the target.
- Click Delete.
Note: The deleted target is not automatically removed from existing replication schedules. You must edit scheduled events to remove the deleted target. See Scheduler.
The source DXi controls the replication pause behavior.
- To pause replication, select a target under Target DXis or Systems and click Pause. The DXi temporarily stops sending replicated data to the selected target.
- To resume replication, select a target under Target DXis or Systems and click Resume. The DXi resumes sending replicated data to the selected target.
Additional Information
- If namespace replication is paused midway through a replication job, the job will fail.
- If namespace replication is paused before the replication job starts, the job will sit in the queue until replication is resumed. When resumed the job will start and replication will occur.
- Trigger replication can be paused midway through a replication job. When resumed the job will continue from where it was paused.
Enable system throttling to limit the network bandwidth used for replication to all targets. When a constant throttle is enabled, the DXi limits the amount of data it sends during source replication so that it does not exceed the specified bandwidth.
Additional Information
- If multiple targets are configured, replication to all targets counts against the same bandwidth limit.
- To vary the replication throttle rate over time, use the Configuration > Scheduler page. Do not enable a constant throttle if a throttle schedule is configured. The scheduled replication throttling bandwidth settings take precedence over the constant throttle value. (The currently active replication throttle rate appears on the Home page under Current Activity.) See Scheduler.
To enable system replication throttling:
-
Under Target DXis or Systems, click the box next to Throttling.
The Replication Throttle window displays.
- Select the Enable system throttling check box, or clear the check box to disable system throttling.
- In the Throttle box, enter the maximum allowed bandwidth, and select the units you want to use to specify the constant throttle
(KB/s or MB/s). The lowest value you can set is 32 KB/s. The highest value you can set is 125 MB/s for 1GbE and 500 MB/s for 10GbE. - Click Apply.
Caution: Do not set the maximum allowed bandwidth to a value that is lower than necessary. If the maximum allowed bandwidth is set to the lowest value, large replication jobs may fail.
The Source DXi list displays the following information for each source DXi:
| Source | The IP address of the source system that is allowed to send data to the DXi9000 Series. |
| Actual Data Received | The amount of data actually received over the network during replication or failback. |
| Average Receive Rate | The average receive rate (in MB/s) of data received over the network during replication or failback (Actual Data Received divided by the amount of time required to complete replication or failback). |
You can customize the appearance of the Source DXi list in the following ways:
- Click the top banner row of the list to collapse or expand the list.
- Click the arrow to the right of a column heading and select Sort Ascending or Sort Descending to sort the rows in the table by that column.
- To show or hide a column, click the arrow to the right of a column heading, and then click Columns. Select the check box to show a column, or clear the check box to hide a column.
Note: The statistics in the Source DXis or Systems list are for each source DXi rather than a cumulative total for all sources as is displayed on the Home page.
Add a system to the list of replication sources to allow it to send replicated data to the DXi9000 Series. You must add a source system to the list of allowed replication sources on the target DXi before you configure the source DXi to send replicated data to the target. The DXi can receive replicated data from 1 source to 10 sources, with the limit based on configured resources.
Additional Information
- For more information about working with received snapshots, see Receive NAS or Receive VTL.
- It is typical for the target DXi to require additional disk space for replication data compared to the source DXi. This is because complete replication data is sent to the target before old data is deleted. For optimal performance, if the DXi is a replication target, Quantum recommends keeping the amount of free space at 20% or more.
To add a replication source:
-
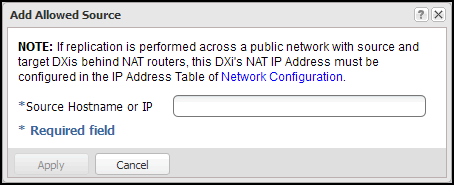
Under Source DXis or Systems, click Add.
The Add Allowed Source window displays.

-
Note: Using uppercase letters in the hostname is acceptable but will not be preserved after entry. For that reason, Quantum recommends using lowercase letters in the Hostname or IP Address box.
Note: To use hostname format, you must specify at least one DNS IP address on the Network page. See Network.
- Click Apply.
Delete a system from the list of replication sources if it will no longer send replicated data to the DXi9000 Series. After the source system is deleted, the DXi9000 Series will no longer accept replicated data from that system.
To delete a replication source:
- Under Source DXis or Systems, select one or more sources to delete.
- Click Delete.
Note: If a source DXi is deleted from the list, its contribution to the cumulative totals on the Home page are not removed until you clear Receive statistics. See Replication Performance.
During scheduled or manual namespace data replication, the DXi9000 Series receives a snapshot from the source system.
The DXi9000 Series can retain up to 32 snapshots for each replicated share or partition. Once the maximum number of snapshots have been saved, the oldest snapshot is deleted to make room for each new snapshot that is received.
To change the maximum number of received snapshots:
- Under Source DXis or Systems, in the Maximum Snapshots drop-down box, select the number of snapshots to retain for each replicated share or partition.
- The default value is 10. The maximum value is 32.
Note: Retaining more than the default number of snapshots will use additional disk space on the target DXi. This can cause the target DXi to fill up more quickly.
