Receive VTL
The Receive VTL page allows you to manage incoming replication activity for VTL partitions. You can recover a replicated partition on the target system if the source system is unavailable. Once the source system becomes available, you can failback the partition to make it available on the source system again.
Note: Before you can receive replicated partitions, you must specify one or more replication sources. See Adding a Replication Source.
To access the Receive VTL page, click the Replication menu, and then click the Receive > VTL tab.
Tasks
Use the Receive VTL page to perform the following tasks:
- View received snapshots and recover, failback, or delete snapshots. See Received Snapshots.
- Manage recovery jobs. See Recovery Jobs.
- Manage failback jobs. See Failback Jobs.
- Manage shares configured for Cartridge Based Replication. See Cartridge Based.
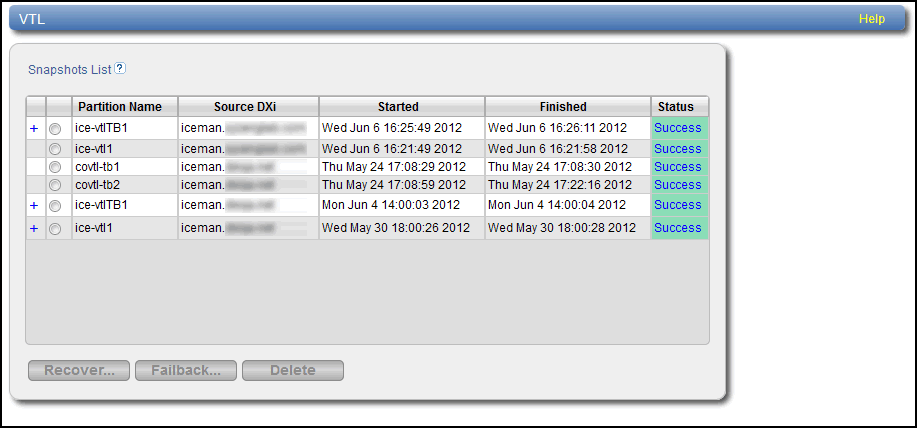
The Received Snapshots page allows you to view and work with received snapshots. When a replicated VTL partition is received from a source system, it is saved as a snapshot. The snapshot contains all of the data necessary to fully recover or failback the partition to the point in time when the snapshot was saved.
To access the Received Snapshots page, on the Receive VTL page, click the Received Snapshots tab.
Tasks
Use the Received Snapshots page to perform the following tasks:
- View information about received snapshots. See Snapshots List.
- Recover a partition on the target system. See Recovering a Partition.
- Failback a partition to the source system. See Performing a Failback For a Partition.
- Delete a received snapshot. See Deleting a Snapshot.
Note: The target system will retain up to 10 replication snapshots (default setting) for each replicated partition. Once 10 snapshots have been saved, the oldest snapshot is deleted to make room for each new snapshot that is received. To change the maximum number of snapshots retained for each partition, see Changing the Maximum Number of Snapshots.
The Snapshots List displays all available snapshots that have been received from configured replication sources. Snapshots are grouped by VTL partition. To see all available snapshots for a partition, click the plus icon [+] next to the partition name.
The Snapshots List displays the following information about each snapshot:
| Partition Name | The name of the partition. |
|
Source System |
The hostname of the system that sent the snapshot. |
| Started | The time the most recent replication job was started. |
| Finished | The time the most recent replication job finished. |
| Status | The status of the most recent replication job. Click the status to display detailed information about the most recent replication job. See Replication and Synchronization Status. |
Note: Click a column heading to sort the rows in the table by that column. Click the column heading again to reverse the sort order.
Recover a VTL partition if the source system is unavailable and you need to access the partition (for example, to continue performing backups). When you recover a partition, you select a received snapshot. The DXi9000 Series uses the snapshot to recreate the partition on the target system just as it was at the point in time when the snapshot was saved.
Note: To recover a partition, the target system must support the library emulation and drive type used in the original partition. For a list of the available library emulations and drive types on the target system, see Adding a VTL Partition.
To recover a partition:
-
On the target system, select a snapshot in the Snapshots List and click Recover.
The Recovered Partition Name page displays.

- (Optional) In the Recovered Partition Name box, type a new name for the recovered partition. (The default name is the original partition name.)
-
Click Apply.
The partition and its cartridges are recovered on the target system. All data stored on the partition at the time the snapshot was saved is available.
Note: The Recovered Partition Name cannot be the same as an existing partition name.
After recovering the partition, you must add tape drives to the partition. The tape drive type must be identical to the original partition so that the media is compatible. In addition, you must map the devices before the VTL partition is accessible.
If the partition contains media, you will only be able to select the highest capacity tape drive for that media type. For example, if the partition contains SDLT600 tape cartridges, you will only be able to select DLT-S4 tape drives when mapping devices to the recovered partition.
Additional Information
- When a VTL partition is recovered on a target system, a new serial number is created for the partition.
- After you recover a partition, if you want to continue backing up data to the partition, you must remap your backup application to point to the target system instead of the source system.
Perform a failback of a VTL partition if a source system that was previously unavailable becomes available again. When you failback a partition, you select a received snapshot. The DXi9000 Series copies the snapshot from the target system back to the source system. You can then perform a recover operation to recreate the partition on the source system just as it was at the point in time when the snapshot was saved.
Note: Before you can failback a partition, on the original source system, you must add the original target system to the list of allowed replication sources. This is because during failback the original target is acting as a source when it sends a snapshot to the original source. See Adding a Replication Source.
-
To perform a partition failback:
On the target system, select a snapshot in the Snapshots List and click Failback.
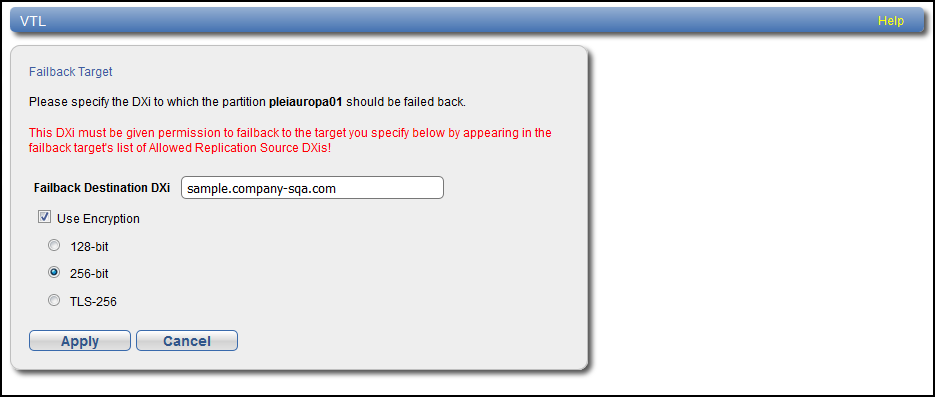
The Failback Target page displays.
-
(Optional) In the Failback Destination System box, type the hostname or IP address of a new destination system to failback the partition to. (The default destination is the original source system.)
Note: To use hostname format, you must specify at least one DNS IP address on the Network page. See Network.
Note: Using uppercase letters in the hostname is acceptable but will not be preserved after entry. For that reason, Quantum recommends using lowercase letters in the Hostname or IP Address box.
-
(Optional) Leave the Use Encryption check box selected to enable encryption when sending the snapshot to the destination. Or clear the Use Encryption check box to disable encryption when sending the snapshot to the destination.
Caution: Select 128-bit encryption if you are sending data to a DXi running a system software version prior to DXi 2.1 Software.
-
Click Apply.
The snapshot is sent to the source system.
-
On the source system, in the Snapshots List. select the snapshot that was sent during the failback operation and click Recover.
The Recovered Partition Name page displays.
- (Optional) In the Recovered Partition Name box, type a new name for the recovered partition. (The default name is the original partition name.)
-
Click Apply.
The partition and its cartridges are recovered on the source system. All data stored on the partition at the time the snapshot was saved is available.
After recovering the partition, you must add tape drives and a robot to the partition, and you must map the devices before the VTL partition is accessible. If the partition contains media, you will only be able to select the highest capacity tape drive for that media type. For example, if the partition contains SDLT600 tape cartridges, you will only be able to select DLT-S4 tape drives when mapping devices to the recovered partition.
Note: The Recovered Partition Name cannot be the same as an existing partition name.
Additional Information
- When a VTL partition is recovered on a target system, a new serial number is created for the partition.
- If you previously remapped your backup application to a recovered partition on the target system, after you failback the partition, you must remap your backup application again to point to the source system.
Delete a snapshot if it is no longer needed. After you delete a snapshot, it can no longer be used to recover or failback a VTL partition.
Note: You cannot delete a snapshot if a failback operation is in progress for the snapshot. Wait for the failback operation to complete, or abort the operation. See Failback Jobs.
To delete a snapshot:
-
Do one of the following actions:
- On the source system, disable replication for the partition associated with the snapshot. See Enabling Replication For a Share or Partition.
- On the target system, delete the source system associated with the snapshot from the list of allowed replication sources. See Deleting a Replication Source.
-
On the target system, select a snapshot in the Snapshots List and click Delete.
Note: If you delete the last snapshot for a partition while replication for the partition (to this target) is still enabled, any replicated data not yet protected by a replicated partition is not deleted. To delete this data, on the source system, disable replication for the partition before deleting the last snapshot.
- Click Yes to confirm the action.
The Recovery Jobs page allows you to view information about snapshot recover operations that were previously completed.
To access the Recovery Jobs page, on the Receive VTL page, click the Recovery Jobs tab.
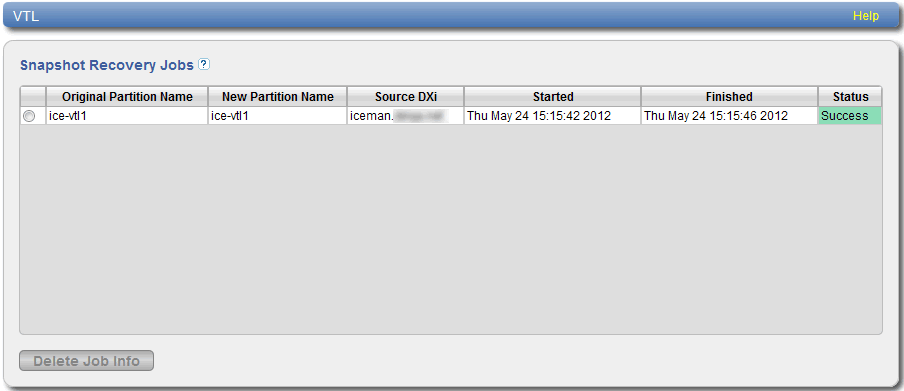
The Snapshot Recovery Jobs section displays the following information about recovery jobs:
| Original Partition Name | The name of the partition from which the snapshot was created. |
| New Partition Name | The name of the partition where the snapshot was recovered. |
|
Source System |
The hostname of the system that sent the snapshot. |
| Started | The time the recovery job was started. |
| Finished | The time the recovery job finished. |
| Status | The status of the recovery job (Success, In Progress, or Failed). |
To delete information for a recovery job, select it in the Snapshot Recovery Jobs list and click Delete Job Info.
The Failback Jobs page allows you to view information about snapshot failback operations that were previously completed. You can also abort a failback that is currently in progress.
To access the Failback Jobs page, on the Receive VTL page, click the Failback Jobs tab.
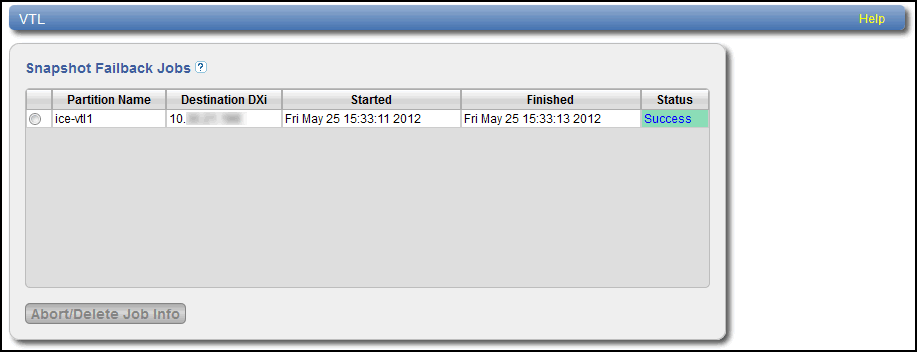
The Snapshot Failback Jobs section displays the following information about failback jobs:
| Partition Name | The name of the partition the snapshot was created from. |
| Destination DXi9000 Series System | The hostname of the system that the snapshot was sent to. |
| Started | The time the failback job was started. |
| Finished | The time the failback job finished. |
| Status | The status of the failback job (Success, In Progress, or Failed). |
Use the Failback Jobs page to perform the following tasks:
To delete information for a failback job, select it in the Snapshot Failback Jobs section and click Delete Job Info.
To abort a failback job that is in progress, select it in the Snapshot Failback Jobs section and click Abort.
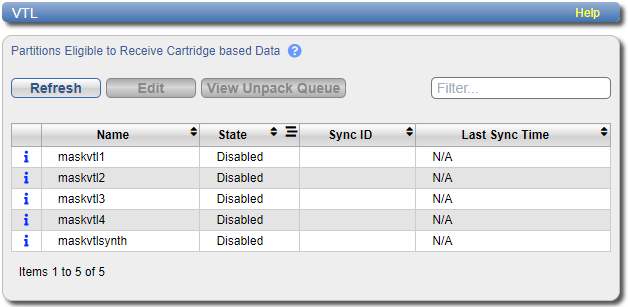
The Cartridge Based page allows you to manage Cartridge Based Replication on the target system. You can configure a VTL partition to receive Cartridge Based Replication data sent from a source system and view replication statistics for the partition.
Note: For information about creating VTL partitions, see Adding a VTL Partition.
To access the Cartridge Based page, on the Receive VTL page, click the Cartridge Based tab.
Tasks
Use the Cartridge Based page to perform the following tasks:
- View partitions eligible to receive Cartridge Based data. See Partitions Eligible to Receive Cartridge Based Data.
- Configure a partition to receive Cartridge Based Replication data. See Configuring a Target Partition for Cartridge Based Replication.
- View statistics for partitions configured for Cartridge Based Replication. See Unpack Queue.
The Partitions Eligible to Receive Cartridge Based Data section displays information for all VTL partitions on the DXi9000 Series that are eligible to receive Cartridge Based Replication data from a source partition. To be eligible to receive Cartridge Based Replication data, a partition must have data deduplication enabled at the time it is created.
The Partitions Eligible for Replication section displays the following information:
| Partition Name | The name of the partition. |
| State | The state of Cartridge Based Replication for the partition (Enabled or Disabled). |
| Sync ID | The Sync ID used to identify the source partition that will send replicated data to the partition. |
| Last Sync Time | The last day, date, and time that the selected partition was synchronized with its replication source partition. |
Note: Click the Information button (![]() ) next to a partition to display detailed information about the partition and recent replication activity.
) next to a partition to display detailed information about the partition and recent replication activity.
Configuring a VTL partition for Cartridge Based Replication enables the automatic replication of cartridges on the source partition to the target partition. Before you configure a partition on the source system for Cartridge Based Replication, you must configure a partition on the target system to receive the replicated data from the source partition.
Note: For information about configuring Cartridge Based Replication on the source system, see Configuring Directory/File or Cartridge Based Replication.
To configure a target partition for Cartridge Based Replication:
-
Select the partition and click Edit.
The Edit Partition Settings page displays.

-
Select the Enable to receive Cartridge Based replication data check box to enable Cartridge Based Replication for the partition.
Or clear the Enable to receive Cartridge Based replication data check box to disable Cartridge Based Replication for the partition.
-
Enter a Sync ID in the box.
The Sync ID is used to identify the source partition that will send replicated data to the target partition. The Sync ID must be identical to the Sync ID of the source partition on the source system.
-
Select an Access option:
- Locked - The partition is not allowed to receive new Cartridge Based Replication data.
- Unlocked - The partition is allowed to receive new Cartridge Based Replication data.
If a partition configured for Cartridge Based Replication is locked on the target system, synchronization jobs may fail on the source system.
- Click Apply.
Use the Unpack Queue to view Cartridge Based Replication statistics for data received from the source system.
To view the Unpack Queue, select a partition and click View Unpack Queue.
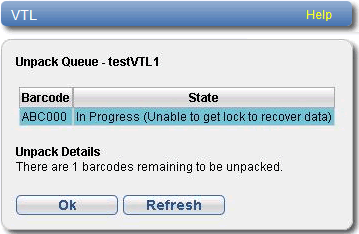
The Unpack Queue displays the following information:
| Barcode | The barcode of the cartridge to be replicated. |
| State | The replication state of the cartridge. |
Click Refresh to update the statistics in the Unpack Queue. Click OK to return to the Cartridge Based page.
