|
How to Create a PDF |
Basic Operations
This section includes information about setting up the VS1110-A.
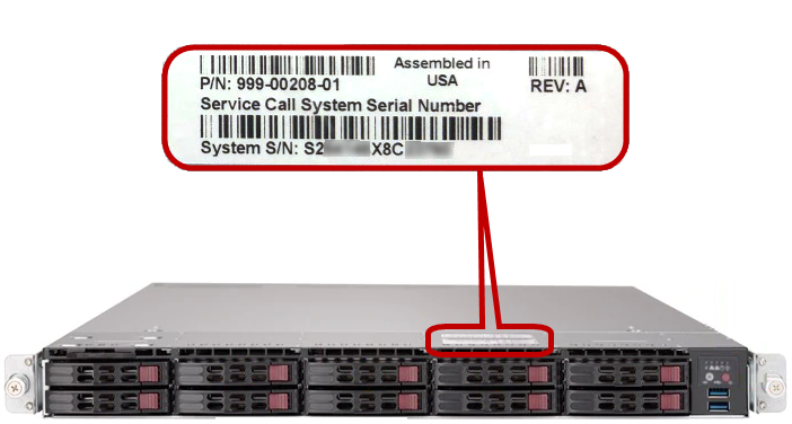
You will need the system serial number and chassis part number when contacting Quantum Technical Support, or when ordering a replacement part.
| Item | Use This Number When |
| System Serial Number | Calling Quantum Technical Support, to identify your system. |
| Chassis Part Number (P/N) | Requesting a system replacement component. |
The pull-out tag containing the system part number and serial number is located between the top-left drive bay and the node cover, as you face the front of the server.
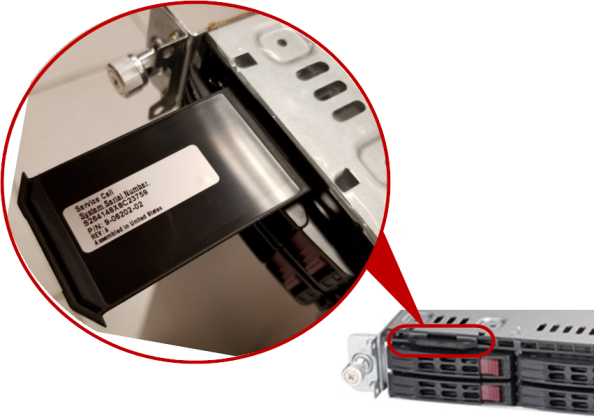
You can also find this information on a label on the top panel.
To power on or power off your VS1110-A, see the following sections:
Note: This section assumes that your VS1110-A is installed, and was properly powered off. See Power Off the VS1110-A.
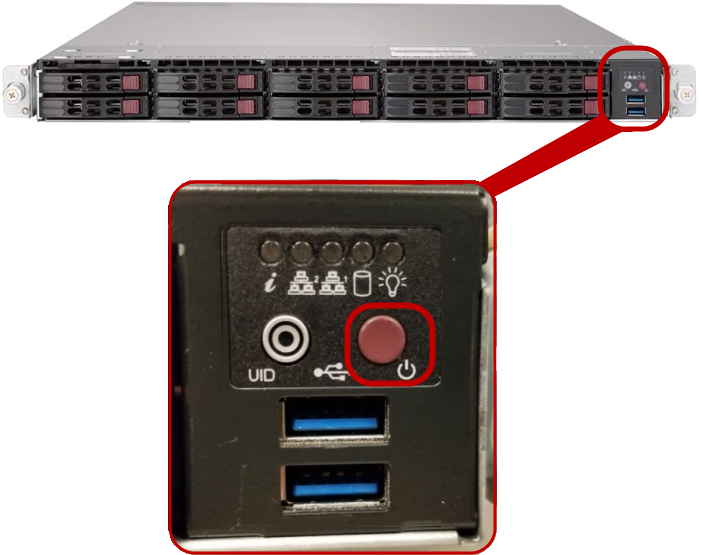
To power on the system:
Press and release the Power button on the front of the VS1110-A.
Note: Wait for the system to boot before logging on. This can take five to ten minutes, or longer for multi-unit systems.
All virtual machines (VMs) that were installed and running when the system was powered off will start automatically.
At this point, you can launch the Host OS console, where you can:
Caution: Before powering off the VS1110-A, be sure all Internet of Things (IoT) and building automation application activities are complete.
When you power off the VS1110-A, the system completes the following steps:
- Shuts down a running VM.
- Shuts down the Host OS.
- Powers off the server.
Note: This process takes several minutes.
You can shut down and power off the system in three ways:
Press and release the power button on the front of the VS1110-A.
-
In the Hose OS console, click VS-Reboot.

The VS Reboot window displays.
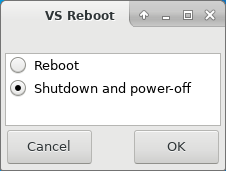
- Select Shutdown and power-off.
- Click OK.
From a window or terminal connection and with root access, type init 0. To obtain root access when logged in as the admin user, run sudo su -, then run the init 0 command.
This command shuts down a running VM and the Host OS, and powers off the server.
Note: If you are installing multiple VS1110-A systems, Quantum recommends that you record all IP information. In addition, you can print a copy of the Networking IP List to help you record your IP addresses.
Use the following login credentials and IP address for initial system startup.
| Identifier | Username/Password/Setting | Description |
|---|---|---|
| Host Operating System (OS) Username | Username: admin | |
|
Host OS and VNC Password (These passwords are synched) |
Password: admin |
You can change this password using VS-Settings Menu option 3) Advanced Menu, then option 0) Change password for user. |
| Host OS Management IP Address | dhcp |
Open VS-Info from the Host OS desktop to see the actual IP address. You can set the Host OS management IP to a static address using VS-Settings Menu option 3) Advanced Menu, then 1) Set IPs/Jumbo frames. |
| Default BMC1 (IPMI)2 Username |
Username: ADMIN | |
| Default BMC (IPMI) Password |
Password: BMCadmin1 |
You can change this password using VS-Settings Menu option 3) Advanced Menu, then 5) Change BMC settings. |
| Default BMC IP Address | 192.168.17.21 | You can change this address using VS-Settings Menu option 3) Advanced Menu, then option 5) Change BMC settings. |
|
1BMC: Baseboard Management Controller - A specialized service processor that monitors the physical state of a computer, network server or other hardware device using sensors and communicating with the system administrator through an independent connection. 2IPMI: Intelligent Platform Management Interface - A set of computer interface specifications for an autonomous computer subsystem that provides management and monitoring capabilities independently of the host system's CPU, firmware (BIOS or UEFI) and operating system. |
||

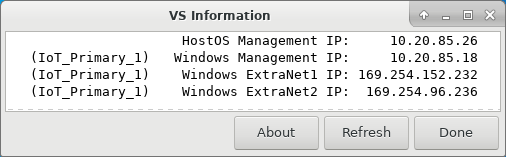
The VS-Info script reads and displays the Host Operating System (OS) Management IP and Windows network IP addresses. Use these instructions to log on to your Host OS, then display and review your IP address settings.
- Launch the Host OS console.
-
Double-click VS-Info to display all known external-facing IP addresses for the Host OS server and Windows VM.

The VS network IPs display.
Note: All external-facing ports on the VM and host operating systems are set by default to DHCP.
Configure the network settings on a Windows laptop before accessing the system directly from the BMC/IPMI port. After completing the steps below, you can access the Host OS console.
VS1110-A default network IP addresses and initial installation credentials are available at Access Default Login Credentials. Additionally, you can print a copy of the Networking IP List to help you record your IP addresses. If you are installing multiple VS1110-A systems, Quantum recommends that you record all IP information.
After configuring the laptop network settings for direct server connections, you might need to reset the network connection settings on your laptop to automatically obtain an IP address.
-
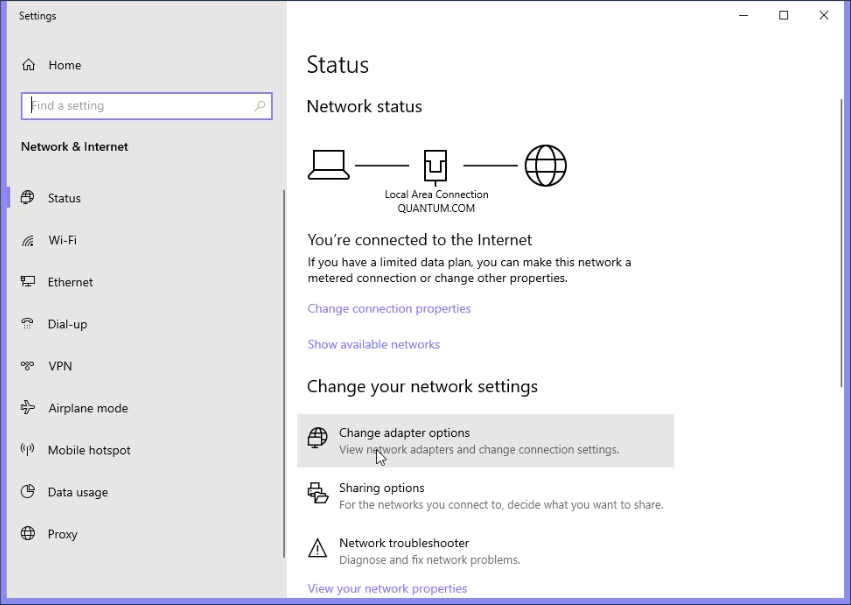
Access the Network Connections control panel. To do this, right-click Start on the taskbar.

-
Click Network Connections in the Start menu. The Network status window appears.
-
In the Change your network settings section, click Change adapter options.
-
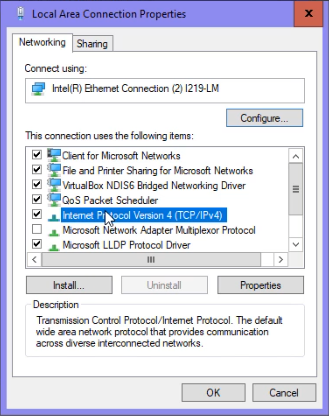
The Network Connections window appears. Double-click Local Area Connection.

-
The Local Area Connection Status property sheet appears. Click Properties.

-
The Local Area Connection Properties dialog box appears. Click Internet Protocol Version 4 (TCP/IPv4), then click Properties.
-
The Internet Protocol Version 4 (TCP/IPv4) Properties sheet appears.
Quantum recommends writing down the settings in this dialog before you change them. You can refer to this information when you reset these settings to their original values, after you finish using this local network connection.
Click Use the following IP address, then type the following addresses:
- IP address: 192.168.17.100
- Subnet mask: 255.255.255.0
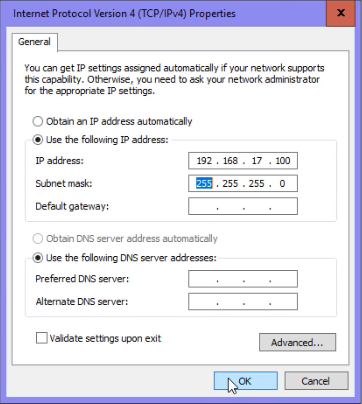
- Click OK to close the Internet Protocol Version 4 (TCP/IPv4) Properties sheet. The settings take effect after about 30 seconds.
-
Connect your laptop to the BMC port.
You can now launch the Host OS console to configure your system or complete other tasks.
- When your session with the Host OS console is complete, you can reset your laptop's network connection settings to their previous configuration in the Internet Protocol Version 4 (TCP/IPv4) Properties sheet.
You can change the default BMC IP address to an IP that matches your local subnet, if needed. You might want to do this to access a console connection through the BMC without having to connect directly with a laptop. You can also change the password for the default ADMIN user account on the BMC.
Before changing the BMC IP address, you will need to launch the Host OS console. You can change the BMC IP address through the VS-Settings Menu.
To change the BMC IP address and password:
-
Launch the Host OS Console, then double-click on the VS-Settings icon.

-
The VS-Settings Menu displays. Type 3 for Advanced Menu, then press Enter.
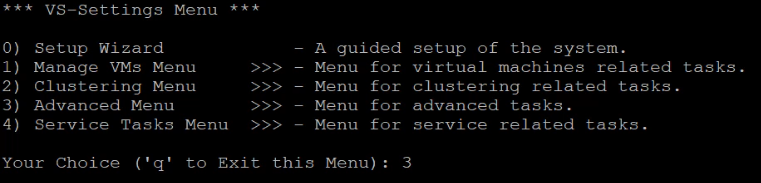
- In the Advanced Menu, type 5 for Change BMC settings, then press Enter.
-
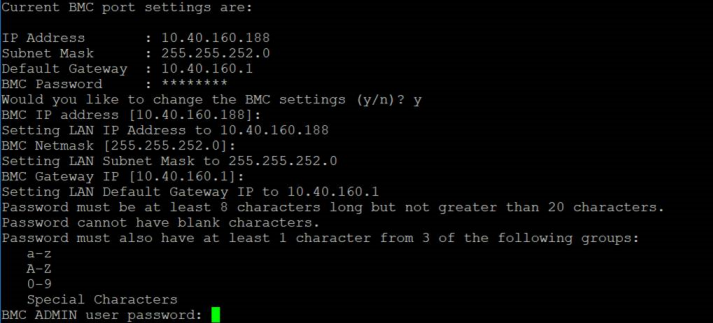
The current settings display. At the Would you like to change the BMC settings prompt, type y, then press Enter.
-
Type the new BMC network settings, pressing Enter after every change:
- BMC IP address
- BMC Netmask
- BMC Gateway IP
To accept a current setting, simply press Enter.
-
Type a new BMC Admin password twice to change it. The default password is “BMCadmin1.”
Clustering multiple nodes together provides high availability for the IoT_Primary VM. If Node 1 fails or is rebooting, the VM automatically fails over to Node 2.
You must configure the nodes’ numbers before you can cluster them together. Nodes must be configured with a number only if they will be clustered.
Before configuring a node with a number and clustering it with another node, it must be set up through the VS-Settings Menu (see Configure Your System's Settings).
-
Double-click VS-Settings to open the VS-Settings Menu.
-
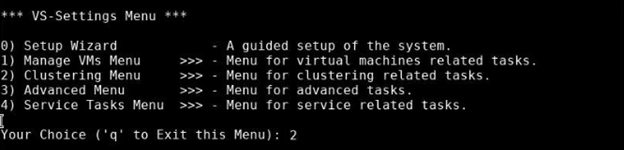
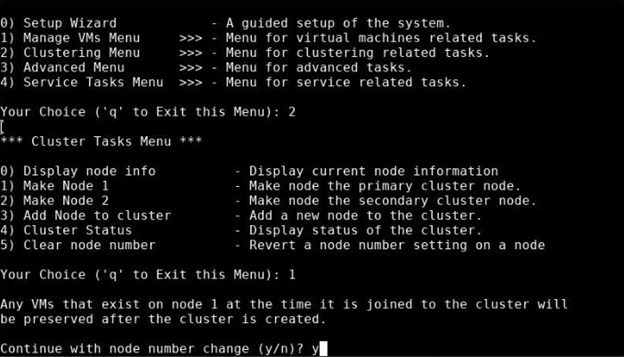
In the VS-Settings Menu, enter 2, then press Enter to open the Clustering Menu.
-
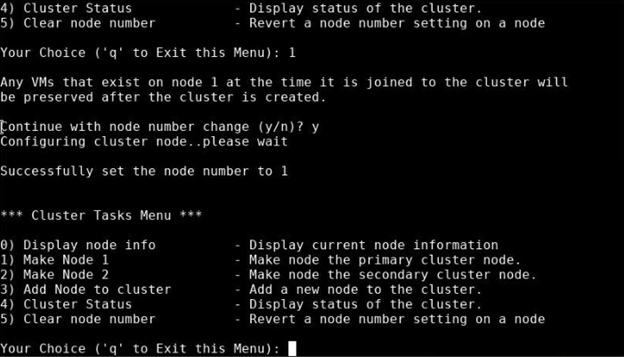
To establish Node 1, enter 1 in the Cluster Tasks Menu; to establish Node 2, enter 2; then press Enter.

-
A confirmation message displays:
-
If you are creating Node 1, a confirmation message informs you that the VM on the Node 1 will be preserved after the cluster is created.
-
If you are creating Node 2, a confirmation message informs you that you will be unable to create VMs on Node 2.
Type y, then press Enter to continue configuring the node’s number.
The system indicates when it successfully set the node, then returns to the Cluster Tasks Menu.
-
Additional Information:
- Ensure that Node 2 does not have a VM, or an error will result when you add it to a cluster. Remove the VM from Node 2 through the Manage VMs Menu.
- If Node 1 has a VM, the VM will automatically start after the clustering process is complete.
- You can create a cluster from Node 1, only.
-
Double-click VS-Settings to open the VS-Settings Menu in a terminal window.
-
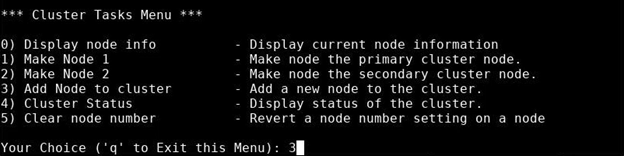
In the VS-Settings Menu, type 2 to open the Clustering Menu; then press Enter.
-
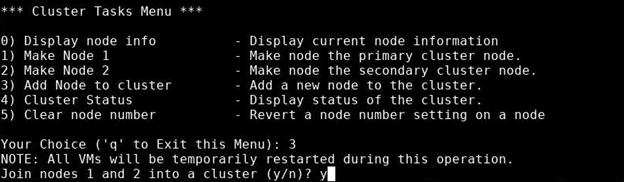
In the Cluster Tasks Menu, type 3 to add a node to a cluster; then press Enter.
-
A note informs you that the VM will restart while clustering the nodes together. Type y to confirm that you want to cluster Nodes 1 and 2 together, and then press Enter. Clustering can take a few minutes; allow the process to finish.
While creating the cluster, the system notifies you of its progress, including:
- Checking access to the nodes
- Checking the status of the VM
- Connecting the nodes
- Getting hostnames
- Enabling firewalls
- Installing the VM on one node
- Creating DRBD device
- Enabling DRBD failover on the cluster
When the processes is finished, the Cluster Tasks Menu displays.
Cloud-Based Analytics enables the VS1110-A to collect data about the VS-Series System and environment performance. The collected data is bundled and uploaded to the remote Cloud-Based Analytics server for analysis.
When Cloud-Based Analytics is enabled, your VS-Series System collects performance data at regular ten-minute intervals, or at an appropriate interval for the given metric. All data that is collected is stored locally in system cache.
Data collected with Cloud-Based Analytics includes the following:
- Cluster-level statistics about the hypervisor, virtual machines, and aggregated statistics from the portal for VS1110-A use
- Device-specific statistics for CPU usage, memory usage, and network activity
- Count of events, such as system restarts and number of times the system stops working
- Log file entries, including the level of the entry (error, warning, fatal, or fail)
Data policies ensure the security and privacy of your uploaded data. The following information is not included with a data upload:
- Passwords or encryption keys
- Network architecture
- Proprietary or confidential data
- All on-premise communication to the Cloud-Based Analytics server uses a secure https connection via port 443
- The DNS hostname api-as.quantum.com must be resolvable by the device on which the Cloud-Based Analytics agent is enabled
- For Cloud-Based Analytics, only port 443 needs to be open through the on-premise firewall
- No connections from the Cloud-Based Analytics server back to on-premise system are required or used
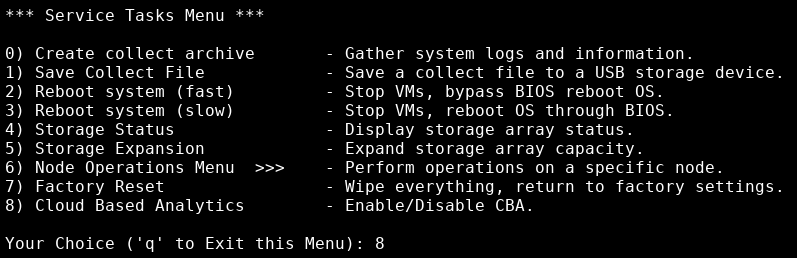
Cloud-Based Analytics is enabled and disabled through the VS-Settings Menu.
- Launch the Host OS console.
-
Double-click VS-Settings to open the VS-Settings Menu.
- Type 4 to open the Service Tasks Menu, then press Enter.
-
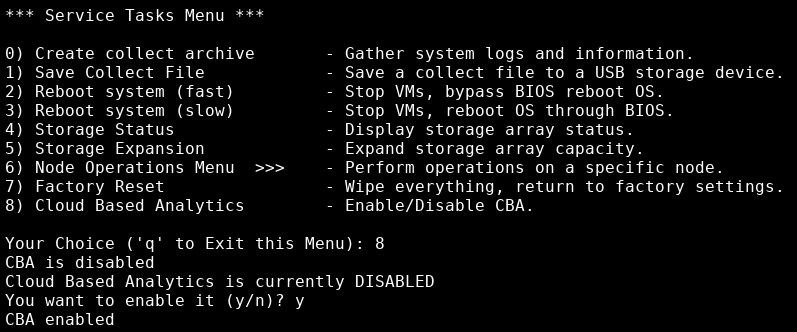
In the Service Tasks Menu, type 8 to enable or disable Cloud-Based Analytics (CBA); then press Enter.
-
The system informs you that Cloud-Based Analytics is disabled, and asks you if you want to enable it; type y, then press Enter.
The system then lets you know that Cloud-Based Analytics is enabled.
Your VS-Series System will automatically upload the data bundles to the Cloud-Based Analytics server every four hours. The uploaded data bundles supply the Cloud-Based Analytics server with current statistics, which in turn provides the opportunity for early identification of any problems with the your VS-Series System.
After data is uploaded to the Cloud-Based Analytics server, it is analyzed to determine the status of the VS-Series System.
You can access information about the uploaded data on the Cloud-Based Analytics dashboard (at: insight.quantum.com). This displays the analytic results of the uploaded data through flexible charting tools, along with an overall health score of the VS-Series System.
To request an account for Cloud-Based Analytics, click the "Request an account" link on the Cloud-Based Analytics site at insight.quantum.com.
You can access your VS-Series System performance and health results on the Cloud-Based Analytics dashboard (at: insight.quantum.com). This dashboard displays the analytic results of the uploaded Cloud-Based Analytics data using flexible charting tools, along with an overall health score of the VS-Series System configured for the Cloud-Based Analytics account.
To request an account for Cloud-Based Analytics, click the "Request an account" link on the Cloud-Based Analytics site at insight.quantum.com.
Cloud-Based Analytics is enabled and disabled through the VS-Settings menu.
- Launch the Host OS console.
-
Double-click VS-Settings to open the VS-Settings Menu.
- Type 4 to open the Service Tasks Menu, then press Enter.
-
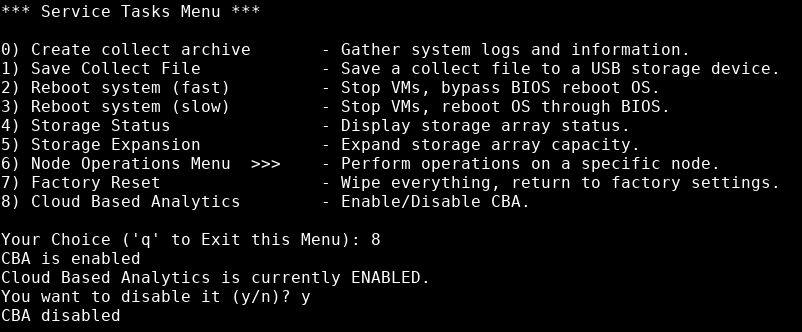
In the Service Tasks Menu, type 8 to enable or disable Cloud-Based Analytics (CBA); then press Enter.
-
The system informs you that Cloud-Based Analytics is enabled, and asks you if you want to disable it; type y, then press Enter.
The system then lets you know that Cloud-Based Analytics is disabled.
Use these instructions to log on to the Host Operating System (OS) console. There, you can use the icons to complete several tasks.
| Icon | Function |
|---|---|
|
|
Use this icon to access the VS-Settings menu, where you can setup your system, change settings, manage a VM, cluster nodes, and complete other tasks. See Use the VS Settings Menu. |
|
|
Use this icon to view the network IP addresses. See Display IP Addresses. |
|
|
Use this icon to create data collect logs to help diagnose an issue. See Generate Data Collect Logs. |
|
|
Use this icon to monitor tickets that are generated by the node. See Monitor and Manage RAS Tickets. |
|
|
Use this icon to fully restart the Host OS (a slow reboot), or to shut down and power off the system. The system will attempt a clean shutdown of a running Windows VM. See Service Tasks Menu for information about rebooting. See Use the VS-Reboot Icon for information about shutting down and powering off the system. |
|
|
Use this icon to monitor a cluster's status. Green indicates that the cluster's status is healthy. Yellow indicates that the cluster has issues. See Monitor a Cluster's Status. |
|
|
Use this icon to monitor the status of VMs on the node. See Monitor a VM. |
|
|
Use this icon to log out of Cent OS (the VS1110-A's operating system). The Login window displays after the operating system logs out. |
Launching the Host OS console through the BMC Port involves first opening the Server Home screen in a browser, then using an HTML5 or Java viewer to access the Host OS console. The first part of the procedure details how to open the Server Home screen; instructions about using the HTML5 and the Java viewers follow.
Additional Information:
The baseboard management controller (BMC) manages the interface between system-management software and platform hardware.
Quantum supports the following browsers for VS products:
- Google Chrome v77.0.3865.75
- Mozilla Firefox v69.0 (64-bit)
- Microsoft Edge v44.18362.329.0
- Internet Explorer v11.356.18362.0
- Apple Safari 12.1.2 (14607.3.9)
Note: Java version 8 or later must be installed to access the Host OS through the Java viewer.
To open the Server Home screen in a browser:
With your laptop connected to the BMC LAN Port:
-
In your browser, type the BMC IP address for the server in the address bar, and press Enter.
Note: Contact your network administrator for your server's company-specific IP address. If you didn’t change the BMC IP address as part of the installation and initial configuration, see Access Default Login and Credentials to find the BMC IP address.
The login dialog appears.
If the Login window does not display, verify that you entered the correct server IP address, and that the network settings on the computer are correct. Wait ten minutes, then try again. If the Login window still does not display, contact Quantum Customer Support. See Contacting Quantum.
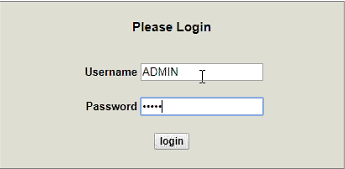
- For this step, use either your company-specified server login credentials, or if your company has not changed the server login credentials, use the Default BMC information provided in Access Default Login Credentials:
- The default username is ADMIN.
- Type default password is BMCadmin1; however, if changed during installation, use your company-specified password.
The Server home screen appears.
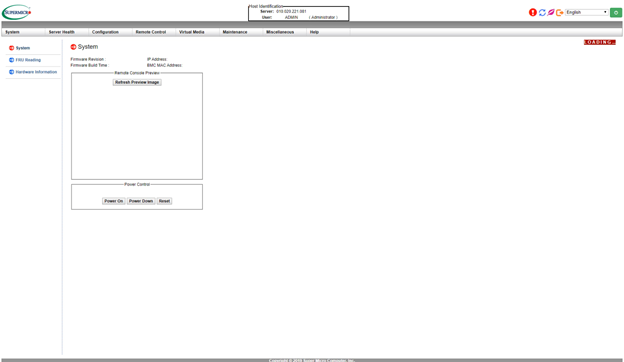
-
At the top of the screen, click the Remote Control list to change the left-side navigation to display Remote Control options.
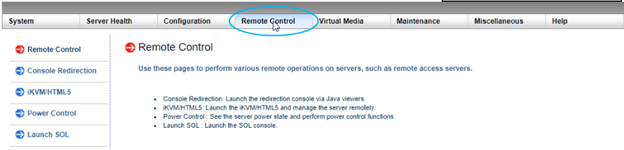
At this point, you can use either an HTML5 or Java viewer to access the Host OS console.
-
In the navigation on the left, click iKVM/HTML5. The iKVM/HTML5 screen appears.
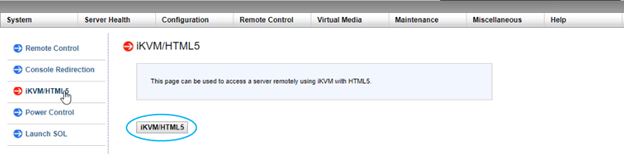
-
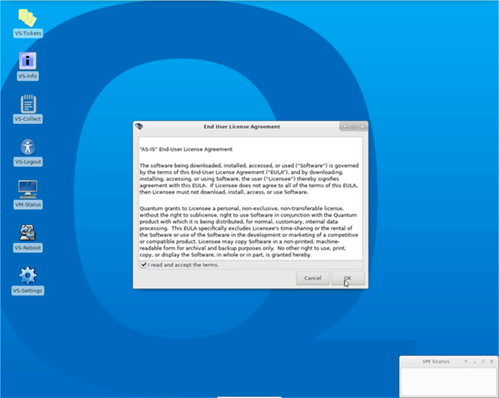
Click the iKVM/HTML5 button to access the Host OS console. If this is the first time that you accessed the Host OS console, the End User License Agreement displays.
-
Click OK to accept the End User License Agreement.
-
In the navigation on the left, click Console Redirection. The Console Redirection screen appears.
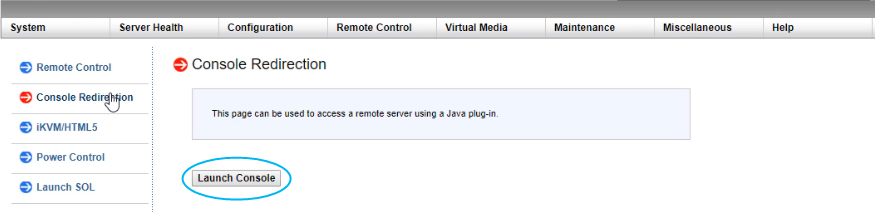
- Click Launch Console to download the launch.jnlp file from the VS1110-A node to your laptop.
-
A download confirmation message asks if you want to keep launch.jnlp; click Keep.

-
Click the downloaded launch.jnlp file to launch it.
-
A confirmation message asks if you want to access the web site from which the Java application will be launched. Click Continue.
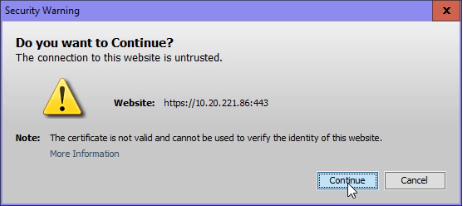
-
A confirmation message asks if you want to run Java. Click Run.

The Host OS Console appears.
-
If this is the first time that you accessed the Host OS console, the End User License Agreement displays. Click OK to accept it.
On the rear panel of the VS1110-A:
- Connect a USB keyboard to one of the two USB 3.0 ports (item 2 below).
-
Connect a USB mouse to the remaining USB 3.0 port (item 2 below).
-
Connect a monitor to the VGA port (item 4 below).
Note: If you use the monitor, keyboard ,and mouse to connect to the VS1110-A, skip to the Configure Your System's Settings section.

Item Description Connect to 1 Management Port CentOS and Windows VMs after initialization
Note: This port is not used for initial configuration.
2 (2) USB 3.0 Ports USB keyboard and mouse 3 BMC LAN Port Laptop via Ethernet connection 4 VGA Port Monitor -
The End User License Agreement displays. Click OK to accept it.
Note: This topic assumes that the VS1110-A is initially configured. See Perform Initial Configuration in the VS1110-A Installation topic for configuration details.
The VS-Settings.sh script on the VS product is a text-based menu interface to all configuration and monitoring of various components in the Host Operating System (OS) portion of the VS product. The X Windows desktop (Windows VS console) includes an icon that launches the VS-Settings.sh script in a terminal window. The VS-Settings interface can also be run from an SSH connection to the server by logging in as the admin user, and then running the /opt/quantum/scripts/VS-Settings.sh file.
To access the VS-Settings Menu:
- Launch the Host OS console.
-
Double-click VS-Settings to open the VS-Settings Menu.
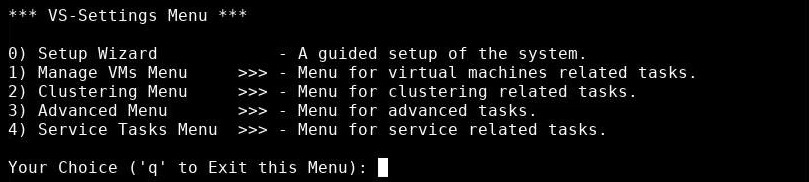
Use this option to initially configure your system. The Setup Wizard configures settings for the items below. You can also change some of these items after initial configuration through the Advanced Menu.
- VS password
- Management network
- Email proxy and email notification recipients (optional)
- Time zone
- System time (optional)
- Default BMC IP address and password (optional)
- Windows VMs
With this menu, you can create and remove a VM, start and stop a VM, and move (force a fail over or fail back) an high availability (HA) VM.
For more information, see Monitor and Manage a VM.
With this option, you can assign a number to a node, and cluster a multi-node configuration for high availability. For more information, see Cluster a Multi-Node Configuration.
You can also monitor the cluster's status. For more information, see Monitor a Cluster's Status.
You can change the password for the user admin account in the Host OS. The default password for the user account is admin. It should be changed to your company's preferred string after installation. You will be prompted for the old password, followed by the new password.

Use this option to change the settings for the management network for the server. This is the IP address information for the management port (Ethernet port 0). It is used to connect to your LAN and Internet. By default, this port is configured as DHCP, and it is recommended that you change this to a static IP address at installation time. The current settings and a prompt to change the settings will display.
Note: You will be prompted for the information above if you select a “manual” (static IP) configuration instead of the default DHCP. Note that changes to the MTU setting may require an equivalent change on your network switch where the system is connected.
-
Review the default settings. To keep them, type n at the Change Current Settings prompt, then press Enter. To change them, type y, press Enter, and then enter your changes at the prompts that follow.
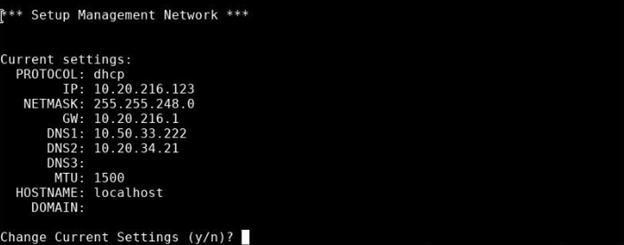
-
Press Enter to accept the default (DHCP) protocol, or type static and press Enter if you want to configure a static IP address for the system.
-
If you selected a static IP configuration, enter the management network settings for your system that are listed below; then press Enter. If you want to accept a setting's default, just press Enter.
- IP address
- Network Mask
- Gateway
- DNS1
- DNS2
- DNS3

-
Enable jumbo frames ONLY if jumbo frames are enabled in the switch for the port; otherwise, communications issues between the server and destination will result. If you want to enable jumbo frames, and if they are supported by the switch, enter y at the Enable Jumbo Frames prompt, then press Enter.
-
Enter the new hostname, then press Enter.
-
Enter the new domain name, then press Enter.

-
When you finish entering the management network settings, the Agree to New Settings prompt appears; press y to confirm your changes, then press Enter.
Note: Changes to network settings are applied when you exit the menu.
Enter the fully-qualified domain name or IP address of the mail server that will send email notifications about RAS tickets and alerts, then the email addresses that will receive them.
-
At the Change email settings prompt, type y, then press Enter.
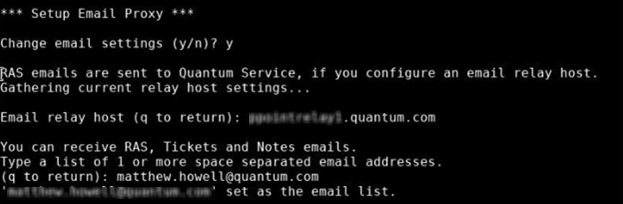
-
At the Email relay host prompt, type the fully qualified domain name or the IP address for your relay host email server, then press Enter.
-
At the Type a list of 1 or more space separated email addresses prompt, type email addresses that will receive RAS tickets and alerts, then press Enter. Quantum Support will also receive tickets and alerts.
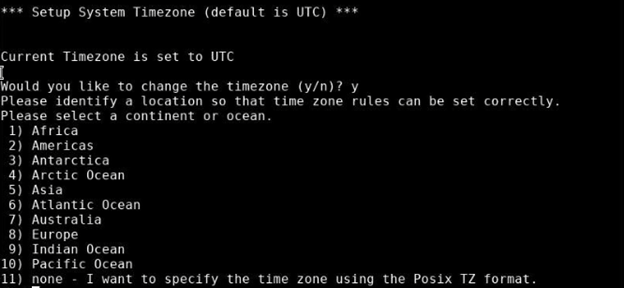
Use option 3 to set the time zone for the system. By default, the system time and time zone are based on UTC. It is recommended to change the time zone to the local time zone for the system.
- At the Would you like to change the timezone prompt, type y, then press Enter.
-
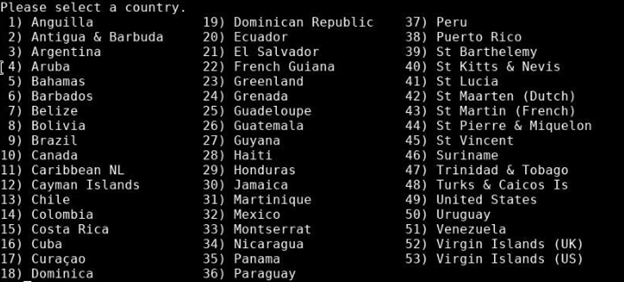
Enter the number for the applicable continent or ocean (1 though 10), then press Enter.
-
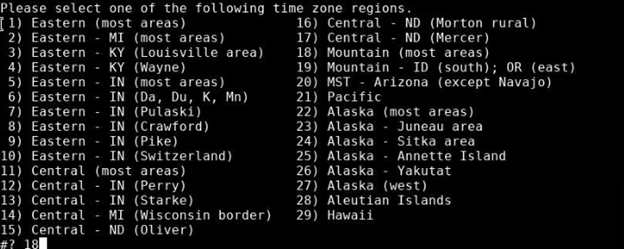
Enter the number for the applicable country, then press Enter.
-
Enter the number for the appropriate state (or region), then press Enter.
-
The system confirms your time zone selections; if they are correct, type 1, then press Enter. If they are incorrect, type 2, then press Enter. You will be prompted again to enter the number for the applicable continent or ocean (see Step 2).

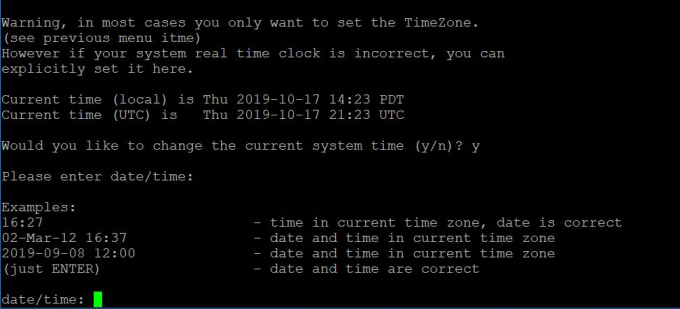
Use option 4 to override the local time on the system with a manual time setting. By default, NTP services are enabled using standard internet NTP servers.
Note: It is recommended that the default time is accepted, and that you do not change the system's time. If it is necessary to change the system’s local time, various formats can be specified for the manual time.
You can change the date and time as shown in the menu instructions. To change the system time, enter the desired time in 24-hour format, then press Enter.
Use option 5 to change the IP address settings for the BMC management interface on the server.
!You can change the default BMC IP address to an IP that matches your local subnet, if needed. You might want to do this to access a console connection through the BMC without having to connect directly with a laptop. You can also change the password for the default ADMIN user account on the BMC.
Note: If you are connected to the BMC, changing these settings will disconnect you from your session, and you will need to reconnect using the new settings.
-
The current BMC port settings display. At the Would you like to change the BMC settings prompt, type y, then press Enter.
- Type the new BMC network settings, pressing Enter after every change:
- BMC IP address
- BMC Netmask
- BMC Gateway IP
To accept a current setting, just press Enter.
-
Type a new BMC Admin password twice to change the password from “BMCadmin1.”
You can use the system to collect data about to the following in a .zip file to assist in diagnosing an issue:
- Host Operating System (OS)
- Windows VM log files
- Metasys log files
- System hardware
- Network
For more information, see Generate Data Collect Logs.
After you create a data collect .zip file with the system, you must download it to your laptop or to a USB drive to forward it to Quantum Customer Support for assistance.
For more information, see Download Data Collect Logs.
You can reboot the server using a “fast” reboot feature in the Host OS. This restarts the OS without unloading the kernel, or going through the HW POST portion of a normal slow reboot.
Note: Both slow and fast system reboots will attempt a clean shutdown of the running Windows VM.
You can reboot the server using a “slow” reboot feature in the Host OS. This fully restarts the Host OS.
Note: Both slow and fast system reboots will attempt a clean shutdown of the running Windows VM.
You can view the current, overall status of the RAID volumes in the system. If background initialization is still in progress, that status also displays.
This option is not available.
This option provides a status of a single node, or of the nodes in a cluster. Online means that the cluster software is functioning.

It also provides the ability to do the following:
- Remove a node from a cluster.
- Enter Maintenance mode, where the both nodes in a cluster will not be automatically managed. In this mode, you can stop a VM without initiating an automatic failover, and a VM will not start automatically. This is useful for making updates to a VM.
- Exit Maintenance mode, where the both nodes will be automatically managed by the clustering software. This enables automatic startup and failover of a VM.
- Enter Standby mode, where the node will not be able to communicate with other nodes. Use this option to service or upgrade a node without affecting its VM or other nodes in the cluster.
- Exit Standby mode, where the node will be able to communicate with other nodes.
You can return the node to factory defaults and settings. This will:
- Remove high availability settings
- Remove the node from the cluster
- Remove the VM
- Reset networking information to defaults
You can elect to retain BMC network information, or reset it to factory defaults.
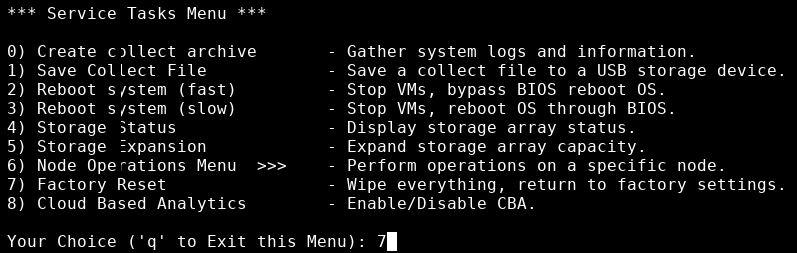
To reset factory defaults:
-
Type 7 for Factory Reset in the Service Tasks menu, then press Enter.
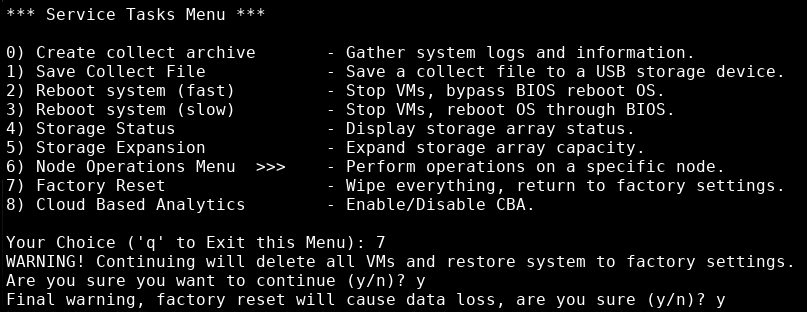
-
A message notifies you that all VMs will be deleted, and the factory settings will be restored. At the Are you sure you want to continue? prompt, type y, then press Enter.

-
At the Final warning, factory reset will cause data loss, are you sure? prompt, type y, then press Enter.
-
At the Reset the BMC network information to factory defaults, type y or n, then press Enter.
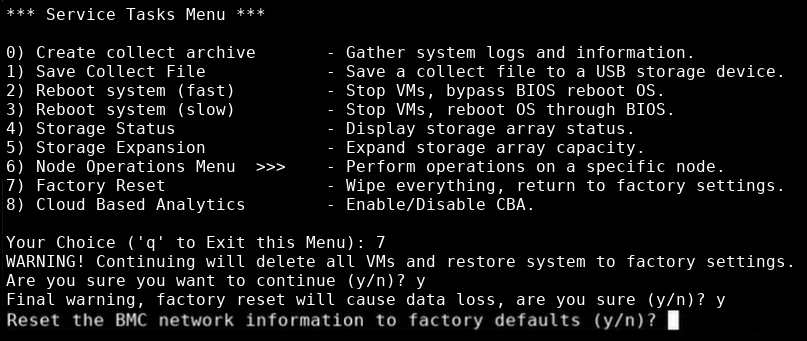
-
The system notifies you of its progress. When it is finished, it reboots, then displays the following:
baseos.sh end.
With this option, you can enable or disable Cloud-Based Analytics, a feature that allows the VS1110-A to collect data about appliance and environment performance. The collected data is bundled and uploaded to the remote Cloud-Based Analytics server for analysis.
For more information, see Enable and Disable Cloud-Based Analytics.