Scalar i7 RAPTOR Unpack and Install
This guide provides hardware installation and initial system configuration instructions for the Scalar i7 RAPTOR library.
Important Information: Tilting the Scalar i7 RAPTOR Library
If a library requires tilting to install into a data center, the procedure should be done by a professional moving service that is licensed, bonded, and insured. DO NOT ATTEMPT to tilt the library without the assistance of a professional moving service! In the event your i7 Raptor is damaged as a result of tilting, the only recourse for product repair or replacement you will have is through the insurance held by the moving company you hired to move the i7 Scalar RAPTOR. Quantum’s product warranty does not cover damage caused by tilting the i7 Scalar RAPTOR.
For more information on tilting the library, refer to Scalar i7 RAPTOR Tilt Instructions.
Packaging Specifications
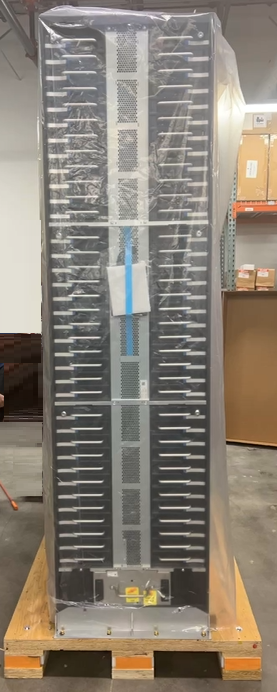
Figure 1: Scalar i7 RAPTOR Package - Front
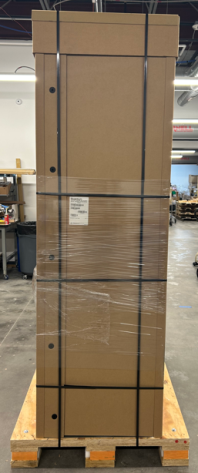
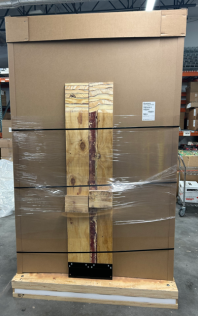
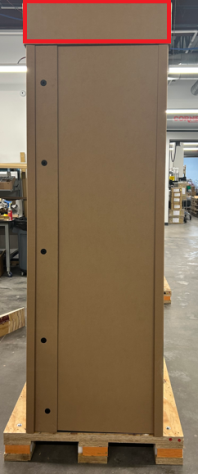
Figure 2: Scalar i7 RAPTOR Package - Side with Ramps Attached
| Shipping Package | Weight | Width | Length | Height |
|---|---|---|---|---|
| Scalar i7 RAPTOR Library |
1919 lbs.¹ (508 kg) |
36.6 in. (92.7 cm) |
60.0 in. (152.4 cm) |
94.6 in. (240.3 cm) |
|
1. Includes 20 LTO drives and empty magazines. Weight varies with configuration. |
||||
Before You Begin
Review the following information before you begin an installation:
- Installation requires a minimum of four people.
- The shipping crate contains sharp and rough edges. Quantum recommends wearing gloves during the installation.
- Installation requires a 13 mm (1/2 inch) socket wrench, a diagonal cutter, and a Phillips screwdriver.
-
Review the Tip and Tells located on the side of the shipping packaging. Make sure the library was not mishandle or tipped before you begin unpacking.

Unpack the Library
Following the instructions below:
-
Using in cutter, remove the shrink wrap that is wrapped around the packaging and ramps.
-
Remove the metal vertical banding across the cardboard packaging.
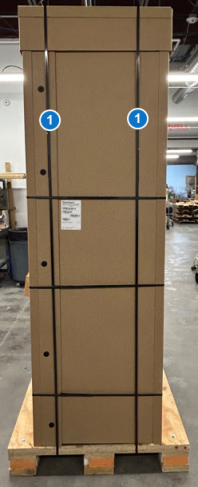
Item Description 1 Vertical Metal Banding -
Remove the horizontal metal banding across the cardboard packaging, taking care to keep the ramps from falling off the side of the packaging platform.
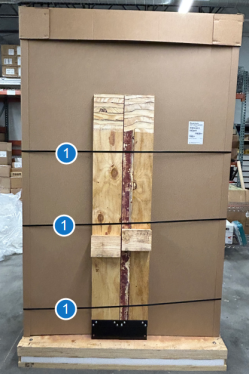
Item Description 1 Horizontal Metal Banding -
Carefully remove the ramp attached to the side of the Scalar i7 RAPTOR packaging and set aside.
-
Remove the cardboard package top.
-
Remove the cardboard edges from each corner of the cardboard packaging.
-
Next, use a screwdriver to unscrew and remove the side cardboard packaging from the Scalar i7 RAPTOR library. There are 5 screws located in the front of the packaging and 5 screws located in the rear of the packaging.
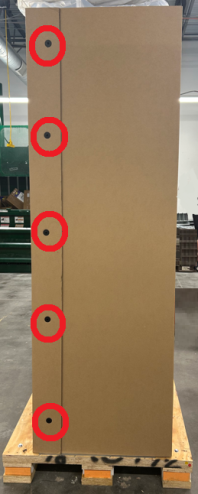
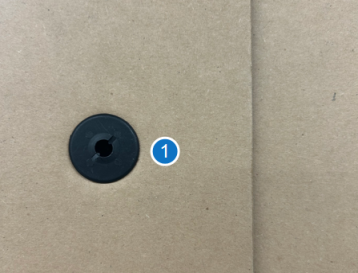
Item Description 1 Cardboard Packaging Screws -
Remove the plastic protection sleeve that cover the Scalar i7 RAPTOR library.
-
Remove the power cable boxes and the magazine lock key from the rear of the library. The magazine lock key is taped to the back of the library.
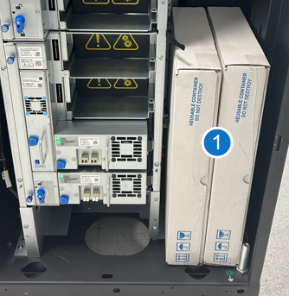
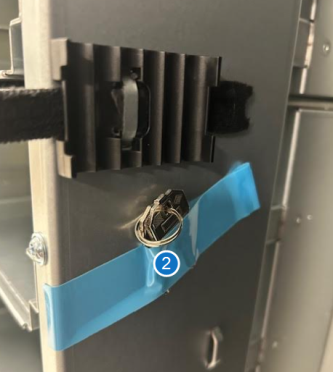
Item Description 1 Power Cord Boxes. Contains the Getting Started Card. Scan the QR code to access the Scalar i7 RAPTOR documentation center. 2 Magazine Lock Key -
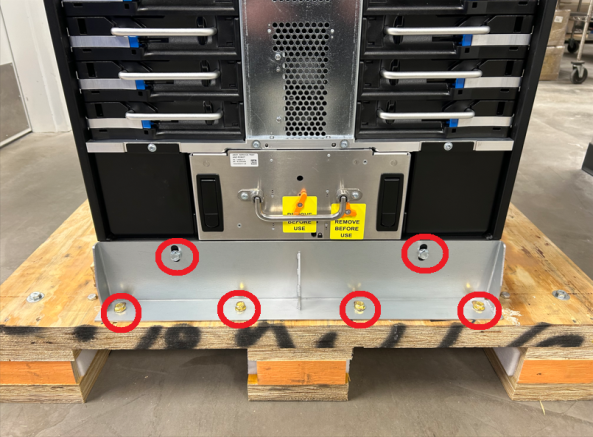
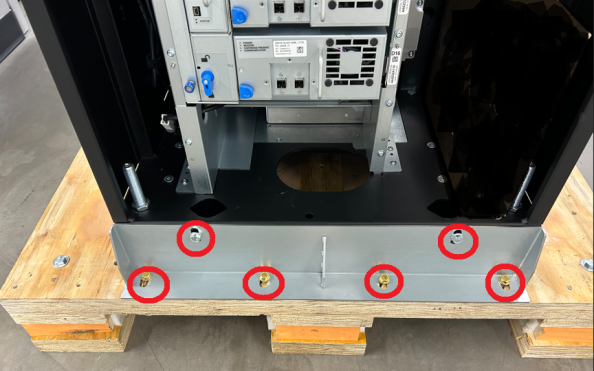
Using a 13 mm (1/2 inch) socket wrench, remove the front shipping brackets that attach the front of the Scalar i7 RAPTOR library to the packaging platform.
-
Using a 13 mm (1/2 inch) socket wrench, remove the front shipping brackets that attach the rear of the Scalar i7 RAPTOR library to the packaging platform.
-
Attach the ramps to the front of the crate:
-
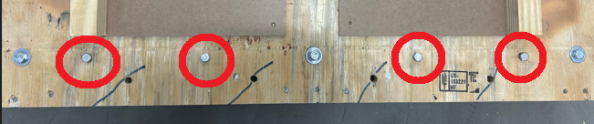
Locate and remove the four bolts attached to the front of the packaging platform.
-
Align the holes on both ramps with the holes in on both ramps.
-
Insert and hand tighten the bolts from the packaging platform into the ramps. This will attach and stabilize the ramps to the packaging platform.
-
-
Carefully remove the Scalar i7 RAPTOR library from the crate using the installed crate ramp.
WARNING!!!!!
Use four people (one person on each corner of the library) to safely push the library down the ramp!
-
Using at least two people, carefully roll the library into the appropriate location in the data center.
Installation Procedure
Follow the steps below to install the Scalar i7 RAPTOR.
Remove the two robot restraints from the front of the Robot Service Tray.

Video: Remove Restraints from the Robot Service Tray
Scan the QR code below:

-
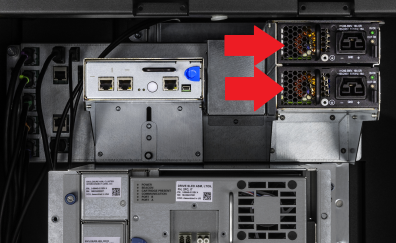
Install the power cords from the PSU to the library.
-
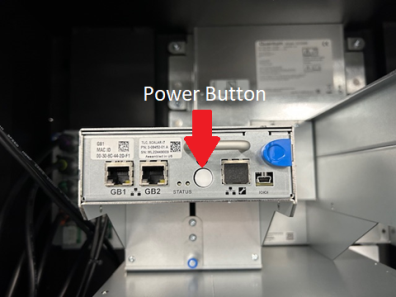
Power up the library.
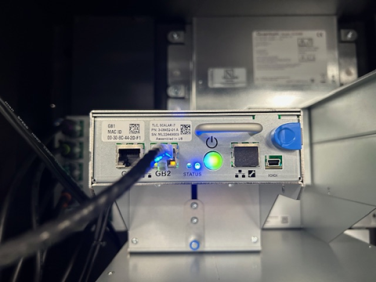
The power button is located in the rear of the library on the Tape Library Controller (TLC). Push the button for approximately 1 second to begin the power up process. The button will turn solid green. The TLC and Drive Cluster Controllers (DCCs) will immediately power up. The rest of the system (controllers and robotics) will then begin initialization.
Depending on the library configuration, total power up time will be 2 to 5 minutes.
-
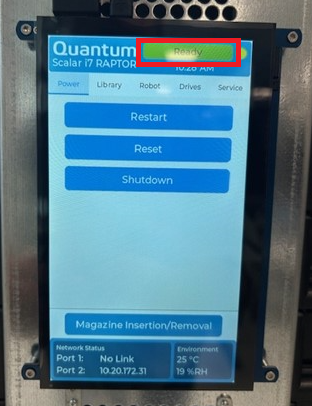
On the Local User Interface (LUI), confirm that the system goes into a ready state. If the library is not in a ready state, contact Quantum service and support.
-
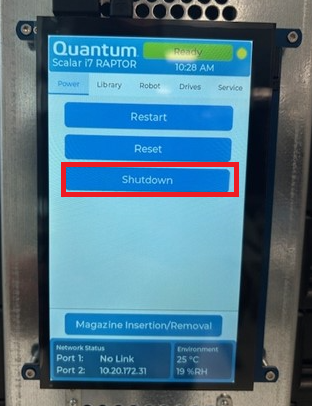
Once it has been confirmed the library is in a ready state, shut down the library using the LUI.
The Scalar i7 RAPTOR library contains either 24, 48, or 72 magazines. Each magazine front and back slots, 2 rows, and 7 columns for a total of 28 media slots per magazine.
Magazines are configured in a bottom, middle, and top group. Each group contains 24 magazines (12 left magazines and 12 right magazines.
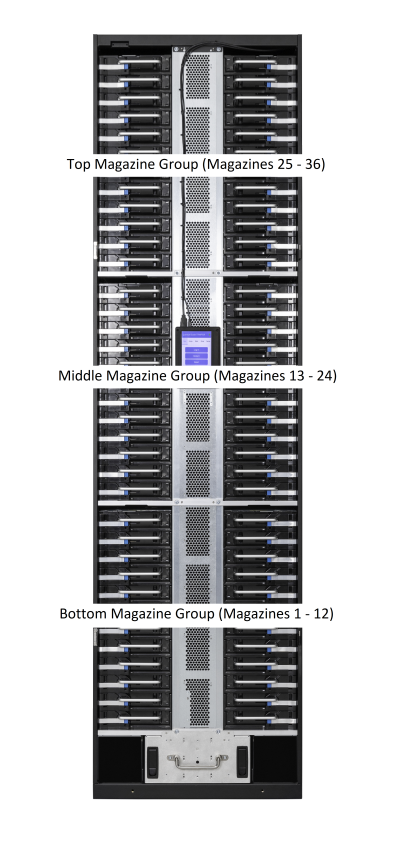
The left magazine and the right magazine at the top of each section contains a lock. You must unlock these magazines to gain access to all the magazines in the group below.
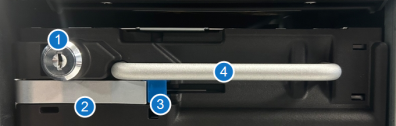
| Item | Name | Description |
|---|---|---|
| 1 | Magazine Lock | Used to lock and unlock the magazines in a group. Only the top left and right magazines in a magazine group will have a lock. |
| 2 | Lever | Used to disengage and the magazine from the library and engage the magazine back into the library. |
| 3 | Lever Release | Used to release the lever, |
|
4 |
Handle | Used to remove and install the magazine into the library. |
To access a magazine, you must remove all magazines above the magazine you want to remove in the group. For example, if you want to remove the left magazine in section 7 below, you will first need to unlock and remove the magazine in section 12, then remove the magazines in sections 11 - 8 to access the magazine in section 7.

-
Using the key provided, unlock the magazine at the top of the magazine group.
-
Push on the blue lever release. The release lever will swing open and disengage the magazine from the library.
-
Using one hand on the handle and one hand to support the magazine, slowly slide the magazine out of the library.
-
Repeat steps 2 and 3 until you can access the magazine in the group you wish to removed.
Video: Remove Magazines
Scan the QR code below.

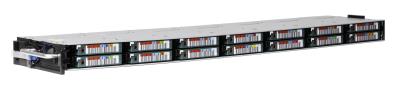
Scalar i7 RAPTOR magazines contain a rear slot and a front slot. To load the magazine, do the following:
-
Insert the media tape with the label facing out in to the slot. The media tape will set into the front slot.
-
With the label facing out, push another media tape into the same slot. The spring loaded slot will then push the first media tape into the rear slot and set the second media tape into the front slot.
Video: Load Media
Scan the QR code below.

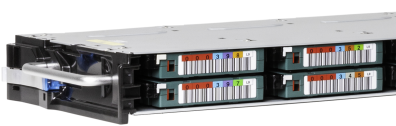
To unload the magazine, do the following:
-
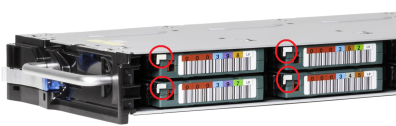
Each front magazine slot has a slot release lever (circled below). Push the release lever to the left. Once the lever clears the front media tape, the spring-loaded tape will eject out of the slot.
-
Remove the front media tape from the slot. The spring will then push the rear media tape to the front slot. Once again, push the release lever to the left so that it clears the front to the media tape. The spring-loaded tape will eject out of the slot.
-
Remove the media tape from the slot.
Video: Unload Media
Scan the QR code below.

-
Using one hand on the handle and one hand supporting the magazine, slowly slide the magazine into the library until the front of the magazine is flush with the library.
-
Push in the release lever until it connects to the blue lever release. The library is now engaged into the library.
-
Repeat steps 1 and 2 until the top magazine in the group is installed. Using the key provided, lock the top magazine.
Video: Insert Magazines
Scan the QR code below.

-
Power up the library using the power button on the TLC.
-
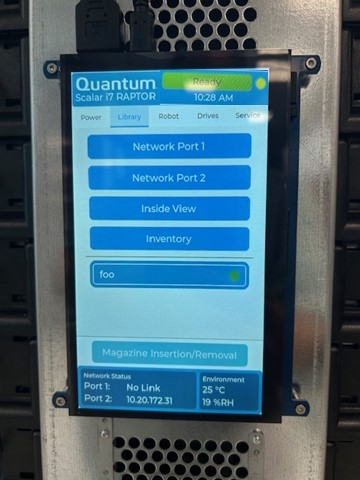
Using the LUI, set the library IP address. Before setting the library IP address, connect the library from the TLC to a network using Port 1 (GB1) or Port 2 (GB2).
-
Once the network connection to the library is confirmed, select the Library menu option in the LUI.
-
Select the Network Port 1 or Network Port 2 option. A dialog box will open to configure the port.
-
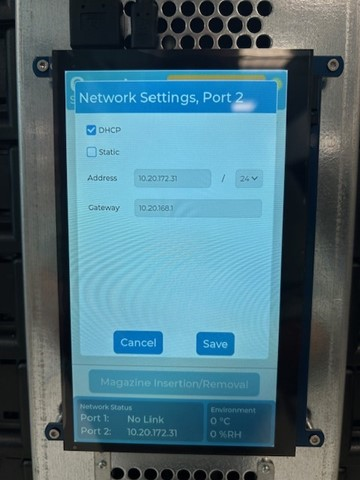
Enter the following:
-
Select DHCP or Static.
-
If static, enter the IP address, port number, and gateway address.
-
Select Save.
-
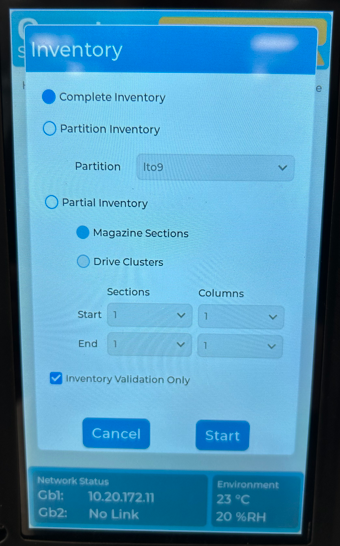
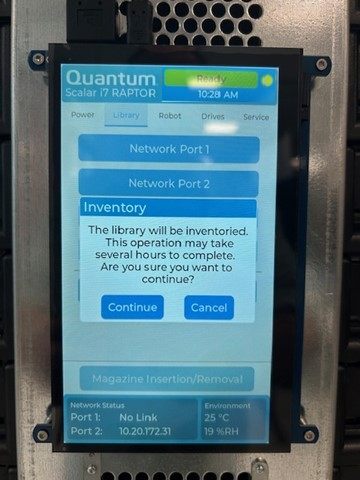
Once the library is in a ready state and contains media, start a full library inventory.
Note: Library auto inventory is set to off by default.
Important Inventory Information
-
This inventory covers slot inventory and library configuration.
-
A full inventory for a library will a maximum magazine and media configuration (72 magazines/2016 filled media slots) will take approximately 5 hours.
-
If the library inventory fails, the inventory will stop at the point of failure. Once the issue is resolved and inventory resumes, the library will continue the inventory from the previous point of failure.
-
If the library inventory fails, review the RAS ticket(s) and attempt to resolve the failure issues. Contact Quantum for additional support.
-
In the LUI, select the Library menu option.
-
Select the Inventory button. The Inventory dialog box appears.
-
Select the Complete Inventory radio button and select Start. A dialog box will appear asking if you want to continue with the Inventory.
-
Select Continue.
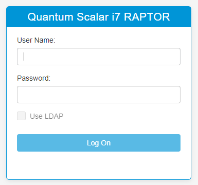
WebGUI Support
The WebGUI is accessed by entering the IP address of the system into a web browser. The default login is the following:
User Name: admin
Password: password
Once you have entered the Web GUI you can create additional users and change the default admin password.
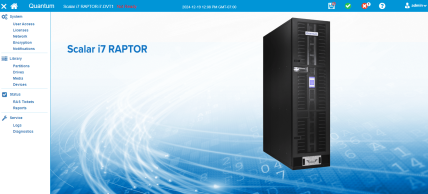
LUI Support
The Local User Interface (LUI) display is on the front of the library.

The LUI supports the following library functions:
-
Library Power Off / Reset
-
Library Inventory
-
Library Diagnostics
-
Display Drives, Drive Status
-
Drive Replacement
-
Robot Vary On / Vary Off
-
Robot Park for Replacement
-
Display and set IP Address for 2 Network Ports
