Overview
This document reviews the procedures that need to occur before tilting a library.
The Quantum Scalar i7 RAPTOR library is a 48U system and has a height of 90.2 in.(229.1 cm). Some data centers may not have the proper door height to install the Scalar i7 RAPTOR into the data center. In this scenario, the library must be tilted backwards to allow successful passage through the doors into the data center.
Tilting the Scalar i7 RAPTOR Library
If a library requires tilting to install into a data center, the procedure should be done by a professional moving service that is licensed, bonded, and insured. DO NOT ATTEMPT to tilt the library without the assistance of a professional moving service! In the event your i7 Raptor is damaged as a result of tilting, the only recourse for product repair or replacement you will have is through the insurance held by the moving company you hired to move the i7 Scalar RAPTOR. Quantum’s product warranty does not cover damage caused by tilting the i7 Scalar RAPTOR.
Important Tilting Information
-
Remove all components from the library documented in the Before You Begin section below. This reduces the weight of the library before tilting and prevents library components from being damaged.
-
Lay the library down on the rear of the chassis only. DO NOT lay the library down on its front or sides! Laying the library down on its front or sides can damage the library chassis and render the library inoperable.
Before You Begin
Before the Scalar i7 RAPTOR library is tilted, the following components must be removed from the library to reduce weight and prevent damage to components. Removal procedures are documented below:
Remove Magazines
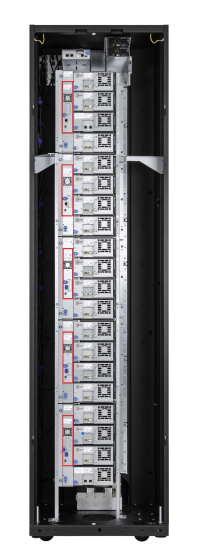
The Scalar i7 RAPTOR library contains either 24, 48, or 72 magazines. Each magazine has front and back slots, 2 rows, and 7 columns for a total of 28 media slots per magazine.
Magazines are configured in a bottom, middle, and top group. Each group contains 24 magazines (12 left magazines and 12 right magazines.

The left magazine and the right magazine at the top of each section contains a lock. You must unlock these magazines to gain access to all the magazines in the group below.
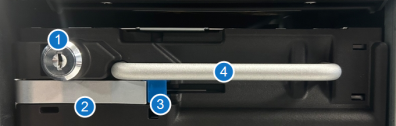
| Item | Name | Description |
|---|---|---|
| 1 | Magazine Lock | Used to lock and unlock the magazines in a group. Only the top left and right magazines in a magazine group will have a lock. |
| 2 | Lever | Used to disengage and the magazine from the library and engage the magazine back into the library. |
| 3 | Lever Release | Used to release the lever, |
|
4 |
Handle | Used to remove and install the magazine into the library. |
-
Using the key(s) provided with the library, unlock the magazine at the top of the magazine group.
-
Push on the blue lever release. The release lever will swing open and disengage the magazine from the library.
-
Using one hand on the handle and one hand to support the magazine, slowly slide the magazine out of the library.
-
Repeat the steps above until all magazines are removed from the library.
Video: Remove Magazines
Scan the QR code below to download the video to a mobile device.

Remove Robot Service Tray
-
Verify that the robot restraints are installed on the front of the Robot Service Tray.
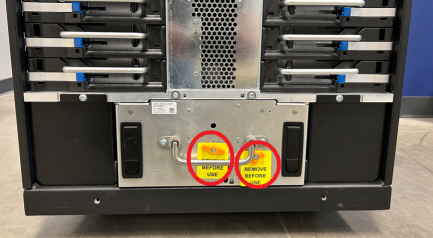
If the restraints are not in the service tray, install them before removing the service tray from the library.
Video: Install Restraints in the Robot Service Tray
Scan the QR code below to download the video to a mobile device.

-
Push the latch releases on the left and right latches. The latches will flip up.
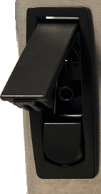
-
Using the handle, slowly pull the service tray out of the library.
Remove Drives
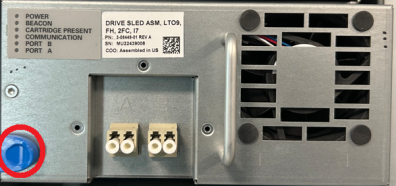
Tape drives are installed in the back of the library. The Scalar i7 RAPTOR supports 1 - 20 tape drives.

| Item | Name | Description |
|---|---|---|
|
1 |
Unlock Lever |
The unlock lever must be pushed to the right before the drive sled can be removed from the library. |
| 2 | Handle |
Used to remove and install the power supply. |
-
On the left side of the drive sled, push the unlock lever to the right. Using the handle, slowly slide the drive out of the drive slot.
Video: Remove the Drive
Scan the QR code below to download the video to a mobile device.

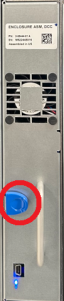
Remove Drive Cluster Controllers (DCC)
The Drive Cluster Controllers provide connectivity and control of the LTO drives to the library. Each drive controller cluster controls up to 4 LTO drives.
The DCCs are located in the back of the library.
-
Push the blue release lever to the right.
-
Using the handle, pull the DCC out of its slot. The drives in the DCC cluster will power off when the DCC is removed.
Video: Remove the DCC
Scan the QR code below to download the video to a mobile device.

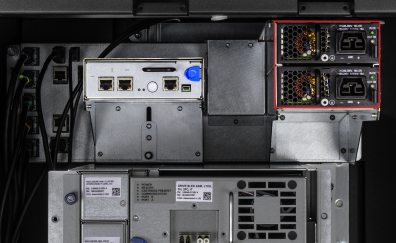
Remove Power Supplies
Power supplies are located in the power shelf in the top rear of the Scalar i7 RAPTOR library.
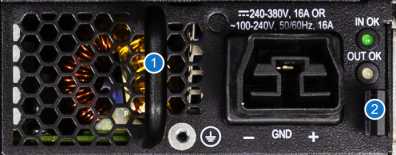
| Item | Name | Description |
|---|---|---|
|
1 |
Handle | Used to remove and install the power supply. |
| 2 | Lever | Used to remove the power supply. |
- Push the lever to the left.
- Using the handle, slide the power supply out of the power shelf.
- Repeat Steps 1 - 2 for the second power supply.
Video: Remove the Power Supply
Scan the QR code below to download the video to a mobile device.

Remove Tape Library Controller (TLC)
The Tape Library Controller (TLC) is the main controller for all library operations. It contains the user interface operations, Web Services, and it stores the configuration.
The TLC is located in the power shelf in the top rear of the Scalar i7 RAPTOR library.

-
Push the blue release lever to the left.
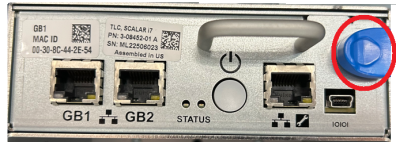
- Using the handle, pull the TLC out of its slot in the power shelf.
Video: Remove the TLC
Scan the QR code below to download the video to a mobile device.

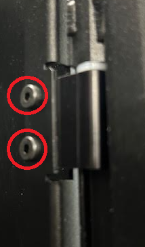
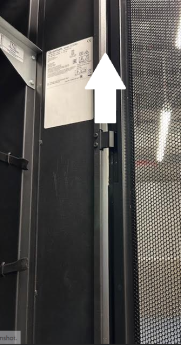
Remove Rear Door and Door Hinges
Tools Required: T10 Torx screwdriver
-
Remove the rear doors on the library by lifting the doors upwards, The door pins will slide out off the door hinges.
-
Using a T10 Torx screwdriver, remove the two left door hinges and two right door hinges from the library. These hinges must be removed to prevent damage to the hinges if the library needs to be laid down on its rear chassis.