Recovering VM Disks Using iSCSI
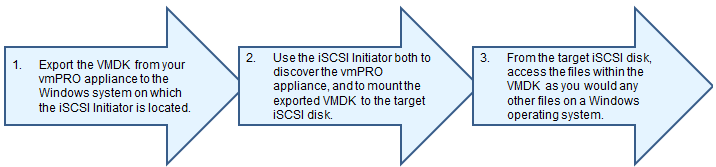
Use the following workflow to recover virtual machine disk images (VMDKs) using iSCSI:
Figure 1: iSCSI Recovery Workflow
 Export VMDKs to an iSCSI target
- From the SmartMotion Backup menu, select Recover to display the Recover Virtual Machines Wizard.
Figure 2: Recover Virtual Machines Wizard
- As needed, filter the list of VMs from which to select by doing the following:
- In the Filter VM Name field, enter the name of the VM to recover.
- In the Backup in the last xx days drop-down list, select to display VMs that have been backed up in the last 30 or 60 days, or select to display all backup history.
- Click Update filter to update the list of VMs based on the filter criteria.
- Select the VMs to recover by doing one of the following:
- In the Recover from drop-down list for each selected VM, select the date and time of the backup from which to recover data.
Note: If you are performing a recovery using iSCSI, click Manage iSCSI Targets to display the iSCSI Targets dialog box. Use this dialog box to view your current iSCSI targets, as well as to remove iSCSI targets you no longer need. See Manually Cleaning Up the Exchange Server.
- Click Next to display the Select the type of recovery to perform page.
Figure 3: Select the type of recovery to perform Page
- Select iSCSI Export and click Next to display the Enable Disks for iSCSI Export dialog box.
Figure 4: Enable Disks for iSCSI Export Dialog Box
- Select the check box next to each VMDK to export to the iSCSI target.
Note: Click Manage All iSCSI Targets to display the iSCSI Targets dialog box. Use this dialog box to view your current iSCSI targets, as well as to remove iSCSI targets you no longer need. See the Remove the iSCSI Target task in Manually Cleaning Up the Exchange Server.
- In the iSCSI Initiator IP Address field, enter the address of the computer on which the iSCSI Initiator is running.
- In the iSCSI User drop-down list, select one of the following:
- The user created for the iSCSI Initiator.
- Create New User to display the Configure User dialog box. Use this dialog box to create a user for the iSCSI Initiator. See Configuring Users for a vmPRO Appliance.
- In the Password field, enter the 12- to-16-character password assigned to the iSCSI user.
- Click Export Selected Disks to export the selected VMDKs to the iSCSI target.
- Click OK to exit the wizard.
Recover disk images from the iSCSI Initiator
- Open your iSCSI Initiator.
- Discover the vmPRO:
- Click the Discovery tab to display the Discovery page.
- Click Discover Portal to display the Discover Target Portal dialog box.
- In the IP address or DNS name field, enter the IP address of your vmPRO appliance.
- Click OK to save changes and exit the dialog box.
- Click the Targets tab of the iSCSI Initiator to display the vmPRO appliance in the Discovered targets field.
Figure 5: Targets Page
- Select the vmPRO appliance, and click Connect to display the Connect To Target dialog box.
- Click Advanced to display the Advanced Settings dialog box.
Figure 6: Advanced Settings Dialog Box
- Connect to the iSCSI target from the vmPRO appliance:
- Select the Enable CHAP log on check box to encrypt the password needed to access the target.
- In the Name field, enter the user name created for the vmPRO iSCSI user. See the "Prerequisites" section of About iSCSI Export and Recovery.
- In the Target secret field, enter the password assigned to the vmPRO iSCSI user.
- Click OK to save changes and exit the dialog box.
- In the Connect To Target dialog box, click OK to display an AutoPlay dialog box, which you can use to access your mounted VMDK.
Figure 7: AutoPlay Dialog Box for iSCSI Target
- Open your mounted VMDK to access its files.
Caution: Do not close the iSCSI Initiator after connecting to the target vmPRO appliance. If you close the iSCSI Initiator, the AutoPlay dialog box will not display, and you will be unable to access the files on the VMDKs without repeating the discovery and connection process.
Abort an iSCSI export
- Display the iSCSI Targets dialog box by doing one of the following:
- From the SmartMotion Backup menu, select iSCSI Targets.
- From the Recover Virtual Machines Wizard, click Manage iSCSI Targets.
Figure 8: iSCSI Targets Dialog Box
- Select the VMDK being exported to an iSCSI target.
- Click
 to abort the export.
- Click OK to save updates and exit the dialog box.


