 minute read
To configure a StorNext File System or the StorNext client on Windows operating systems, use the Windows configuration utilities. The configuration utilities let you set up a Windows-based Metadata Controller, configure a StorNext client, and work with StorNext file systems.
This section contains the required steps to configure StorNext, and also provides a description of all the other configuration utilities that StorNext provides.
Once you have installed StorNext, follow the steps below to configure StorNext.
To obtain StorNext component and feature licenses, see Obtain and Install StorNext Licenses – GUI-based Appliances and Customer-supplied MDCs. After following those steps, you will have a license.dat file, and then continue with the following procedure.
-
Copy the file to the C:\Program Files\StorNext\config directory. If there is a temporary license file, rename the file or move it to a backup location.
Note: To prevent accidentally losing a valid license, be sure to back up or rename any existing license.dat files.
- Install StorNext File System (see Install the StorNext File System on a Windows MDC: Interactively). Licenses can be installed as part of the installation process or later if desired.
-
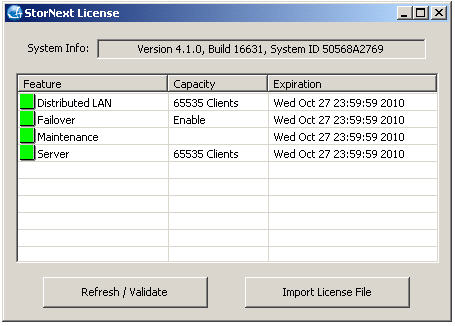
If installing licenses after the initial install, click Start > All Programs > StorNext File System > Licenses. The StorNext License screen displays.
-
Click Import License File. The License Import File window opens.
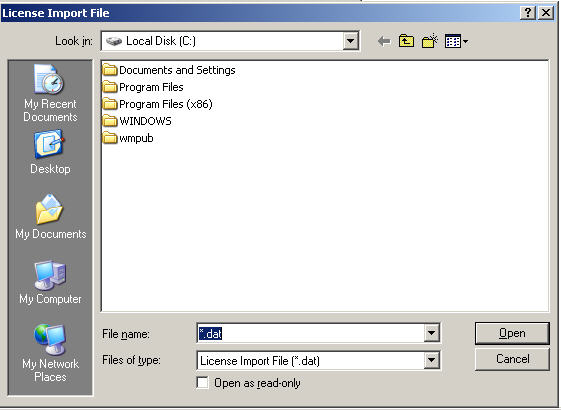
- Browse to the license file location and click Open. The licenses are installed and a confirmation dialog box displays.
- Click OK. The StorNext License screen displays again.
-
Close the window by clicking the X in the upper right corner. The Installation Complete dialog box displays.
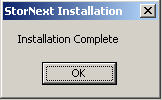
- Click OK in the Installation Complete dialog box.
- Reboot the system if instructed to do so.
The purpose of a File System Name Server is to track the IP addresses of StorNext component servers, such as file system servers and gateways. StorNext SAN clients and LAN clients query name servers to locate appropriate services. The name server is a critical component for handing failover.
Every computer running StorNext components must have an fsnameservers file. The default location is Program Files\StorNext\config\fsnameservers.
At least one, but preferably two of the systems that have StorNext Server installed must be designated as a StorNext Name Server. The Name Server and Metadata Controller (MDC) can be the same machine.
Note: The Name Servers configuration (including the ordering) must be identical on every computer running StorNext.
StorNext name servers can be added as either IP addresses or computer names, but when possible you should use IP addresses to avoid ambiguity.
Follow these steps to add a name server:
-
Access the name servers utility from the Windows Start menu (Start > All Programs > StorNext File System > Name Servers). The StorNext Name Servers window appears.
Note: You may also access the name servers utility from the StorNext configuration window (see Use the StorNext Configuration Window).
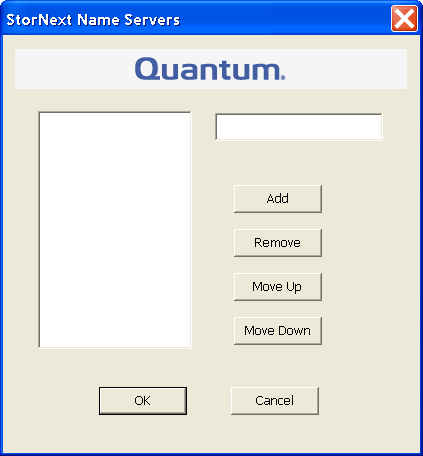
- Enter the IP address, and then click Add. The IP address will be added to the list on the left side of the window.
-
If desired, manipulate the order by selecting a name server and then clicking Move Up or Move Down. Name servers will be used in the order specified.
Note: The Name Servers configuration (including the ordering) must be identical on all computers running StorNext.
- To remove a name server, click the name server you want to remove and then click Remove. Confirm the deletion when prompted.
- When you are finished adding name servers, click OK.
Note: This feature is not available for client-only configurations.
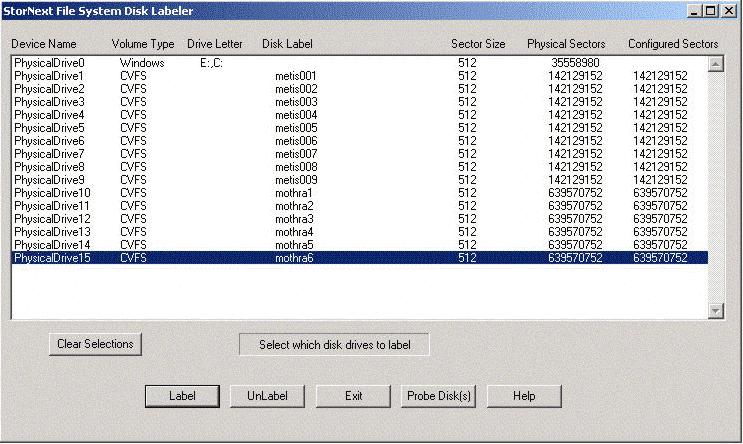
Use the Disk Labeler to configure StorNext File System storage area network (SAN) disks. Each disk that is to be used in the file system must have a StorNext File System Label. The Disk Labeler formats the disk so it can be used by StorNext. Use the Disk Labeler to create a list of disk labels, associated device names, and optionally the sectors to use.
Run the Disk Device Label Tool on a system that has visibility to all disk devices on the SAN.
Caution: Use extreme caution when labeling your storage area network disk devices. Inadvertently labeling a Windows system disk will cause irreparable harm to your system and/or loss of data! Only label disk devices that are intended for use with the StorNext File System SAN.
The file system uses the volume labels to determine which disk drives to use. The label name written to a disk device must match the disk name specified in the Server Configuration utility (see Step 4: Configure a Server (Advanced)).
Follow the steps below to label a disk drive:
-
Access the disk labeler from the Windows Start menu (Start > All Programs > StorNext File System > Disk Labeler).
Note: You may also access the disk labeler from the StorNext configuration window (see Use the StorNext Configuration Window).
The StorNext File System Disk Labeler window appears. All disk devices are scanned for labels, and those devices with labels are displayed.
Note: The label type NotVerified is used for disks that are unusable or represent a secondary (passive) path to a disk that appears elsewhere in the list. The label type TooLarge is used for disks that have valid StorNext labels, but are not usable on this system without re-labeling, because the system SCSI driver cannot access disk blocks beyond block number 4294967295.
- Do one of the following:
- Click Label to write a volume label to the selected device(s) (see Label a Disk).
- Click UnLabel to remove the existing volume label from the selected device(s).
- Click Exit to quit the Disk Device Labeler utility.
- Click Probe Disk(s) to pulse the activity light of the selected device(s). Use this feature to correctly identify disks before labeling them.
- Click Clear Selections to deselect all devices in the list.
Follow the steps below to label a disk.
- Select the disks you wish to label. If desired, verify that the disks selected are the correct ones by pressing the Probe Disk(s) button. The activity light on selected disks will pulse, allowing visual verification that the correct disk drives are selected. This procedure will continue until you click the Stop button.
- After you have verified that the correct disk devices are selected, press the Label button. A confirmation screen appears asking if you are sure you want to proceed.
- Click OK to continue.
-
A properties screen for each disk appears, one at a time. This screen allows you to name the disk and assign the configured number of sectors to use on the disk.
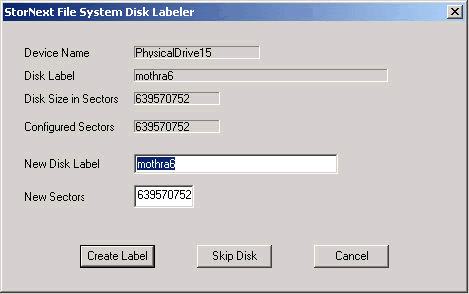
- Enter the following fields:
- New Disk Label: The label you want to give the disk.
New Sectors: The number in 512-byte sectors you will use in the DiskType configuration during file system configuration.
Normally you will use the default number of new sectors provided by the tool. However, some disks must be configured smaller than their actual size. For example, MPIRE video disks must be under-configured to eliminate using the last zone of the disk.
- Click Create Label to commit the label to the disk device. If more than one disk was selected, a properties screen for the next device will appear until all of the selected devices are completed. If you click Skip Disk, then you proceed to the next selected disk.
Note: Not available for client-only configurations.
The Advanced Server Configuration utility lets you view and modify properties for an MDC. Use this utility to create a new server configuration or modify an existing configuration. This tool provides access to advanced features of StorNext File Systems. It is assumed that you are familiar with individual features available in the File System Cfg File (.cfg).
-
Access the advanced server configuration utility from the Windows Start menu Start > All Programs > StorNext File System > File System Cfg (Advanced). The File System Configuration window appears.
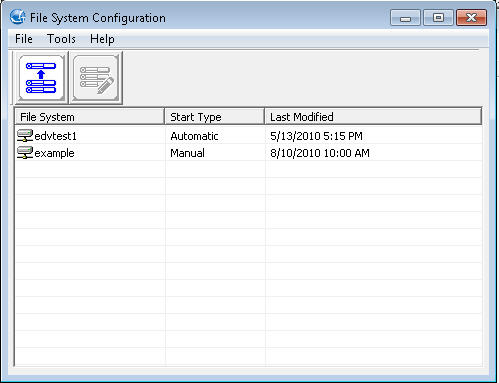
- Do one of the following:
- Click Create New Configuration to create a new configuration file.
- Select an existing file and click Open Existing Configuration to edit an existing configuration file.
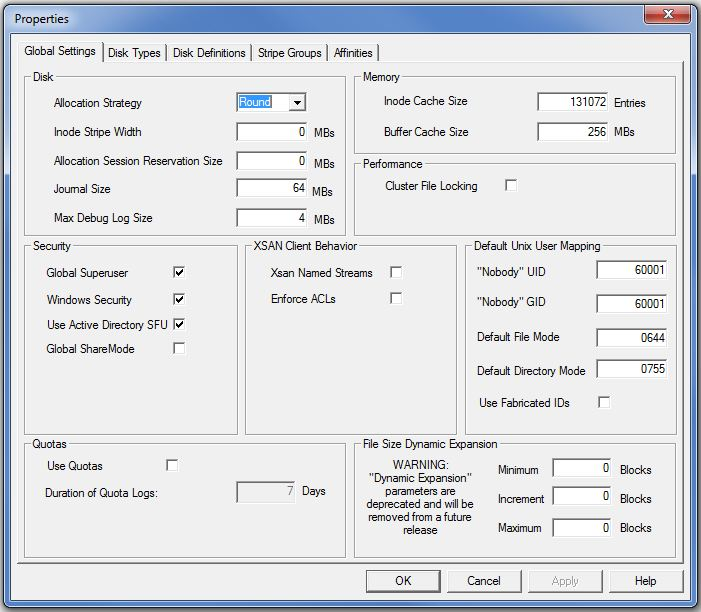
The Properties window appears. This window includes four tabs:
 Global Settings
Use the Global Settings parameters to specify general file system properties. The table below describes the fields on the Global Settings tab.
Field / Button
Description
Disk
Allocation Strategy
Select the method of allocation for new disk blocks:
- Round: Alternate between similar stripe groups. (Default)
- Fill: Use the stripe group with the least amount of free space (that can accommodate the file) before using the stripe group with the next smallest amount of free space.
- Balance: Use the stripe group with the most free space.
Inode Stripe Width
(Optional) Specify a value in MB.
This feature defines how a file is striped across the file system’s data stripe groups.
See the Windows on‑line help for additional information.
Allocation Session Reservation Size
(Optional) Specify the size (in MB) this feature should use when allocating segments for a session.
This features allows a file system to benefit from optimized allocation behavior for certain rich media streaming applications, and potentially other workloads. The feature also focuses on reducing free space fragmentation.
This feature is disabled by default; a value of 0 is the default value, which means the feature is turned off. When enabled, the value can range from 128 MB (134217728) to 1 TB (1099511627776); the largest value would indicate segments are 1 TB in size, which is extremely large.
Journal Size
Type the maximum size (in MB) for the journal.
Max Debug Log Size
Type the maximum size (in MB) for the debug log.
Memory
Inode Cache Size
Type the number of entries in the inode cache.
Buffer Cache Size
Type the amount of memory (in MB) used for general metadata information caching.
Performance
Cluster File Locking
(Optional) Select to send a warning when a user attempts to access a file that is locked or already in use.
Security
Global Superuser
(Optional) Select to allow a user with superuser privileges to have global access rights on the file system.
Windows Security
(Optional) Select to use Windows Security Reference Monitor (ACLs) on Windows clients.
Use Active Directory SFU
(Optional) Select to enable or disable the use of Microsoft’s Active Directory Services for UNIX (SFU) on Windows based SNFS clients.
Always use Active Directory SFU in a mixed Windows/Unix environment, or if there is a possibility in the future of moving to a mixed environment. If Use Active Directory SFU is disabled, files created on Windows based SNFS clients will always have their UID and GID set to NOBODY with default permissions.
Global ShareMode
(Optional) Select to enable or disable the enforcement of Windows Share Modes across StorNext clients. This feature is limited to StorNext clients running on Microsoft Windows platforms.
See the Windows CreateFile documentation for the details on the behavior of share modes.
When enabled, sharing violations will be detected between processes on different StorNext clients accessing the same file. Otherwise, sharing violations will only be detected between processes on the same system.
XSAN Client Behavior
Xsan Named Streams
(Optional) Select to enable or disable support for Apple Named Streams.
The namedStreams parameter enables or disables support for Apple Named Streams. Named Streams can be used by macOS clients to efficiently store resource forks and extended attributes directly in file system metadata instead of using Apple Double files.
If namedStreams is not enabled when the file system is initialized, cvupdatefs(8) must be run after enabling namedStreams for it to take effect. The FSM will not activate if it detects that namedStreams has been enabled in the config file, but the metadata has not been updated by cvupdatefs.
Enabling namedStreams is meant to be a permanent operation. Once enabled, disabling namedStreams requires a special procedure only available through technical support that is not always feasible.
Note: Note that most "copy" programs on Windows and Linux do not preserve namedStreams. This includes Windows Explorer.
Note: This parameter applies to Apple Named Streams support in the file system only. The StorNext NAS SMB server has its own named streams option that must be activated separately.
Enforce ACLs
(Optional) Select to enable Access Control List enforcement on XSan clients. On non-XSan MDCs, Windows Security should also be enabled for this feature to work with XSan clients.
Default Unix User Mapping
"Nobody" UID
Type the Windows user ID to use when no user ID can be found using Active Directory.
"Nobody" GID
Type the Windows group ID to use when no group ID can be found using Active Directory.
Default File Mode
Type the permission mode to use when creating files.
Default Directory Mode
Type the permission mode to use when creating directories.
Use Fabricated IDs
Select if the Metadata Controller is running on Apple macOS X.
Quotas
Use Quotas
(Optional) Select to enforce file system quotas and track storage usage for individual users and groups.
Duration of Quota Logs
Type the duration (in days) of the system quota logs.
File Size Dynamic Expansion
Note: File Size Dynamic Expansion is calculated on a file-by-file basis for better performance. If this is not working optimally, you can use these settings to override the file-by-file calculations.
Minimum
(Deprecated) Type the minimum number (in blocks) to allocate when a file is created.
Increment
(Deprecated) Type the initial increment (in blocks) by which a file is expanded.
Maximum
(Deprecated) Type the maximum increment (in blocks) by which a file is expanded.
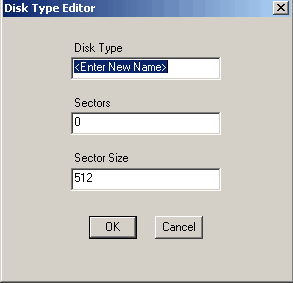
Disk TypesThe Disk Types parameters define disk types used in the file system.
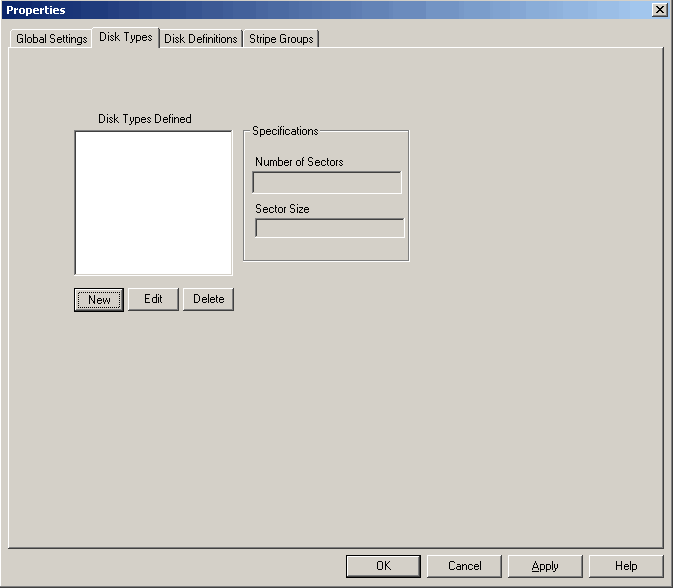
On the Disk Types tab, do one of the following:
- Click New to add a new disk type.
- Select a disk type in the list and click Edit to modify it.
- Select a disk type in the list and click Delete to delete it.
When you add or modify a disk type, the Disk Type Editor dialog box appears. The table below describes the fields on the Enter New Disk Type dialog box.
Note: The Sectors and Sector Size fields are populated with values from the Disk Labeler utility. For more information, see Step 3: Label a Disk Drive.
Field / Button
Description
Disk Type
Type a descriptive name for the disk.
Sectors
Type the number of physical sectors on the disk.
Sector Size
Type the size of sectors on the disk.
OK
Click to create the new disk type with the specified properties.
Cancel
Click to close the Disk Type Editor dialog box without saving changes.
Disk DefinitionsThe Disk Definitions parameters create disk definitions and modify disk specifications. The table below describes the fields on the Disk Definitions tab.
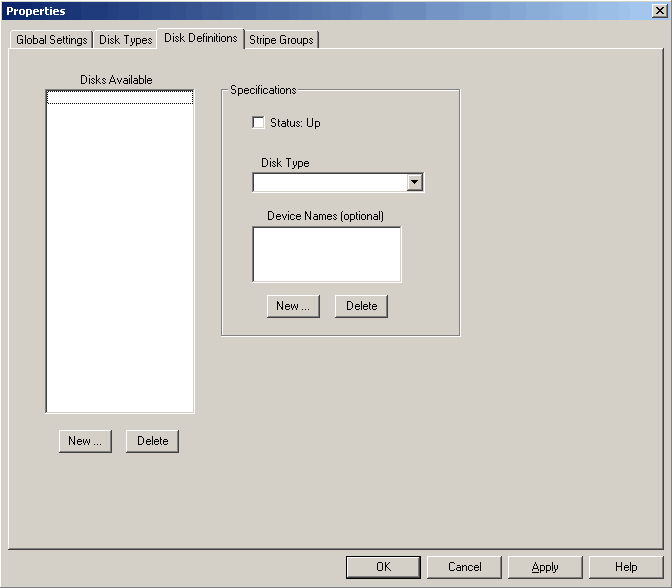
Field / Button
Description
Disks Available - New
Click to create a new disk definition. Type a name for the disk and click OK.
Disks Available - Delete
Click to delete the selected disk definition.
Status: Up
Select to enable the selected disk definition. When enabled, the defined disk is available to the configured file system for I/O.
Disk Type
Select a disk type for the selected disk definition. (Disk types are defined on the Disk Types tab.)
Device Names - New
Click to add a device name to the disk definition. Type a device name and click OK.
Device Names - Delete
Click to delete the selected device name.
Stripe GroupsThe Stripe Groups define stripe groups. A stripe group is a logical storage unit consisting of one or more disk drives. The table below describes the fields on the Stripe Groups tab.
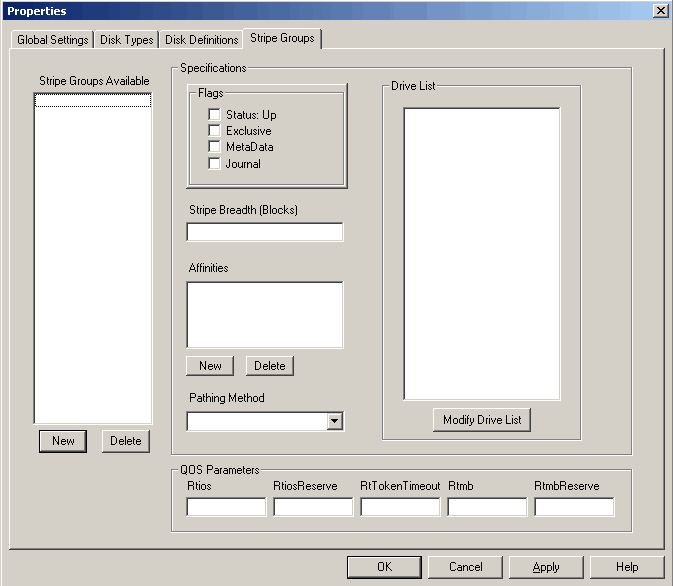
Field / Button
Description
Stripe Groups Available - New
Click to create a new stripe group. Type a name for the stripe group and click OK.
Stripe Groups Available - Delete
Click to delete the selected stripe group.
Status: Up
Select to enable the selected stripe group. When enabled, the stripe group is available to the configured file system for I/O.
Exclusive
Select to allow only file types associated with the affinities specified under Affinities to be stored on the stripe group.
MetaData
Select to allow file system metadata to be stored on the stripe group.
Journal
Select to allow the file system logging journal to be stored on the stripe group.
Stripe Breadth (Blocks)
Describes the number of file system blocks that are appended to a file before switching to the next disk in the stripe group.
Affinities - New
Click to add a new affinity to the stripe group. Type the name of the new affinity and click OK.
Note: Affinity names cannot be longer than eight characters.
Affinities - Delete
Click to the delete the selected affinity.
Pathing Method
Select a method for how the file system accesses the disk:
- Rotate: Chooses an I/O path based on load.
- Static: Always uses the same I/O path.
- Sticky: Chooses an I/O path based on the identity of the target file.
Rtios
Type the maximum number of disk I/O operations per second available to real-time applications using the Quality of Service (QOS) API.
RtiosReserve
Type the minimum number of disk I/O operations per second reserved for non-real-time applications.
RtTokenTimeout
Type the number of seconds to wait for clients to respond to a token callback.
Rtmb
Type the maximum number of MBs per second available to real-time applications using the Quality of Service (QOS) API.
RtmbReserve
Type the minimum number of MBs per second reserved for non-real-time applications.
Modify Drive List
Click to add or remove disks for the selected stripe group. Use the left and right arrows to add or remove disks in the Primary Disks list, and then click OK.
Caution: When adding a disk to an existing stripe group, make sure the disk is added to the bottom of the Drive List. If the disk is inserted in the middle of the list, the file system behaves as if files on the file system are corrupted.
-
Click a tab to view or modify StorNext File System properties. After making changes on one or more tabs, click OK to save the changes. Specify a name and a location for the *.cfg file, and then click Save.
Note: Before configuring a file system, you should label disk devices. See Step 3: Label a Disk Drive.
- Import and Export Client Settings. This feature is described in Restore a Previous StorNext Client Configuration.
In order for a client to access a StorNext file system, the file system must be mapped to a folder or drive letter. The Client Configuration Tool maps a StorNext file system to a Windows drive letter or folder and controls various configuration settings.
The values for a Client Configuration are stored in the Windows Registry and are referenced by StorNext when the file system is mounted.
Access the client configuration utility from the Windows Start menu Start > All Programs > StorNext File System > Client Configuration. The Client Configuration dialog box appears. Displayed under the File System column heading are all file systems advertised by the name server, and currently mapped StorNext file systems found in the Windows registry.
Note: You may also access the client configuration utility from the StorNext configuration window (see Use the StorNext Configuration Window).
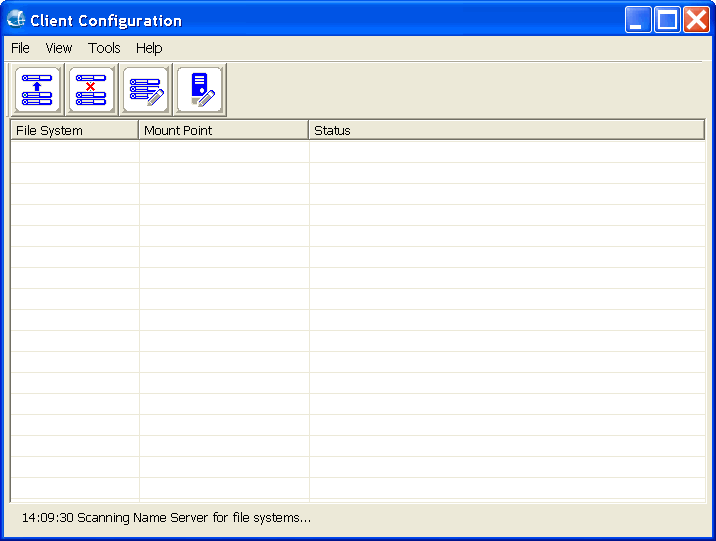
Review the sections below to configure a client. The Client Configuration dialog box includes the following functions.
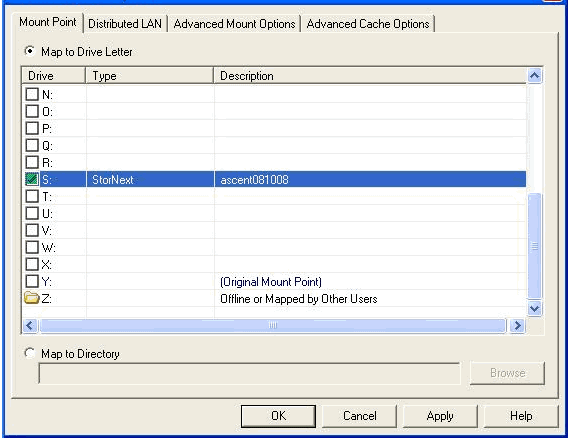
To map a StorNext file system to a folder or drive letter, double-click the desired file system (or select it and click the Map Drive icon or Tools >Map Drive). The Client Properties screen appears.
Use the Mount Point tab to specify drive mappings. The table below describes the fields on the Mount Point tab.
If your file systems are not displayed, check the status bar at the bottom. The most common problems are:
- An incorrect Name Server Configuration.
- Network problems.
- The file system is not running.
- The StorNext Services are not running.
StorNext file systems can be mapped to a drive letter or to a folder. When mapping to a folder, the following conditions must be met:
- The folder must be empty or non-existent.
- The folder must exist on an NTFS file system volume, for example:
C:\Mount\MySnfs. - The NTFS volume must be a local volume. In other words, StorNext cannot be mounted in a folder on a Cluster Shared Volume.
Note: Verify the fsnameservers configuration is the same for all clients on the SAN. An incorrect or incomplete fsnameservers configuration may prevent the client from connecting to the file system.
|
Field / Button |
Description |
|
Map to Drive Letter |
Select Map to Drive Letter to map the drive to a specific drive letter. |
|
Drive (Letter) |
Select the desired drive letter. |
|
Map to Directory |
Instead of selecting Map to Drive Letter, select Map to Directory. Enter a directory path, or click Browse to navigate to the directory path. |
Note: If this is a LAN client or gateway, be sure to enter the parameters on the Distributed LAN tab (see Configure a LAN Client and a Gateway Server).
Select the file system you want to unmap and then click the Unmap Drive icon or select Unmap Drive from the Tools menu. You must close all applications (included Windows Explorer) which might be using the file system. If the file system is busy, you will not be allowed to unmap the drive.
Note: In order to unmap a drive, you must have Administrator rights on the local computer, and you must have read/write access to root of the StorNext file system.
Once a file system is mapped, double-click the file system to change the map. Alternatively, select the file system and click the Properties button, or select the file system and click Tools > Edit Drive Mapping. This opens the Properties window where you can change drive mapping. See Map a Drive.
Click Edit Name Servers icon or choose Configure Name Servers from the Tools menu to edit, add or remove a file system name server. See Step 2: Configure a File System Name Server.
To configure a StorNext LAN client and a gateway server, double-click the desired file system (or select it and click the Properties icon). The Properties dialog box appears.
Note: Do not enable gateway functionality for MDCs, connected to Lattus/ActiveScale systems.
Use the Distributed LAN tab to enable and configure StorNext LAN clients and gateway servers for a file system.

The Enable Client and Enable Server radio buttons determine whether the system is a LAN client or gateway Server. Note that separate licensing is required for LAN clients.
StorNext LAN clients provide the same functionality as StorNext SAN clients but do not need to be connected directly to the SAN. They instead send I/O via the TCP/IP network through a gateway server - a StorNext SAN client enabled as a gateway server. Metadata is sent over the TCP/IP network directly to the File System Metadata Controller (Server/MDC).
LAN Clients request the location of gateway servers via the Name Server.
- Gateway Server: A gateway server has direct access to data disks (using fibre channel) and makes the shared storage pool available to distributed LAN clients over a network.
- LAN Client: A StorNext LAN client does not have direct access to data disks and instead accesses the shared storage pool by connecting to a gateway server over a network. (LAN clients have full StorNext client functionality.)
Note: A StorNext SAN client configured as a gateway server requires a dedicated system. Do not run other applications or services on a system configured as a gateway server.
The table below describes the fields on the Distributed LAN tab.
|
Field / Button |
Description |
|
Disable |
Select this option to disable the StorNext client as a StorNext LAN client or gateway server. |
|
Enable Client |
Select to configure the StorNext client as a LAN client. The StorNext client will connect to all available gateway servers. (If you select this check box, all other fields on the tab become unavailable.) |
|
Enable Server |
Select to configure the StorNext SAN client as a gateway server. The StorNext client will make the disks for this file system available to LAN clients over the specified LAN. |
|
Read Timeout (sec) |
Specify how long the LAN client will wait for a read operation to complete before retrying it on a different gateway server. |
|
Write Timeout (sec) |
Specify how long the LAN client will wait for a write operation to complete before retrying it on a different gateway server. |
|
Number of Transfer Buffers |
Specify the number of socket transfer buffers used for LAN client I/O. |
|
Transfer Buffer Size (kb) |
Specify the size in kilobytes of the socket transfer buffers used for LAN client I/O. |
|
TCP Window Size (kb) |
Specify the size in kilobytes of the TCP window used for LAN client I/O connections. |
|
Max Threads |
Specify the number of kernel threads that will be used to service LAN client I/O requests. |
|
Server Interfaces |
To complete gateway server configuration, select one or more network interfaces to be used for LAN client traffic. |
From the Client Configuration dialog box, click Tools Global Options. The Global Client Options window appears.
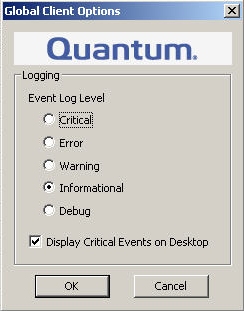
Select the level of logging you want to receive and whether you want to display critical events on your desktop. Log information is available in the Windows Event Viewer.
|
Field / Button |
Description |
|
Event Log Level |
Controls how many messages are inserted into the Windows Event Viewer. Critical provides the fewest messages; Debug provides the most. Each level includes all the messages in the levels listed above it. |
|
Display Critical Events to Desk Top |
Enables a notification of critical events to be sent to work station’s desktop in a message box. If this is not desired, clear the check box. |
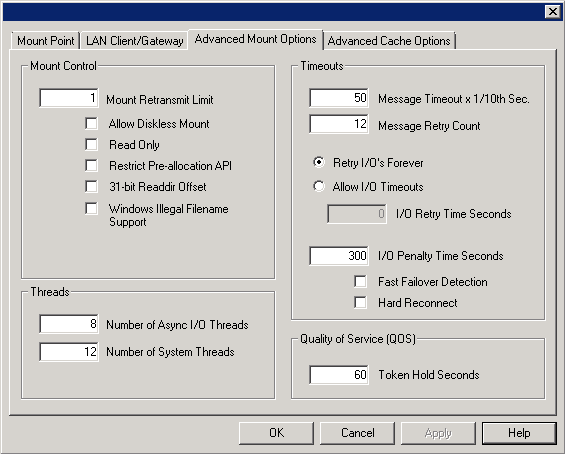
The Mount Options tab displays the mount options for the drive currently selected on the Drive Mappings tab. The table below describes the fields on the Distributed LAN tab.
Caution: Changing the values on the Mount Options tab can affect system performance and stability. Do not change mount options unless instructed to do so by the Quantum Technical Assistance Center.
|
Field / Button |
Description |
|
|---|---|---|
|
Mount Control |
Mount Retransmit Limit |
Specify the number of times the driver will re-transmit a message to the FSM. After a successful connection, this value is no longer used. The default is 1. |
|
Allow Diskless Mount |
When this box is checked, the file system can be mounted and accessed without all the disks being accessible in the file system stripe groups. In this mode, file metadata can be viewed and changed, but no data can be accessed. The default is to not allow a file system to be mounted unless all disks are accessible. |
|
|
Read Only |
When this box is checked, the file system is mounted in read-only mode. The default is off or not checked. |
|
|
Restrict Pre-allocation API |
When set to yes, non-administrator users are unable to use the preallocation ioctl. |
|
|
31-bit Readdir Offset |
When this option is enabled, you force the directory offsets to fit into 31 bits. Note: Enable this option only when a problem has been identified with using the full size of the struct d_off field from readdir(2) or related system calls. |
|
|
Windows Illegal Filename Support (Previously: Apple SFM Filename Support) |
If this box is checked, filenames that Windows considers illegal due to having certain reserved characters or having a space or period at the end will have the offending characters mapped to Unicode Private Use Area code points with the method used by the Microsoft Windows feature Apple Services For Macintosh ®. Note: Before you enable the Windows Illegal Filename Support option, read the section StorNext File Name Considerations in the StorNext 6 User's Guide to understand the system wide ramification of using this option. |
|
|
Threads |
Number of Async |
Specify the number of threads created to be used as asynchronous I/O threads for user applications. The default is 8. The allowed range is 4 to 32. |
|
Number of System Threads |
Specify the number of threads created for use by the file system. The default value is 16. |
|
|
Timeouts |
Message Timeout x 1/10th Sec. |
Specify (in tenths of a second) the amount of time before a message to the FSM is timed out. The default is 50 (five seconds). |
|
Message Retry Count |
Specify the number of attempts to be made for sending a message to the File System Service. The default is 12. |
|
|
Retry I/Os Forever or Allow I/O Timeouts |
Choose either Retry I/Os Forever or Allow I/O Timeouts, depending on whether you want to allow timeouts or keep trying I/O. The default value is to Retry I/Os Forever. |
|
|
I/O Retry Time Seconds |
When you choose Allow I/O Timouts, this option controls the I/O retry behavior. This parameter establishes the amount of time that may elapse during an I/O retry sequence. An I/O retry sequence consists of the following: Retry an I/O request across all available paths that are currently present. Compare the current time to the Instantiation time of the I/O request, if at least <n> seconds have elapsed, return the I/O request in error, otherwise reset the paths used, and retry again. |
|
|
I/O Penalty TIme Seconds |
This option controls the Multi-Path I/O penalty value, where <n> is expressed in seconds with a minimum value of 1 and a maximum value of 15. This parameter establishes the amount of time a Path_In_Error will be bypassed in favor of an Operational Path during a Multi-Path selection sequence. If all paths are currently in the Path_In_Error state, the first available path will be selected, independent of the Path_In_Error state. The default value is 5 seconds. |
|
|
Fast Failover Detection |
When this box is checked, the client uses a more aggressive approach to detecting if the FSM has failed. With this option on, the client monitors the FSM heartbeat. If no heartbeat is detected within three (3) seconds, a failover request is initiated. This option is desirable for near realtime activities that cannot sustain more than 10 seconds of access loss to the server. Quantum does not recommend enabling this option for normal file system operations. |
|
|
Hard Reconnect |
When this box is checked, the file system attempts to reconnect to the FSM forever. If this option is not enabled, the file system attempts to reconnect to the FSM for the number of times specified at the Mount Retransmit Limit field before failing the request. The default value is off. |
|
|
Quality of Service (QOS) |
Token Hold Seconds |
The QOS Token Hold Time parameter is applicable only when using the StorNext Quality of Service (QOS) feature for real-time IO. This parameter determines the number of seconds a client stripe group holds on to a non-realtime I/O token during periods of inactivity. If no I/O is performed on a stripe group within the specified number of seconds, the token is released back to the FSM. The default value is 60 seconds. The parameter should be specified in five-second increments; if the parameter is not a multiple of five, it will be rounded up automatically. |
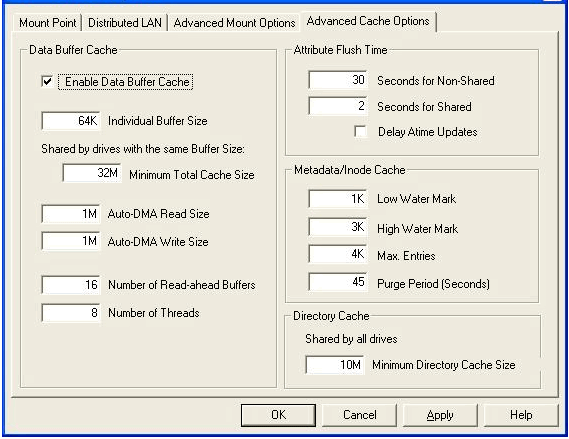
The Data Buffer Cache keeps the file system data in memory on the local computer to speed up performance for small I/O operations.
The Advanced Cache Options tab displays performance values that control how many file system lookup names are kept in memory.
Caution: Changing the values on the Advanced Cache Options tab can affect system performance and stability. Do not change cache parameters unless instructed to do so by the Quantum Technical Support.
|
Field / Button |
Description |
|
|---|---|---|
|
Data Buffer Cache |
Enable Data Buffer Cache |
When this box is not checked, the file system will not buffer any data. All files will be read directly into the application's memory using DMA. Requests that are not properly aligned will be read into temporary buffers, then copied to the application's buffer. If Buffer Cache is disabled, the remaining Data Buffer Cache options are ignored. |
|
Individual Buffer Size |
This option sets the size of each cache buffer. This determines the I/O transfer size used for the buffer cache. To determine optimal performance, try different sizes or contact your RAID vendor. This size must be divisible by the file system block size. The maximum value allowed is 512K and the minimum value allowed is the file system block size. The value default is 64K. |
|
|
Minimum Total Cache Size |
This value controls the amount of memory used to cache data from the file system. This parameter is shared by all file systems with the same block size. |
|
|
Auto-DMA Read/Write Sizes |
Buffer Cache Auto DMA Read Length and Buffer Cache Auto DMA Write Length control the minimum I/O size for DMA transfers. That is, any smaller transfer will always go through the buffer cache. The default value is 1MB. |
|
|
Number of Read-ahead Buffers |
This option controls the size of the read-ahead window used by the buffer cache. The default value is 16 buffers with a maximum of 100. Using a value of 0 disables read-ahead. |
|
|
Number of Threads |
This option controls the number of dedicated background threads used by the buffer cache for performing I/O. The default value is 8, with a minimum of 1 and a maximum of 100. Using a larger value can increase I/O concurrency in the buffer cache and therefore improve performance. |
|
|
Attribute Flush Time |
Seconds for Shared/ Non-Shared |
The Attribute Flush Time parameters control the length of time attributes are held on the client before they are flushed back to the FSM (unless there is an explicit attribute request from the FSM). The default values are 30 seconds for non-shared files (Attribute Flush Time, non shared), and 2 seconds for shared files (Attribute Flush Time, shared). Setting these parameters lower will greatly increase the amount of metadata traffic between clients and the FSM. However, in circumstances where files are frequently shared on the SAN, setting the Attribute Flush Time Shared can result in other clients seeing size updates more frequently if a file is being written on one client and read on another. A value of zero is invalid, and will result in using the default setting. |
|
Delay Atime Updates |
When this box is checked, the file system delays Atime (access time) updates when reading a file to the time when the file is closed. This cuts down on FSM metadata updates at the expense of coherency. |
|
|
Metadata/Inode Cache |
Low Water Mark |
A metadata/inode cache contains non-data information such as file names, sizes, update times, and so on. Tuning the low and high water marks and the frequency of purge passes can help certain large mix applications. |
|
High Water Mark |
||
|
Max. Entries |
||
|
Purge Period (Seconds) |
||
|
Directory Cache |
Minimum Directory Cache Size |
This option sets the size of the directory cache. Directory entries are cached on the client to reduce client-FSM communications during directory reads. The default value is 10 MB. |
Additional Windows configuration utilities are available. See below for details.
There are two ways to access the configuration utilities.
You can access all of the configuration utilities, along with several others, from the Windows Start menu.
To run a configuration utility from the Windows Start menu, click Start > All Programs > StorNext File System, and then click one of the available configuration utilities (see Available Configuration Utilities).
As soon as you finish installing StorNext, the StorNext Installation window remains open. If you wish to begin configuring immediately, click the Configure StorNext button to open the StorNext Configuration window.
You can return to the StorNext Configuration window at any time by double-clicking the file named SnfsSetup32.exe (32-bit systems) or SnfsSetup64.exe (64-bit systems) and then clicking the Configure StorNext button.
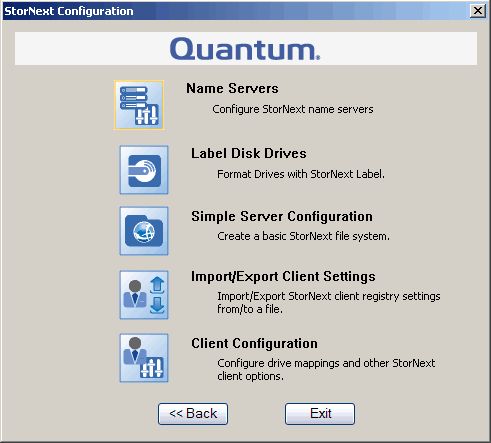
The StorNext Configuration window provides buttons to access several of the most common configuration utilities:
- Name Servers, see Step 2: Configure a File System Name Server.
- Label Disk Drives, see Step 3: Label a Disk Drive.
- Import/Export Client Settings, see Configure the StorNext Client Software on Windows.
- Client Configuration, see Step 5: Configure a Client.
The following configuration utilities are accessible from the Windows Start menu Start > All Programs > StorNext File System.
For more information on using these utilities, see the online help accessible from Start > All Programs > StorNext File System > StorNext Help.
Use this utility to view and modify properties for the StorNext client software. See Step 5: Configure a Client.
Formats a hard disk so it can be used by StorNext. See Step 3: Label a Disk Drive.
Allows you to configure StorNext file systems. This tool provides access to advanced features of StorNext File Systems. It is assumed that you are familiar with individual features available in the File System Cfg File (.cfg). See Step 4: Configure a Server (Advanced).
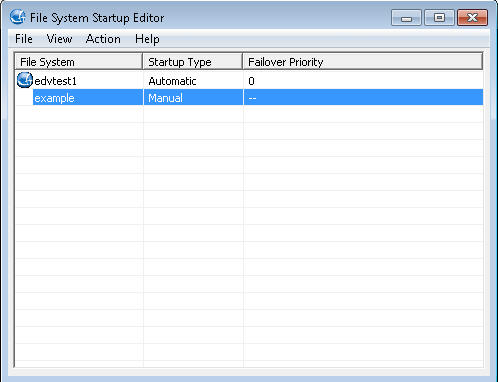
The File System Startup List utility lets you modify the File System Manager (FSM) services list and set file system priority. You can check the StorNext file system health status while the file system is active. You can note changes but not commit them in read-only mode. You can also list all of the existing files and their pertinent statistics, such as inode number, size, file type and location in the file system
The File System Manager is a process that manages the name space, allocations, and metadata coherency for a file system. Each file system uses its own FSM process. When there are multiple file systems (and therefore multiple FSM processes), the FSM services list controls which FSM processes are run when the server starts up, and also sets the priority for each file system (for failover configurations).
To run the File System Startup List utility, on the Windows Start menu, click All Programs > StorNext File System > File System Startup List. The File System Startup Editor appears.
Select a file system do any of the following. When finished making changes, select File > Save to save your changes.
|
Action |
Description |
|
Action Toggle Startup Type |
Allows you to choose if the file system will start up automatically upon server startup. This action toggles the startup type between automatic and manual. |
|
Action Priority |
(Optional) Select the priority for the selected file system. This priority is used for failover configurations. 0 is highest priority and 9 is lowest priority. |
The File System Check (Repair) utility allows you to repair corrupted metadata on a file system. You can also list all of the existing files and their pertinent statistics, such as inode number, size, file type and location in the file system. Repair a file system if errors were identified when checking the file system (see The File System Check (Read-Only) Utility).
The file system must be inactive in order to be repaired. To stop a file system, see The Stop File System Services Utility.
To repair a file system, on the Windows Start menu, click All Programs > StorNext File System > File System Check (Repair). Type the number that corresponds to the file system you want to repair, and then press Enter.
Note: Multiple repair passes may be needed to fully fix a damaged file system. Run the repair utility repeatedly until no problems are reported by the utility.
The File System Check (Read-Only) utility allows you to check a StorNext file system for metadata corruption (due to a system crash, bad disk, or other failure). Run the utility on an MDC that contains the file system you want to check.
To check a file system, on the Windows Start menu, click All Programs > StorNext File System > File System Check (Read-Only). Type the number that corresponds to the file system you want to check, and then press Enter.
Because the file system check is run in read-only mode, any problems that exist are not repaired. If the utility identifies errors or corruption in metadata, you must repair the file system (see The File System Check (Repair) Utility).
The Re-initialize a File System utility allows you to re-initialize an existing file system or initialize a file system for the first time. Initializing a file system prepares it for use.
Caution: Use extreme caution when using this tool. This will destroy all data on the selected file system.
To initialize a file system, on the Windows Start menu, click All Programs > StorNext File System > Re-initialize a File System. Type the number that corresponds to the file system you want to re-initialize, and then press Enter.
Use the License Identifier utility to display the host license identifier. The host license identifier is required to obtain a permanent license for StorNext.
To run the License Identifier utility, on the Windows Start menu, click All Programs > StorNext File System > License Identifier. A dialog box displays the host license identifier. Record this information.
Allows you to import StorNext licenses. See Step 1: Obtain and Install a StorNext License.
Specifies the name server(s) used by StorNext File System services. See Edit a Drive Map.
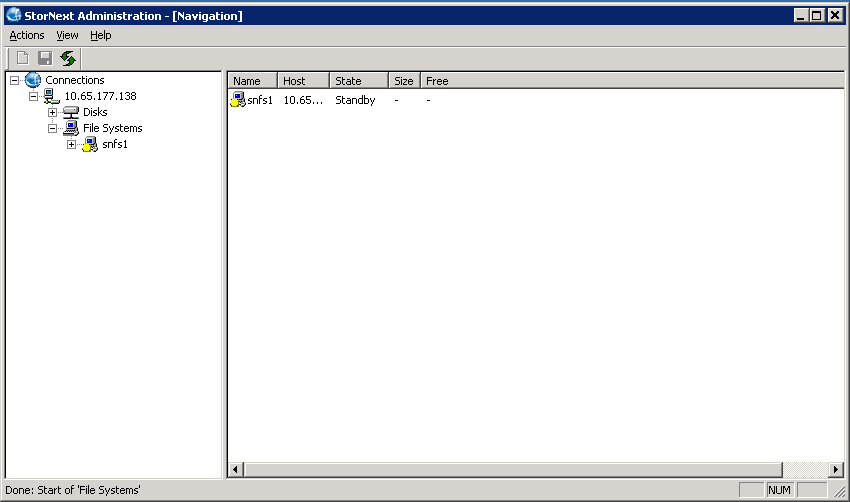
The Server Administration utility allows you to look at the current status of file systems and to start, stop and perform basic file system administration tasks (similar to the CLI command, cvadmin).
Note: A stripe group is a logical storage unit made up of one or more disks. A quota is a space limit that is set for specified users or groups.
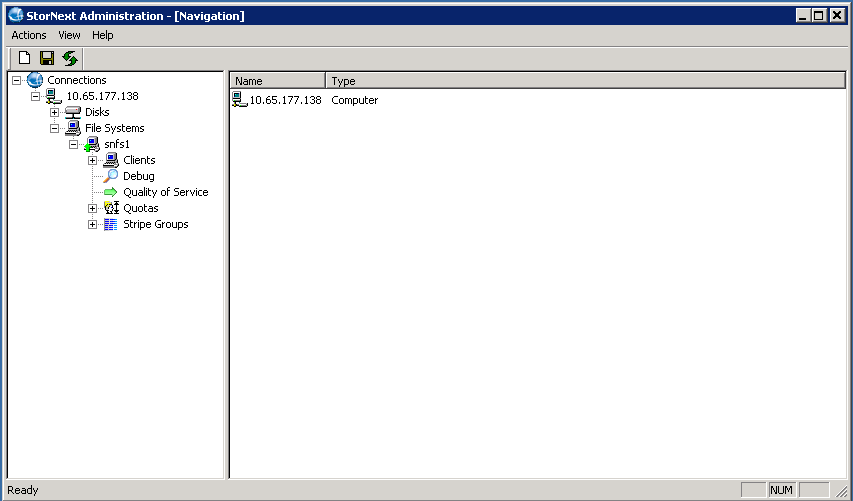
To run the Server Administration utility, on the Windows Start menu, click All Programs > StorNext File System > Server Administration. The StorNext Administration window appears.
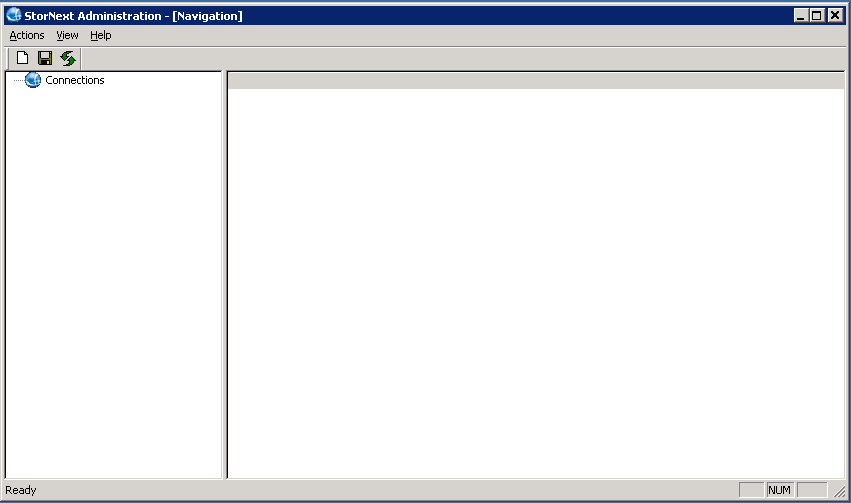
In the StorNext Administration window, you can perform the following procedures.
- Click Connections, and then click Actions > New.
- Type the host name and click OK. Disks and File Systems are displayed in the left pane.
- Right-click File Systems, and then click Start.
- Enter file system information. For additional details, see Start a File System.
- Click File Systems in the left pane.
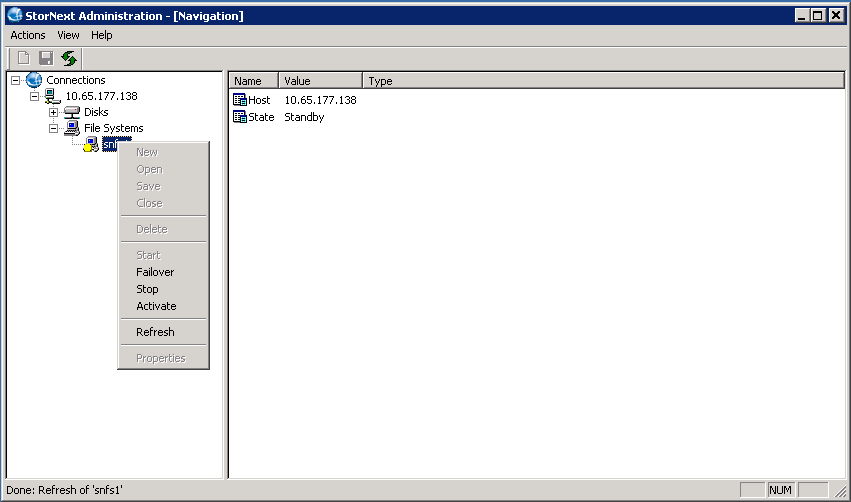
- Right-click the name of the file system under File Systems, and then click Activate.
- Click File Systems in the left pane.
- Right-click the name of the file system under File Systems, and then click Stop.
Press Ctrl+R, or click View, and then click Refresh.
You can create a connection to any StorNext client or server.
-
To create a new connection, click Actions, and then click New. The New Connection dialog box appears.
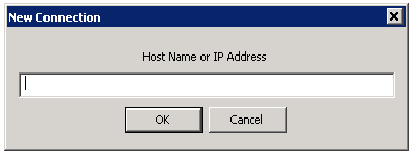
-
In the New Connection dialog, enter the host name or IP address of the computer to add, and then click OK. The new connection information appears. The left pane displays file systems running on the connected MDC.
Note: Expand a file system to see stripe groups, quotas, and additional file system properties.
You can close a connection to any StorNext client or server.
To close an existing connection, right-click the connection, and then click Close.
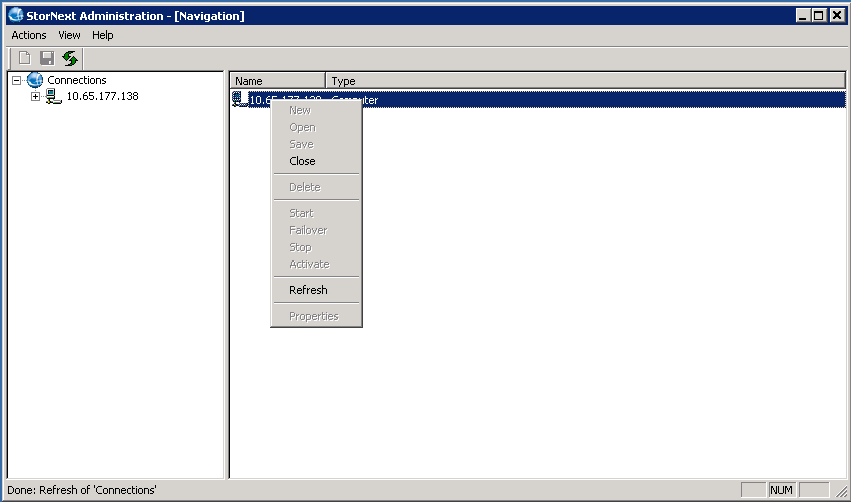
You can save the current connections. The next time you open the StorNext Administration utility, the utility will query the saved list to automatically open connections.
To save the list, click Connections (in the left pane.), click Actions on the menu, and then click Save.
The Start File System Services utility starts all StorNext services on an MDC or StorNext client.
The StorNext services must be running on the MDC for file systems to be active and available. In addition, the StorNext services must be running to use the StorNext configuration utilities and to mount file systems using the client software.
To start StorNext File System services, on the Windows Start menu, click All Programs > StorNext File System > Services Start.
The Stop File System Services utility stops all StorNext services on an MDC or StorNext client.
To stop StorNext File System services, on the Windows Start menu, click All Programs StorNext File System Services Stop.
To start the StorNext services again, reboot the system or use the Start File System Services utility. For more information, see The Start File System Services Utility.
The Stop and Remove File System Services utility stops all StorNext services on an MDC or StorNext client, and also removes registry entries that automatically start the services on bootup.
To stop and remove StorNext File System services, on the Windows Start menu, click All Programs > StorNext File System > Services Stop and Remove.
To start the StorNext services again, you must use the Start File System Services utility. Rebooting the system will not restart services. For more information, see The Start File System Services Utility.
View StorNext help documentation for utilities and other commands.
The Version Information utility displays information about the currently installed version of the StorNext server and/or client software, such as the version number, build number, and platform.
To run the Version Information utility, on the Windows Start menu, click All Programs > StorNext File System > Version Information. A dialog box displays version information for the StorNext server and/or client software installed on your system.
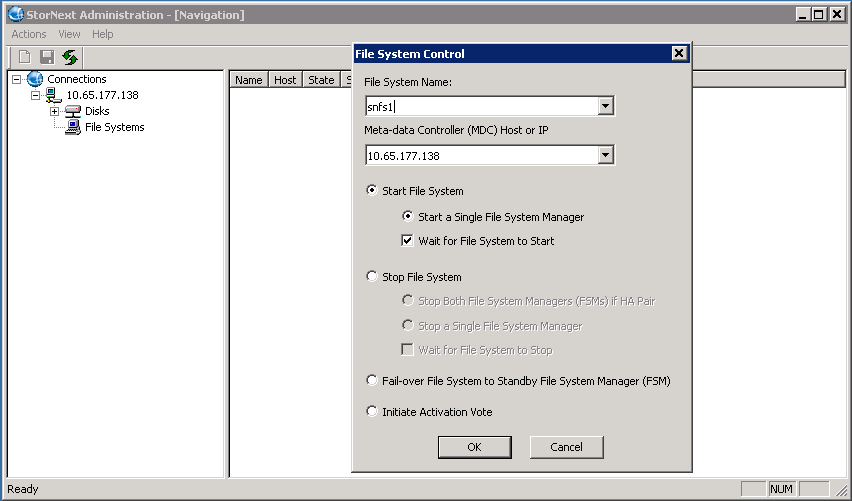
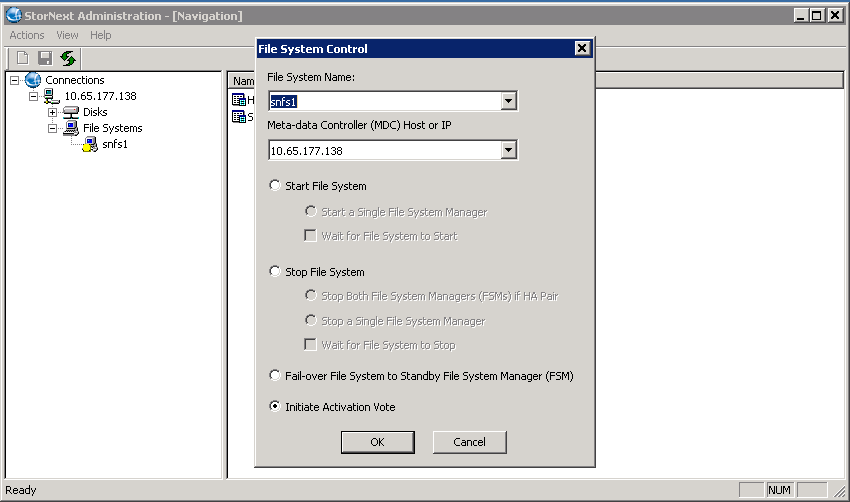
The StorNext Administration's File System Control dialog is used to Start, Stop, Failover and Activate a StorNext file systems. The actions in the File System Control dialog perform actions equivalent to the cvadmin commands.
Note: To prevent long delays, the StorNext Administration tool does not automatically refresh. After issuing commands from the File System Control dialog, you may need to issue a Refresh before the changes will appear.
To start a file system, perform the following procedure.
- Right-click File Systems, and then click Start. The File System Control dialog displayed.
- Enter the file system name and the IP address of the MDC.
- The File System Name is the name of a file system configuration file without the .cfg/.cfgx file extension.
- The Meta-data Controller (MDC) Host or IP is the hostname or IP address of the MDC managing the specified file system.
- If Start a Single File System Manager is checked, this will start a single FSM on the specified host. If it is unchecked, it will start FSMs on both HA (High Availability) MDCs if they are an HA pair. Optionally, you may have the dialog wait for the file system to start before returning. Otherwise the request will be issued and return immediately.
Once the file system is started, the file system status is displayed.
- A yellow dot indicates the file system is in the standby state.
- A green arrow indicates the file system is in the active state.
Once the file system is started, perform the following procedure to activate the file system.
-
Right-click the file system, and then click Activate. The File System Control dialog is displayed with Initiate Activation Vote checked.
Note: Initiate Activation Vote causes a client "vote" to commence and might cause a file system to activate. If an FSM is already active, no action is taken.
-
Click OK to activate.
If the file system activates successfully, the File System Control status is updated to display the following.

Other radio buttons in the File System Control specify the following parameters:
- The Stop File System radio button is used to stop a single FSM or to stop both FSMs, if they are HA pairs. As with the Start File System option, you can have the dialog wait for the command to complete before return control back to you.
- The Fialover option can be used on a HA MDC. This radio button will cause the file system to fail-over from the active FSM to the standby FSM (regardless of which MDC host is specified).
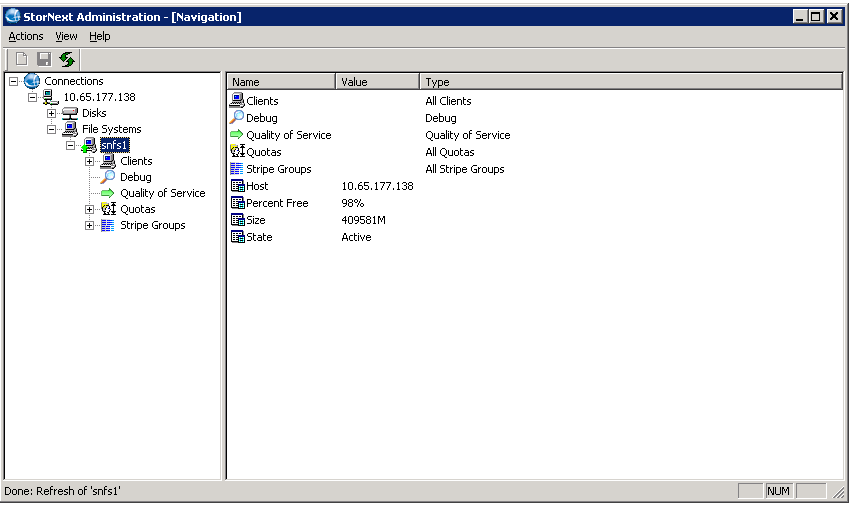
You can select a file system to display clients, debug options, quality of service, quotas and stripe groups. The table below provides the description of the various fields in the File System Properties display.
|
Name |
Value |
Type |
|
Clients |
Expandable list of connects to the file system (clients with file system mounts and control connections) and the client properties. |
|
|
Debug |
None |
Click to expand to a clickable list of debug flags. |
|
Quality Of Service |
None |
Click to display QOS properties (if QOS is enabled on file system.) |
|
Quotas |
None |
Click to display Quotas properties (if Quotas are enabled on file system.) |
|
Stripe Groups |
None |
Expandable list of stripe groups and stripe group properties. |
|
Host |
IP address of the MDC running the file system. |
|
|
Percent Free |
Percentage of free space on the file system. |
|
|
Size |
Size of the file system |
|
|
State |
Current state of the file system. |
|
To view information about a client connected to the file system, expand a file system in the left pane, and then click Clients. Information about the clients currently connected appears in the right pane.
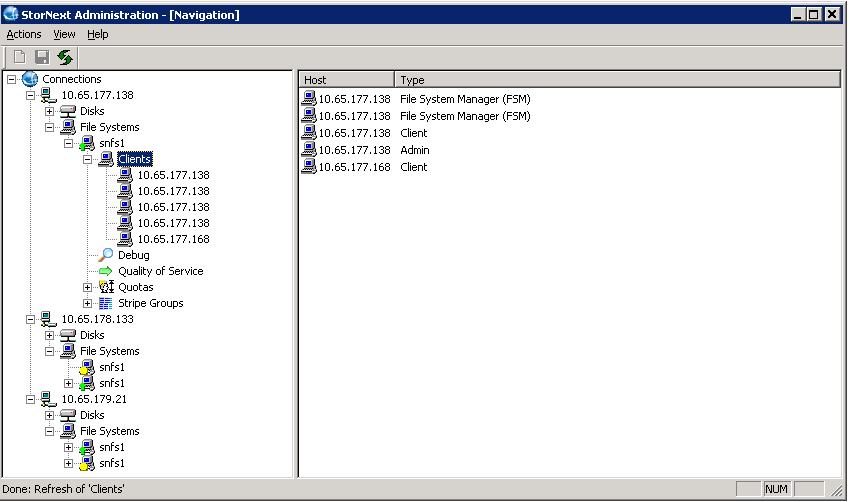
Click on a specific client to see the client’s properties.
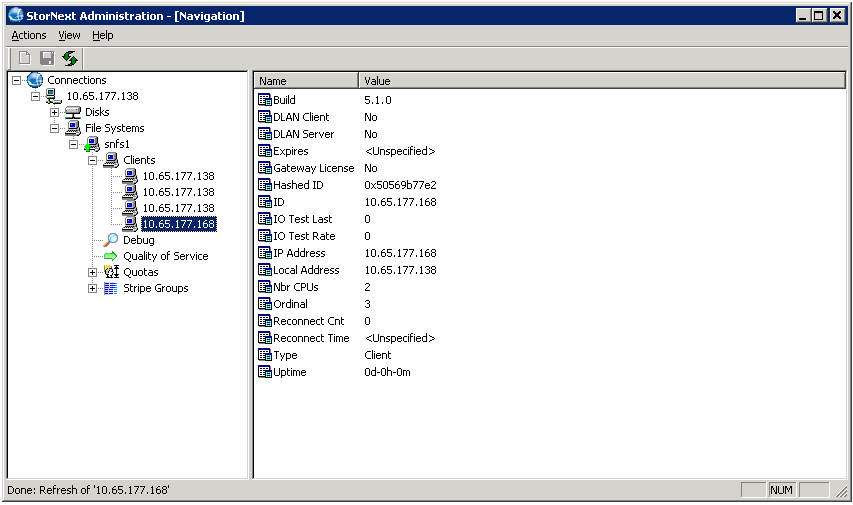
Select a specific Client to display the following information.
|
Name |
Value |
|
Build |
StorNext version |
|
DLAN Client |
Is it a Distributed LAN Client? |
|
DLAN Server |
Is it a Distributed LAN Gateway? |
|
Expires |
When the license expires |
|
Gateway License |
Distributed LAN Gateway license installed |
|
Hashed ID |
SNFS Identifier hash value |
|
ID |
ID or IP address |
|
IO Test Last |
Last IO Test result |
|
IO Test Rate |
IO Test rate |
|
IP Address |
Address of connection |
|
Local Address |
Alternate local address |
|
Nbr CPUs |
CPU count on Client |
|
Ordinal |
FSM Connection number |
|
Reconnect Cnt |
Number of reconnections |
|
Type |
Type of connection |
|
Uptime |
Connection time |
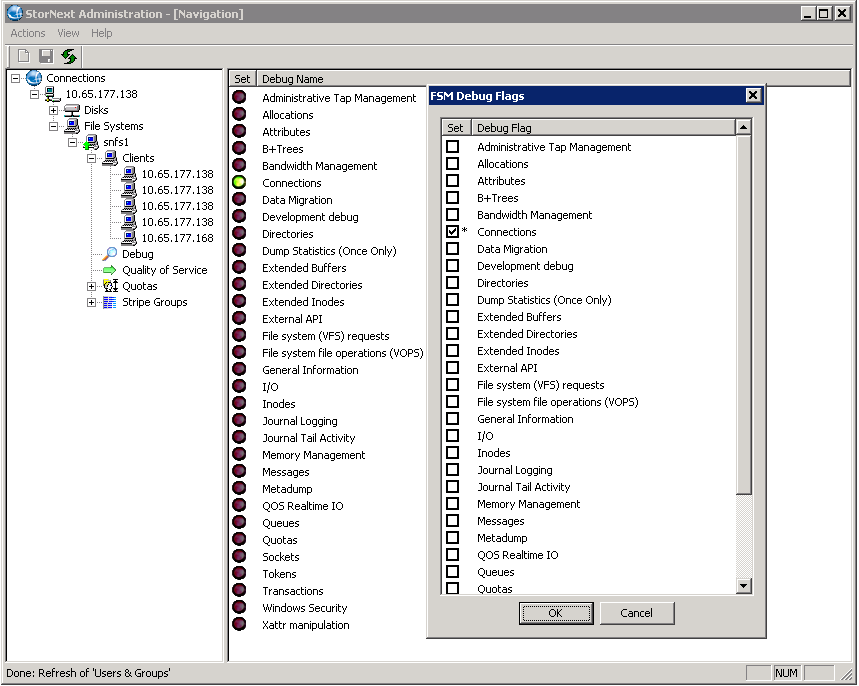
Click the Debug icon to display the current active debug flags used by the File System Manager (FSM) process. If any of the debug flags are turned on, the debug output is printed to the file:
Caution: If you enable debug flags, this might severely impact file system performance. Do not enable debug flags unless recommended by Quantum.
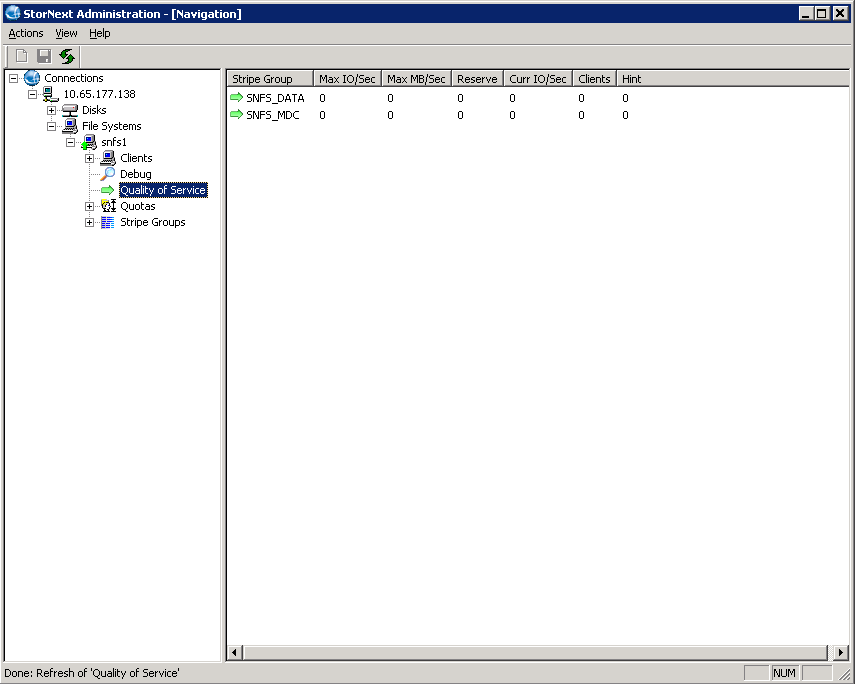
The Quality of Service (QOS) pane displays the settings and current metrics. Quality of Service must be enabled on the file system for it to be active. See Quality of Service for additional details.
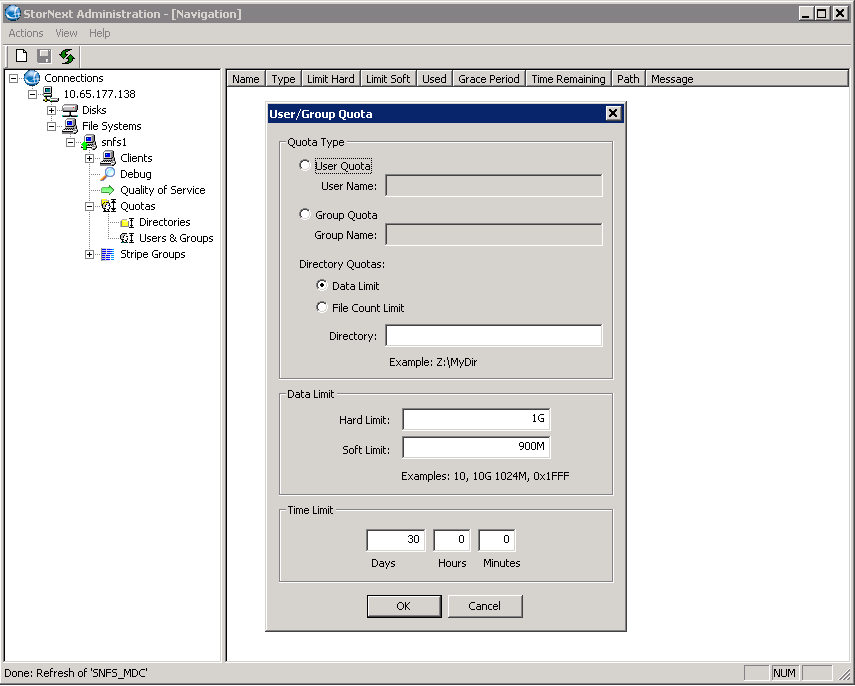
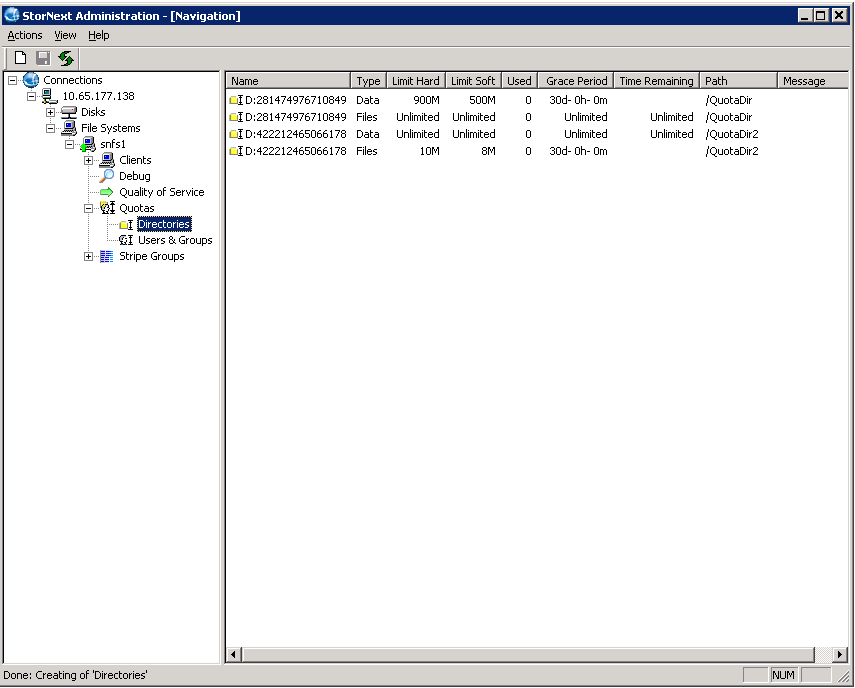
Quotas define the amount of storage space a specified user or group is allowed to own. You can set hard or soft quota limits. Quotas must be enabled in the File System Configuration file to be able to set and change quotas.
- To view quota properties, expand a file system in the left pane, expand Quotas and then click Directories or Users & Groups. The User/Group Quota dialog box appears
- To change quotas, right-click on Directories or Users & Groups. The User/Group Quota dialog box appears
There are three types of quotas you can configure:
- Set quotas for users on the User Quotas button.
- Set quotas for groups on the Group Quotas button.
- Set data or file quotas for directories under the Directory Quotas heading.
|
Field / Button |
Description |
|
|---|---|---|
|
Quota Type |
User Quota |
Type the name of the user for which you want to set a quota. |
| Group Quota |
Type the name of the group for which you want to set a quota. |
|
| Directory Quotas |
|
|
|
Data Limit |
Hard Limit |
Specify an amount in bytes or with the extensions M (megabytes), G (gigabytes) or T (terabytes). This is the maximum amount of space the specified user or group can use. |
| Soft Limit |
Specify an amount in bytes or with the extensions M (megabytes), G (gigabytes) or T (terabytes). Once the user or group exceeds this limit, a warning is sent. Note: Typically, this is set at 80% of the hard limit. |
|
|
Time Limit |
|
Specify the amount of time it takes for the soft limit to turn into a hard limit. |
|
Field / Button |
Description |
|
Name |
The Linux user or group name |
|
Type |
The type of quota (User or Group) |
|
Limit Hard |
The absolute maximum amount of data the user or group can consume |
|
Limit Soft |
The maximum amount of data the user or group can consume. They can exceed this limit for Grace Period amount of time, but cannot exceed the Hard Limit. |
|
Used |
The amount of data currently consumed. |
|
Grace Period |
The amount of time the user or group is allowed to exceed the Soft Limit |
|
Time Remaining |
Amount of time remaining before the user or group cannot allocate any more space in the file system. If the value is negative, the user can no longer allocate any more space. |
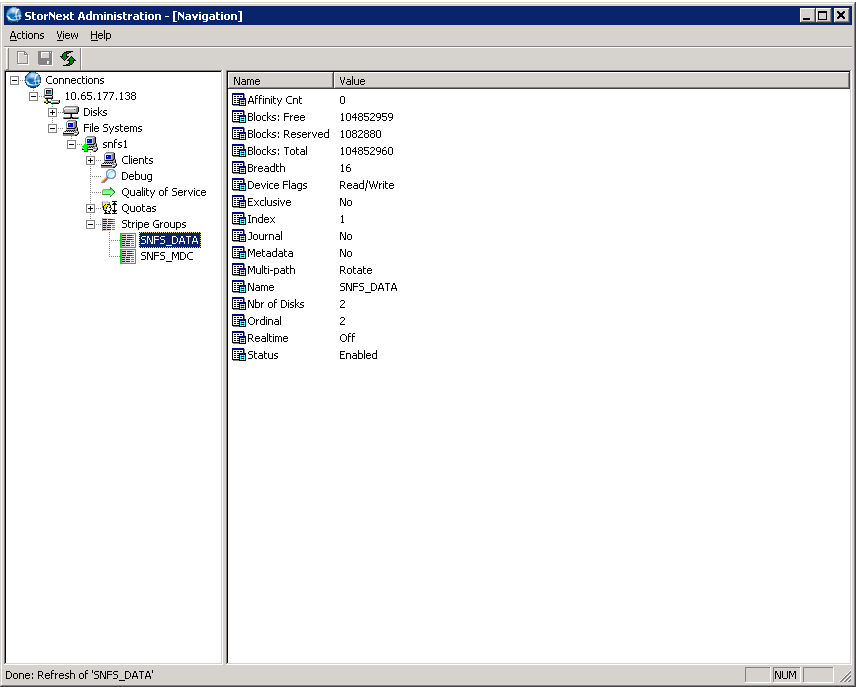
To view stripe group properties, expand a file system in the left pane, click Stripe Groups, and then click the stripe group name in the left pane. The stripe group’s property appears in the right pane. The table below describes the fields of the stripe group property display.
|
Name |
Value |
|
Affinity Cnt |
Number of affinities |
|
Blocks: Free |
Number of blocks free |
|
Blocks: Reserved |
Number of blocks reserved |
|
Blocks: Total |
Total number of blocks |
|
Stripe Breadth |
The number of file system blocks to write before switching to the next disk in the stripe group. |
|
Stripe Depth |
The number of disks in the stripe group. |
|
Device Flags |
Read and Write flags |
|
Exclusive |
Indicates if only specified file types (associated with the stripe group affinities) can be stored on the stripe group. |
|
Index |
Disk index in configuration |
|
Journal |
Indicates if the file system logging journal can be stored on the stripe group. |
|
Metadata |
Indicates if file system metadata can be stored on the stripe group. |
|
Multi-path |
Indicates the method the file system uses to access the disk: round, static, or sticky. |
|
Name |
Stripe group name |
|
Nbr of Disks |
Number of disks in group |
|
Ordinal |
Internal index |
|
Realtime |
Uses Real-time IO |
|
Status |
Current status |
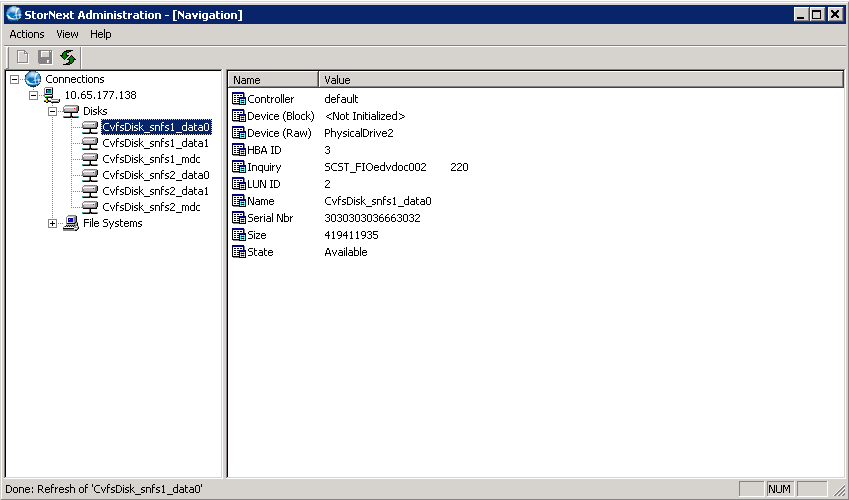
Click Disks to see all disks visible to the currently selected host. Click a specific disk to display the various attributes of that disk.
|
Name |
Value |
|
Controller |
Device driver |
|
Device (Block) |
The block device |
|
Device (Raw) |
The Raw Device |
|
HBA ID |
Host Bus Adapter identifier |
|
Inquiry |
Manufacturer string |
|
LUN ID |
Logical Unit Number |
|
Name |
Disk Label |
|
Serial Nbr |
Disk's Serial Number |
|
Size |
Size of the disk |
|
State |
State of the disk |
