System Requirements
To run StorNext, the Metadata Controller must meet all operating system, hardware, and LAN requirements.
Note: The performance of the storage holding the Storage Manager database and metadata archives has an impact on overall StorNext file system performance. Quantum recommends that the Storage Manager database and metadata archives are stored on high performance storage devices, such as a RAID array. Storing the Storage Manager database on slower storage devices, including local disks, can result in poor performance or time-outs.
Note: The UIDs for the quantumdb and tdlm users and the adic group must be identical on both nodes of an HA pair. If the UIDs are not identical, the MySQL database will not start (due to file permission errors), which in turn prevents storage manager from fully starting up. Quantum recommends creating the UIDs for the quantumdb and tdlm users along with the adic group on both nodes prior to running install.stornext.
Operating System Requirements
The operating systems, kernel versions, rpm package dependencies, and hardware platforms supported by StorNext File System are listed in the StorNext 5 Compatibility Guide.
Make sure the system meets the operating system and platform requirements outlined in the guide, and, if necessary, update to a supported release or kernel version before installing StorNext.
Modifying the grub.conf File to Disable the Intel Sleep State
Newer versions of Linux include a driver that controls CPU C-states. It is strongly recommended that this driver be adjusted so that deep sleep states are disabled. Making this change may result in increased power consumption but improves stability and performance. This change should be applied to systems running RHEL 6.x and newer, SLES11 and newer, and all supported versions of Debian and Ubuntu:
| 1. | Prior to installation, append the following text to the "kernel" line in the boot loader configuration file: |
|
intel_idle.max_cstate=0 processor.max_cstate=1 |
Note: Consult your distribution's documentation on how to modify the kernel boot loader.
For RHEL 6.x and Debian systems update/boot/grub/grub.conf.
For RHEL 7.x update/boot/grub2/grub.cfg.
For SLES systems use /sbin/yast to change the boot loader options under System > Boot Loader. Save the configuration and verify that /boot/grub/menu.lst was updated.
For Ubuntu systems update the GRUB_CMDLINE_LINUX_DEFAULT string in/etc/default/grub to include the above text, and then execute update-grub. Afterwards verify that/boot/grub/grub.cfg was updated.
| 2. | Reboot the system for the change to take effect. |
Note: Disabling C-States in the system BIOS has no effect on Linux.
In some cases, performance can also be improved by adjusting the idle kernel parameter. However, care should be taken when using certain values. For example, idle=poll maximizes performance but is incompatible with hyperthreading (HT) and will lead to very high power consumption. For additional information, refer to the documentation for your version of Linux.
Installing StorNext from a DVD
Installation and upgrade media is shipped on DVDs. Both software and documentation are now stored on a single DVD, eliminating multiple discs for different operating systems. If you plan to install from media, you must have a DVD ROM drive to perform the installation or upgrade.
Refer to the following procedures:
Installing StorNext and StorNext FX Client Software on Linux or Unix.
Installing StorNext and StorNext FX Client Software on Windows.
Downloading a StorNext Media Kit (Creating an ISO Image)
Another way to obtain a StorNext media kit is by downloading the software. This process consists of obtaining a download authorization certificate, creating a download account (or signing on if you already have an account), downloading a software ISO image onto DVD, and then installing the software as described in the following procedures.
Refer to the following procedures:
Installing StorNext and StorNext FX Client Software on Linux or Unix.
Installing StorNext and StorNext FX Client Software on Windows.
If you have problems or questions with this process, contact your Quantum StorNext support representative.
Installing StorNext from a Web Download
A third StorNext delivery method is downloading from the Web. With this method you will download an executable program that will require you to accept the StorNext end user license agreement and will then extract the StorNext installer.
As part of the installation from a Web download, the software files are extracted into the /tmp/stornext directory by default. The software, when extracted, requires approximately 400 MB of space. Make sure there is enough free space in the default directory to extract the files. If there is not sufficient space, you may need to specify an alternative directory with the -d option.
To specify an alternate location before beginning the installation, enter the following command:
|
# ./<installation file> -d <dir> |
where <installation file> is the name of the installation file, and <dir> is the directory into which you want to extract the installation files.
Refer to the following procedures:
- Installing StorNext and StorNext FX Client Software on Windows.
Installing StorNext and StorNext FX Client Software on Linux or Unix
Hardware Requirements
RAM and hard disk space requirements to run the StorNext File System are listed in the StorNext 5 Compatibility Guide.
Make sure the MDC meets the hardware requirements outlined in the guide, and, if necessary, update the MDC before installing StorNext.
For improved performance and stability, it is strongly recommended that CPU C-States be disabled in the BIOS if they are supported by your system. Refer to system vendor documentation for additional information.
Partitioning Local Hard Disks
StorNext can be installed on any local file system (including the root file system) on the MDC. However, for optimal performance, as well as to aid disaster recovery, follow these recommendations:
Avoid installing StorNext on the root file system.
Partition local hard disks so that the MDC has four available local file systems (other than the root file system) located on four separate hard drives. This is so you can install the support directories in four separate locations (for more information, see Support Directories).
Note: You can run the pre-installation script to help determine the estimated size of and optimal location for StorNext support directories. For more information, see Running the Pre-Installation Script.
Additional Memory and Disk Requirements for Deduplication and Replication
Additional requirements that must be met in order to use the data deduplication and replication features on the StorNext MDC are listed in the “StorNext MDC Additional RAM and Disk Requirements for Deduplication and Replication” section in the StorNext 5 Compatibility Guide.
Make sure the MDC meets the requirements outlined in the guide, and, if necessary, update the MDC before installing StorNext.
LAN Requirements
StorNext LAN requirements are listed in the “StorNext MDC Network Requirements” section in the StorNext 5 Compatibility Guide.
Make sure the MDC meets the network requirements outlined in the guide, and, if necessary, update the MDC before installing StorNext.
In addition, the following also apply:
SUSE Linux distributions automatically associate the fully-qualified domain name (FQDN) of the local machine with the address 127.0.0.2 in the /etc/hosts file. There is no benefit from doing this when the machine is connected to a network that can resolve its name to an IP address. However, the existence of this entry can sometimes cause a failure of configuration synchronization within and between the server computers in an HA configuration. For this reason, the 127.0.0.2 entry should be deleted from the /etc/hosts file.
Software firewalls such as “iptables” on Linux and Windows Firewall can interfere with the proper functioning of StorNext and result in unexpected errors unless specifically configured for use with StorNext. Quantum strongly recommends that all software firewalls be disabled on systems used as StorNext clients and servers. If required, StorNext can be configured for use with hardware firewalls. For more information, refer to the fsports man-page or help file and the “Ports Used By StorNext” section in the StorNext Tuning Guide.
Other Requirements
Additional requirements that must be met for the StorNext system are listed in the “Additional StorNext MDC and StorNext Client Requirements” section in the StorNext 5 Compatibility Guide.
Make sure the system meets the additional requirements outlined in the guide, and, if necessary, update the system before installing StorNext.
Note: The version of the kernel-source or kernel-devel package must correspond to the version of the booted kernel. In addition, the system must have basic utilities installed such as perl, bash, grep, etc. as well as basic libraries. In general, StorNext will not install on a stripped-down installation of Linux. For management servers running Red Hat Enterprise Linux version 5 or 6, before installing SNFS and SNSM, you must first install the kernel header files (shipped as the kernel-devel or kernel-devel-smp RPM, depending on your Linux distribution).
Note: For servers running SUSE Linux Enterprise Server, you must install the first kernel source code (shipped as the kernel-source RPM). StorNext will not operate correctly if these packages are not installed. You can install the kernel header files or kernel source RPMs by using the installation disks for your operating system.
cpuspeed, an external Linux service on recent Intel processors, is not correctly tuned to allow StorNext to take advantage of processor speed. SUSE systems may also be impacted, as may AMD processors with similar capabilities.
On processors with a variable clockspeed (turboboost), the cpuspeed service on Red Hat controls the actual running speed of the processors based on system load.
A workload such as a heavily used FSM and probably Storage Manager does not register as something which needs a faster cpu. Turning off the cpuspeed service has been shown to double metadata performance on affected hardware.
Looking at the reported CPU clock speed by doing cat /proc/ cpuinfo while the system is under load displays if a system is impacted by this issue.
System Clock Synchronization
Quantum recommends that system clocks are synchronized using NTP for easier debugging. For HA installations, the system clocks must be synchronized for proper operation.
Nobody User and Group ID Values
The default UID/GID values for the "Nobody" user differ across platforms. Please ensure that your environment is set up with a common value for the Nobody user and group to ensure proper file access. Also note the default values for nobody when files are generate by Windows clients, as defined in each file system's configuration.
Windows Recycle Bin Requirements
If you are using the StorNext client software with Windows Server 2003, Windows Server 2008, Windows XP, Windows Vista or Windows 7, turn off the Recycle Bin in the StorNext file systems mapped on the Windows machine.
You must disable the Recycle Bin for the drive on which a StorNext file system is mounted. Also, each occurrence of file system remapping (unmounting/mounting) will require disabling the Recycle Bin. For example, if you mount a file system on E: (and disable the Recycle Bin for that drive) and then remap the file system to F:, you must then disable the Recycle Bin on the F: drive.
As of release 3.5, StorNext supports mounting file systems to a directory. For Windows Server 2003 and Windows XP you must disable the Recycle Bin for the root drive letter of the directory-mounted file system. (For example: for C:\MOUNT\File_System you would disable the Recycle Bin for the C: drive.)
For Windows Server 2003 or Windows XP:
| 1. | On the Windows client machine, right-click the Recycle Bin icon on the desktop and then click Properties. |
| 2. | Click Global. |
| 3. | Click Configure drives independently. |
| 4. | Click the Local Disk tab that corresponds to the mapped or directory-mounted file system. |
| 5. | Click the checkbox Do not move files to the Recycle Bin. Remove files immediately when deleted. |
| 6. | Click Apply, and then click OK. |
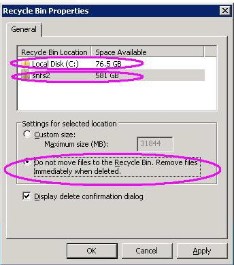
For Windows Server 2008, Windows Vista and Windows 7 systems, you must disable the Recycle Bin on C: and the File system name:
| 1. | On the Windows client machine, right-click the Recycle Bin icon on the desktop and then click Properties. |
| 2. | Click the General tab. |
| 3. | Select the mapped drive that corresponds to the StorNext mapped file system. For directory-mounted file systems, select the file system from the list. |
| 4. | Choose the option Do not move files to the Recycle Bin. Remove files immediately when deleted. |
| 5. | Click Apply. |
| 6. | Repeat steps 3-5 for each remaining directory-mounted file system. |
| 7. | When finished, click OK. |
(See Windows Recycle Bin Settings Example)
Figure 1: Windows Recycle Bin Settings Example