Configuring the StorNext and StorNext FX Client on Windows
Configuring StorNext and StorNext FX clients on Windows is similar to configuring a StorNext File System, but with more limited configuration options.
Note: For StorNext or StorNext FX clients on Windows, copy the .auth_secret file from the Xsan MDC to the following directory on the Windows system:c:/Program Files/StorNext/config/.auth_secret
To configure the StorNext or StorNext FX client software on Windows operating systems, use the Windows configuration utilities.
The following tools are provided with the StorNext Configuration utility, which is accessible from the StorNext Installation program:
Name Servers: Configure StorNext name servers.
Import/Export Client Settings: Import or export StorNext registry settings from or to a file.
Client Configuration: Configure drive mappings and other StorNext client options.
Additional tools are accessible from the Windows Start menu (see Additional Windows Configuration Utilities).
Important StorNext FX Client-only Procedure
For StorNext FX clients ONLY, copy the .auth_secret file from the Xsan MDC to c:/Program Files/StorNext/config/ on the client system.
Accessing the Configuration Utility
| 1. | Open the StorNext Installation window by double-clicking the file named SnfsSetup32.exe (32-bit systems) or SnfsSetup64.exe (64-bit systems). |
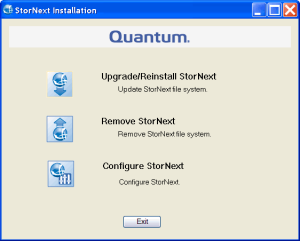
The StorNext Installation window displays appears (Figure 1).
Figure 1: StorNext Installation Window: Upgrade/Reinstall StorNext

| 2. | Click Configure StorNext. |
The StorNext Configuration screen appears (Figure 2).
Figure 2: StorNext Configuration

| 3. | Click one of the following options: |
Name Servers: This feature is described in Configuring Name Servers.
Import/Export Client Settings: This feature is described in Restoring a Previous StorNext or StorNext FX Client Configuration.
Client Configuration: This feature is described in Configuring the Client .
Additional Windows Configuration Utilities
The following additional configuration utilities are accessible from the Windows Start menu (Start > All Programs > StorNext File System).
For instructions on using any of these utilities, see the online help accessible from Start > All Programs > StorNext File System > StorNext Help.
License Identifier: Use this utility to display the host license identifier. The host license identifier is required to obtain a permanent license for StorNext. For details, see Retrieving the Host License Identifier.
Services Start: Use this utility to start all StorNext services on an MDC or StorNext client. For details, see Starting File System Services.
Services Stop: Use this utility to stop all StorNext services on an MDC or StorNext client. For details, see Stopping File System Services.
Services Stop and Remove: Use this utility to stop all StorNext services on an MDC or StorNext client, and also remove registry entries that automatically start the services on bootup. For details, see Stopping and Removing File System Services.
StorNext Help: View StorNext help for these utilities and other commands.
Version Information: View information about the currently installed version of the StorNext server and/or client software, such as the version number, build number, and platform. For details, see Obtaining Version Information.
Adding or Removing StorNext Components
After installing the StorNext or StorNext FX client, you may wish to add or remove components. If you installed the client only, you can add or remove the online help files or the StorNext or StorNext FX client.
| 1. | If you just completed installing the client, the StorNext Installation window displays (Figure 3). The components you selected during the install are already added, but if you changed your mind and want to select different components, you can do so now. |
Figure 3: StorNext Installation Window: Add/Remove Components

If you previously installed StorNext and would like to add or remove components, display the StorNext Installation window by double-clicking the file named SnfsSetup32.exe (32-bit systems) or SnfsSetup64.exe (64-bit systems). Note that the screen is slightly different from Figure 3 above: instead of Add/Remove Components, the button you need to click is called Upgrade/Reinstall StorNext (see Figure 4).
Figure 4: StorNext Installation Window: Upgrade/Reinstall StorNext

| 2. | Click Add/Remove Component or Upgrade/Reinstall StorNext, depending on which screen you are looking at. |
The Component Selection screen appears (Figure 5).

| 3. | Select the check boxes of the components you want to add. Clear the check boxes of the components you want to remove. Click Next to proceed. |
The StorNext EULA appears.
| 4. | Read and accept the EULA by selecting “I accept the terms in the License Agreement” and clicking Next. |
It make take several minutes for the selected components to finish being added or removed.
| 5. | When a message informs you that the process is complete, click OK. |
| 6. | Click Exit. |
Restoring a Previous StorNext or StorNext FX Client Configuration
StorNext and StorNext FX client configuration files are automatically saved when you remove StorNext, or can be manually saved for backup purposes.
If you want to restore a saved a client configuration file, you can import it using the StorNext Installation tool. This configures StorNext using the settings from a previous installation.
| 1. | Start the StorNext installation tool if it is not already running by double-clicking the file named SnfsSetup32.exe (32-bit systems) or SnfsSetup64.exe (64-bit systems). (See Step 1 and Step 2 of Installing StorNext and StorNext FX Client Software on Windows.) |
The StorNext Installation window appears (Figure 6).
Figure 6: StorNext Installation Window: Configure StorNext
| 2. | Click Configure StorNext. |
The StorNext Configuration window appears (Figure 7).
Figure 7: StorNext Configuration Window

| 3. | Click Import/Export Client Settings. |
The Import/Export Client Configuration window appears (Figure 8).
Figure 8: Import/Export Client Configuration Window
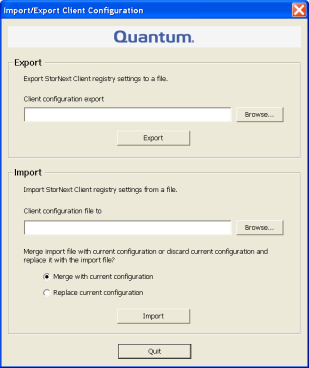
| 4. | Under Import, click Browse. Locate the client configuration (*.reg) file to import, and then click Open. |
Client configuration files saved during removal of a previous version of StorNext are located in the following directory by default:
C:\Program Files\StorNext\config\
| 5. | Click an option for handling current configuration settings: |
Merge with current configuration: The imported configuration is merged with the current configuration settings. Imported mount information is added to, or overwrites, existing information.
Replace current configuration: The current mount information is completely removed and replaced by the imported configuration.
| 6. | Click Import, and then click Yes to confirm. |
A message appears informing you the configuration settings were successfully added to the registry.
| 7. | Click OK, and then click Quit to close the Import/Export Client Configuration window. |
Upgrading or Reinstalling StorNext and StorNext FX Clients
The Upgrade/Reinstall button allows you to upgrade to a new version of StorNext or StorNext FX client software, or reinstall the current version. You might want to reinstall if you accidentally removed some components and need to get them back. During an upgrade/reinstall, the old software is removed and the new software is installed. Your previous configuration settings remain intact.
| 1. | To upgrade or reinstall a StorNext or StorNext FX client after the initial installation, download the new client software from the MDC as described in Downloading StorNext or StorNext FX Client Software. |
Exception: If you are running SNFS-only on a Windows machine, you cannot download the client software from the MDC. Instead, you will need to obtain the client software from the StorNext installation DVD. Copy one of the following files from the DVD and place it in an accessible location on the client system, then proceed to the next step.
fs_only/snfs_client_Windows_i386.zip (for 32-bit systems)
fs_only/snfs_client_Windows_x86_64.zip (for 64-bit systems)
| 2. | If necessary, unzip the client software file you downloaded. |
| 3. | Open the unzipped folder and double-click the client software installer file. This file is named SnfsSetup32.exe (32-bit systems) or SnfsSetup64.exe (64-bit systems). |
The StorNext Installation screen appears (Figure 9).
Figure 9: StorNext Installation Window: Upgrade/Reinstall StorNext

| 4. | Click Upgrade/Reinstall StorNext. |
The StorNext Component Selection window appears (Figure 10).
Figure 10: Component Selection
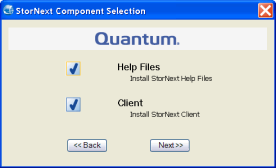
| 5. | Select the check boxes of the components you want to include in the upgrade. Clear the check boxes of the components you want to exclude. Click Next to proceed. |
The StorNext EULA appears.
| 6. | Read and accept the EULA by selecting “I accept the terms in the License Agreement” and then clicking Next. |
It make take several minutes for the selected components to finish being added or removed.
| 7. | When a message informs you that the installation is finished, click OK. |
