Media
The Media page allows you to manage virtual tape cartridges in VTL partitions on the DXi T10. Backup applications can write data to virtual tape cartridges just as they would to physical media.
Note: Some media actions do not require the Partition to be Offline to perform. Quantum strongly recommends that you set the Partition to the Offline state when performing any media action. This will prevent the host from receiving extraneous Unit Attentions and prevent confusion in the Backup Package.
To access the Media page, on the VTL page, click the Media tab.

The Media page contains the following tabs:
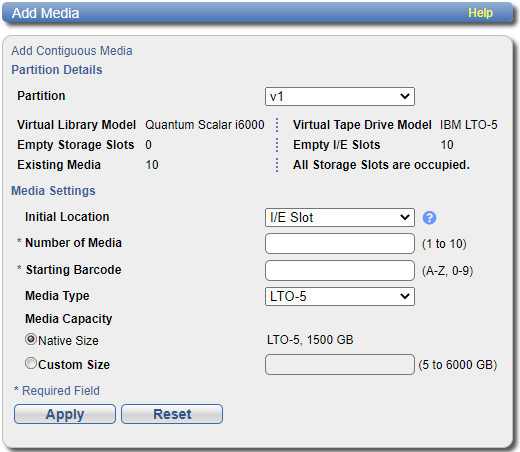
Use the Media Add page to add a contiguous range of virtual tape cartridges to a VTL partition. You can specify the initial location, starting barcode, media type, and media capacity. After the cartridges are created, they are available for backing up data.
Note: It is possible to oversubscribe space on the DXi T10. In this case, the total capacity of all media is more than the capacity of the DXi .
To access the Media Add page, on the Media page, click the Add tab.
To add virtual tape cartridges to a partition:
- In the Partition drop-down box, select the partition where the media will be created.
-
Under Add Contiguous Media, enter information about the media:
Initial Location The initial location for cartridges after they are created (Storage Slot or I/E Slot).
Note: You cannot create more cartridges than the number of available slots in the initial location. For example, if 50 I/E slots are available, you cannot create more than 50 cartridges if the initial location is set to I/E Slot.
Number of Media The number of cartridges to create in the partition. Starting Barcode The first barcode number in the cartridge sequence.
You can enter any alpha-numeric string for the starting barcode (uppercase letters only). Subsequent barcodes are incremented accordingly. For example, if you enter AA, the cartridges are numbered AA0000, AA0001, AA0002, and so on. If you enter a starting barcode with less than 6 characters, zeroes are appended to the barcode to make it 6 characters long.
Media Type The media type of the cartridges.
Note: The available media type options are determined by the type of tape drive selected when the partition was created. See Adding a VTL Partition.
Media Capacity The capacity of the cartridges. Select an option:
- Native Size - The capacity is determined by the selected media type.
- Custom Size - The capacity is a custom value. Enter the custom cartridge capacity in the box. Make sure the value is within the acceptable range displayed next to the box.
- Click Apply.
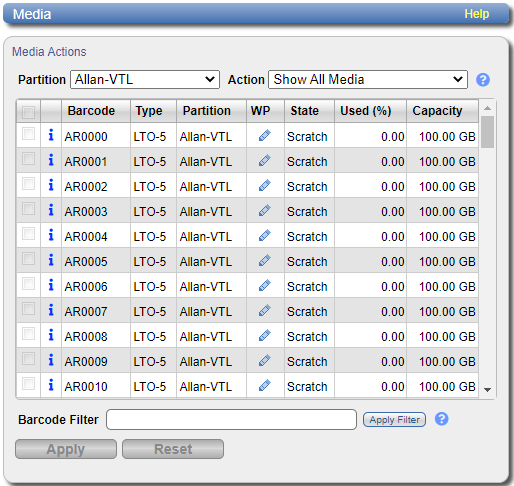
Use the Media Actions page to perform actions on virtual tape cartridges. You can import, export, and remove cartridges from VTL partitions. You can also configure cartridges to be write protected to prevent access.
To access the Media Actions page, on the Media page, click the Actions tab.

To perform actions on virtual tape cartridges:
-
In the Partition drop-down box, select the partition that contains the applicable cartridges.
Note: Select UNASSIGNED to work with cartridges that are not assigned to any partition.
The table displays the following information for all virtual tape cartridges in the partition:
Barcode The barcode number of the cartridge. Type The cartridge type (LTO or SDLT). Partition The partition where the cartridge is located. WP The write protect status of the cartridge (Write Enabled or Write Protected). State The state of the cartridge:
 State:
- Scratch - Scratch newly created virtual media or virtual media that has been recycled with no data on it.
- Virtual - Virtual media with data on it.
- Virtual, Mounted - Virtual media with data that is mounted in a tape drive.
- Vaulted - Virtual media with data that has been exported from a partition. Data is still intact on the virtual media.
- Exported - Virtual media with no data that has been exported from a partition. Media has to be in this state before it can be deleted from the DXi T10.
- Pool - The type of cartridge pool such as application, cleaning, service, or unknown.
Used (%) The percentage of the tape cartridge that is used.
Caution: The Used (%) value is not updated while the media is mounted. Because of this, the displayed Used (%) value may be different from the real value for mounted media.
Capacity The total capacity of the tape cartridge. Additional Information- Click a column heading to sort the rows in the table by that column.
- Click the column heading again to reverse the sort order. Click the Information button [i] next to a cartridge to display detailed information about the cartridge.
-
In the Action drop-down box, select the action to perform:
Show All Media Default selection, shows all slots for the partition.
Note: When any of the other drop-down selections are made, the check boxes for each Barcode become active (ungrayed, selectable).
Export Removes a cartridge from the virtual media changer and places it in an exported state. Perform this action if an export cannot be performed from the backup application. The cartridge must be in the vaulted, scratch, or virtual state. Recycle Recycles (erases) a cartridge so it can be reused by the partition. Write Protect (WP) Enables or disables write protection for the cartridge. Import Media Imports cartridges into the currently selected partition. Cartridges that are in the exported or vaulted state can be imported from another partition with the same media type and data deduplication settings. After you select an action, the table is updated to show only the cartridges that support the selected action. Select Show All Media in the Action drop-down box to see all cartridges.
-
(Optional) To reduce the number of cartridges displayed in the table, enter a barcode or barcode range in the Barcode Filter box and click Apply Filter.
Use a hyphen (-) to indicate a range, and use an asterisk (*) to indicate a wildcard. Separate multiple entries with commas, and do not use spaces.
Example: Enter AAA* to display all cartridge barcodes beginning with AAA. Or enter AAA010-AAA020 to display all barcodes in the specified range. Click the Quick Tip icon [?] for additional examples. -
Select the cartridges to perform the action on. The action is performed only for selected cartridges on the current page. Or select the check box in the table heading row to perform the action on all cartridges in the partition.
If necessary, use the controls at the bottom of the table to navigate between multiple pages of results. Select the number of rows to display in the Show drop-down box.
- Click Apply.
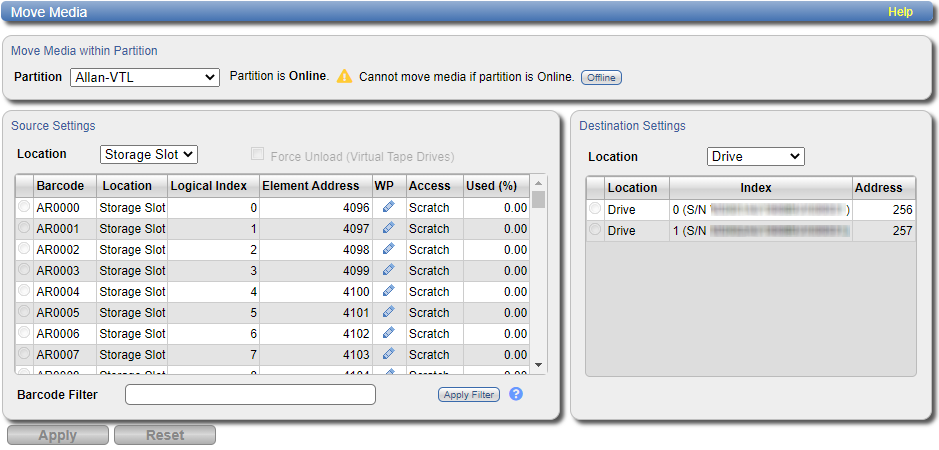
Use the Media Move page to move a virtual tape cartridge from a source location (drive, storage slot, or I/E slot) to a destination location (drive, storage slot, or I/E slot). The location and destination must be in the same partition.
Note: If you do not create and associate a host access group with a partition, the virtual devices are not visible from the host, and drives cannot be destinations for move operations. See Remote Host Access.
Caution: Moving a virtual tape cartridge might disrupt backup jobs.
To access the Media Move page, on the Media page, click the Move tab.

To move a virtual tape cartridge:
- In the Partition drop-down box, select the partition that contains the cartridge to move.
- If the partition is online, click Offline to take the partition offline. To move media, the partition must be offline.
- Under Source Settings, in the Location drop-down box, select the type of location you want to move a cartridge from (Drive, Storage Slot,or I/E Slot).
- (Optional) If you are moving a cartridge from a drive, select the Force Unload (Virtual Tape Drives) check box to force the drive to unload the cartridge before ejecting it.
-
(Optional) To reduce the number of cartridges displayed in the table, enter a barcode or barcode range in the Barcode Filter box and click Apply Filter.
Use a hyphen (-) to indicate a range, and use an asterisk (*) to indicate a wildcard. Separate multiple entries with commas, and do not use spaces.
Example: Enter AAA* to display all cartridge barcodes beginning with AAA. Or enter AAA010-AAA020 to display all barcodes in the specified range. Click the Quick Tip icon [?] for additional examples. -
Select the cartridge to move from the source location.
Note: If necessary, use the controls at the bottom of the table to navigate between multiple pages of results. Select the number of rows to display in the Show drop-down box.
- In the Destination Location drop-down box, select the type of location you want to move the cartridge to (Drive, Storage Slot, I/E Slot).
-
Select the destination location for the cartridge.
Note: The destination section displays empty drives, storage slots, and I/E slots. Offline drives are not displayed. A drive might be offline if it has not been mapped to a host. See Remote Host Access.
- Click Apply.
- Return the partition to an online state. See Changing Partition Mode.
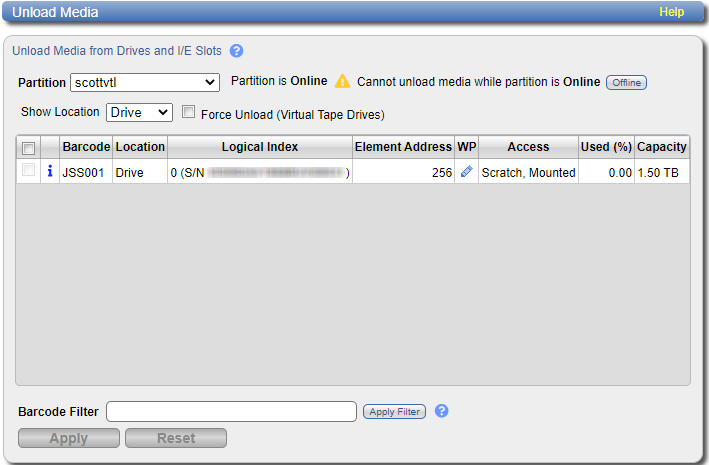
Use the Media Unload page to perform a bulk unload of virtual tape cartridges from drives or I/E slots.
Note: If you do not create and associate a host access group with a partition, the virtual devices are not visible from the host, and drives cannot be destinations for move operations. See Remote Host Access.
Caution: If you unload a virtual tape cartridge from a drive while a backup to that drive is in progress, the backup job will fail.
To access the Media Unload page, on the Media page, click the Unload tab.

To unload virtual tape cartridges:
- In the Partition drop-down box, select the partition that contains the cartridges to unload.
- If the partition is online, click Offline to take the partition offline. To unload media, the partition must be offline.
- In the Show Location drop-down box, select the type of location you want to unload cartridges from, either Drive or I/E Slot.
- (Optional) If you are unloading cartridges from a drive, select the Force Unload (Virtual Tape Drives) check box to force drives to unload the cartridges before ejecting them.
-
(Optional) To reduce the number of cartridges displayed in the table, enter a barcode or barcode range in the Barcode Filter box and click Apply Filter.
Use a hyphen (-) to indicate a range, and use an asterisk (*) to indicate a wildcard. Separate multiple entries with commas, and do not use spaces.
Example: Enter AAA* to display all cartridge barcodes beginning with AAA. Or enter AAA010-AAA020 to display all barcodes in the specified range. Click the Quick Tip icon [?] for additional examples. -
Select the cartridges to unload.
Note: If necessary, use the controls at the bottom of the table to navigate between multiple pages of results. Select the number of rows to display in the Show drop-down box.
-
Click Apply.
Cartridges are moved to a previous storage slot if available. Otherwise, they are moved to the first available storage slot.
- Return the partition to an online state. See Changing Partition Mode.
