DXi9000 Series DAE Installation
Overview
This topic provides instructions for installing and configuring a Dynamic Application Environment (DAE) on DXi9000 Series systems.
Dynamic Application Environment (DAE)
DAE, technically known as a Hypervisor, provides a virtual machine environment in which you can install additional operating systems for running third-party applications you provide on your supported system. Once licensed and configured, the DAE feature on the DXi allows applications installed in the VM to run in a completely independent environment, and can also access DXi resources and shares.
Apache Guacamole, also enabled from the DAE section of the App Environment page, provides a web-based (HTML5) method for accessing a virtual machine (VM).
Contact Quantum Service to have DAE installed and configured on your DXi system.
An example use for DAE is installing Veritas NetBackup (NBU) media server as a virtual machine (VM) instead of purchasing and installing a dedicated server to run the NetBackup application.
Note: Any combination of ISC (Increased Stream Counts), DAE, and Veeam cannot be used concurrently.
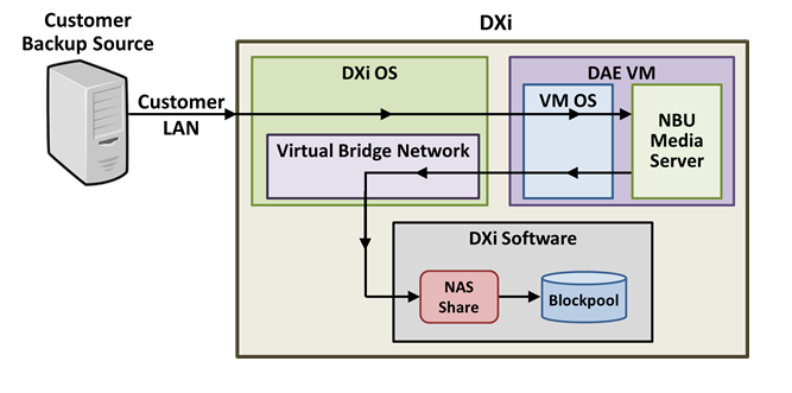
The simplified block diagram below shows the data flow when NBU is installed in a DXi as a DAE VM. Management communication is omitted for simplicity. Backups of the customer data are scheduled by the virtualized NBU Media Server, and backup data is sent from the Customer Data Source to the DXi, where it is routed through the NBU Media Server, then through a Virtual Bridge Network to a NAS Share for deduplication and storage in the Blockpool.
In this example, data stays within the DXi because the NBU Media Server has direct access to a NAS share. Some DAE installations may not have direct access to the DXi software, and would communicate only with the LAN ecosystem.
Prepare for the Installation
Installation Prerequisites
To successfully complete a DAE installation, it is important that you have experience in the following areas:
- Installing and configuring Linux and Windows operating systems.
- Virtual machine network configuration experience.
- Experience with terminal programs such as MobaXterm.
DAE installation support is available from Quantum. Please contact your Quantum account sales manager for more information.
Before you begin the DAE installation, make the following preparations:
The following items are required to successfully install and configure DAE on a DXi system.
| Requirement | Description |
|---|---|
|
CLI Admin User |
The CLI Admin (cliadmin) account must be enabled on the DXi. |
| ServiceLogin User | The ServiceLogin (SSH/CLI Service) account must be enabled on the DXi. |
|
DAE License |
A DAE License must be installed on the DXi system. |
|
DXi Software |
The DXi system must be running DXi 4.0 Software or higher. |
| .ISO File |
|
|
Data Space |
The DXi must have a minimum 100 GB + the size of the .ISO file in free data space available. Note: Installing DAE when the DXi is in Low Space or Critical Low Space is not supported. |
| GUI Admin User | You must have the GUI Administrator user account password. |
|
NAS Support |
The DXi must have NAS support. |
|
NIC Ports |
One or more NIC ports on the DXi with no IP address assigned to it must be available. These ports will be used by the virtual machine (VM) operating system (OS). This can be viewed using DXi GUI. Navigate in the GUI to Configuration > System >Network. Scroll to IP Address Table and view network ports that are not used. Record the name of the port(s) you wish to use. |
| X11 Support |
An external host system that supports running X11 Windows is required to install the DAE virtual machine (VM) operating system (OS) and manage the OS via a local DXi VNC connection. This can be met by using a Linux host with X11 support or by using a program such as MobaXterm installed. |
| Apache Guacamole |
This feature is available as of SW version 4.1 and is recommended for Quantum systems using software version 4.1 or later. Note: This feature replaces the requirement for X11 support. |
Make sure the following conditions are met before you continue with DAE installation:
- All backup jobs are completed and there is no pending I/O.
- All replication jobs are completed, and replication is paused (Replication > Actions page).
- All space reclamation tasks are completed without errors (Utilities > Space Reclamation page).
- All healthchecks are completed without errors (Utilities > Space Reclamation page).
- All components in the system display Normal status (Status > Hardware page).
- All outstanding administration alerts are deleted (Alerts > Admin Alerts page).
- All service tickets are closed (Alerts > Service Tickets page).
For more information, click Help in the remote management console to display the DXi online help. To access remote management, see Step 3 - Access Remote Management).
To access the remote management console, do the following:
-
Launch a supported Web browser on a workstation that has network access to the DXi
The DXi GUI is compatible with Chromium-based web browsers. Quantum-tested Chromium-based browsers include Brave, Google Chrome, Microsoft Edge, Opera and Vivaldi. Mozilla Firefox is also compatible with the GUI.
-
In the browser address box, type the IP address of the DXi, and then press <Enter>.
The Login window displays.

If the Login window does not display, verify that the IP address is correct and that the network path to the DXi system is valid. Also verify that you are using a supported Web browser. Then try again. If you are still unable to access the Login window, contact the DXi GUI administrator.
- Select Administrator and enter the GUI Administrator user password.
- Click Login.
-
If a security banner message has been specified for the DXi, click Accept.
The Home page displays.
Configure the DXi System
To perform the DAE configuration on the DXi system, complete the following steps in order:
| Step | Description | Procedure to Complete |
|---|---|---|
| 1 | Install the DAE License on the DXi. | Go to Install the DAE License. |
| 2 | Create a virtual machine (VM) NAS share on the DXi. | Go to Create a VM NAS Share. |
| 3 | Enable the DAE feature on the DXi. | Go to Enable DAE. |
A DAE License is required to enable product functionality. Your DAE License is preinstalled with the purchase of a new product or a License Certificate is provided by Quantum with a product upgrade. The certificate will contain an authorization code.
To add a DXi9000 Series license key, perform the following steps:
- Open a Web browser on a computer with Internet access.
-
Enter http://www.quantum.com/licensekeys in the browser address box.
The License Key Management page displays.

-
Enter the DXi system serial number in the Serial Number box and click Submit.
The Licensed Feature page displays. Preinstalled licenses will be shown and no additional action is required.
Note: The serial number displays on the License Keys page, above the New Key box.
-
If required, enter the authorization code (included on the DXi9000 Series License Certificate) and click Get License Key.
The Licensed Feature page returns a license key. Print out or write down the license key, or save it to a text file.
- Access the DXi remote management console (see Step 3 - Access Remote Management).
-
Click the Utilities menu, and then click the License Keys tab.
The License Keys page displays.
-
Enter the DXi9000 Series license key in the New Key box, and then click Add.
The DXi9000 Series license key is added to the system.
You must create a Virtual Machine (VM) NAS share to present the storage capacity of the DXi as a NAS share that is compatible with VMs.
Additional Information
- The VM NAS share should not be used by backup applications. It should only be used to manage DAE virtual machines (VMs).
To add a VM NAS share:
-
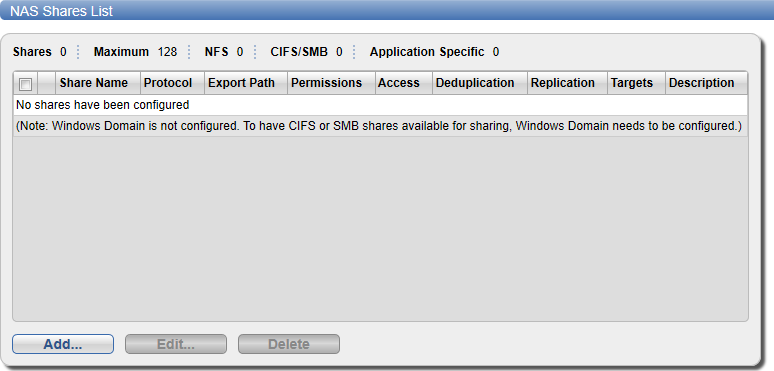
In the DXi remote management console, select Configuration > NAS. The NAS Summary page displays.
-
Click Add.
The Add NAS Share page displays.
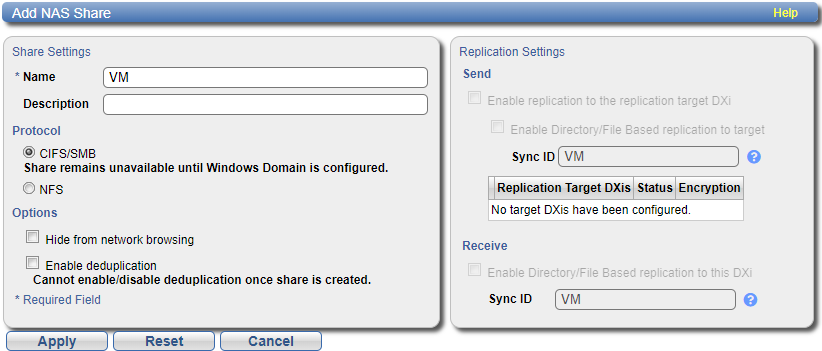
- Under NAS Share Settings, enter information about the share:
- The NFS option to use the share on a UNIX or Linux network.
- The CIFS/SMB option to use the share in a Windows network.
- Click Apply.
| Name |
Enter the name of the DXi9000 CIFS/SMB or NFS share. VM CIFS/SMB or NFS shares must be named VM (upper case). |
| Description | (Optional) Enter a brief description of the share. |
| Protocol |
Select either: |
| Hide from network browsing |
Do not select. This is for CIFS/SMB shares only. |
| Enable deduplication |
Deselect the check box. The VM NAS share must have deduplication disabled. |
Once the DAE license is installed and a VM NAS share created, complete this section to enable DAE on the DXi.
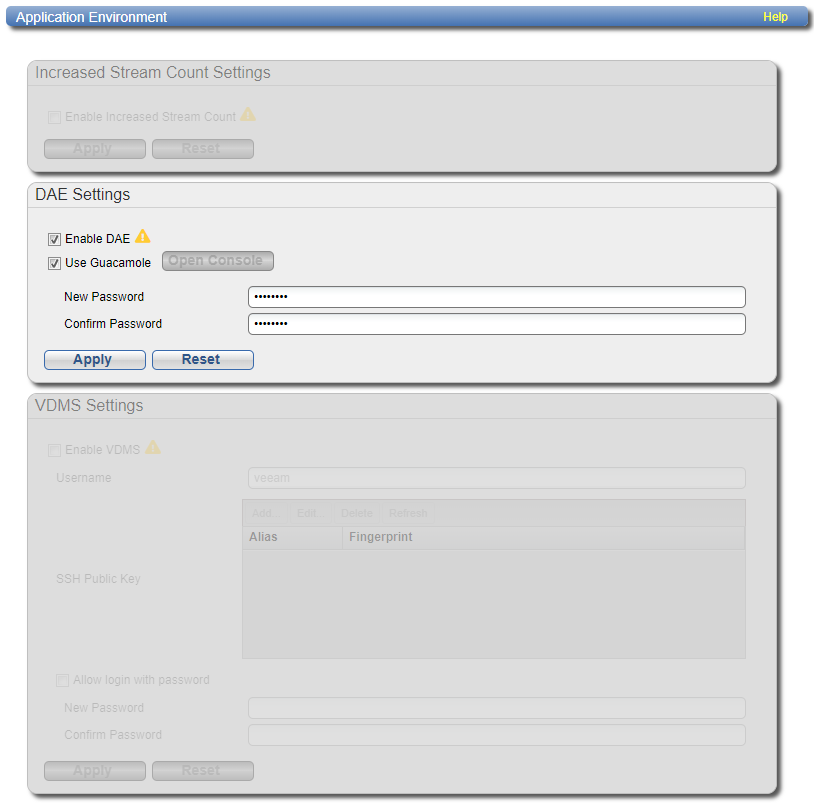
In the DXi remote management console, select Configuration > System > App Environment. The Application Environment page displays.
- Select the Enable DAE check box.
- To enable Apache Guacamole for accessing the DAE VM, select the Use Guacamole check box.
- The account created for Guacamole is admin. A virtual machine (VM) NAS or CIFS/SMB share must be created before DAE is enabled (see Adding a NAS Share).
- If the DXi SW version is prior to 4.1, the Use Guacamole check box will not appear.
- Your browser must support HTML5 in order to support Guacamole.
- Enter the New Password to use for the Guacamole admin account.
-
Enter the same password in the Confirm Password box.
- Click Apply. A Save Changes dialog box appears stating that the system will require a reboot.
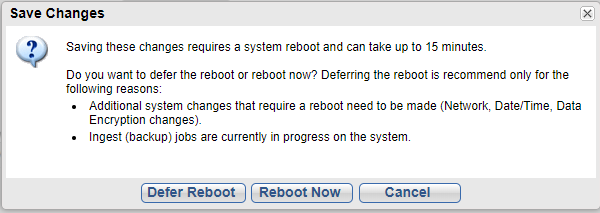
Select one of the following options.
Option Description Defer Reboot Defers the system reboot. A Reboot Required alert message will appear in the GUI banner until the system is rebooted.
Deferring a reboot is only recommended if additional system changes that require a reboot need to be made (Network, Application Environment, Data Encryption changes) or ingest (backup jobs) are currently in progress on the system.
Note: Once a reboot is in a deferred state, the applied changes cannot be reset.
Reboot Now Starts the system reboot. A system reboot can take up to 15 minutes.
Cancel No reboot occurs and the Application Environment page reappears. Changes made to the settings remain but are not applied. Click the DAE Settings Reset to reset settings to their original state. Note: After the reboot and a VM has been created using
syscli --add daeand with the VM running, the Open Console button will be enabled.
|
IMPORTANT INFORMATION |
Create the Virtual Machine (VM)
You can create the VM using one of the following three options:
-
Guacamole
-
MobaXterm
-
SSH and VNC Viewer
Note: This step is for the SSH and VNC View option only. If you are using Guacamole or MobaXterm, go to step 2.
To install the Virtual Machine OS:
- Open an SSH session to the DXi using a Linux host. Example:
ssh -Y cliadmin@<DXi IP> -
Enter the
cliadminpassword
Once the DXi system has been configured for DAE, a Linux type or Windows Server operating system .iso image file must be copied over from your host system to the DXi system. The .iso file must then be mounted to the virtual machine (VM) NAS share created on the DXi during the DXi system configuration.
Logging On to the DXi System to Copy the ISO image
To copy the .iso image, log on to the DXi System from the ServiceLogin account.
- From a Linux host, such as ssh ServiceLogin@<DXi IP>, enter the password for your ServiceLogin account.
- From a Windows host, use MobaXterm to open an SSH window to the DXi and log on with your ServiceLogin account.
Note: The following method is for a Linux host. In this case, we will mount a directory to the DXi.
To copy the .ISO image to the target DXi, log on to the host system and perform the following commands:
-
Go to the user host directory:
Note: This procedure assumes that the .iso image file is located under the
/home/userdirectory.cd /home/user
-
Create a directory. In this example, the directory is VM.
mkdir VM
-
Mount the filesystem
sudo mount -t nfs -o resvport,rw <dxi data IPaddress>:/Q/shares/VM /home/user/VM
Additional Information
- <linx_type_os>.iso - the Linux bootable ISO image to use for the DAE VM.
- <dxi data IP address> - the DXi data IP address that has access to the DXi NAS
-
Copy the .iso file to the DXi.
cp /home/user/<linux_type_os>.iso cp /home/user/VM/Iso/
Additional Information
- The
Isodirectory is automatically created when the DAE feature was enabled in the DXi.
- The
-
Unmount the file system.
sudo umount /home/user/VM
The .iso image file is now placed at the VM share as required to create the virtual machine.
Example: Mount and Copy an Image File
In the example below, a directory named dxivmshare was created. The host Linux system then mounts a DXi VM share on a DXi system with an IP address of 10.40.160.80. A file image named CentOs-6.8-x86-minimal.iso was copied to the DXi VM share /Iso folder.

Note: Alternatively, a Windows host and a program such as WinSCP can be used to copy the .iso file to the DXi @ /Q/share/VM/Iso. Use the ServiceLogin username and password to login to the DXi from within WinSCP.
Before creating a VM on the DXi, you will need to define the following VM parameters:
Use the syscli --getlimits dae command to review the current DAE resources available on the DXi.
DAE Resources Example
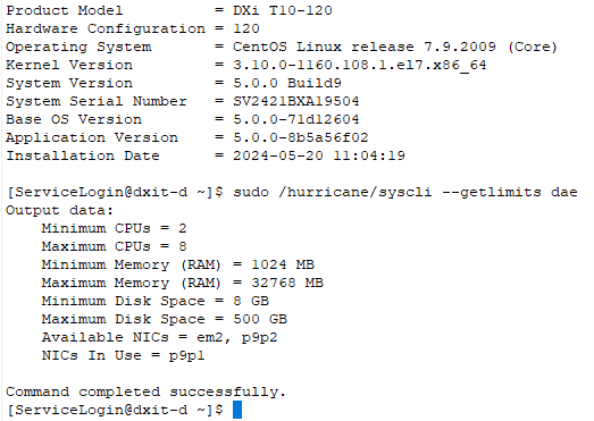
Output Definitions for syscli --getlimits dae
| Output Field Name | Description | Notes |
|---|---|---|
|
Minimum CPUs |
Defines the minimum number of CPUs that can be assigned to a VM. |
The number of CPUs used by a VM can be changed after creation. |
|
Maximum CPUs |
Defines the maximum number of CPUs that can be assigned to a VM. |
|
|
Minimum Memory (RAM) |
Defines the minimum amount of RAM (in MB) that can be assigned to a VM. |
|
|
Maximum Memory (RAM) |
Defines the maximum amount of RAM (in MB) that can be assigned to a VM. |
|
|
Minimum Disk Space |
Defines the minimum amount of disk space (in MB) that can be assigned to a VM. |
You cannot change the amount of disk space used by a VM after creation. |
|
Maximum Disk Space |
Defines the maximum amount of disk space (in MB) that can be assigned to a VM. |
|
|
Available NICs |
Defines the list of available network devices not in use by the DXi that can be assigned to a VM. |
Once a physical network device on a DXi system is assigned to a VM, that device cannot be used for other DXi network configurations until one of the following occurs:
|
|
NICs In Use |
Defines the list of network devices that have been already assigned to one or more VMs. |
Review .ISO Images on the DXi
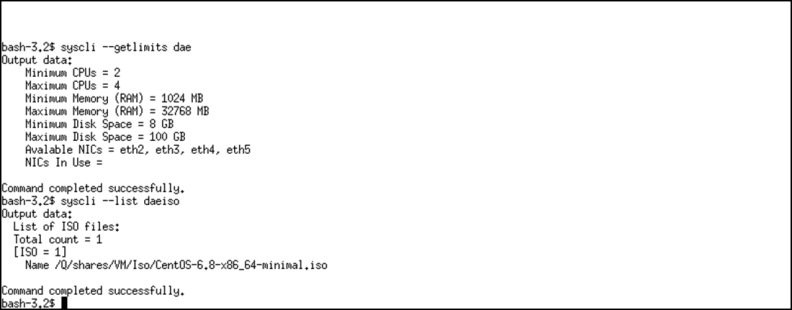
Use the syscli --list daeiso command to verify the .ISO images copied over to the DXi system.
Note: If you use the –path parameter, that path defines the iso image to use, which must be located under the /Q/shares/VM/Iso share or below.
Review the following attribute descriptions.
|
|
Retrieves a list of .iso files in the specified directory. |
|
|
The directory to search for the .iso files. |
Example: List of .ISO Images on a DXi
Once you have defined the VM parameters and .ISO image list, use the syscli --add dae command to create a new VM.
Command
syscli --add dae --name <vm name> --cpus <num cpus> --memory <ram> --diskspace <vm diskspace> --isoimage <iso pathToImage> [(--appnetwork <dxi nic port>)] [--autostart yes|no] --password <password> [--sure]
MAXIMUM VALUES
- Number of CPUs – 8
- Memory – 32768
- Disk space – 500 GB
Note: Quantum recommends using the maximum values.
Review the following attribute descriptions.
|
|
Create a new VM instance. |
|
|
The name of the VM. |
|
|
The number of CPUs for the VM. |
|
|
Amount of RAM memory (in MB) for the VM. |
|
|
Amount of disk space (in GB) for the VM operating system. |
|
|
Selection of the path and image file to use for the operating system install. Note: In this instance, the ISO filename is also needed, so the command is |
|
|
Selection of the application network devices (NIC ports) on the DXi. More than one may be specified. |
|
|
Autostart the VM on the system boot. The default is no. WARNING: Do not enable autostart at this time. |
|
|
Password for accessing the console over VNC. |
|
|
If specified, this command will execute immediately without asking for confirmation. |
‑‑getlimits dae
|
Output data:
|
Create a New Virtual Machine Example
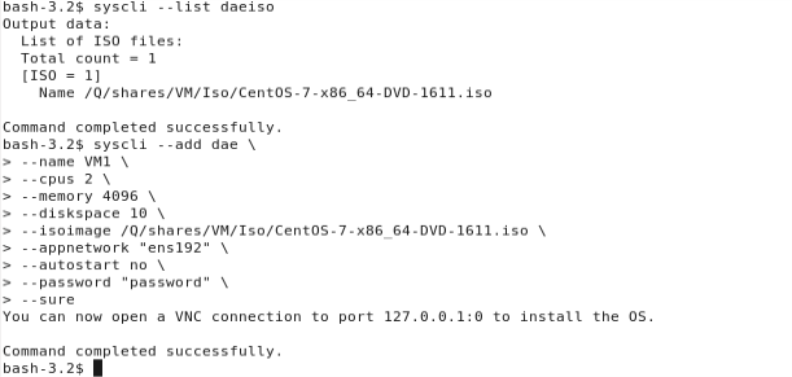
Note: When the syscli --add dae command completes successfully, you must perform the same type of OS installation procedures as are usually performed with a physical machine.
Once the virtual machine (VM) has been installed, it is the responsibility of the user to correctly configure the VM. Review the following recommendations for VM configuration.
Before starting the virtual machine (VM), verify that the VM is in a "shut off" state using the syscli --list dae command.
Example: Verify the Virtual Machine
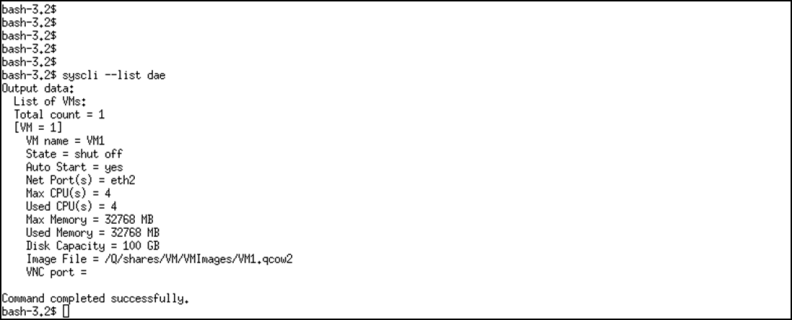
To start the VM, use the --start dae syscli command. Once the VM starts, it will be in a "running" state.
Command
syscli --start dae --name <vm name>
Review the following attribute descriptions.
|
|
Starts the VM instance. |
|
|
The name of the VM to start. |
Example: Running the Virtual Machine
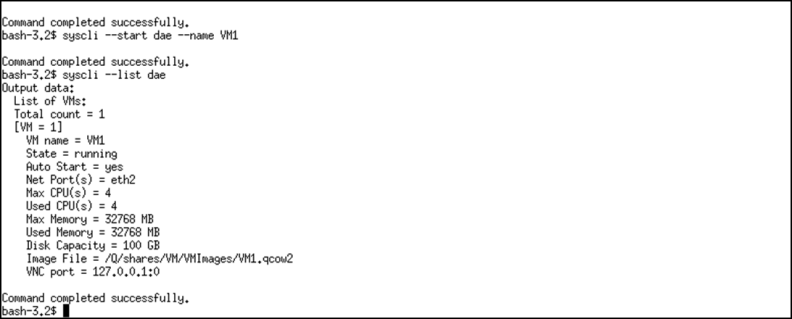
Note: The virtual machine iso file resides on the virtual machine cdrom. The iso file must be ejected from the cdrom. Use syscli --eject daeiso --name <vm name>
This step is for the Guacamole only. Skip this step if you are using MobaXterm or SSH and VNC Viewer.
-
In the DXi remote management console, select Configuration > System > App Environment. The Application Environment page displays.
Note: The default Gucamole console user is admin.
Application Environment - DAE Enabled with Guacamole

Note: If DAE is not running, see Troubleshooting DAE.
- Next to the Use Guacamole check box, click on Open Console.
- Enter Username admin and use the password specified when Guacamole was enabled.
- Complete the OS installation procedures as necessary for the OS you have installed.
- After the virtual machine OS is installed, you will need to configure network connections.
- When finished, continue with Finish the OS Installation.
A new tab displays the VM console.
Note: The first time you click Open Console displays the Apache Guacamole Login screen.

Note: Because the Apache Guacamole credentials are saved in a cookie, the login will not be required again, unless cookies are cleared.
If you encounter problems when enabling the DAE feature, see the table below for troubleshooting steps.
| Problem | Corrective Action |
|---|---|
| System alerts | Review any Admin Alerts (see Admin Alerts) or Service Tickets (see Service Tickets) that were generated when enabling DAE. |
| System memory | Depending on the current system configuration, additional memory may be required to run DAE, or the additional memory was installed incorrectly. Contact Quantum. |
Finish the OS Installation
Once the virtual machine (VM) operating system (OS) has been installed, it must be set up and configured. It is the responsibility of the user to correctly set up the VM OS.
Important Information
Do not install any VM packages when setting up the VM OS.
Security
It is the responsibility of the user to correctly set up the VM OS firewall and security. This is not configured by the DXi.
Complete installation of the Linux OS.
- Define the following network configuration parameters in the Linux OS. If the guest OS is Linux-based (Red Hat or CentOS), follow these steps.
- Ethernet Interface eth0 (required)
- Additional Ethernet Interfaces (optional)
Note: Do a service network restart to save any network changes.
NetworkManager
If you modify network configuration parameters on a Red Hat Enterprise Linux (RHEL) based distribution, it is recommended that you do not use NetworkManager to configure the VM network parameters. If you use NetworkManager, add or edit the following parameter in /etc/sysconfig/network-scripts/ifcfg-eth*:
NM_CONTROLLED- set to no.
Ethernet Interface eth0
Each VM is configured with at least one virtual Ethernet port. You must set eth0 to connect on boot using DHCP protocol. eth0 is connected via a VPN to the DXi.
eth0 File Example
/etc/sysconfig/network-scripts/ifcfg-eth0
TYPE=Ethernet
BOOTPROTO=dhcp
DEFROUTE=no
DEVICE=eth0
NAME=eth0
ONBOOT=yes
NM_CONTROLLED=no
Note: Remove the HWADDR and UUID parameters (CentOS 6 and lower).
The DXi system will appear on this network at the address of 192.168.122.1. When connecting to DXi shares from the VM OS, use this network address to obtain the best performance for the VM application that needs to access the DXi shares.
Do a service network restart to save any network changes.
Additional Ethernet Interfaces
- If you are using more than one physical DXi network port for a VM, the first network port will be eth1, where eth1 will be the DXi's lowest named network device.
- For each network port, you must define the network settings as needed for the applications running in the VM.
- The lowest physical NIC port used for the VM will be labeled eth1.
eth1 File Example
/etc/sysconfig/network-scripts/ifcfg-eth1TYPE=Ethernet
BOOTPROTO=none
DEFROUTE=yes
NAME=eth1
DEVICE=eth1
ONBOOT=yes
IPADDR=<available on your network>
PREFIX=
GATEWAY=<available on your network>
DNS=<available on your network>
DOMAIN=<available on your network>
NM_CONTROLLED=no
Complete these steps to setup your Windows Server VM network:
- Open an SSH session to the DXi using ServiceLogin as the login user.
- Enter the password for the ServiceLogin account.
- Enter the command
sudo -i - Enter the command
ls /Q/shares/VM/Iso - If the iso file of the Windows Server OS is listed in the Iso directory, remove the iso file, using
rm /Q/shares/VM/Iso/<iso file name> - Enter the command
wget https://fedorapeople.org/groups/virt/virtio-win/virtio-win.repo -O /etc/yum.repos.d/virtio-win.repo - Enter the command
yum install virtio-win - Enter the command
ls /usr/share/virtio-win - Observe the virtio-win iso file.
- Copy the virtio-win<version number>.iso file to /Q/shares/VM/Iso
- Edit the file /etc/libvirt/qemu/<name of VM>.xml as below:
- Enter the command
/hurricane/syscli --list dae --name <vm name> - If the DAE is shown as Running, enter the command
/hurricane/syscli --shutdown dae --name <name of VM> - Reboot the DXi. Use command
hurricane/syscli --nodemanage --reboot - Open the DXi GUI after approximately 10 minutes to see if DXi is in Normal state. When the DXi is in Normal state, continue with the next step.
- Reconnect ssh sessions from the host:
ssh -Y cliadmin@<DXi IP> -
Enter the cliadmin password.
- Verify the VM is running by using
syscli --list dae --name <vm name>If the State is not Running, start the VM by usingsyscli --start dae --name <vm name> - Click the following links for the configuration instructions applicable to your network:
- Navigate to the VM console. From the management console, select Configuration > System > App Environment.
- Press Ctrl-Alt-Shift to activate the Guacamole console.
- Select On-Screen keyboard.
- Click Ctrl, then click Alt, then click Del.
- Press Ctrl-Alt-Shift (on the physical keyboard) to access the Guacamole menu and change the input back to None.
- Enter the Windows Server password.
- At the bash prompt, enter
vncviewer 127.0.0.1:0. - Enter the password to access the QEMU console.
- For a Windows host using MobaXterm, open an ssh session to the cliadmin account.
- Enter the cliadmin password.
- At the bash prompt, enter
vncviewer 127.0.0.1:0. - Enter the password to access the QEMU console.
-
If installing a Windows Server OS in the virtual machine, press F8 to open a dialog to allow entering Ctrl-Alt-Del to allow entering the Windows Server password.
-
Open Device Manager for the Windows Server VM to add a driver to Ethernet controller(s).
- Browse to find the driver from the cdrom.
- Look for the NetKVM folder and find the operating system folder.
- Connect an Ethernet cable from the Ethernet port on the DXi that was called out in the
--appnetworkparameter of the--add daecommand.
Note: Ethernet drivers are not included when creating a Windows Server setup in a VM.
Example: virtio-win-0.1.171.iso
<disk type='file' device='cdrom'>
<driver name='qemu' type='raw'/>
<source file='/Q/shares/VM/Iso/virtio-win-<version number).iso' startupPolicy='optional'/>
<target dev='hdc' bus='ide'/>
<readonly/>
<address type='drive' controller='0' bus='1' target='0' unit='0'/>
</disk>
The ssh sessions will terminate during the DXi reboot.
The Windows login screen is displayed.
Example: NetKVM/2k16/amd64
There are two methods to add applications to the VM OS:
- Use an assigned network interface to the VM OS and download or copy files to your VM OS.
- Copy the application software to the
/Q/shares/VMfolder and mount the share through the VM OS by using192.168.122.1:/Q/shares/VM.
To mount a DXi host NAS share in the virtual machine (VM), do the following:
- Log in to the VM through the VNC connection (see ).
-
Create a directory. In this example, the directory is named "mybackupshare" and the NAS share is "MyBackupShare".
mkdir mybackupshare -
Mount the file system.
mount -t nfs -o resvport,rw 192.168.122.1:/Q/shares/MyBackupShare ./mybackupshare
Example: Mounting a DXi Host NAS Share within a Virtual Machine

Complete Virtual Machine Installation
To complete the virtual machine (VM) installation, perform the following tasks:
When you have finished using the .ISO image file used to create the VM, unmount the image on the DXi using the syscli --ejectiso dae command.
Command
syscli --eject daeiso --name <vm name>
Review the following attribute descriptions.
|
|
Ejects the .iso file for the VM. |
|
|
The name of the VM to eject the .iso file. |
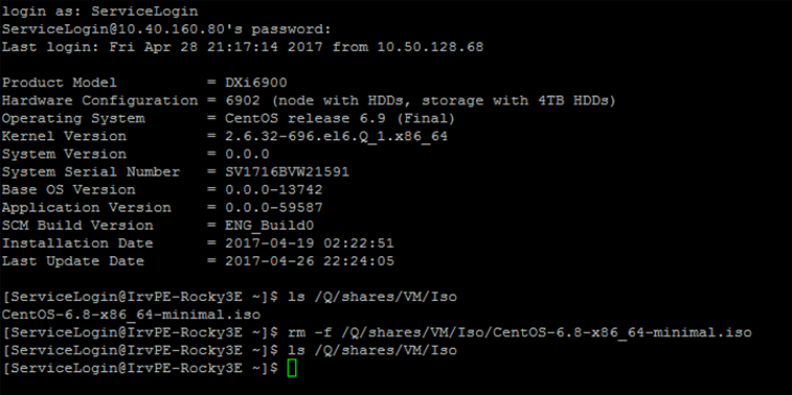
Once the .iso image file has been ejected from the VM on the DXi, delete the file from the /Q/shares/VM/Iso directory
Note: The cliadmin user account does have permisson to remove files. To remove the .iso image file, log in to the DXi system using the ServiceLogin user account.
Example: Delete an Image File
Manage DAE Virtual Machines
The following Command Line Interface (CLI) commands are used to manage Virtual Machines (VMs) on a DXi system:
This command deletes an existing virtual machine (VM) instance.
WARNING: The VM MUST be shut down before running this command. A running VM will not be deleted.
Command
syscli --delete dae --name <vm name> [--sure]
Review the following attribute descriptions.
|
|
Delete the VM instance. |
|
|
The name of the VM to be deleted. |
|
|
If specified, this command will execute immediately without asking for confirmation. |
This command exports a virtual machine (VM) image to a file suitable for import on another system.
Note: VM image exports can take 10 or more minutes to complete.
Additional Information
- VM image exports can take 10 or more minutes to complete.
-
VM images that are exported will not have a VNC
passworddefined, and theautostartsetting will be disabled. To define a VNCpasswordand enable theautostartsetting, do the following:- Use the
syscli –-edit daecommand as shown then start the VM (see Start a Virtual Machine). - Start the VM.
- Use the
- Update any network settings within the VM OS for the new system on which the image is exported (hostname, static IP address, etc.) if the following occurs:
- The target DXi system network ports are not available to the application network ports assigned to the VM image being imported.
Command
syscli --export dae --name <vm name> [--path <path for image>]
VM Network Parameters
It is recommended that you do not use NetworkManager on a Red Hat Enterprise Linux (RHEL) based distribution to configure the VM network parameters. Use of NetworkManager will require the following file cleanup before shutting down and exporting a VM.
-
Remove the following parameters from
/etc/sysconfig/network-scripts/ifcfg-eth*:- HWADDR
- UUID
-
Remove the
70-persistent-net.rulesfile:rm -f /etc/udev/rules.d/70-persistent-net.rules
Review the following attribute descriptions.
|
|
Export a VM image. |
|
|
The name of the VM image to save. |
|
|
(Optional) Destination for the exported image. The default path is /Q/shares/VM/VMExportedImages. |
This command imports a virtual machine (VM) image exported using --import dae.
Additional Information
-
VM images that are imported will not have a VNC
passworddefined, and theautostartsetting will be disabled. To define a VNCpasswordand enable theautostartsetting, do the following:- Use the
syscli –-edit daecommand as shown then start the VM. - Start the VM.
- Use the
- Update any network settings within the VM OS for the new system on which the image is imported (hostname, static IP address, etc.).
- VM images created in DXi4700/6900 systems cannot be imported to DXi4800/9000/9200/T10 systems.
- VM images created in DXi4800/9000/9200/T10 systems can be imported to DXi4700/6900 systems.
VM Network Parameters
It is recommended that you do not use NetworkManager on a Red Hat Enterprise Linux (RHEL) based distribution to configure the VM network parameters. Use of NetworkManager will require the following file cleanup before shutting down and exporting a VM.
-
Remove the following parameters from
/etc/sysconfig/network-scripts/ifcfg-eth*:- HWADDR
- UUID
-
Remove the
70-persistent-net.rulesfile:rm -f /etc/udev/rules.d/70-persistent-net.rules
Command
syscli --import dae --image <path name> [--name <new name>]
Review the following attribute descriptions.
|
|
Import a VM image. |
|
|
The name of file containing the VM image to import. |
|
|
The name of the imported VM if different from the original name. |
This command lists current DAE virtual machines (VMs) and summary information on each VM.
Note: Only the cliadmin can access the VM with VNC Viewer
Command
syscli --list dae --name <vm name>
Example output
Output data:
List of VMs:
Total count = 1
[VM = 1]
VM name = caspervm01
State = running
Auto Start = yes
Net Port(s) = eth2
Max CPU(s) = 4
Used CPU(s) = 4
Max Memory = 32768 MB
Used Memory = 32768 MB
Disk Capacity = 100 GB
Image File = /Q/shares/VM/VMImages/<vmname>.qcow2
VNC port = 127.0.0.1:0
Review the following attribute descriptions.
|
|
List the VM instance(s). |
|
|
The name of a specific VM to show (optional). |
This command lists DAE virtual machine (VM) image files in a specified directory.
Command
syscli --list daeexport [--path <export file path>]
Review the following attribute descriptions.
|
|
Retrieves a list of VM image export files in a specified directory. |
|
|
The directory to search for VM image export files. If not specified, the default path is /Q/shares/VM. |
This command performs a clean operating system (OS) shutdown of the virtual machine (VM). All services are cleanly shutdown within the VM before it is powered off.
Advanced Configuration and Power Interface (ACPI)
VMs with a CentOS 7 minimal .iso may not install ACPI. This can cause issues when attempting to shut down the VM. Install the acpi-support-base package and verify that the acpid daemon is running after installing the package:
# yum -y install acpid; /etc/init.d/acpid start; chkconfig --level 235 acpid on;
Note: This requires sudo privileges, so sudo yum. You should login in as ServiceLogin account for installing this rpm.
Command
syscli --shutdown dae --name <vm name> [--poweroff] [--sure]
Review the following attribute descriptions.
|
|
Shutdown the VM instance. |
|
|
The name of the VM to shutdown. |
|
|
If specified, the VM instance is immediately powered off. The current state is not preserved, so any open files or active I/O could result in VM corruption. |
|
|
If specified, this command will execute immediately without asking for confirmation. |
This command starts a virtual machine (VM) that has been shutdown or stopped.
Command
syscli --start dae --name <vm name>
Review the following attribute descriptions.
|
|
Starts the VM instance. |
|
|
The name of the VM to start. |
This command stops a virtual machine (VM) and saves the current state to disk.
Command
syscli --stop dae --name <vm name>
Review the following attribute descriptions.
|
|
Stops the VM instance. |
|
|
The name of the VM to stop. |
|
|
If specified, this command will execute immediately without asking for confirmation. |
This command allows for the modification of an existing DAE virtual machine (VM) instance.
In order to update VM settings, the VM must be in a shut off state. You can put a DAE VM into a shut off state by either stopping or shutting down the VM (see and ).
Note: If VM is stopped and has a saved RAM state file, updating that VM will remove the RAM saved state file.
Updating the Application Network Devices for a VM
Before change the application network devices used by a VM, review the following:
- Ensure that the new application network devices can be used by a VM. The list of available application network devices available for a VM can be retrieved using the
syscli -–getlimits daecommand. You can use either the available or used network ports shown on the output of this command - When updating the application network ports for a VM, un-assign the current network ports for that the VM and then assign the new list of application network devices for the VM.
-
When updating the application network devices for a VM, the actual VM virtual network ports assigned to the DXi physical network devices will change within the VM OS.
For example, a VM uses the DXi physical eth2 network device. This network device appears in the VM OS as eth1. If the application network device changes in the VM, the application network device defined with the VM OS will change to a new network device name.
Command
syscli --edit dae --name <vm name> [--cpus <num cpus>] [--memory <ram>] [(-- appnetwork <nic port>)] [--autostart yes|no] [--password <password>]
Review the following attribute descriptions.
|
|
Edit VM instance. |
|
|
Edit the name of the VM. |
|
|
Edit the number of CPUs for the VM. |
|
|
Modify the amount of RAM memory (in MB) for the VM. |
|
|
Modify the application network devices (NIC ports). More than one may be specified. |
|
|
Change the autostart status of the VM on the system boot. The default is no. |
|
|
Change the password for accessing the console over VNC. |
|
|
If specified, this command will execute immediately without asking for confirmation. |
