Initial Configuration
Before the DXi4700 is operational, you must configure the system through the remote management console. You must also configure your backup software.
Configuring the DXi4700 consists of five major steps. See the following subsections for detailed instructions for completing each step:
Note: You will need a notebook computer and an Ethernet cable to complete the initial configuration.
To access the DXi4700 remote management console:
-
Turn on the DXi4700 system components in the following order:
-
Turn on both power switches on the back of each Expansion module. Wait 30 seconds for the Expansion modules to initialize. Verify on the front panel that the modules have power and there were no hard drive failures (Drive status indicator on hard drive blinks amber four times per second).

1 - Power Switches -
Press the power button on the front of the Node. Wait for the system to boot before continuing with the procedure. (This can take up to 30 minutes.)
Note: The system may reboot one or more times depending on the components that were installed. If all components are properly installed and cabled, the LEDs on all hard drives in the Node and the Expansion modules will be lit. (The top LED will be solid and the bottom LED will blink.)
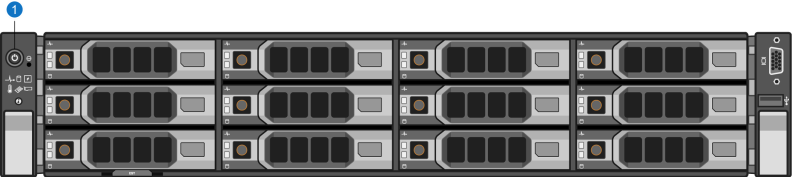
1 - Power Button -
-
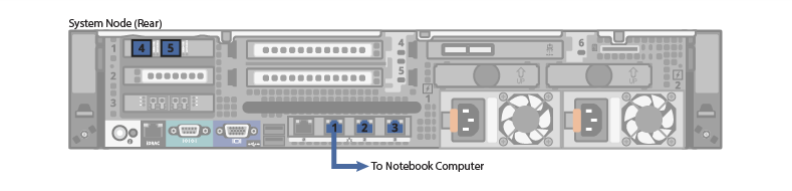
Using an Ethernet cable, connect the Ethernet port on the notebook computer to Ethernet port 1 on the back of the DXi4700.
-
Configure the network settings on the computer:
Note: This procedure assumes you are running Windows 7 on the computer. The steps might be different if you are using another operating system.
- Access the Network Connections control panel. To do this, press the Windows key on the keyboard, type view network connections, and press <Enter>.
-
Right-click the network connection that corresponds to the Ethernet port on the computer (for example, Local Area Connection), and click Properties.
-
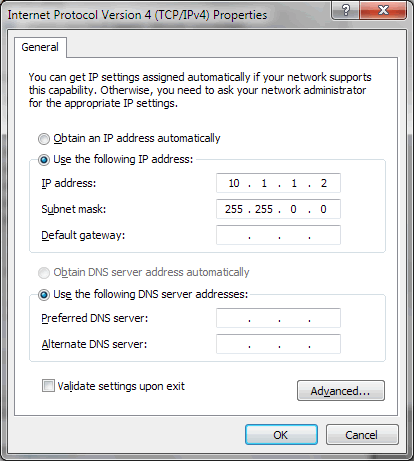
Select Internet Protocol Version 4 (TCP/IPv4) in the list of connections, and then click Properties.
The Internet Protocol Version 4 (TCP/IPv4) Properties window displays.
-
Select Use the following IP address and then enter the following information:
Caution: Before changing the IP address information, write down the original settings. This will be used later to reset the network configuration.
- IP address - 10.1.1.2
- Subnet mask - 255.255.0.0
-
Click OK, and then click Close.
-
Wait at least two minutes for the computer to set the IP addresses on the local computer.
-
On the computer, open a supported Web browser, type 10.1.1.1 in the Address box, and press <Enter>.
The Login window displays.
Additional Information
- For Web browsers, the DXi4700 supports Firefox 26 or higher, Chrome 40 or higher, or Internet Explorer 11 or higher.
- If the Login window does not display, verify that you entered the correct IP address (10.1.1.1) and that the network settings on the computer are correct. Wait 10 minutes, then try again. If the Login window still does not display, contact Quantum Customer Support. (Contact information is located on the last page of this document.)
Continue with the next section to log on to the system and complete the Getting Started wizard.
To complete the DXi4700 Getting Started wizard:
-
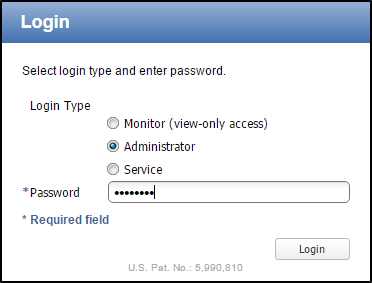
On the Login window, select Administrator, type password for the password, and click Login.
The Welcome page displays.
Note: If a message on the page indicates the DXi is in Limited Mode, wait ten minutes, and then log on again.
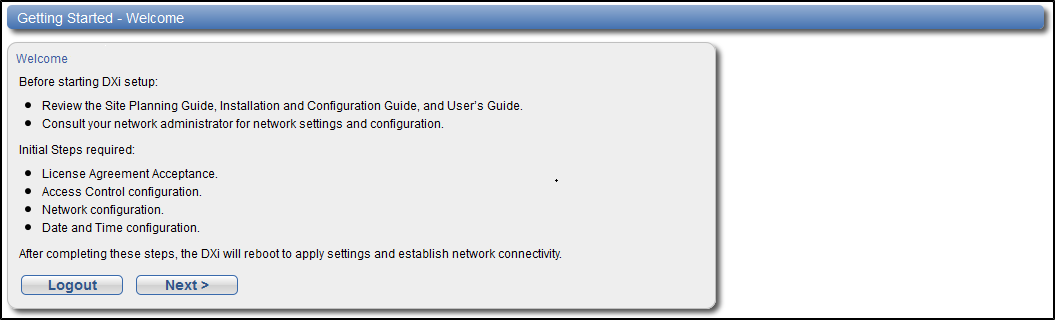
-
Read the information about the wizard, and then click Next to continue.
The License Agreement page displays.
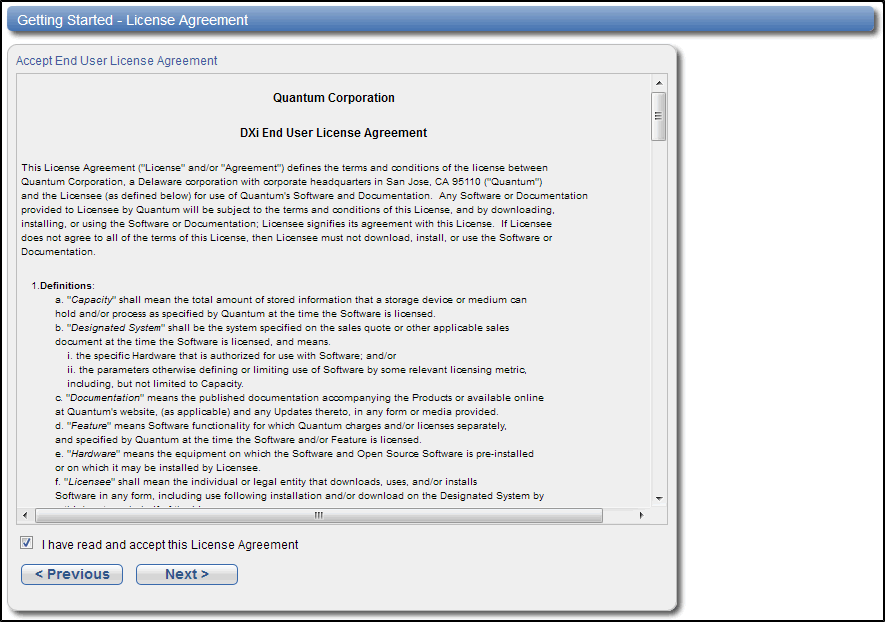
-
Select the I have read and accept this License Agreement check box, and then click Next to continue.
Note: If you do not accept the license agreement, the DXi4700 will not function.
The Access Control page displays.
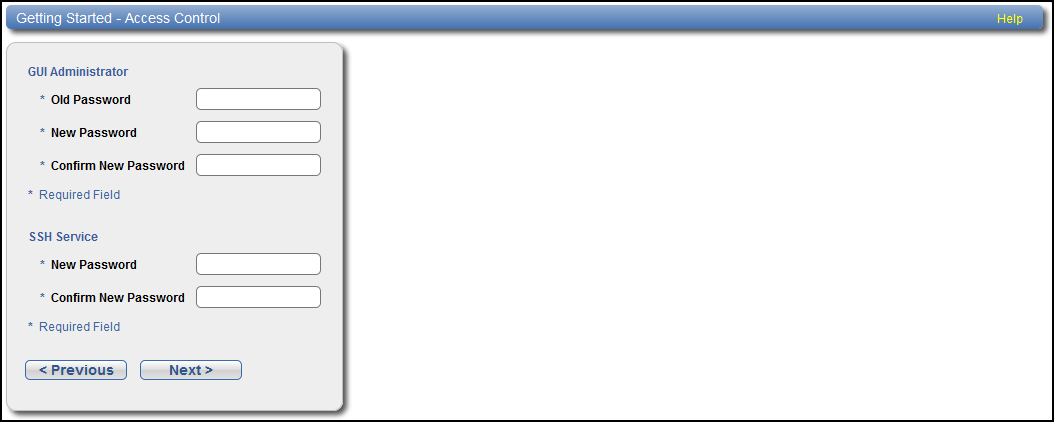
-
Create a new password for the GUI Administrator user account:
- Enter the Old Password (password).
-
Enter a New Password.
Note: The GUI Administrator password can be up to 32 characters. Alphanumeric characters and special characters are allowed.
- Enter the new password again in Confirm New Password.
-
Create a new password for the Service SSH (ServiceLogin) user account:
-
Enter a New Password.
Additional Information- The Service SSH password can be up to 20 characters. Alphanumeric characters and special characters are allowed.
- The Service SSH (ServiceLogin) password is also used for iDRAC/IPMI login.
- The Access Control page in the Remote Management Console allows the Service SSH (ServiceLogin) and iDRAC login to be disabled.
- Enter the new password again in Confirm New Password.
-
-
Click Next to continue.
The Network page displays.
IMPORTANT - READ BEFORE CONTINUING
Steps 7-12 below provide an example of configuring network settings on the DXi4700. In this example, the DXi4700 is configured as follows:
- All Ethernet ports are configured as individual devices (Not Bonded).
- A single network interface with one IP address is configured for eth1.
- All traffic types (management, data, and replication) travel over the single network interface.
- All other settings are at default values.
The actual network settings you will enter depend on the configuration of your company’s network and may differ from those below. Work with your network administrator to determine the correct settings for integrating the DXi4700 into your company’s network.
If you set up the DXi4700 using the example below, you can always change the network settings as needed at a later time. For more information, see the “Network” section in the Quantum DXi4700 User’s Guide.
Caution: For effective bonded network use, a properly configured network switch is required. (A network switch is not supplied with the DXi4700.) The DXi4700 bonding settings must match the switch settings. If the switch settings and the DXi4700 settings do not match, your system may become inaccessible through the switch.
Note: The figure below is for illustrative purpose only. The Network page will reflect the actual number of physical ports in the system.
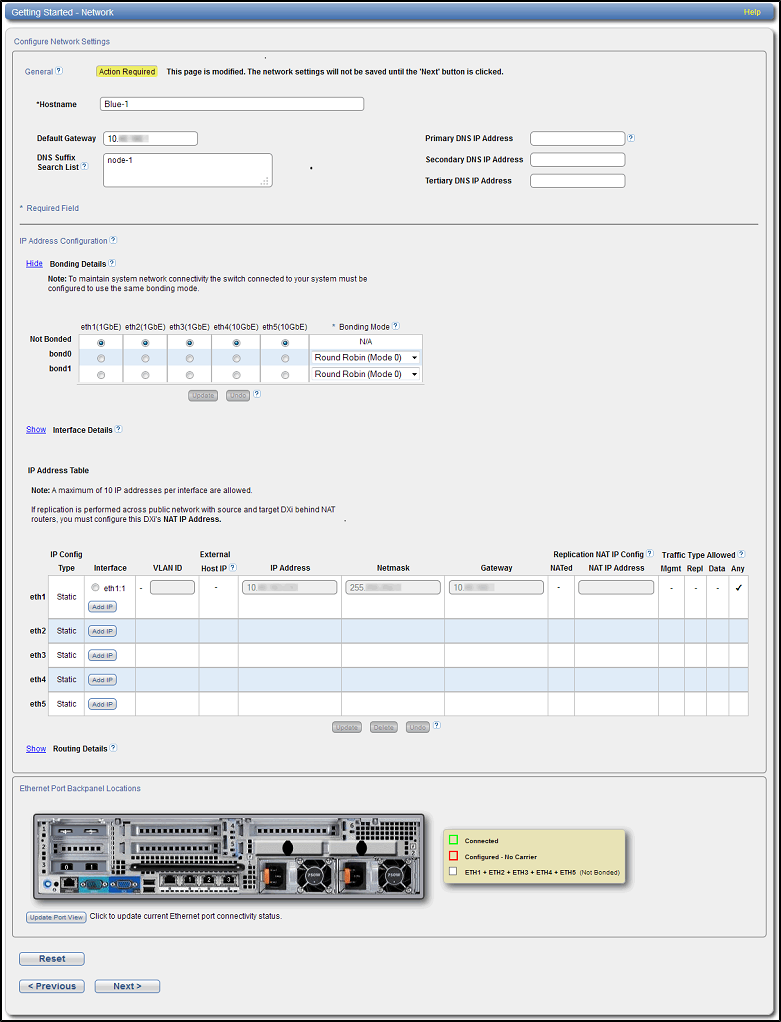
-
Under General, enter the following network information as provided by your network administrator:
-
Enter the Hostname used to identify the DXi4700 system.
The Hostname cannot be blank and must contain only letters [ A–Z, a–z ], numbers [ 0–9 ], hyphens [ - ], underscores [ _ ], and dots [ . ].
-
(Optional) Enter the Default Gateway IP address.
Specifying a default gateway is optional if all access is local to a particular subnet. For example, if the DXi4700 and all of its clients are on the same subnet, you do not need to specify a default gateway.
Caution: Specifying a default gateway is required to enable connectivity with all subnets other than those that the DXi4700 is directly connected to. For example, if the DXi4700 and its clients are on different subnets, you must specify a default gateway.
-
(Optional) In the DNS Suffix Search List box, enter the local domain to search first when resolving domain names.
The domain suffix is a single domain name. The domain name may contain only letters (A–Z), numbers (0–9), dots (.), and hyphens (-).
-
(Optional) In the Primary, Secondary, and Tertiary DNS IP Address boxes, enter the IP address of up to three DNS servers used to resolve domain names and translate them into IP addresses.
Caution: You must specify a DNS IP address if you plan to use hostname format when configuring an NTP time server, outgoing e-mail server, replication sources and targets, and other information.
-
-
Under IP Address Configuration > Bonding Details, configure each Ethernet port as a separate network device:
- If necessary, click the Show link to show the bonding details table.
- In the Not Bonded row, make sure each Ethernet port is selected (eth1, eth2, and so on).
- If necessary, click Update to save the changes you made to the Bonding Details table.
- Do not make any changes under IP Address Configuration > Interface Details unless directed by your network administrator. (For more information about the VLAN tag and MTU size options, see the “Network” section in the Quantum DXi4700 User’s Guide.
-
Under IP Address Configuration > IP Address Table, enter network information for the eth1 device:
Note: Do not make any entries in the VLAN ID, External Host IP, NATed, or NAT IP Address columns unless directed by your network administrator.
- Select the eth1 row in the table. Or, if necessary, click Add IP in the eth1 row to enable entry in the IP Address box.
-
Enter the following network information as provided by your network administrator (all fields are required):
Caution: Make sure you enter the correct IP address information and that you write this information down. If you enter the incorrect IP address information and reboot, you will not be able to access the system.
- IP Address - The IP address of the DXi4700.
- Netmask - The network mask of the DXi4700.
- Gateway - The gateway of the DXi4700. (This is usually not the same as the default gateway.)
- Select the Any check box to allow all traffic types (management, replication, and data) on the interface.
- Click Update to save the changes you made to the IP Address table.
-
Do not make any changes under IP Address Configuration > Routing Details unless directed by your network administrator.
Note: If the DXi needs to communicate with another subnet that is not reachable using the default gateway, a route must be added under the Routing Details section. (For more information about interface routing, see the “Network” section in the Quantum DXi4700 User’s Guide,).
-
Click Next to continue.
The Date & Time page displays.
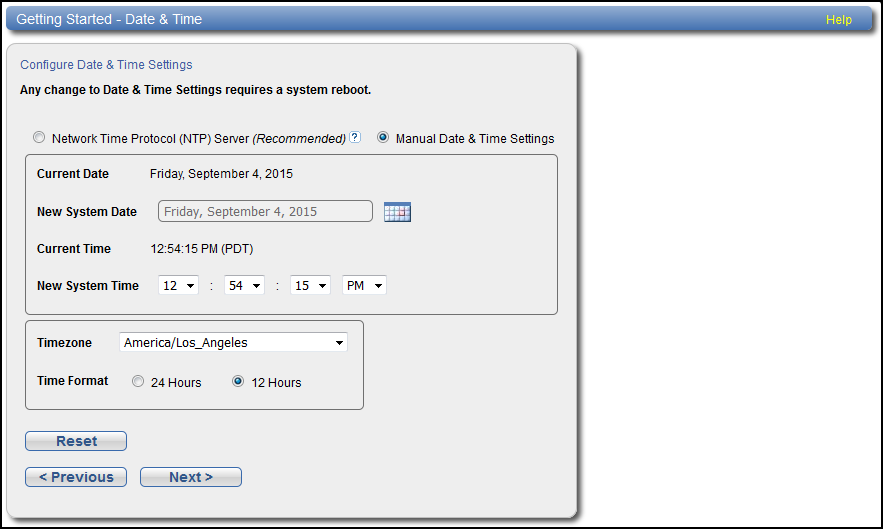
-
If necessary, select Manual Date & Time Settings to manually set the system date and time.
Specify the New System Date by clicking Calendar. Specify the New System Time using the drop-down boxes.
Note: You can also choose to synchronize the system time with an NTP time server. To select a timeserver pool, you must have specified at least one DNS IP address above. Otherwise, you must specify the IP address of the timeserver pool. For more information, see the Quantum DXi4700 User’s Guide.
- In the Timezone drop-down box, select the time zone where the DXi4700 is located.
- Next to Time Format, select the format to use when displaying times (24 hours or 12 hours).
-
Click Next to continue.
The Confirm page displays.
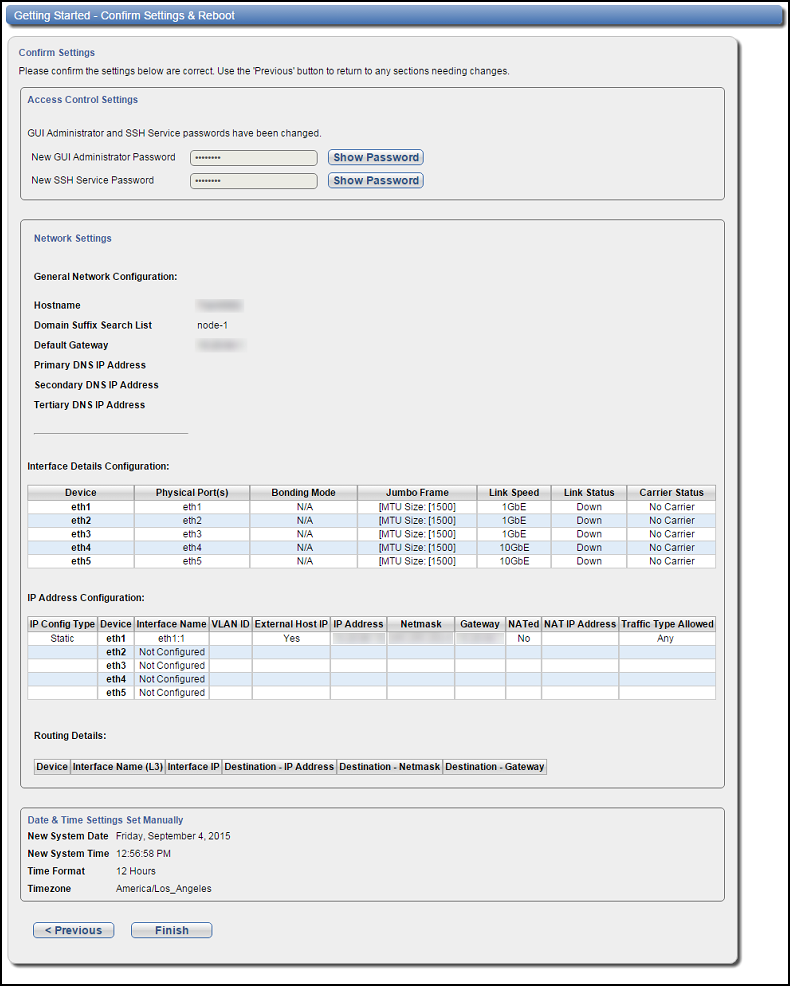
- Review the settings you selected to make sure they are correct. If necessary, click Previous to return to a previous step to make changes
-
After you have confirmed all settings, click Finish.
A message appears stating that completing the setup will restart the system.
- Click Yes to restart the system.
- Disconnect the computer from the DXi4700 service port. Reset the computer network settings back to the default values.
-
Wait for the system to fully restart. This can take up to 30 minutes.
Continue with the next section to upload the new DXi software.
Before configuring and using the DXi, you must upgrade to the latest available software version.
To complete the software upgrade:
-
On the service laptop, open a supported Web browser, type 10.1.1.1 in the Address box, and press <Enter>.
The Login window displays.
Additional Information- For Web browsers, the DXi4700 supports Firefox 36 or higher, Chrome 40 or higher, or Internet Explorer 11 or higher.
- If the Login window does not display, verify that you entered the correct IP address (10.1.1.1). Also make sure that the service laptop is connected to the service port on the Node, and that the network settings on the laptop are correct. If the GUI is in Limited Mode, wait ten minutes, then try again.

-
On the Login window, select Administrator, type the password you created in the Getting Started Wizard, and click Login.
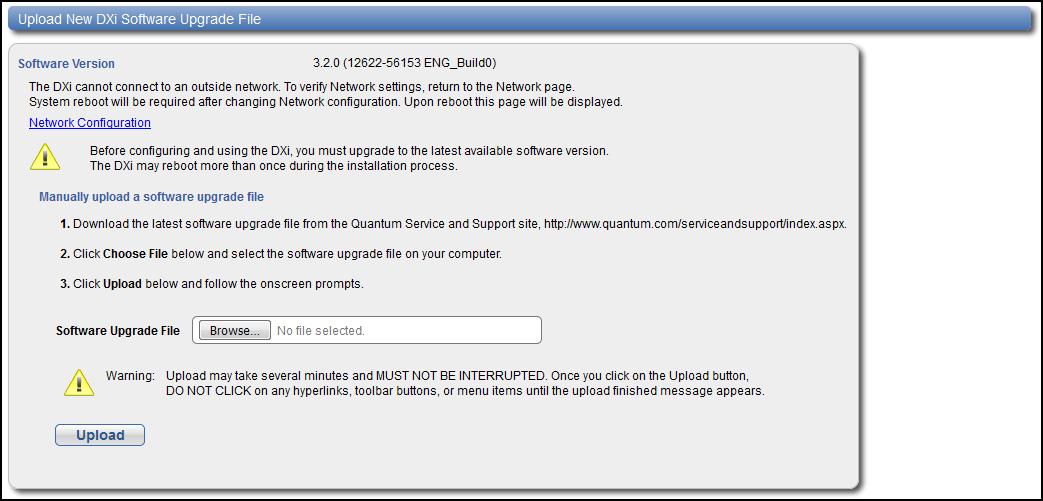
The Upload New DXI Software Upgrade File page displays.
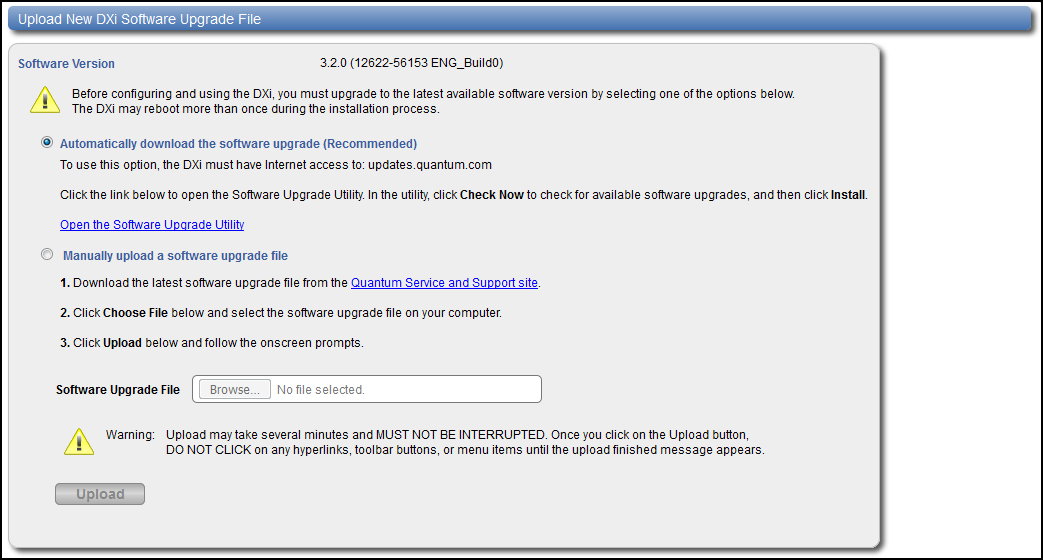
The DXi can automatically check for the latest new software upgrade file. This is the recommended method for upgrading, but it requires that the DXi be able to access the Internet.
If the DXi cannot access the Internet, a link back to the Getting Started Wizard: Network page appears.
Note: Resetting network settings in the Getting Started Wizard: Network page requires a DXi system reboot.
To access the Software Upgrade Utility:
-
Click the Open the Software Utility link.
The Software Upgrade Utility appears.

- Click Check Now to check for available software upgrades.
- Click Install to begin the software installation.
Wait for the system to fully restart. This can take up to 30 minutes.
Clear Your Web Browser Cache
It is important to clear your Web browser cache before logging on to the remote management console for the first time following the software upgrade. This will ensure the remote management console displays correctly.
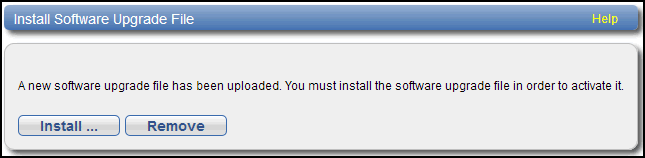
This option allows you to upload and install a software upgrade file on the DXi4700.
-
Download the latest software upgrade file from the Quantum Service and Support Site:
- Click Browse and select the software upgrade file on your computer downloaded in step 1.
- Click Upload.
-
Click Start to begin the upload process.
Do not close the window until the uploading and unpacking process is complete. An Information message displays stating the software upgrade file was uploaded successfully.
-
Click OK.
The Install Software Upgrade File page indicates that a software upgrade file has been uploaded.
-
Click Install.
The Software Upgrade Utility displays.
- Click Check Now to check for available software upgrades.
- Click Install to begin the software installation.
Wait for the system to fully restart. This can take up to 30 minutes.
Clear Your Web Browser Cache
It is important to clear your Web browser cache before logging on to the remote management console for the first time following the software upgrade. This will ensure the remote management console displays correctly.
Continue with the next section to connect the Ethernet cables.
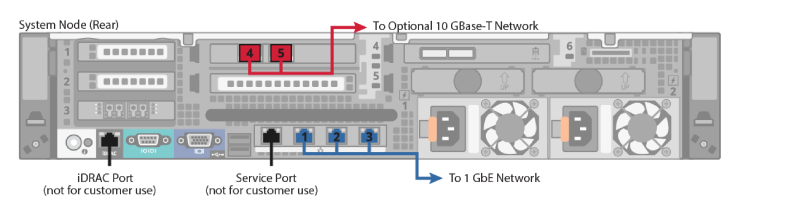
Connect the Ethernet cables to theDXi4700 Node as follows:
Note: The Ethernet cables are used for remote management, NAS and OST connectivity, and replication. Review the DXi4700 Site Planning Guide to determine the number of Ethernet cables to attach. When connecting and disconnecting Ethernet cables or making configuration changes, it is normal for the Admin Alert indicator to display on the remote management console.
Caution: CAT6 Ethernet cables can be damaged when tightened with plastic zip ties. Use hook and loop cable straps instead.
- Connect up to three CAT5 Ethernet cables to the 1 GbE ports (1, 2, and 3).
-
Connect up to two 10 GbE cables (optical or Twinax) to the optional 10 GbE ports (4 and 5).
- Connect up to two CAT6 cables to the optional 10 GBase-T ports (4 and 5).
Note: A DXi4700 system can be configured with either the optional X520 10 GbE network card or X540 10 GBase-T network card. The system cannot be configured with both cards.
Figure 1: DXi4700 G1 Optional 10 GbE Ethernet Cabling
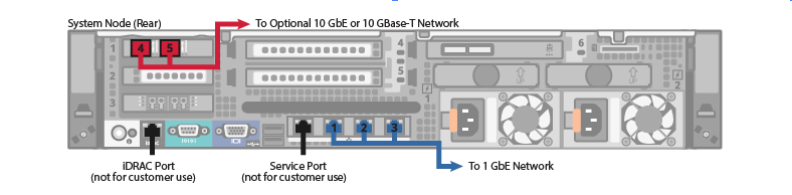
Figure 2: DXi4700 G2 Optional 10 GbE Ethernet Cabling
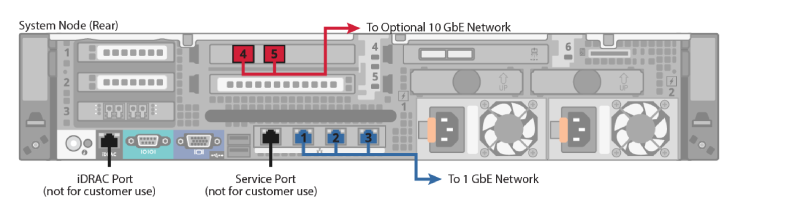
Figure 3: DXi4700 Optional 10 GBase-T Ethernet Cabling
New DXi Bezel
A new DXi bezel is available. Please contact your account sales manager to purchase additional new bezels.

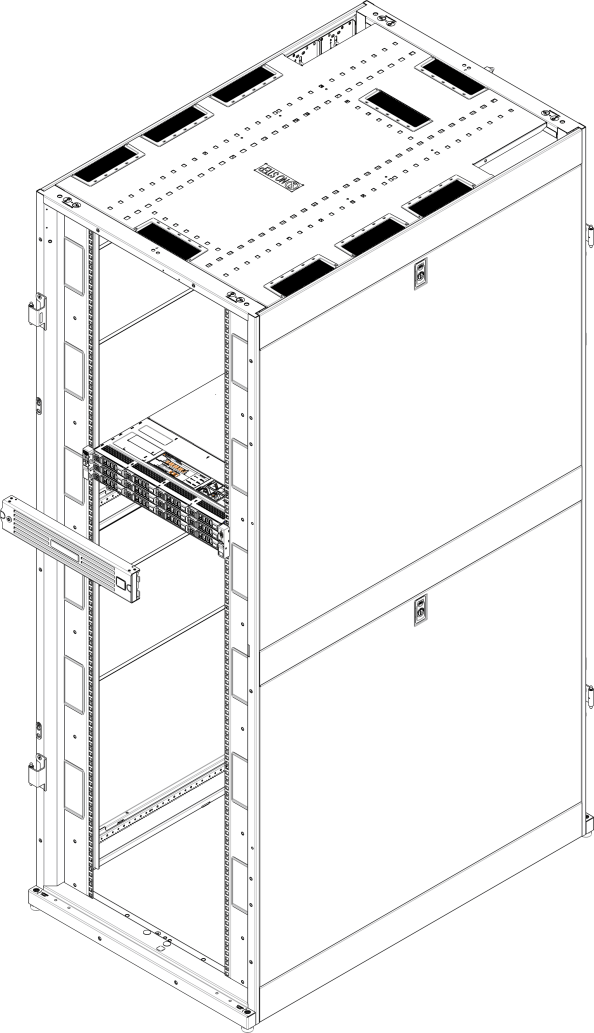
Install the protective bezel on the front of the DXi4700Node. The bezel snaps into place on the front of the Node to prevent the removal of the system from the rack.
- If you have not already done so, remove the bezel key secured with tape inside the bezel.
- Insert the right side of the bezel into the slots on the right side of the Node or Expansion module (You can recognize the Node bezel by the square DXi4700 badge).
- Snap the left side of the bezel into place.
Note: To remove the bezel, lift the latch on the left side of the bezel.
Caution: The Expansion module bezel may interfere with door operation on some rack models. In this case, remove the Expansion module bezels, and make sure to keep the rack door closed and secured.
Figure 4: Installing the Front Bezel
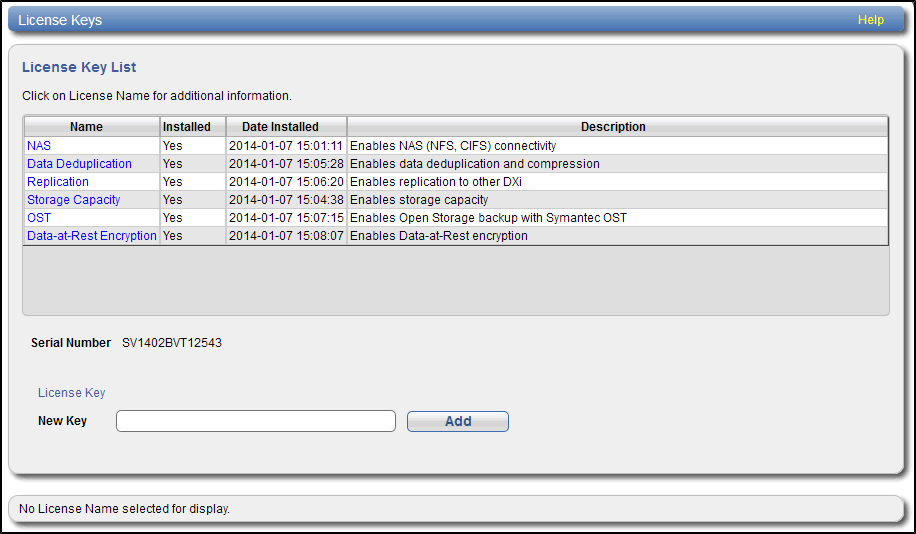
You must install one or more licenses to enable the additional purchased capacity. The 6TB, 8TB, and 18TB licenses each need to be installed separately.
Locate the Storage Capacity License Certificate that was included with the system, and then complete the following procedure:
-
Open two Web browser windows on a computer with Internet access.
Note: During this procedure, you can copy and paste required numbers between these two windows.
-
In one browser, navigate to the Utilities > License Keys page in the DXi remote management console. Note that the system serial number displays directly above the New Key box.
For information about accessing the remote management console, see the DXi4700 User’s Guide.
-
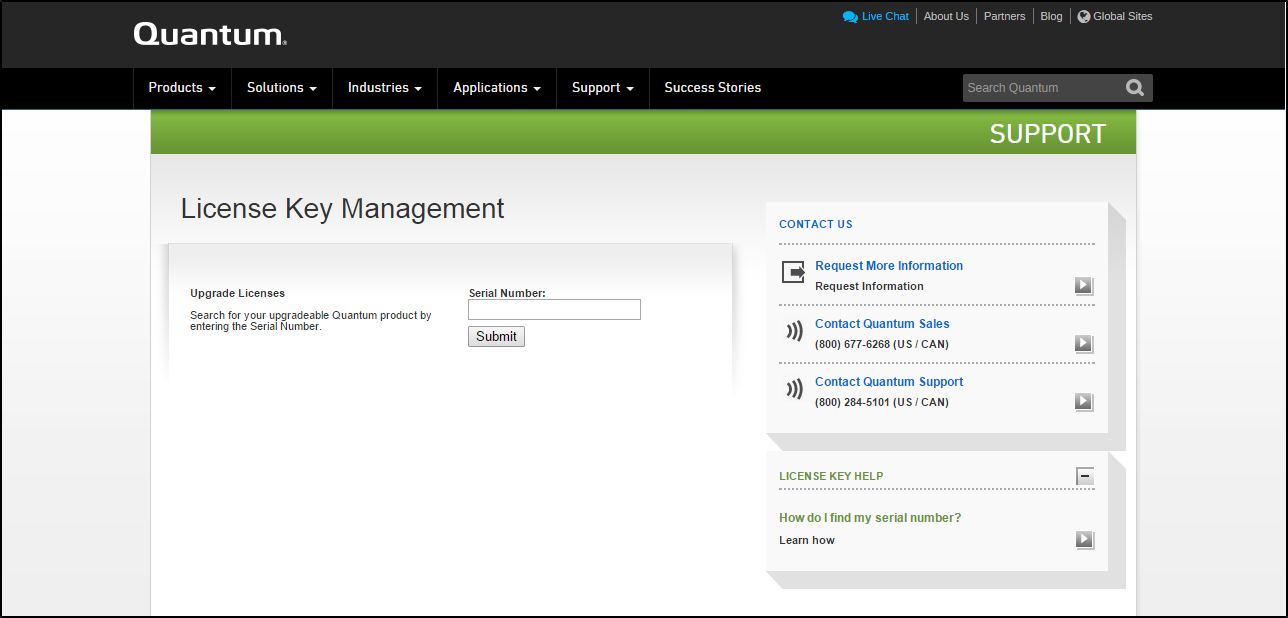
In the other browser, enter the address for the License Key Management Web site:
http://www.quantum.com/licensekeys
-
-
On the License Key Management Web site, perform the following steps:
- Enter the system serial number in the Serial Number box and click Submit.
-
Enter the authorization code (printed on the License Certificate) and click Get License Key.
The Licensed Feature page returns a storage capacity key.
-
Switch to the Utilities > License Keys page in the DXi remote management console.
-
Enter the license key in the New Key box and click Add.
The file system is automatically expanded. (This can take up to 10 minutes.)
-
Click the Storage Capacity license link on the License Keys page. The maximum allowed storage capacity appears under License Details.
Verify that the licensed capacity equals the expected total storage capacity of the system.

Before the customer can begin using the DXi4700 for backups, they must configure the system. Here are next steps the customer can take:
Quantum recommends enabling Email Reports after you install your DXi. When enabled, Email Reports periodically sends system configuration and status information to Quantum, including any software upgrades you have installed using the Software Upgrade Utility. Quantum Support can use this information to provide a better support experience in the future.
To configure Email Reports:
- Make sure a valid outgoing e-mail server is specified on the Configuration > Notifications > Email > Server page. Also make sure to select the Enable automatic emails to Quantum check box on this page.
- (Optional) Specify any additional recipients to receive the reports on the Configuration > Notifications > Email > Email Reports > Recipients page.
- Make sure a weekly Email Reports schedule is configured on the Configuration > Scheduler page. Configure two weekly recurring events: one for Status reports and one for Configuration reports.
Use the Configuration Wizards on the Wizards menu to configure the DXi for backups, and to configure additional features:
| Wizard |
Description |
|---|---|
| VTL Wizard | (VTL and Multi-Protocol configurations only) Helps you configure the DXi as a VTL (Virtual Tape Library) appliance for use with a backup application. |
| NAS Wizard | (NAS and Multi-Protocol configurations only) Helps you configure the DXi as a NAS (Network Attached Storage) appliance for use on a Windows or UNIX/Linux network. |
| OST Wizard | (NAS and Multi-Protocol configurations only) Helps you configure the DXi to present its storage as one or more OST (OpenStorage) storage servers for use with a backup application. |
| Replication Wizard | Helps you configure the DXi to send replicated data to or receive replicated data from another DXi system. |
| Users Wizard | Helps you configure the DXi to manage users for Application Specific shares, OST storage servers, PTT Backups, Share Administrators, and Workgroup Users for CIFS/SMB shares. |
| Email Alerts Wizard | Helps you configure the DXi to automatically send notifications and reports to selected recipients. |
| Support Wizard | Helps you enable licensed features on the DXi, register your system with Quantum, and perform other tasks that will aid Quantum customer support in assisting you. |
Note: To learn more about using the Configuration Wizards, refer to the Quantum DXi4700 User’s Guide. Or access the online help by clicking Help from any page in the wizard.
- To configure your backup application to begin performing backups to the DXi, refer to your backup application documentation.
- To learn more about operating theDXi4700, refer to the QuantumDXi4700 User’s Guide). Or access the online help from the remote management console by clicking Help > Help Contents.
- To enable data replication to another DXi™-Series system, refer to Chapter 6, “DXi4700 Replication” in the QuantumDXi4700 User’s Guide).
For DXi4700 systems that will run a DAE or Veeam configuration, the installation of additional memory modules is required (see DAE/Veeam Memory Module Installation).