Converged Scale Out Guide
This topic provides instructions on scaling out an existing ActiveScale system as well as procedures that can be executed on existing scale out systems.
If the customer wants a new scale out system, please follow the documentation in this order:
-
Make sure prerequisites are fulfilled.
-
Install the scale out rack.
-
Apply converged scale out steps.
-
Depending on prerequisites: Unlocking S3 access to scale out nodes (a.k.a Performance Scale Out)
If the customer’s deployment is already scaled out there are additional procedures that can be executed separately. Without going through prerequisites, installation and converged scale out steps, you can go to Unlocking S3 access to scale out nodes (a.k.a Performance Scale Out)
Information that has to be provided by the customer or actions that have to be taken before installing the scale out rack and starting the scale out procedure. The base environment will need to be upgraded to 6.1 prior to scale out with a 6.1 and above environment.
Networking documentation can be found in the Combined Scale Out Networking Guide:
-
Switch Configuration: Configure the Switches
The networking guide provides examples and recommendations for installing the scale out system with certain subnets. Of course it is important to respect the customer’s wishes. The recommended subnets might not be an option in the customer’s datacenter due to e.g. conflicts. The installation process makes no assumptions about what subnets are being used. The subnets and IP address allocation is completely customizable so the customer can choose them at their convenience.
There is one restriction: it is important to note that the scale out system that is the subject of this installation has to occupy different private subnets than the private networks of the base system and they should also be different from the private subnets of previously installed scale out systems. It is not possible to just add the nodes of the scale out system to the already defined subnets of the base system or previously installed scale out systems. The new nodes will have to be in their own, separate subnets. In order for the base system and the scale out system to communicate, the customer has to prepare gateways that can route traffic between the base system and the scale out system. Should the customer already have a previously installed scale out system, the customer can choose to use different gateways at the base system, or reuse the same gateways. The requirement here is that the gateway allows traffic to and from the scale out system.
Starting from ActiveScale software version 7.0, it is also possible to send traffic to the scale out nodes and not only to the nodes of the base system. Refer to the section about Unlocking S3 Access to Scale Out Nodes. Should the customer want this, pay attention to the following:
-
The customer has to prepare their public network. Make sure the public interfaces of the new scale out nodes are cabled.
-
In some cases the customer has to configure private network gateways. Please refer to Configure gateways.
-
Make sure when installing the scale out rack that you have defined the public networks and IP addresses in the inventory file. More information about this in the Software installation guide.
If the customer does not want S3 access to their new scale out nodes, pay attention to the following:
-
We recommend to pull cables of the public interfaces. The customer is free to follow this recommendation. the software does not depend on this.
-
Software Installation talks about the different possibilities to fill in the inventory file when removing these cables.
-
In some cases the customer has to configure private network gateways. Please refer to Configure gateways.
Before installing the scale out system it is useful to already prepare a document or note that describes the customer’s networking layout.
-
All subnets of the scale out system and also of the base system and all previously installed scale out systems.
-
IP addresses of all nodes in the scale out system.
-
Which nodes have cabled public interfaces and which nodes don’t.
-
Gateways IPs should be known and gateways should be configured:
-
Gateways of scale out networks should be able to route to base system.
-
Gateways of base system networks should be able to route to all scale out systems.
-
Gateways of scale out networks should be able to route to previously installed scale out systems if the customer has Performance Scale Out.
-
Gateways of previously installed scale out systems should be able to route to the new scale out system if the customer has Performance Scale Out.
-
Determine the selected policy on the existing deployment. We need:
-
policy type
-
policy category
-
policy name
Using sherpa on a scaler management node on the existing deployment:
%cpaste
policy_type = !/opt/ampli/apps/marvinbase/venv/bin/python -c "from installer.common import find_policy_group; print find_policy_group()"
policy_type = policy_type[0]
policy_category = cli.marvin.environment.list()[0]['selectedstoragepolicy']['category']
supportedstoragepolicies = cli.marvin.environment.list()[0]['supportedstoragepolicy']
policy_name = next((policy['name'] for policy in supportedstoragepolicies if policy['category'] == policy_category), None)
if not policy_name:
    from marvin_lib.utils import load_yaml
    dssconfig_path = "/opt/ampli/apps/marvinbase/config/dssconfig.yml"
    dss_config = load_yaml(dssconfig_path)
    policy_name = dss_config.get('policies').get(policy_type).get(policy_category).get('name')
print "policy type: %s\npolicy category: %s\npolicy name: %s" % (policy_type, policy_category, policy_name)
--
Make sure to note these values. The customer can only choose a policy of the same category on the scaleout rack.
The converged scale out procedure depends on the location names that are defined in the model of the existing deployment. Make sure it is known in which datacenter each rack is situated. This information is visible in the GUI and can be provided by the customer. It is also possible to determine it from the model. Execute following snippet in sherpa to get a list of datacenters and corresponding racks:
for dc in cli.marvin.location.list(query="locationtype=DATACENTER"):
    for rack in [l for l in cli.marvin.location.list(query="locationtype=RACK") if l['parent']==dc["guid"]]:
        print "DATACENTER %s with RACK %s (serial: %s)" % (dc["name"], rack["name"], rack["serial"])
example output:
DATACENTER Site1 with RACK R02 (serial: rack_serial)
DATACENTER Site1 with RACK R01 (serial: rack_serial_scalout)
Important Information
Make sure network connectivity between base deployment and scale out deployment is completely setup before starting installation of the scale out deployment. Refer to the Prerequisites section above for links to the networking documentation.
See installer guide: 3.0 Setup the Quantum Installer VM
Follow the different steps in the Quantum VM installer guide to prepare and set up the installer. Make sure that the host machine has the necessary hardware requirements and that the VM installer can actually reach the ActiveScale nodes that are going to be installed. As this is an installation of a scale out rack, make sure that the VM is connected to one of the switches of the scale out rack and that the specific port on that switch is on the same VLAN as the nodes that are being installed.
Then follow the VM installer guide steps to build the inventory and configure the ActiveScale system options for the scale out rack. For the converged scale out it is important to make sure the settings in the following section are correctly specified in the inventory file.
Among the asnodes variables in the inventory file there will be a parameter called scale out_rack. By default its value is set to false, but when installing a capacity only scale out rack, the value has to be set to true:
all:
  children:
    ...
    asnodes:
      vars:
        ...
        scaleout_rack: true
        ...
The purpose of this setting is to skip column configure and scaler account generation on the scale out rack.
AS 6.1 and above leverages the federation concept for scaling out. The federation is stored in a separate database (a dedicated mongodb cluster). During the install of the scale out environment, it will contact the base rack for information. To get the credentials to access the base rack, execute the following sherpa script on the base rack:
%cpaste
from marvin_lib.network import ha
import json
cluster = [c for c in cli.marvin.mongocluster.list() if c['name'] == 'federated_model']
for c in cluster:
    for a in c['application']:
        machine = cli.marvin.machine.get(a['machine'])
        for n in machine['nic']:
            if 'network' not in n or n['network'] is None:
                continue
            nw = cli.marvin.network.get(n['network'])
            if nw['networktype'] == 'PRIVATE':
                print("%s [%s/%s]" % (n['address'], nw['network'], nw['netmask']))
        print a['ports']['general']
    print('')
print('')
print(json.loads(ha.get('/model/environment/?insecure=True'))['environment'][0]['ssl_key'])
print(json.loads(ha.get('/model/environment/?insecure=True'))['environment'][0]['ssl_certificate'])
--
It will list the IP addresses (with network and netmask) and port to connect to the (usually 3) mongodb instances that make up the federated cluster, e.g. when executed on an X100:
172.16.210.1 [172.16.210.0/255.255.255.0]
172.16.110.1 [172.16.110.0/255.255.255.0]
27018
172.16.210.2 [172.16.210.0/255.255.255.0]
172.16.110.2 [172.16.110.0/255.255.255.0]
27018
172.16.210.3 [172.16.210.0/255.255.255.0]
172.16.110.3 [172.16.110.0/255.255.255.0]
27018
-----BEGIN PRIVATE KEY-----
MIIEvwIBADANBgkqhkiG9w0BAQEFAASCBKkwggSlAgEAAoIBAQDClNvsCwmZw+yv
ZDL/acbQlsNnZP+HiVYojUu0yaKb7smsUXUpO87UlfI9cIO25X0tSoeuR2PR+J1T
qq3j2WDV4CxbCZntHPQ1sZI3sp1qY7n+52BUBn3UPBVk8HZ9csuyu1vYKk9zMMsy
6p1jci2lgitV/6JX4pHZaFpcW1BuH+TLIucUwJ0RVTqP9XFRREzrput1ozLA7y+z
zEh5JWIUsTn0Y/kpTrAb3h9cCfN81yLF0EYjmcIju6/tPqCE0EXzkUUJ4380Zv2G
pQUFbTeP6Av07RtK4z/yPe7ALh+1uiLNVwI9ntBOSJDm0K60p/maGa+SMvzayqjC
6EK+8WsdAgMBAAECggEBAJ7bq0TlqfvokhaLZntR32gyfeuu8FO2UyoeWT2LFP/b
jrjpdA6q7mxu0utILbCnYXAVlfo5/IvTPpatFPSdZ0qVj4DvsMR9y/7+LxLb91qB
ertaKTHQbvBT8V+MViCLFTShdBViTaUMpAi4tLAY6p1iTYETiHXZ2xs07/jQ8DRG
1mG/rc6U0qh1a545Gvefd3ZcXk21kYnUev6hwyzvH/K370qgFxzHNVB7DUEJxkok
kR15Ip0yeLPF5pS6P/lC36e47WUsD+/ftXN3FfYGdJg+l17CUJyDfEX52p/DHugK
hwKwrIUl6KUyyOqnYrJk6ObFfCOV3C7gxxA9WkxqdsECgYEA7rS4I4uvo00uVG1S
2tyNfo5NrHLykzuPBpxjDu8HBOzZku5OxJvD6AVQEUfg7Fcuy5pDyO3N05fDskLX
26ydrZyBM9xvrue40AxwQloVvqzNrASJUeBoBAzO3ylJfHCnTq+gt5weaFnlCAi8
BvBvTDPhzmnZqgKnPMoSmWCi6M0CgYEA0K3DYapJnVYClV96NuARoIFNCFxFyV/w
2ji4+uzHyEdeYcYIy5gBJvL15ELLrcalS9hDFpCFkyP9386FbN9XfosgQLn23jzE
vEhQg4upLj54BovyvUEajDys9NX1zAPC/hSrsonzIdcyJvj1iN0i/fuomujntuMB
HwpUdKhVy5ECgYAjs6/e0SOh3wdQ5VEBHv+isBH5+u9BCiVoLbe7IhEAsZQRH8d0
LH/ukezZyNBhSODc3uPIh5jDTu2cGddDKdwjfUbtxMiHdmzz4QhhRCwAasQQOFV5
g4DLKkc+pWQyUn8Ti70T+SurG9bfjr7gotFiqlfZkYdWoDL3KpoBiqyS+QKBgQCS
TgF56+YIxVCyYWpSJu601XKotejHstguZy5p3rCDHmZxrmJkO4IzSIxVKO+cOnWR
o2IF4/WCn+1SiHzLRBsXwXsvZjJKxdg5GYo5cCWBIpMMI/pf7dErGS85yPi3vLtt
YBiw6D7qLvIemNWsyz3JTDN9yGUMuEME/D0SPSNJwQKBgQCv8H6QAwbbncEnR5vA
aTjbl/BRRcirsza6/ayvHraSOcWPcuoDi40Ks1JnPie1EcetAgxeyuq0WhvZjEik
ecrO5owhc3V5otc2LhQR9nzc03OhHa5B4q9d9a5aCUI8BsQk6xyFciX1TkhKkXNL
T94C+CCcdnQtYp6OfHlepGWQgA==
-----END PRIVATE KEY-----
-----BEGIN CERTIFICATE-----
MIIC/TCCAeWgAwIBAgIBATANBgkqhkiG9w0BAQUFADAcMRowGAYDVQQDDBF1bmF0
dGVuZGVkX21hcnZpbjAeFw0yMTExMTAxNjQwMThaFw0zMTExMDgxNjQwMThaMBwx
GjAYBgNVBAMMEXVuYXR0ZW5kZWRfbWFydmluMIIBIjANBgkqhkiG9w0BAQEFAAOC
AQ8AMIIBCgKCAQEAwpTb7AsJmcPsr2Qy/2nG0JbDZ2T/h4lWKI1LtMmim+7JrFF1
KTvO1JXyPXCDtuV9LUqHrkdj0fidU6qt49lg1eAsWwmZ7Rz0NbGSN7KdamO5/udg
VAZ91DwVZPB2fXLLsrtb2CpPczDLMuqdY3ItpYIrVf+iV+KR2WhaXFtQbh/kyyLn
FMCdEVU6j/VxUURM66brdaMywO8vs8xIeSViFLE59GP5KU6wG94fXAnzfNcixdBG
I5nCI7uv7T6ghNBF85FFCeN/NGb9hqUFBW03j+gL9O0bSuM/8j3uwC4ftboizVcC
PZ7QTkiQ5tCutKf5mhmvkjL82sqowuhCvvFrHQIDAQABo0owSDAMBgNVHRMEBTAD
AQH/MA4GA1UdDwEB/wQEAwIBBjAdBgNVHQ4EFgQUCDWQ+PJC5FfC3Wk7jDrdibLU
fJ4wCQYDVR0jBAIwADANBgkqhkiG9w0BAQUFAAOCAQEAQG16BaD7uI/oofYG9fxU
RHYCCutbff4ESEZffVm6HkaIczjpWrVcG3xLGn6avWsnawMxI9CFeQPPy8LfKjWf
/ZhJqlfLEYfQVMAxo4QxR5jpetloBR5U3rfqd4cHffmV+6TTemNIwQ8pAD5fX0SS
mrbbAHKB9hB8Cm6B9QTETPGSejPbXSIRbe3EeOCRHr/Frnu9AQUUHi45oKYE6sFA
qoLvROVvHcQRnODFuYVcEjx5Z48Pmuiljy3AiPvNilHkax1r6VgfK+4MtjKvo9lJ
7hP6/km2hj2o6U/hfZn+AYdOJ7xhunf0hNEBc1Oyobm6fL7g6qRSUmN17N+bynlw
Tg==
-----END CERTIFICATE-----
This information is then input into the federated_api section of the VM installer inventory. The keys and certificate need to be copied into separate files in the quantum_installer/federated_api_files folder, the filenames can then be input into the VM installer inventory, together with the information for the mongodb endpoints:
    # Below section is not relevant if this is not a scaleout rack
        federated_api:
          ssl_key: federated_ssl.key # File name of file containing the SSL key for the federated api, located in quantum_installer/federated_api_files folder
          ssl_cert: federated_cert.crt # File name of file containing the certificate for the federated api, located in quantum_installer/federated_api_files folder
          endpoints:
            - endpoint: # endpoint 1 for federated api
                ip1: 172.16.110.1
                ip2: 172.16.210.1
                port: 27018 # Port number for federated api on endpoint 1
            - endpoint: # endpoint 2 for federated api
                ip1: 172.16.110.1
                ip2: 172.16.210.1
                port: 27018 # Port number for federated api on endpoint 2
            - endpoint: # endpoint 3 for federated api
                ip1: 172.16.110.1
                ip2: 172.16.210.1
                port: 27018 # Port number for federated api on endpoint 3
        # end scaleout rack section
The inventory file of the VM installer has a datacenter section where the datacenter name can be specified. The converged scale out procedure requires that the datacenter name that is defined at installation of the scale out rack has to be same as the one specified in the model of the existing deployment. Datacenters and rack names of the existing deployment were determined in the prerequisite section (Determine datacenter and rack names of existing deployment). Determine which rack of the existing deployment is in the same physical datacenter, and get the corresponding datacenter name. For a 1 GEO deployment this will be trivial as all racks are in that same datacenter, and there is really only 1 datacenter name. In the 3 GEO case you’ll have to make sure to select the correct datacenter.
In either case, the datacenter should be defined in the model of the existing deployment. This can be verified in the GUI or by entering following command (change <dc name> to the datacenter name you’ve found) in sherpa on one of the scaler management nodes of the existing deployment:
cli.marvin.location.get(<dc name>)
Once you are certain that you’ve found the correct datacenter name, adjust the inventory file of the VM installer as outlined in the installer guide:
all:
  children:
    ...
    asnodes:
      vars:
        ...
        datacenter:
          - name: <dc name>
        ...
The inventory file of the VM installer will also have a rack section where the rack name and serial can be specified. The converged scale out procedure requires that the rack name has to be unique. All rack names in the existing deployment were already determined in the prerequisite section (Determine datacenter and rack names of existing deployment), so make sure to not pick a name that is already defined. It is also crucial that the rack serial is correctly specified:
all:
  children:
    ...
    asnodes:
      vars:
        ...
        rack:
          - name: <rack name>
              serial: <rack serial>
        ...
The inventory file of the VM installer will have a network section where we can specify the private networks that have to be modeled on the scale out rack. Using the specific guide on the networking scenario that was determined in the prerequisite section Networking, the network and netmask of the 2 private networks should be determined.
In case the customer wants to have the machines of the scale out rack on the same subnets as the machines of the existing deployment, the startip and endip should be carefully chosen such that there is no overlap with the ip range that is specified for the private networks in the model of the existing deployment. The ip range should be big enough to cover all machines. In case of scale out with X200 there should also be extra ip addresses for IPMI and JBODs.
The scale out rack needs to be able to route to the base rack during install. These are also added to the private network definitions in the installer. The information for the networks that need to be routed to was listed as output of the command to get the credentials to access the federation (federated_api section). Note that when following the recommended network numbering, systems consisting only of X200/P200 can use aggregated routes towards all “private 1” and “private 2” (destination 172.20.128.0/17) networks (See the X200 networking guide).
-
Single GEO aggregated routes for a column X:
-
private 1: 172.20.0.0/17 via ToR 1: 172.20.X.200
-
private 2: 172.20.128.0/17 via ToR 2: 172.20.[128+X].200
-
-
3-GEO systems aggregated routes for column X
-
private 1: destination networks 172.21.0.0/17, 172.22.0.0/17, 172.23.0.0/17 via ToR 1
-
private 2: destination networks 172.21.128.0/17, 172.22.128.0/17, 172.23.128.0/17 via ToR 2
-
all:
  children:
    ...
    asnodes:
      vars:
        ...
        private1:
          network: <nw 1>
          netmask: <nm 1>
          startip: <startip 1>
          endip: <endip 1>
          routes:
            - name: <route name>
              destination_network: <private network 1 on base rack>
              destination_netmask: <network mask for destination network>
              destination_gateway: <gateway in private network 1>
        ...
        private2:
          network: <nw 2>
          netmask: <nm 2>
          startip: <startip 2>
          endip: <endip 2>
          routes:
            - name: <route name>
              destination_network: <private network 2 on base rack>
              destination_netmask: <network mask for destination network>
              destination_gateway: <gateway in private network 2>

        ...
The inventory file of the VM installer will also contain the public network definitions. In case the customer decides to not cable public nics, these public network definitions can just be omitted from the file.
The inventory file of the VM installer will have a dssconfig section where the customer can specify the storage policy. The converged scale out procedure requires the policy type, category and name to be the same on the scale out rack as for the existing deployment. Please make sure the dss policy values that were determined in the prerequisite section Determine selected policy type, category and name are correctly specified in the inventory file.
all:
  children:
    ...
    asnodes:
      vars:
        ...
        dssconfig:
          policy-type: <policy_type>
          policy-category: <policy_category>
          policy-name: '<policy_name>'
          spread_width: <spread width>
          blockstore_safety: <blockstore safety>
          max_blocks_per_node: <max blocks>
        ...
Complete the connectivity from the base system towards the scale out column. To easily configure the network routes, use the support script: /opt/ampli/scripts/capacity_scaleout_routes.py
In this step you need following information to determine the routes:
-
All private networks of the scale out column.
-
IP address of the gateways in the base environment.
In the 1-GEO case you need following 2 routes:
| To network of scale out column | via gateway of base environment |
|---|---|
| private 1 | private 1 |
| private 2 | private 2 |
In the 3-GEO case you need 18 routes, 6 routes per GEO. You need following routes for SiteX:
| To network of scale out column | via gateway of base environment |
|---|---|
| Site1 private 1 | SiteX private 1 |
| Site1 private 2 | SiteX private 2 |
| Site2 private 1 | SiteX private 1 |
| Site2 private 2 | SiteX private 2 |
| Site3 private 1 | SiteX private 1 |
| Site3 private 2 | SiteX private 2 |
Using this information, run the capacity_scaleout_routes script. The script expects a number of --route <destination network> <gateway IP address> inputs (e.g. --route 192.168.54.0/24 192.168.56.5). See the table above to determine what routes you will have to specify.
For 3-GEO deployments, run the capacity_scaleout_routes script 3 times: once from each Site. The script will fail when you attempt to add routes with a gateway in one of the other sites.
For 1-GEO you have to specify 2 routes. For 3-GEO you have to specify 6 routes, as indicated in the table above
/opt/ampli/scripts/capacity_scaleout_routes.py --route route1 --route route2 --route routeN
An example of successful execution for 1-GEO is below:
vagrant@site1-combined-1:~$ /opt/ampli/scripts/capacity_scaleout_routes.py --route 192.168.54.0/24 192.168.56.5 --route 192.168.55.0/24 192.168.51.5
{
"task": "4731f6e0-dd69-4bb7-b312-ca5e424a44bb",
"network": {
"fb805027-b10f-4277-9699-e477d23baea1": {
"routes": [
{
"destination_gateway": "192.168.51.5",
"guid": "e7c99ea5-285a-42fc-a254-c7017522bf50",
"destination_netmask": "255.255.255.0",
"destination_network": "192.168.55.0"
}
]
},
"84fe48bc-955e-4da6-897d-b6ecdd213de4": {
"routes": [
{
"destination_gateway": "192.168.56.5",
"guid": "f99be6c4-db96-4c1d-8f80-47e60506771d",
"destination_netmask": "255.255.255.0",
"destination_network": "192.168.54.0"
}
]
}
},
"exit_code": 0
}
The output will show the GUIDs for the network and created routes.
An example of failed execution is below:
vagrant@site1-combined-1:~$ /opt/ampli/scripts/capacity_scaleout_routes.py --route 192.168.54.0/24 192.168.56.5 --route 192.168.55.0/24 192.168.60.5
{"exit_code": 1, "error": "Destination gateway 192.168.60.5 not reachable"}
The above scripts will wait until the NICs are configured. It’s also possible to specify a --nowait flag. The script then returns immediately, and you can use the task GUID (if there is one, there won’t be any if all routes are already in the model) to manually check the status of the NIC configure tasks (e.g using taskviewer).
You can run following on the base environment as marvin user, and check that the routes are as expected:
$ecmd -r all -- ip route
This should show the added routes on all nodes. In addition, a ping test towards the mgmt IP addresses on the ToR gateways for the scale out system can be performed to confirm connectivity:
ping 172.20.0.200
In case a wrong route was added, you can use the network and route GUIDs that are listed in the output of the capacity_scaleout_routes script to delete the routes from the model.
In sherpa execute the following:
cli.marvin.network.route.delete(<network guid>, <route guid>)
Then re-run the script with the correct destination network and gateway as input.
Note: Provisioning of the scale out rack can start only after connectivity has been confirmed.
After the scale out rack was installed successfully, some additional configuration steps are needed to complete converged scale out:
Note: All steps have to be run in the order below.
The scale out rack has no column defined and the column_update_bucket task would throw a lot of critical events in the GUI. It’s best to disable this first, or these will show up in the event log. Similarly there are several flame jobs that don’t have to run on a converged scale out system.
Open sherpa on a management node of the scale out environment and execute following snippet:
disable_tasks = ['column_bucket_update', 'flame_scalerdb_foreground', 'flame_scalerdb_background', 'flame_scalerdb_verifier', 'flame_object_verifier_report_check', 'flame_job_status_check', 'flame_spark_health_checker', 'account_quota_checker', 'slow_blockstores', 'coldstorage_tape_media_verify']
taskguids = [t['guid'] for t in cli.marvin.taskschedule.list() if t['name'] in disable_tasks]
for tg in taskguids:
    cli.marvin.taskschedule.update(tg, enabled=False)
In this step, generate a column document for the scale out environment.
For the remainder of the procedure it is advised to open 2 terminals. One terminal in which you are logged in on one of the management nodes of the base environment, and the other terminal in which you are logged in on one of the management nodes of the scale out environment.
Open sherpa on a management node of the scale out environment and execute following snippet:
from marvin_lib.network import ha
import json
env_guid = cli.marvin.environment.list()[0]['guid']
column = json.loads(ha.post('/model/environment/%s/action/get_column_record/?insecure=True' % env_guid))['column_record']
This dict needs some cleanup. Change the X in ColumnX to the column number.
del column['column_id']
column['name'] = 'ColumnX'
column['sdb_status'] = 'ACTIVE'
Then run following snippet:
for connection in column['connection']:
    if 'location' in connection:
        connection['location'] = cli.marvin.location.name(connection['location'])
To print the column dict, just type "column" (without quotes). This will print a datastructure like the following. Then copy the complete datastructure.
{u'api_type': u'PROXY',
u'column_deployment_id': u'fa1b30f1-abb1-43f5-b865-387ca6f6409d',
u'column_id': u'changeme',
u'connection': [{u'connectiontype': u'S3',
u'location': <dc guid>,
u'login': u's3user',
u'name': None,
u'password': u's3pass',
u'server': [u'http://192.168.2.31:11000',
...
u'http://192.168.1.33:11003'],
u'ssl_certificate': None,
u'ssl_key': None,
u'ssl_root_certificate': None},
{u'connectiontype': u'AXM',
u'location': <dc guid>,
u'login': u'admin',
u'name': None,
u'password': u'adminsecret',
u'server': [u'http://192.168.2.31:10000',
...
u'http://192.168.1.33:10003'],
u'ssl_certificate': None,
u'ssl_key': None,
u'ssl_root_certificate': None},
{u'connectiontype': u'ModelAPI',
u'login': None,
u'name': None,
u'password': None,
u'server': [u'https://192.168.2.31:8443/model/',
...
u'https://192.168.1.33:8443/model/'],
u'ssl_certificate': u'-----BEGIN CERTIFICATE-----\nMIICyzCCAbOgAwIBAgIEYFtO8DANBgkqhkiG9w0BAQsFADAZMRcwFQYDVQQDDA5D\nQWdvLWNvbS1ibHVlMTAeFw0yMTAzMjQwMjM4NDBaFw0zMTAzMjIxNDM4NDBaMDYx\nNDAyBgNVBAMMK2NvbHVtbl9mYTFiMzBmMS1hYmIxLTQzZjUtYjg2NS0zODdjYTZm\nNjQwOWQwggEiMA0GCSqGSIb3DQEBAQUAA4IBDwAwggEKAoIBAQDE8zDsJxgWGVvb\nnghmczR84EvghtyS/7Sfipwvx8+IjY6HTmwI94zZRvDc69kyhZM5hK5jeOBoNymP\n8ls5cYYmhpyuENOPgFZyHWuKTE2EG8Ec86344Q+ZYTXEMv2k56udHK9l2TBLIqLy\nhtZnR00yPMHqb7cshMU1vdEzDNp3opKvdpvsL4hBKmmpkKpkq8dnDhmVa5wn8ssF\nglRFwAdvcWVWX1u6rTNKZrWxYYF75iglxE1cBvL+3OF2DJ80d+JjKlGNOzRDFB4E\n3qf1ozmPb8wUQQep376AYj31YavqMz0NF4Swk+Ns0A7+594VMgvf/p7UBqoSr14b\nD+RaFhZ1AgMBAAEwDQYJKoZIhvcNAQELBQADggEBAAwmHqRBg951abtbz4sq+xsc\nvgGaMVrNenOF3rQDrXNp0Y594L/cqaomsk1ZYazD3HPYW+tCgZqyhSgg8QPJPRQ3\nGwv5WlAC7ghg7tWS0iuZLroi/IN+AsfxLbArLhEYDSx/KjBgFxTVnKaw/lykO9M1\n6pIUG9G8ZYrxvCeW7eEQC6vaa6QQDmNeZt+zG0Ym3AbJKej+AJcy+S5x7HQclwdC\npaPouM18o1lfNBpRoaE360nchHy2RDPQSVwBM4cSiuIDheWWqtleMUkaX1Q9pzMb\nboM/JBsotZuc8ysAR7aRYpvv3mO1n9tVSt9fG2MoCAJfykRYJ9p4tgKKyK3f9DU=\n-----END CERTIFICATE-----\n',
u'ssl_key': u'-----BEGIN PRIVATE KEY-----\nMIIEwAIBADANBgkqhkiG9w0BAQEFAASCBKowggSmAgEAAoIBAQDE8zDsJxgWGVvb\nnghmczR84EvghtyS/7Sfipwvx8+IjY6HTmwI94zZRvDc69kyhZM5hK5jeOBoNymP\n8ls5cYYmhpyuENOPgFZyHWuKTE2EG8Ec86344Q+ZYTXEMv2k56udHK9l2TBLIqLy\nhtZnR00yPMHqb7cshMU1vdEzDNp3opKvdpvsL4hBKmmpkKpkq8dnDhmVa5wn8ssF\nglRFwAdvcWVWX1u6rTNKZrWxYYF75iglxE1cBvL+3OF2DJ80d+JjKlGNOzRDFB4E\n3qf1ozmPb8wUQQep376AYj31YavqMz0NF4Swk+Ns0A7+594VMgvf/p7UBqoSr14b\nD+RaFhZ1AgMBAAECggEBAJSFiKktuh5ANWNiw5bu3fAl/VJuoTxBlOaTUsE9fyXN\nCmTDIPmKJS9dLhqLyRkuXh4MDq5441Hz92XUMDMbhzzaWqFxkvkuoQIhaY27iOFN\nRM4efV2n62mRQ0iX42tOQb6TeTnnFWIz1onqYRk1TePKqbmvUYVDAq1KXc6PrNh1\n7sPKblH+rbI8lh1aDbKcVzHsf+7wO8/iTip/kkHSOJEdDBzPWlYU9IxICXwnWzT4\n2PdoLljpGraVlNLM/vjGfX8reRXNpNBRUxpr7fBlvZoCSfjNutZReW06pQ0rXGEY\n6vabTzWRmP8Fz/vFNo6OPm0JnxYb0DxOYU9lywZsBikCgYEA918bXKFQ0JpbUugl\nwk4heqnb8PAKUHuS1ZtBt9pAUU0nxEAdrrZrCIKsiHhdeAw9bPUIVgqMaYuNIZuu\nU+/V2WyGr4WdrBq/oyUbZ1wdr5gNmodNICfEXSU60ibfAmSaoONGy1yWA7f+uyjn\n/tiA2gRivCrWZ/0dKy6OxGJlvGcCgYEAy9HY48r5PW7K0aAMRm5RejzcXs9LdrUI\n9QcPHlhEyHwJRKB4Bw5k29JyUpQ6pX5ujRaPPok05ot6tDzcCBYUOAeShxPQvKk3\nDQfmw4OnYl9lZ7n6UaIjQUn6JcPrq8nMTg2gAMELcTS3D26/eVxDunxu/vRtQS6u\nEZOx4C5vTMMCgYEAywc/MNahuqSFwdURcJmptsCE6QpKnOXfjPwBg0FZOqFFuzgY\nZJYJ4RFHRDbuGCKLo8q0zdGYjuPfsK7S9MdK0EnXfWYAFApcMS26gSnEn6L/v02/\nSl35N63fyi3nKVKi6tu+9hgGdATmyHv5dVwC3W1uEBxknzLKZu+uc5aDA48CgYEA\nsUnRbSNq9ULf7MNYqhLfkIJL9bQ+of0K04fWYMDK49Dwht9GSGz+0i8V/jqtYLK/\nGr5azzyt5TPCAfFGO0ppP+tmS1SzJsfR+OW8lqh3+pucK0OcN1HfdLUSf7MR1hXs\nPqCfYsiIWWpPKX9d0gStbRM7wU1/k0k1ZFiiSqxZZ90CgYEAwK7U1No3REn2WS69\n5wVF/mcE+cKVO9mJZVJ/yRLXDK44R69bXhPbDel7aN9bpd1kM47+VQxXFpeyNGZ/\nB+mu9MEC3w2Wc+1wfLglCp2w22rmTKQ+3pvfSbsOo0y8SpnQ26INtt2bw258hgYd\npPiFR5f/pIEzXN30G0FaZhQPhb0=\n-----END PRIVATE KEY-----\n',
u'ssl_root_certificate': u'-----BEGIN CERTIFICATE-----\nMIIC+jCCAeKgAwIBAgIEYFTI4DANBgkqhkiG9w0BAQsFADAZMRcwFQYDVQQDDA5D\nQWdvLWNvbS1ibHVlMTAeFw0yMTAzMTkwMzUzMDRaFw0zMTAzMTcxNTUzMDRaMBkx\nFzAVBgNVBAMMDkNBZ28tY29tLWJsdWUxMIIBIjANBgkqhkiG9w0BAQEFAAOCAQ8A\nMIIBCgKCAQEApIVy77wSO4uBd23ls5UjOfoo2rkoXRf/eW952pvmVy4ij2wtJWrJ\nrAbuiWomxR+8ohAkYGkC73PA3Q5jsNvbbiOYq3YZbZqfN6t0RJ2oU0HtEaCEvTsO\nP4if9am55aEDdjCZy0iS9BthtMRA51EkEsstCjYDj2Ce9nqmwNTi+fySz3q3s8co\nncRduzuqB3FOf3p5Cg/kFPijuHppSGCIJOXFqdhNRx105vN7lmJ4LSbnl4xQBTfV\nyG4QxKhCi+tca3ZU8wXk3hZKOY/d8EyIcMcy5Z1QjTSRBst+WwLnzCN8wPpreWuy\n6/Cs5kP4l82Mkz48hl7V+QCanXDO5INtOQIDAQABo0owSDAMBgNVHRMEBTADAQH/\nMA4GA1UdDwEB/wQEAwIBBjAdBgNVHQ4EFgQUDfc0bR7IipgS0EEMuqE/PgJLI3Aw\nCQYDVR0jBAIwADANBgkqhkiG9w0BAQsFAAOCAQEAIbRVDrnm0T5gXVpt90+1Ig1+\n3TdI0KFXNVAf0Lh5zJHHcaN9/MqG2XC3aVwVvtM4SdH1IBNSIO8Hj5FEqImN6f6L\n6Aey8XBGc9B6wH57oIe1yOkGRAgH/gFFcHS3lUx+jyHhToy/2LhNO+fuBykd3KSS\n5IOoL0zkl4EHptTqpWSBMP7HULYDKVw6IYgYvZEqWbdnKZtyg1tD4YYyT/ugurD2\nZY0w0TcU5xpoNbG0T66HG3a116ZDrQUX/7gpI9JtATm5QR6CHrBJ3KjyVFbe6P2m\nE+kMFDvKAY8P1oEX/hrs30FANXs+hKYPnkQUEA9vCHjcAHV/Kzhr78b1DwEEtQ==\n-----END CERTIFICATE-----\n'}],
u'name': u'changeme',
u'sdb_status': u'MAINTENANCE',
u'status': u'NOTCONFIGURED'}
The column document from the previous step has to be manually copied to the base environment.
Open sherpa on a management node of the base environment and copy-paste the column document in a variable like in the following snippet:
column = <paste the column dict>
To add the column to the model and configure it, execute following snippet in that same sherpa session:
from marvin_lib.network import ha
import json
col_guid = json.loads(ha.post('/model/column/', json.dumps(column)))['column']['guid']
cli.marvin.column.configure(col_guid)
Verify that the column configure task succeeds by executing following taskviewer command on one of the nodes in the base environment:
taskviewer -a configure
The column configure task will start new tasks on the scale out environment. Before proceeding with the scale out procedure wait for all tasks on the scale out environment to be finished. Log in to one of the nodes on the scale out environment and execute following taskviewer command:
taskviewer -i no
Log in to one of the management nodes of the scale out environment and become marvin user. Then execute following command:
/opt/ampli/apps/sherpa/venv/bin/python /opt/ampli/scripts/clean_configrules.py
Log into one of the management nodes of the scale out rack and start sherpa. Execute following snippet.
%cpaste
from marvin_lib.network import ha
import json
private_nws = json.loads(ha.get('/model/network/?query="networktype=PRIVATE"'))['network']
[ha.put('/model/network/%s/' % private_nw['guid'], data=json.dumps({'shared': True})) for private_nw in private_nws]
--
Then log into one of the management nodes of the base environment. Start sherpa and execute the following snippet. Wait for it to finish.
%cpaste
import json
from marvin_lib.network import ha
from marvin_lib.task import wait_for_tasks
env_guid = json.loads(ha.get('/model/environment/'))['environment'][0]['guid']
task = json.loads(ha.post('/model/environment/%s/action/update_scaleout_routes/?configure=True' % env_guid))['task']
wait_for_tasks([task['guid']], stop_on_error=True)
--
The last snippet will reconfigure the private network interfaces of all machines in the base environment and on ALL scale out environments, so including previously installed scale out environments.
Log in to one of the management nodes of the scale out environment and become marvin user. Then execute following command:
/opt/ampli/apps/sherpa/venv/bin/python /opt/ampli/scripts/ensure_metadata_scaleout.py
This script will write what it is doing to terminal as well as to /opt/ampli/var/log/marvin/marvin.log on the node from which you are running the script.
In case the command fails, the script will write the failure to terminal and in the log. Please contact engineering for root cause analysis and to apply a fix. The script is rerunnable and will detect if metadata scale out already happened or not, or whether it happened partially due to an error during a previous attempt. Make sure to have run this script without errors before proceeding to the next step in the scale out procedure.
The rack serial for the scale out rack(s) needs to be known on the existing deployment. New Rack resource(s) should be added to the model of the existing deployment such that GUI and prometheus can also gather and display resources and metrics from the scale out rack(s).
Open sherpa on a management node of the base environment and execute following snippet:
%cpaste
from marvin_lib.network import ha
import json
col_guid = max(cli.marvin.column.list(), key=lambda c:c['column_id'])['guid']
scaleout_racks = json.loads(ha.get('/model/column/%s/action/proxy/location/?query="locationtype=RACK"' % col_guid))['location']
for scaleout_rack in scaleout_racks:
    scaleout_dc_name = json.loads(ha.get('/model/column/%s/action/proxy/location/%s/' % (col_guid, scaleout_rack['parent'])))['location']['name']
    new_location = {
        'address': scaleout_rack['address'],
        'locationtype': 'RACK',
        'name': scaleout_rack['name'],
        'serial': scaleout_rack['serial'],
        'parent': scaleout_dc_name
    }
    ha.post("/model/location/", data=json.dumps(new_location))
--
This step only applies when the customer does not want the additional performance of (some of) the scale out nodes, so the customer won’t send S3 requests to (some of) the scale out nodes. In that case it is suggested, but not necessary, to pull the cables on the public interfaces of these scale out nodes. If left uncabled, the customer will see NIC_DOWN events for the public interfaces in the GUI. If there are no NIC_DOWN events in the GUI, you can skip this step. Otherwise we can unconfigure the public interfaces of the nodes. This step can be applied for both bonded and non-bonded public interfaces.
To resolve the NIC_DOWN events, log into one of the management nodes of the scale out environment and become marvin user. Most likely all cables of all nodes have been pulled, in which case you will see NIC_DOWN events for all nodes. Determine the hardware platform of the scale out system (X200/P200/P100E3/Z200) and use it to run following command. Notice that it says “all”, so the script will fix all nodes in the scale out environment:
performance_scaleout_networks.py --unconfigure all --system <X200/P200/P100E3/Z200>
If the customer has a system that is different from X200/P200/P100E3/Z200, it is also possible to define the public interfaces. Determine which interface belongs to which public network. This is also required if nic bonding is applied. Then you run the script like this:
performance_scaleout_networks.py --unconfigure all --eth-devices <eth for public nw 1> <eth for public nw 2>
For example, the equivalent command for X200 would be the following (using --system is more convenient though)
performance_scaleout_networks.py --unconfigure all --eth-devices eth3 eth5
In some cases the customer has some nodes that are cabled and some nodes that are not. In those cases you can specify which nodes are NOT cabled, so the nodes for which you’ll see NIC_DOWN events in the GUI.
For example, the customer has a 3GEO system and only wants S3 traffic on all nodes of Site1. Then you can unconfigure the public interfaces of Site2 and Site3 as follows:
performance_scaleout_networks.py --unconfigure Site2 Site3 --system <X200/P200/P100E3/Z200>
If, for example, the customer has a 6-node 1GEO system and only wants S3 traffic on node CMB04-6, then you can unconfigure the public interfaces of CMB01-3 as follows:
performance_scaleout_networks.py --unconfigure Site1-R02-C02-CMB01 Site1-R01-C02-CMB02 Site1-R02-C02-CMB03 --system <X200/P200/P100E3/Z200>
If, for example the customer has a 3GEO system with 6 nodes per GEO and the customer only wants S3 traffic on nodes CMB01-3 of Site3, then you can unconfigure the public interfaces of the nodes on Site1, on Site2 and nodes CMB04-6 on Site3 as follows:
performance_scaleout_networks.py --unconfigure Site1 Site2 Site3-R02-C02-CMB04 Site3-R02-C02-CMB05 Site3-R02-C02-CMB06 --system <X200/P200/P100E3/Z200>
This way you can unconfigure the public interfaces of the nodes in every way that the customer wants.
The script will always tell you which interfaces of which nodes that it unconfigured. An example output is the following:
marvin@Site1-R01-C02-CMB01:~$ ./performance_scaleout_networks.py --unconfigure all --system P100E3
All public nics of all machines will be set NOTMANAGED
Unsetting bond0 of machine Site1-R02-C02-CMB02
Unsetting eth0 of machine Site1-R02-C02-CMB02
Unsetting eth3 of machine Site1-R02-C02-CMB02
Unsetting bond0 of machine Site1-R02-C02-CMB03
Unsetting eth0 of machine Site1-R02-C02-CMB03
Unsetting eth3 of machine Site1-R02-C02-CMB03
Unsetting bond0 of machine Site1-R02-C02-CMB01
Unsetting eth0 of machine Site1-R02-C02-CMB01
Unsetting eth3 of machine Site1-R02-C02-CMB01
WARNING: Please make sure cables of the public nics are unplugged!
Mind the last line in the output! Make sure that cables are actually unplugged for all public interfaces that are unconfigured. After running the script, the NIC_DOWN events will gradually go away. You will also see that the public interfaces are not listed anymore in the Resources page of the GUI.
To configure the metrics, execute the following command in sherpa on the existing deployment.
cli.marvin.environment.configure_metrics(cli.marvin.environment.list()[0]["guid"])
The result of the configure_metrics task is accessible trough taskviewer. Run following as marvin user:
taskviewer -a configure_metrics
Note: Please note that metrics on the scaleout rack will only be available when the scaleout completes.
At this point in the configuration, you can SSH to any node in the scale out environment using the password, but without the support password prefix. For security reasons this has to be rectified.
This is currently a manual procedure. The system admin will need to log into the GUI and re-enter the support password prefix again. You will need to contact the customer’s system administrator and request that the support code prefix be re-entered .
Note: When clicking the Save button, the GUI might seem unresponsive, but the support password prefix will now be set for the scale out environment as well. Please verify that this is the case.
If the customer has an external Prometheus and/or external Grafana to monitor ActiveScale metrics, the new racks that have been added to the deployment via this scale out procedure also have to become visible to the external monitoring framework. This will not happen automatically as part of the previous steps. Instead the configuration of the external Prometheus and/or external Grafana has to be manually adjusted such that these new racks are also monitored.
Please consult the documentation about External Grafana and Prometheus in the Administration Guide (support edition) External Grafana and Prometheus to have an in depth explanation of the steps that are required to have an external Prometheus scrape a Global or Local Prometheus in ActiveScale and/or have an external Grafana display metrics for a Global or Local Prometheus in ActiveScale.
External Prometheus
-
If the customer’s external Prometheus is scraping a Global Prometheus in ActiveScale, no configuration changes are needed. The metrics for the scale out racks will automatically be included.
-
If the customer’s external Prometheus is scraping Local Prometheus instances in ActiveScale, we will have to add a scrape_config job for every scale out rack to the external Prometheus configuration file. Please consult the Administration Guide for the necessary changes to the configuration file. It is very important to set the systemid correctly for the scale out racks. Make sure that the systemid is the same in all scrape_configs for Local Prometheus instances in the ActiveScale deployment. Otherwise Grafana will incorrectly and incompletely show metrics for the ActiveScale deployment.
External Grafana
-
If the customer’s external Grafana has a data source for an external Prometheus, no configuration changes are needed. Make sure that the configuration changes for the external Prometheus are correctly applied though.
-
If the customer’s external Grafana has a data source for a Global Prometheus instance in ActiveScale, no configuration changes are needed. The metrics for the scale out racks will automatically be included.
-
If the customer’s external Grafana has data sources for Local Prometheus instances in ActiveScale, first ask the customer if they want to add data sources for the scale out racks as well. If so, please consult the Administration guide for the necessary steps to add a new Local Prometheus data source for each scale out rack
Starting from ActiveScale software version 7.0, it is possible for the customer to also direct S3 traffic to the scale out nodes. This is often referred to as Performance Scale Out. This section covers the procedure to enable this feature on the customer’s system if they choose to make use of the additional performance. This procedure can be executed at any time on scale out systems. So if the customer wants to make use of this feature at a later time, that is perfectly possible. The only requirement is for the scale out system to run ActiveScale 7.0 software.
Note that the converged scale out steps in above sections are not sufficient to automatically have performance scale out, nor does the upgrade to 7.0 or above automatically enables this feature. This procedure has to be executed to guarantee that the customer can send S3 traffic to the scale out nodes.
Note: After applying this procedure the scale out nodes will be able to accept and process S3 traffic. NFS (file) traffic will not be processed by scale out nodes.
In ActiveScale versions prior to 7.0 it was not necessary to cable the public interfaces of the scale out nodes. They only extended the storage capacity of the customer, but they were not able to accept and process S3 traffic. Starting from software version 7.0 this is possible, so if the customer chooses to make use of this feature, the public interfaces have to be cabled.
Take a note which scale out nodes the customer wants to use. In most cases this will be all of the nodes, but it is also perfectly possible to only add the performance of a subset of the scale out nodes. The rest of the procedure will then only apply to those nodes. Make sure the public interfaces of those nodes are cabled.
-
For X200 these are interfaces eth3 and eth5.
-
For P200 these are interfaces eth3 and eth1.
-
For P100E3 these are interfaces eth0 and eth3.
-
For Z200 these are interfaces eth2 and eth4.
The customer should prepare their public network such that it can also direct S3 traffic to the scale out nodes.
Note: This step only applies when the customer has multiple scale out systems. You can safely ignore this step if the customer has one scale out system.
For Capacity Scale Out, it is only necessary for the scale out systems to have routes to the base environment and vice versa. When enabling S3 access to scale out nodes, it is also necessary for the scale out system to have routes to every other scale out system in the deployment.
The inter-scale out system communication happens over the private networks. Nodes of different scale out systems are in different subnets, so gateways have to be configured such that different scale out systems are able to talk to each other. There are 2 sides to this: a configuration on the customer side, and a configuration on the system side.
Note: In case you are running this procedure for a new scale out system, please execute the customer part before software installation and converged scale out steps.
The customer has to configure gateways such that these are capable of routing traffic from the S3 capable scale out system to every other scale out system. The converged scale out procedure requires each scale out system to at least have one gateway for each private network, and these should have routes to the base environment. Furthermore it is also possible that the customer already has an S3 capable scale out system and that other gateways are used for communication with other scale out systems.
The customer has 2 choices when unlocking S3 access to the current scale out system:
-
Re-use the same gateways again that are already known by the system: this is what is assumed by the system since these gateway are already known.
-
Configure different gateways: this requires a change on the system since is not assumed by default. So once the gateway is configured you won’t be able to ping nodes on other scale out systems via the private networks. Later the System side of this procedure are outlined. Take note of the new gateway IPs so you find them easily for the next steps.
Following configuration of the gateways is necessary:
-
On the Performance Scale Out enabled system:
-
The gateway of private network 1 should have a route to private network 1 of all other scale out systems.
-
The gateway of private network 2 should have a route to private network 2 of all other scale out systems.
-
-
On the other scale out systems
-
The gateway of private network 1 should have a route to private network 1 of the Performance Scale Out enabled system.
-
The gateway of private network 2 should have a route to private network 2 of the Performance Scale Out enabled system.
-
Assume the customer has a base system and wants to scale out with a system for which no S3 access is required. This was always the situation prior to ActiveScale version 7.0.
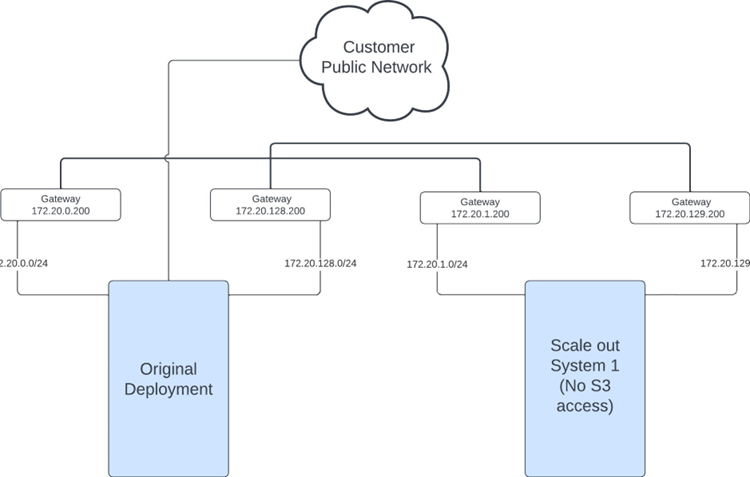
Following table shows which routes have to be configured on the private network gateways. Note that there are 2 gateways, 1 for each redundant private network. Routes are always defined between private network 1 or between private network 2.
| Gateway has Route To/From | Original Deployment | Scale Out System 1 |
|---|---|---|
| Original Deployment | X | |
| Scale Out System 1 | X |
Assume that the customer at a later point wants to unlock S3 access to the scale out system.
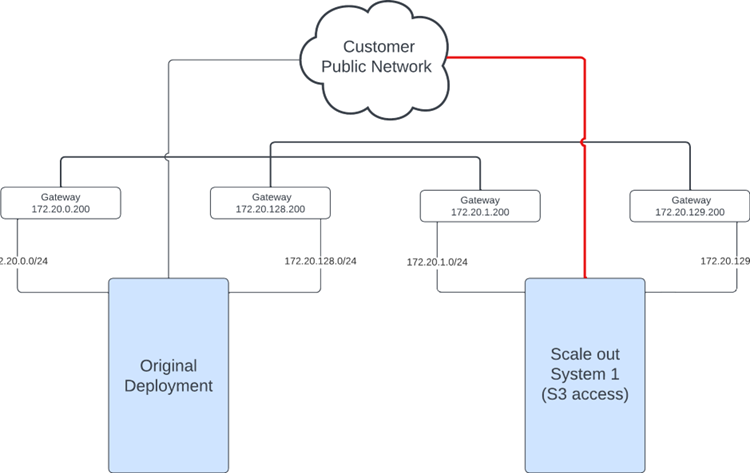
Notice that on the private networking side nothing changes because this is not a multi scale out system. Since the customer intends to send S3 requests to the scale out nodes, their public interfaces have to be cabled.
Now assume that the customer buys another scale out system and decides that they are not going to use it for S3 access.
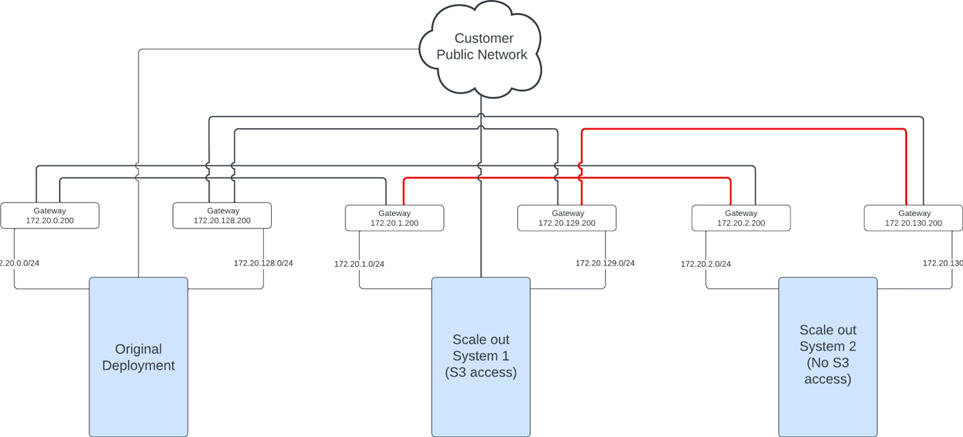
Since this is a multi-scale out system and the customer already has a scale out system that they use for S3 traffic, the first scale out system has to be able to talk to the second scale out system over the private networks. So the customer has to make sure that following routes are configured on the gateways:
| Gateway has Route To/From | Original Deployment | Scale Out System 1 | Scale Out System 2 |
|---|---|---|---|
| Original Deployment | X | X | |
| Scale Out System 1 | X | X | |
| Scale Out System 2 | X | X |
And this also goes on when the customer would decide to buy a third scale out system:
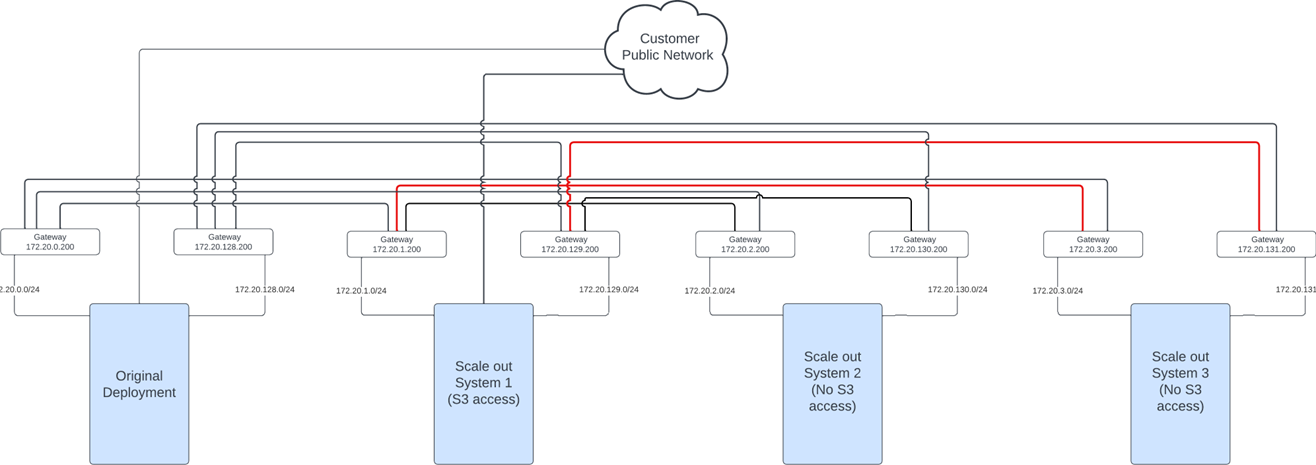
Note that scale out system 3 only needs to be able to talk to scale out system 1 since scale out system 1 is the only scale out system that can process S3 requests! For now no routes are needed between scale out system 2 and scale out system 3
| Gateway has Route To/From | Original Deployment | Scale Out System 1 | Scale Out System 2 | Scale Out System 3 |
|---|---|---|---|---|
| Original Deployment | X | X | X | |
| Scale Out System 1 | X | X | X | |
| Scale Out System 2 | X | X | ||
| Scale Out System 3 | X | X |
Finally, let’s assume that the customer indicates that they could benefit from some additional performance and they also want to unlock S3 access to scale out system 2.
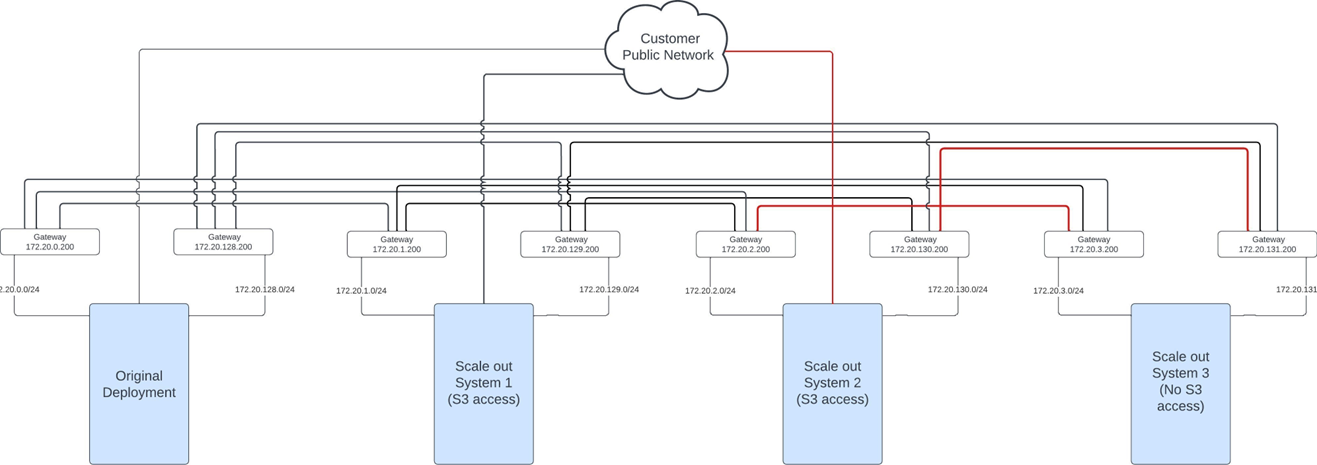
Scale out system 2 will have to be reachable from the public network. Scale out system 2 now has to be able to talk to the other scale out systems as well. It could already talk to scale out system 1 since that system already was able to process S3 requests. Scale out system 2 now also has to be able to communicate with scale out system 3, so gateways have to be configured such that these routes exist
| Gateway has Route To/From | Original Deployment | Scale Out System 1 | Scale Out System 2 | Scale Out System 3 |
|---|---|---|---|---|
| Original Deployment | X | X | X | |
| Scale Out System 1 | X | X | X | |
| Scale Out System 2 | X | X | ||
| Scale Out System 3 | X | X | X |
Notice that if the customer would have chosen scale out system 3 for processing S3 requests instead of scale out system 2 that we would end up with the same table as above.
For 3-GEO, pay attention that routes have to be provided to all 3-GEOs. Let’s go over the same example as for 1-GEO. In the tables below orig= original/base deployment, SO=scale out system.
Assume the customer has a 3-GEO base system and wants to scale out with a system for which no S3 access is required. This was always the situation prior to X200 version 7.0. The gateways of the original deployment have routes to the private networks of the scale out system in all GEOs. The other way around as well.
| Gateway has Route To/From |
Orig GEO-1 |
Orig GEO-2 |
Orig GEO-3 |
SO1 GEO-1 |
SO1 GEO-2 |
SO1 GEO-3 |
|---|---|---|---|---|---|---|
| Orig GEO-1 | X | X | X | X | X | |
| Orig GEO-2 | X | X | X | X | X | |
| Orig GEO-3 | X | X | X | X | X | |
| SO1 GEO-1 | X | X | X | X | X | |
| SO1 GEO-2 | X | X | X | X | X | |
| SO1 GEO-3 | X | X | X | X | X |
Assume that the customer at a later point wants to unlock S3 access to the scale out system on all 3 GEOs. This does not change anything to the table above since there is only one scale out system. The customer has to make sure that the scale out nodes are reachable over the public networks.
Now assume that the customer buys another scale out system and decides that they are not going to use it for S3 access. Since this is a multi-scale out system and the customer already has a scale out system that they use for S3 traffic, the first scale out system has to be able to talk to the second scale out system over the private networks. Scale out system 1 should be able to talk to scale out system 2 in all GEOs and vice versa. So the customer has to make sure that following routes are configured on the gateways:
|
Orig GEO-1 |
Orig GEO-2 |
Orig GEO-3 |
SO 1 GEO-1 |
SO 1 GEO-2 |
SO 1 GEO-3 |
SO 2 GEO-1 |
SO 2 GEO-2 |
SO 2 GEO-3 |
|
|---|---|---|---|---|---|---|---|---|---|
|
Orig GEO-1 |
X | X | X | X | X | X | X | X | |
|
Orig GEO-2 |
X | X | X | X | X | X | X | X | |
|
Orig GEO-3 |
X | X | X | X | X | X | X | X | |
|
SO 1 GEO-1 |
X | X | X | X | X | X | X | X | |
|
SO 1 GEO-2 |
X | X | X | X | X | X | X | X | |
|
SO 1 GEO-3 |
X | X | X | X | X | X | X | X | |
|
SO 2 GEO-1 |
X | X | X | X | X | X | X | X | |
|
SO 2 GEO-2 |
X | X | X | X | X | X | X | X | |
|
SO 2 GEO-3 |
X | X | X | X | X | X | X | X |
And this also goes on when the customer would decide to buy a third scale out system. Note that scale out system 3 only needs to be able to talk to scale out system 1 since scale out system 1 is the only scale out system that can process S3 requests! For now no routes are needed between scale out system 2 and scale out system 3.
|
Orig GEO-1 |
Orig GEO-2 |
Orig GEO-3 |
SO 1 GEO-1 |
SO 1 GEO-2 |
SO 1 GEO-3 |
SO 2 GEO-1 |
SO 2 GEO-2 |
SO 2 GEO-3 |
SO 3 GEO-1 |
SO 3 GEO-2 |
SO 3 GEO-3 |
|
|---|---|---|---|---|---|---|---|---|---|---|---|---|
|
Orig GEO-1 |
X | X | X | X | X | X | X | X | X | X | X | |
|
Orig GEO-2 |
X | X | X | X | X | X | X | X | X | X | X | |
|
Orig GEO-3 |
X | X | X | X | X | X | X | X | X | X | X | |
|
SO 1 GEO-1 |
X | X | X | X | X | X | X | X | X | X | X | |
|
SO 1 GEO-2 |
X | X | X | X | X | X | X | X | X | X | X | |
|
SO 1 GEO-3 |
X | X | X | X | X | X | X | X | X | X | X | |
|
SO 2 GEO-1 |
X | X | X | X | X | X | X | X | ||||
|
SO 2 GEO-2 |
X | X | X | X | X | X | X | X | ||||
|
SO 2 GEO-3 |
X | X | X | X | X | X | X | X | ||||
|
SO 3 GEO-1 |
X | X | X | X | X | X | X | X | ||||
|
SO 3 GEO-2 |
X | X | X | X | X | X | X | X | ||||
|
SO 3 GEO-3 |
X | X | X | X | X | X | X | X |
Finally, let’s assume that the customer indicates that they could benefit from some additional performance and they also want to unlock S3 access to scale out system 2.
Scale out system 2 will have to be reachable from the public network. Scale out system 2 now has to be able to talk to the other scale out systems as well. It could already talk to scale out system 1 since that system already was able to process S3 requests. Scale out system 2 now also has to be able to communicate with all GEOs of scale out system 3, so gateways have to be configured such that these routes exist
|
Orig GEO-1 |
Orig GEO-2 |
Orig GEO-3 |
SO 1 GEO-1 |
SO 1 GEO-2 |
SO 1 GEO-3 |
SO 2 GEO-1 |
SO 2 GEO-2 |
SO 2 GEO-3 |
SO 3 GEO-1 |
SO 3 GEO-2 |
SO 3 GEO-3 |
|
|---|---|---|---|---|---|---|---|---|---|---|---|---|
|
Orig GEO-1 |
X | X | X | X | X | X | X | X | X | X | X | |
|
Orig GEO-2 |
X | X | X | X | X | X | X | X | X | X | X | |
|
Orig GEO-3 |
X | X | X | X | X | X | X | X | X | X | X | |
|
SO 1 GEO-1 |
X | X | X | X | X | X | X | X | X | X | X | |
|
SO 1 GEO-2 |
X | X | X | X | X | X | X | X | X | X | X | |
|
SO 1 GEO-3 |
X | X | X | X | X | X | X | X | X | X | X | |
|
SO 2 GEO-1 |
X | X | X | X | X | X | X | X | X | X | X | |
|
SO 2 GEO-2 |
X | X | X | X | X | X | X | X | X | X | X | |
|
SO 2 GEO-3 |
X | X | X | X | X | X | X | X | X | X | X | |
|
SO 3 GEO-1 |
X | X | X | X | X | X | X | X | X | X | X | |
|
SO 3 GEO-2 |
X | X | X | X | X | X | X | X | X | X | X | |
|
SO 3 GEO-3 |
X | X | X | X | X | X | X | X | X | X | X |
Notice that if the customer would have chosen scale out system 3 for processing S3 requests instead of scale out system 2 that we would end up with the same table as above.
Note: This part of the procedure can only be done when the scale out system is installed and the converged scale out steps have been executed. So in case of a newly installed system don’t forget to execute this procedure afterwards!
Now that the customer side is done, the system side has to be configured to actually use the gateways that are configured by the customer. Log into one of the management nodes of the base environment and start sherpa. Then run following snippet:
%cpaste
import json
from marvin_lib.network import ha
def print_nws_and_routes(scope, nws):
    print "-----------------------"
    print scope
    print "-----------------------"
    for nw in nws:
        print "FROM NETWORK", nw['name'], nw['network']
        for route in nw['route']:
            if route['shared_deps']:
                print "ROUTE TO NETWORK", route['destination_network'], "VIA GATEWAY", route['destination_gateway'], "[route name (%s)]" % route['name']
        print "" # for aesthetics
print "" # for aesthetics
local_nws = cli.marvin.network.list(query='networktype=PRIVATE')
print_nws_and_routes("BASE ENVIRONMENT", local_nws)
deployment_id = cli.marvin.environment.list()[0]['deployment_id']
for column in cli.marvin.column.list():
    if column['column_deployment_id'] != deployment_id:
        column_env = json.loads(ha.get("/model/column/%s/action/proxy/environment/" % column['guid']))['environment'][0]
        if column_env['federateddbconnection']:
            column_nw = json.loads(ha.get("/model/column/%s/action/proxy/network/?query='networktype=PRIVATE'" % column['guid']))['network']
            print_nws_and_routes(column['name'].upper(), column_nw)
--
The output will show all routes that the system knows about. An example output for a 1-GEO X200 scaled out twice both with X200 would be the following
-----------------------
BASE ENVIRONMENT
-----------------------
FROM NETWORK PrivateNetwork1 172.16.110.0
ROUTE TO NETWORK 172.16.11.0 VIA GATEWAY 172.16.110.200 [route name (172.16.11.0_via_172.16.110.200)]
ROUTE TO NETWORK 172.16.31.0 VIA GATEWAY 172.16.110.200 [route name (172.16.31.0_via_172.16.110.200)]
FROM NETWORK PrivateNetwork2 172.16.210.0
ROUTE TO NETWORK 172.16.21.0 VIA GATEWAY 172.16.210.200 [route name (172.16.21.0_via_172.16.210.200)]
ROUTE TO NETWORK 172.16.41.0 VIA GATEWAY 172.16.210.200 [route name (172.16.41.0_via_172.16.210.200)]
-----------------------
COLUMN2
-----------------------
FROM NETWORK PrivateNetwork1 172.16.11.0
ROUTE TO NETWORK 172.16.110.0 VIA GATEWAY 172.16.11.200 [route name (172.16.110.0_via_172.16.11.200)]
ROUTE TO NETWORK 172.16.31.0 VIA GATEWAY 172.16.11.200 [route name (172.16.31.0_via_172.16.11.200)]
FROM NETWORK PrivateNetwork2 172.16.21.0
ROUTE TO NETWORK 172.16.210.0 VIA GATEWAY 172.16.21.200 [route name (172.16.210.0_via_172.16.21.200)]
ROUTE TO NETWORK 172.16.41.0 VIA GATEWAY 172.16.21.200 [route name (172.16.41.0_via_172.16.21.200)]
-----------------------
COLUMN3
-----------------------
FROM NETWORK PrivateNetwork1 172.16.31.0
ROUTE TO NETWORK 172.16.110.0 VIA GATEWAY 172.16.31.200 [route name (172.16.110.0_via_172.16.31.200)]
ROUTE TO NETWORK 172.16.11.0 VIA GATEWAY 172.16.31.200 [route name (172.16.11.0_via_172.16.31.200)]
FROM NETWORK PrivateNetwork2 172.16.41.0
ROUTE TO NETWORK 172.16.210.0 VIA GATEWAY 172.16.41.200 [route name (172.16.210.0_via_172.16.41.200)]
ROUTE TO NETWORK 172.16.21.0 VIA GATEWAY 172.16.41.200 [route name (172.16.21.0_via_172.16.41.200)]
Determine whether the IP addresses of the gateways that are listed in the output correspond with the ones that the customer has provided. If that’s the case you can skip the rest of this section and go to the next step of the procedure.
Gateways addresses that are incorrect can be rectified. Log into one of the management nodes of the Column (scale out system) for which you want to change a gateway and start sherpa. Then execute following snippet. First fill in the parameters from_network, route_name and new_gateway.
%cpaste
from_network = "<network name>"
route_name = "<route name>"
new_gateway = "<new gateway IP>"
to_network = cli.marvin.network.route.get(from_network, route_name)['destination_network']
cli.marvin.network.route.update(from_network, route_name, destination_gateway=new_gateway, name=to_network + '_via_' + new_gateway)
--
Using the example output above: In Column2 the gateway in PrivateNetwork1 that is used to reach network 172.16.31.0 currently has IP address 172.16.11.200. Let’s say you want to change this to e.g. 172.16.11.240. Then you would have to log into one of the management nodes of Column2, start sherpa and execute following snippet.
%cpaste
from_network = "PrivateNetwork1"
route_name = "172.16.31.0_via_172.16.11.200"
new_gateway = "172.16.11.240"
to_network = cli.marvin.network.route.get(from_network, route_name)['destination_network']
cli.marvin.network.route.update(from_network, route_name, destination_gateway=new_gateway, name=to_network + '_via_' + new_gateway)
--
Note: Make sure that all gateways are rectified on all scale out systems before running following command
Log into one of the management nodes of the base environment and run following command. This will reconfigure the interfaces such that the new gateways will we be used.
cli.marvin.environment.update_scaleout_routes(cli.marvin.environment.list()[0]['guid'], configure=True)
This will launch some tasks that you can following in taskviewer. Wait for the tasks to become SUCCESS.
taskviewer -i no
Afterwards you should be able to log into the scale out system that is being Performance Scaled Out and ping all nodes on all other scale out systems. Ping some nodes to verify that this works.
Prior to ActiveScale software version 7.0, it was not required for the public interfaces of scale out nodes to be defined at installation time. Therefore it is possible that the public interfaces of the scale out nodes don’t have an IP address yet. In this part of the procedure the public interfaces are configured such that they have an IP address and the customer can talk to these nodes.
All commands in this section have to be executed from the scale out system on which Performance Scale Out has to be enabled. Log into one of the management nodes of that scale out system and become marvin user:
sudo su - marvin
Throughout this section we are going to make use of a script called performance_scaleout_networks.py everything that this script does is logged to /opt/ampli/var/log/marvin/peformance_scaleout_networks.log
As a first step we are going to determine whether it is actually necessary to run any of the follow up steps. It might be that at installation time the public IP addresses of the nodes were already defined, in which case no further action is needed.
As marvin user, run following command:
performance_scaleout_networks.py --analyze
The output will tell you whether additional action is required. If the last line of the output says:
NO RECONFIGURATION REQUIRED FOR FULL PERFORMANCE SCALE OUT!
Then you don’t have to do anything! You can skip all of the next steps in this “Configure public interfaces” section and proceed with the next section.
If the output ends with:
RECONFIGURATION REQUIRED FOR FULL PERFORMANCE SCALE OUT!
Reasons:
<reason 1>
<reason 2>
...
Then you will have to proceed with the next step in this section. The list of reasons that are provided will indicate why.
Next, we are going to generate a config file. You will have to edit this file to specify IP addresses of public interfaces of scale out nodes. If the current scale out system you are working on is an X200, P200, Z200 or P100E3 you can run following command as marvin user. Specify the path where the config has to be created and also the system.
performance_scaleout_networks.py --generate-cfg <cfg file path> --system <X200/P200/Z200/P100E3>
If the platform is different from X200, P200, Z200 and P100E3, you will have to specify the public interfaces using following command:
performance_scaleout_networks.py --generate-cfg <cfg file path> --eth-devices <eth for public nw 1> <eth for public nw 2>
For example, the equivalent command for X200 would be the following (using --system is more convenient)
performance_scaleout_networks.py --generate-cfg <cfg file path> --eth-devices eth3 eth5
Look at the config file that you generated in the previous step and what values you are expected to fill in. Once you filled it in it will serve as the input for the configuration step.
In some cases, the config file will already contain (some, maybe not all) IP addresses and subnets etc.! This happens when the support engineer that installed the current scale out system already specified these values in the inventory file. Verify that the values that are already pre-filled in are still valid and in accordance with the customer’s wishes.
Following config file is an empty one for 1-GEO with 3 nodes:
marvin@Site1-R01-C02-CMB01:~$ cat config.cfg
{
    "datacenter": {
        "Site1": {
            "machine": {
                "Site1-R01-C02-CMB02": {
                    "nic": {
                        "eth3": {
                            "address": null
                        },
                        "eth0": {
                            "address": null
                        }
                    }
                },
                "Site1-R01-C02-CMB03": {
                    "nic": {
                        "eth3": {
                            "address": null
                        },
                        "eth0": {
                            "address": null
                        }
                    }
                },
                "Site1-R01-C02-CMB01": {
                    "nic": {
                        "eth3": {
                            "address": null
                        },
                        "eth0": {
                            "address": null
                        }
                    }
                }
            },
            "bonding": {
                "apply_bonding": false,
                "miimon": 100,
                "lacp_rate": "fast",
                "xmit_hash_policy": "layer3+4",
                "mode": "lacp"
            },
            "network": {
                "PublicNetwork2": {
                    "endip": "<CHANGEME>",
                    "network": "<CHANGEME>",
                    "startip": "<CHANGEME>",
                    "netmask": "<CHANGEME>",
                    "networktype": "PUBLIC",
                    "pbr_gateway": "<CHANGEME>"
                },
                "PublicNetwork1": {
                    "endip": "<CHANGEME>",
                    "network": "<CHANGEME>",
                    "default_gateway": "<CHANGEME>",
                    "startip": "<CHANGEME>",
                    "netmask": "<CHANGEME>",
                    "networktype": "PUBLIC"
                }
            }
        }
    },
    "eth_devices": {
        "PublicNetwork2": "eth3",
        "PublicNetwork1": "eth0"
    }
}
The top level of the JSON contains 2 fields: eth_devices and datacenter.
The eth_devices are already filled in for you based on the --system or --eth-devices values that you specified when generating the config. Don’t change these values!
The datacenter part either contains 1 key or 3 keys depending on whether the scale out system is a 1-GEO or 3-GEO system. In this example this is a 1-GEO system, and the key is just the GEO name Site1. In the 3-GEO case you can expect the site names of the 3 GEOs. It is possible that customer does not want Performance Scale Out on all 3 sites. In that case, just remove the config for the sites that the customer does not want Performance Scale Out. These will be ignored in the configuration step that comes later.
For each datacenter there are 3 things to consider: bonding, network and machine.
-
bonding: If the customer wants bonded nics in this datacenter, then set apply_bonding to value true and fill in the additional values. Note that apply_bonding might already be set to true if bonding was chosen during installation time of this scale out system:-
mode: Bonding mode. Possible values areroundrobin,lacporalb. -
lacp_rate: Applicable for mode lacp. The rate in which the driver requests its link partner to transmit LACPDU packets. Choices arefastorslow. -
xmit_hash_policy: Applicable for modes lacp and alb. The transmit hash policy to use for slave selection. Choices arelayer2,layer2+3orlayer3+4. -
miimon: Link monitoring frequency in milliseconds (default is 100).
-
-
network: If the customer wants bonding on this datacenter, removePublicNetwork2from the config. In that case you only have to fill in values forPublicNetwork1. Otherwise you’ll have to fill in values for both networks.Caution: Networks might not be listed alphabetically.
The following values have to be provided:
-
network: The network part of the subnet -
netmask: The netmask part of the subnet (e.g. 255.255.255.0) -
startip: (Optional) You can narrow down the subnet even more by specifying a starting IP in the subnet. Remove this line if you don’t want to use this. In that case the start IP will be the first IP of the subnet. -
endip: (Optional) You can narrow down the subnet even more by specifying an end IP in the subnet. Remove this line if you don’t want to use this. In that case the end IP will be the last IP of the subnet. -
networktype: Auto filled in with value PUBLIC. Do not change! -
default_gateway: Only forPublicNetwork1. Specify a default gateway. Necessary if the customer initiates S3 requests from outsidePublicNetwork1. -
pbr_gateway: Only forPublicNetwork2. Specify a PBR gateway. Necessary if the customer initiates S3 requests from outsidePublicNetwork2.
-
-
machine: Contains all machines in the current datacenter. It is possible that customer does not want Performance Scale Out on all nodes in this datacenter. If that’s the case remove the config of those machines that the customer does not want Performance Scale Out.Caution: Machines might not be listed in alphabetical order.
For a machine we only require you to specify IP addresses of the public nics:
-
In case a bond already exists, there will be 3 nics in the config: 2 bond member nics (ethX) and the bond0. Set the value of the bond members to null and specify the IP address of the bond0.
-
In case no bond exists but you have specified
apply_bonding: truein the bonding section, you only have to set the IP address of the interface inPublicNetwork1. This IP address will be used for bond0. Keep the value for the interface inPublicNetwork2null. -
In case
apply_bonding: falsein the bonding section, you will have to specify an IP address for both interfaces.
-
Before configuring the public interfaces you can validate the config file. The command is the following. Specify the path to the config file:
performance_scaleout_networks.py --cfg <cfg file path> --validate
This will throw an error in various cases:
-
The config contains CHANGEME values.
-
Config values are of wrong data type or in wrong format.
-
Missing fields.
-
eth_devicesare not specified. -
IP addresses are not valid or not part of the subnet.
-
IP address of public interface 1 not set.
-
IP address of public interface 2 not null in case of
apply_bonding=True. -
Bonding parameters and/or values that are not allowed.
-
PublicNetwork2is present in case ofapply_bonding=True. -
Same network names across GEOs.
Always resolve errors thrown by the script and rerun the validation step. Furthermore the script prints warnings in several cases:
-
Some nodes are not mentioned in the config file (can happen in case not all nodes are required to be publicly cabled or participate in the Performance Scale Out).
-
Some data centers are not mentioned in the config file (can happen if customer only wants Performance Scale Out on e.g. 1 of its sites).
-
Bonding applied on 1 GEO and not applied on another GEO.
-
No default gateway and no pbr gateway.
These warnings can be ignored if the are expected. If not, fix them and rerun the validation step.
If the validation is good, the script’s output will end with:
Validation done: OK
Finally the config file and script can be used to configure the public interfaces. Run following command. Specify the path to the config file:
performance_scaleout_networks.py --cfg <path to config> --configure
This command will automatically validate the config file. It then proceeds to make changes to the management model and apply the configuration to the system.
An example output is the following:
Validation done: OK
No bonding to be applied on machines of site Site1
Network PublicNetwork2 already exists in model.
No default gateway specified on network PublicNetwork2
No PBR gateway specified on network PublicNetwork2
Network PublicNetwork1 already exists in model.
Default gateway is already set on network PublicNetwork1: 10.108.45.1
No PBR gateway specified on network PublicNetwork1
Status of nic eth3 on machine Site1-R01-C02-CMB02 is NOTMANAGED. Setting status UP
Status of nic eth0 on machine Site1-R01-C02-CMB02 is NOTMANAGED. Setting status UP
Configuring nics of machine Site1-R01-C02-CMB02
Status of nic eth3 on machine Site1-R01-C02-CMB03 is NOTMANAGED. Setting status UP
Status of nic eth0 on machine Site1-R01-C02-CMB03 is NOTMANAGED. Setting status UP
Configuring nics of machine Site1-R01-C02-CMB03
Status of nic eth3 on machine Site1-R01-C02-CMB01 is NOTMANAGED. Setting status UP
Status of nic eth0 on machine Site1-R01-C02-CMB01 is NOTMANAGED. Setting status UP
Configuring nics of machine Site1-R01-C02-CMB01
Waiting for configures to finish
Configuration done
Once it says Configuration done everything is configured.
Everybody can make mistakes. If for example you noticed that you defined an incorrect public network subnet or you assigned an incorrect IP address to one or more of the interfaces, you can rectify this in the config file and rerun the script with --configure.
At this point the customer should be able to ping the public IP addresses of scale out nodes that were configured in the previous step.
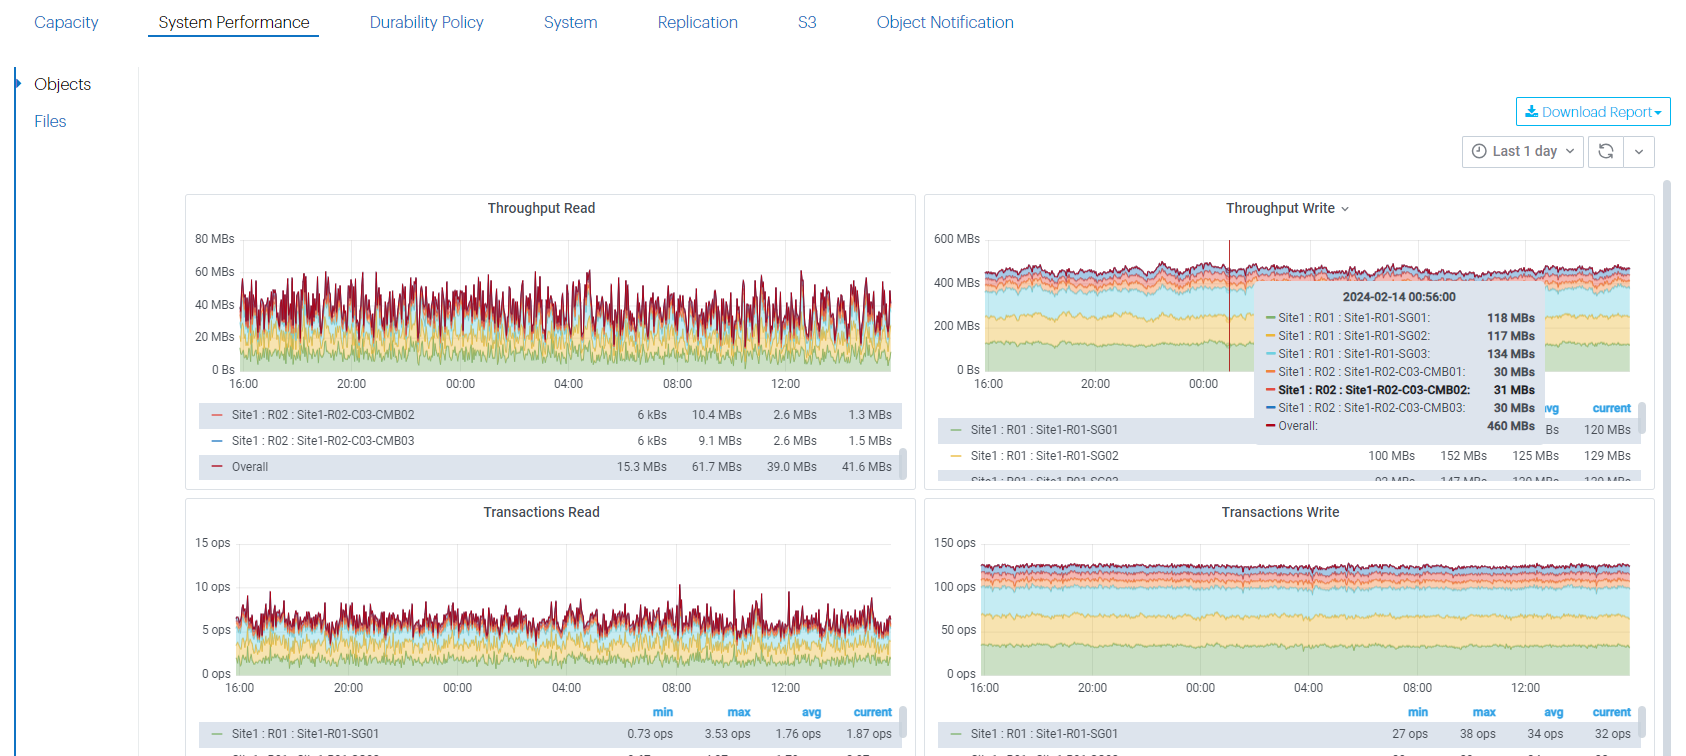
Once the customer starts putting S3 load on the scale out nodes, the metrics in the System Performance panel in the GUI will also start showing values for the scale out nodes. Prior to ActiveScale software release 7.0, the values for the scale out nodes were always 0. Once the customer actually starts using the scale out nodes, the throughput and transactions panels will show values > 0 for the scale out nodes as well. Note that the File metrics will remain 0 since Performance Scale Out currently only enables S3 load on scale out nodes.
The scale out nodes that were configured are now ready to process S3 requests. Notify the customer about this so they can do the needful, e.g. updating their clients with the public IP addresses of these scale out nodes.
Note: This is not a necessary step for Peformance Scale Out. Only apply this when the customer wants VIP failover on their scale out system.
Note: Before applying this procedure make the customer aware that the VIPs on the base environment and the different scale out environments currently are part of a DIFFERENT MULTICAST GROUPS! VIP failover will only happen between nodes that are on the same scale out environment. So VIP failover between nodes on the base environment and nodes on the scaleout environment is not supported! The customer should allocate a different multicast address for the base system and for each scaleout system for which VIP is configured.
The customer might want VIP failover for their scale out nodes. Note that this should only be applied for the nodes that are capable of accepting and processing S3 requests. Nodes for which the public interfaces are not cabled or for which the public IPs are not configured should not participate in the VIP failover group!
The VIP failover groups of scale out systems are not visible in the GUI and therefore they also cannot be configured via the GUI. A manual sherpa procedure is necessary to configure VIP on the scale out system.
Log into one of the management nodes of the scale out system on which you want to configure VIP failover. It does not matter on which GEO in case of 3-GEO. Then start sherpa.
VIP failover groups can be created for each GEO. Determine on which GEOs this has to be enabled (on which GEOs is there performance scale out) and also what multicast address has to be used on that GEO (Remember: this should be different from multicast groups of the base environment and all other scale out systems) and execute following. You will have to run it for every GEO on which VIP has to be enabled. Fill in the geo_name and multicast_addr variable.
%cpaste
geo_name = "<name of GEO>"
multicast_addr = "<multicast addr>"
failovergroup = "VIP_failover_" + geo_name
geo_guid = cli.marvin.location.guid(geo_name)
networks_in_geo = cli.marvin.network.list(query='networktype=PUBLIC%%26location=%s' % geo_guid)
cli.marvin.keepalivedcluster.add(name=failovergroup, ipv4_multicast_group=multicast_addr, network=networks_in_geo)
--
To list all failover groups that you created run:
cli.marvin.keepalivedcluster.list()
To list all VIP addresses in a particular failover group run the following. Change <name of failovergroup> to the actual name of the failover group that you want to check out. The format of the failover group name is VIP_failover_<GEO name>.
cli.marvin.keepalivedcluster.get_virtualips("<name of failovergroup>")
The above should just return an empty list after the failover groups were just created. Later this command will return a list of all VIPs that are currently configured for that failover group.
Verify that the VIP address that you want to add are within a public network subnet. Following snippet shows the subnet and startip and endip for all public networks:
%cpaste
for nw in cli.marvin.network.list(query='networktype=PUBLIC'):
    print nw['name'], nw['network'], nw['netmask'], nw['startip'], nw['endip']
--
The output is of the format: network name - subnet - netmask - start ip - end ip
Example output for 1-GEO:
PublicNetwork1 10.108.45.0 255.255.255.0 10.108.45.201 10.108.45.203
PublicNetwork2 10.108.46.0 255.255.255.0 10.108.46.201 10.108.46.203
Since additional IP addresses have to be added to (some of) the public networks, you have to make sure that there are a sufficient amount of IPs between the start and end IP of each public network. With following commands you can change the start and end IPs to extend the range. Make sure that the start and end ip are always within the subnet:
cli.marvin.network.update("<network name>", startip="<new startip>")
cli.marvin.network.update("<network name>", endip="<new endip>")
For example, using the example output above: Let’s say the customer wants to add 3 VIP addresses to PublicNetwork1: 10.108.45.220, 10.108.45.221 and 10.108.45.222. The end IP of the public network has to be reset.
cli.marvin.network.update("PublicNetwork1", endip="10.108.45.222")
This requires VIP address, node name and failover group name. To add a VIP to a failover group and assign it to one of the nodes, run following. The failover group name has format VIP_failover_<GEO name>:
cli.marvin.keepalivedcluster.add_virtualip("<name of failovergroup>", machine="<node name>", address="<VIP address>")
Run the above snippet for each node that you want to add to a certain failover group.
You can always list the VIP addresses that are part of a certain failover group. The failover group name has format VIP_failover_<GEO name>. Verify that all failover groups are as desired.
cli.marvin.keepalivedcluster.get_virtualips("<name of failovergroup>")
Now the failover groups have to be applied. It is best to configure failover groups in sequence.
To configure a failover group run the following. The failover group name has format VIP_failover_<GEO name>:
cli.marvin.keepalivedcluster.configure("<name of failovergroup>")
And then check taskviewer for the configure task. Wait for it to become SUCCESS before configuring the next failover group:
taskviewer -r keepalivedcluster -a configure
You should be able to ping the VIP addresses of the nodes.
Using ecmd you can also verify that nodes actually have a configured VIP address. Become marvin user (sudo su - marvin) and run following ecmd command:
ecmd r -r all -- 'ip a | grep VIP'
The nodes that you configured with a VIP address should also have a VIP_ entry:
marvin@Site1-R01-C02-CMB01:~$ ecmd r -r all -- 'ip a | grep VIP'
[ Site1-R01-C02-CMB01 ] [out] ecmd r -t Site1-R01-C02-CMB01 -- ip a | grep VIP
[ Site1-R01-C02-CMB01 ] [out] inet 10.108.45.220/24 scope global secondary eth3:VIP_1
[ Site1-R01-C02-CMB01 ] [exitcode] 0
[ Site1-R01-C02-CMB01 ] [time taken] 0:00:01.504713
- - - - - - - - - - - - - - - - - - - - - - - - - - - - - -
[ Site1-R01-C02-CMB02 ] [out] ecmd r -t Site1-R01-C02-CMB02 -- ip a | grep VIP
[ Site1-R01-C02-CMB02 ] [out] inet 10.108.45.221/24 scope global secondary eth3:VIP_2
[ Site1-R01-C02-CMB02 ] [exitcode] 0
[ Site1-R01-C02-CMB02 ] [time taken] 0:00:01.544030
- - - - - - - - - - - - - - - - - - - - - - - - - - - - - -
[ Site1-R01-C02-CMB03 ] [out] ecmd r -t Site1-R01-C02-CMB03 -- ip a | grep VIP
[ Site1-R01-C02-CMB03 ] [out] inet 10.108.45.222/24 scope global secondary eth3:VIP_3
[ Site1-R01-C02-CMB03 ] [exitcode] 0
[ Site1-R01-C02-CMB03 ] [time taken] 0:00:01.545216
- - - - - - - - - - - - - - - - - - - - - - - - - - - - - -
[ ECMD ] Successful execution on 3 node(s).
