When you are ready to install StorNext, use the StorNext installation script to install StorNext File System and Storage Manager on the Metadata Controller. The installation script also installs the client software on the MDC.
Note: The installation script runs dependency checks to ensure the server has all the required RPM packages pre-installed. Refer to the StorNext Compatibility Guide for a list of required RPM packages for the operating system you are using.
If you have StorNext File System only and are adding StorNext Storage Manager, some components remain from the File System installation and the new installation could fail. To prevent installation failure, you should first remove the old components.
The following procedure describes how to remove the old components before starting the new StorNext installation. Follow the steps below only if you are upgrading from a StorNext File System-only configuration to StorNext File System and Storage Manger.
- Log on to the MDC as root.
- Save /etc/fstab and /usr/cvfs/config
- Remove the existing StorNext File System RPMs.
- Install StorNext as described in Launch the StorNext Installation Script.
- Restore /etc/fstab and /usr/cvfs/config
The StorNext installation script lets you choose installation configuration options and install StorNext. To launch the script, you will need to use the correct file on the StorNext installation DVD for your operating system.
Note: localhost cannot map to multiple IP addresses. Before running the StorNext installation script, make sure localhost in the /etc/hosts file is mapped to a single IPv4 address, and not an IPv6 address.
- Log on to the MDC as root.
-
Mount the StorNext installation DVD and change to the DVD root directory.
Note: When you mount a DVD in a Red Hat system, DVDs are mounted by default with a noexec (non-executable) option which prevents you from proceeding with the installation. For complete details on the supported versions of Red Hat, see the StorNext 6 Compatibility Guide.
For Red Hat users only, before proceeding you must remount the DVD by typing mount -o remount, exec ....
-
List the installation directories on the DVD. At the command prompt, type:
ls -l -
Change to the stornext_full directory.
Note: Make sure you are in the stornext_full directory and not the fs_only directory. The fs_only directory installs the StorNext File System only.
-
List the directories in the stornext_full directory. At the command prompt, type:
ls -l - Identify the correct installation directory for your operating system and hardware platform, and then change to that directory. For example, for Red Hat Linux 7 running on an x86 64-bit platform, change to the RedHat7_x86_64 directory.
-
Run the script. For new StorNext installations, at the command line, type:
./install.stornextRunning the installation script displays:
Stornext Install MAIN MENU
1) Installation Configuration
2) Install stornext
3) Show Status
4) Quit
Enter your choice <2>:
The
install.stornextby default usessnPreInstallto automatically detect the available free space on the system for installing StorNext components. Components favor the location/usr/adic, however if there are file systems available that have more space, it will chose those file systems for installing components, creating symbolic links in/usr/adicto the installation location of the installed component as needed. Newly installed components may be changed interactively at install time (see Change Installation Configuration Options). You may also chose to override the locations chosen bysnPreInstallby passing in the-installdirand-dbjrnltoinstall.stornext.To specify the location to install StorNext components, execute the command:./install.stornext -installdir <dir>This causes
install.stornextto install components at<dir>/adic, and will create symbolic links in/usr/adic/<component>pointing to<dir>/adic/<component>.Note: Once elements for a component have been installed the location of the component may not be changed by
install.stornext. -
Type the number corresponding to a menu option and press Enter. Installation menu options are described below.
Menu Option
Description
1
Change installation options, including the location of application directories and the default media type (see Change Installation Configuration Options).
2
Install StorNext using the installation options specified on the Configuration Menu (see Perform an Installation Operation).
3
View the status of an installation operation that is currently in progress.
4
Exit the StorNext installation script.
Use the Configuration Menu to change StorNext installation options. You can specify the location of application and support directories and change the default media type for storage devices.
On the Main Menu, type 1 and press <Enter>. The Configuration Menu appears.
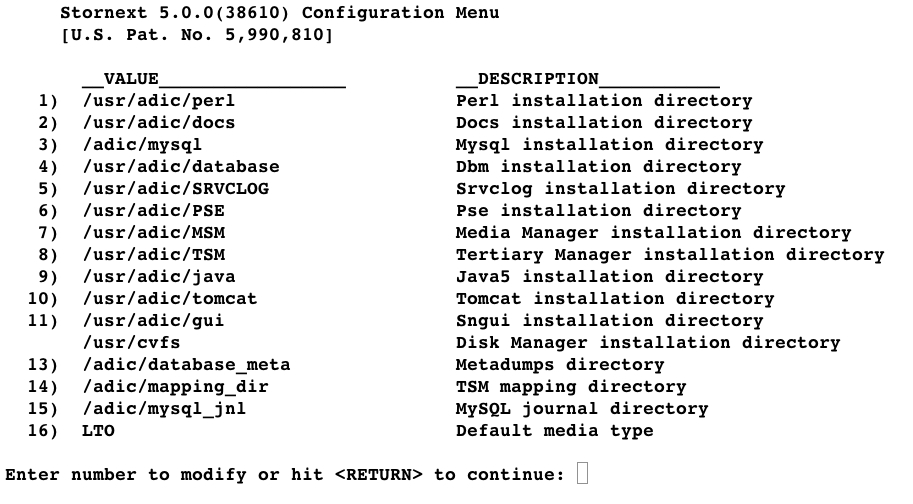
When you first enter the Configuration Menu, it displays recommended locations for StorNext application directories based on the available file systems detected by the installation script. To accept the recommended directory locations and return to the Main Menu, press <Enter>.
Alternately, customize the installation by specifying the file systems where application and support files are stored.
- On the Configuration Menu, type the number that corresponds to the directory location you want to customize (1–16), and then press <Enter>. A list of available local file systems is shown.
- To change the file system where the directory is located, type the name of the file system and press <Enter>.
- To confirm the change, type yes and press <Enter>. To customize additional directory locations, repeat steps 1–3.
-
When you are done customizing the installation, press <Enter> to return to the Main Menu.
Note: To help determine the optimal location for StorNext support directories, use the StorNext pre-installation script. For more information, see Run the Pre-Installation Script.
If you do not specify a different media type, the StorNext installation script selects LTO as the default media type for storage devices. If storage devices in your system use a different media type, change the default media type before installing StorNext.
- On the Configuration Menu, type 16 and press <Enter>. A list of valid default media types is shown. The valid media types are:
LTO
T10K
3592
Various Object Storage
SDISK
- Type the correct default media type for storage devices in your system and press <Enter>.
- To confirm the change, type yes and press <Enter>.
- When you are done customizing the installation, press <Enter> to return to the Main Menu.
To install StorNext using the options specified on the Configuration Menu, perform an installation operation.
Note: Storage Manager requires that the rpcbind service is running. Make sure that the rpcbind service is installed and running before installing StorNext or starting Storage Manager. Consult your distribution's documentation for more information on how to install and start the rpcbind service.
- On the Main Menu, type 2 and press <Enter>. The StorNext installation script runs. The script displays the current progress of the installation.
- When the installation is complete, press <Enter> to return to the Main Menu.
-
To exit the installation script, type 4 and press <Enter>.
Note: The script displays the URL at which the MDC can be accessed. Make a note of this information.
-
After running the installer, source the profile on the MDC by running the command:
. /usr/adic/.profile
You can now access StorNext File System and Storage Manager, and run the Configuration Wizard. For more information, see Configure StorNext Using the StorNext GUI.
