|
|
The following information applies to Manage Clients V10. Do you need to install or update the Manage Clients app? See Manage Applications for instructions about the App Store. |
Prerequisites
Before mounting volumes (file systems) to clients, ensure that:
- The Connector and StorNext client software are installed on the client systems. See Install the Connector on Clients and Install and Update StorNext Client Software for details.
- The client system has access to the data LUNs (if it will be a SAN client) or StorNext Gateway Servers (if it will be a LAN client) for the intended volume(s); otherwise the client will not be able to mount the StorNext volumes.
- The client system is connected to the metadata network.
Mount and Unmount StorNext File Systems on StorNext Linux Clients
- From StorNext Connect, launch the Manage Clients application.
- Click the Hamburger icon.
- Click Management.
- Click Manage Clients. The Manage clients page appears.
- In the Manage StorNext Clients page, click the Configure clients link.
- In the Configure StorNext clients page, locate the client and click its hostname or IP address.

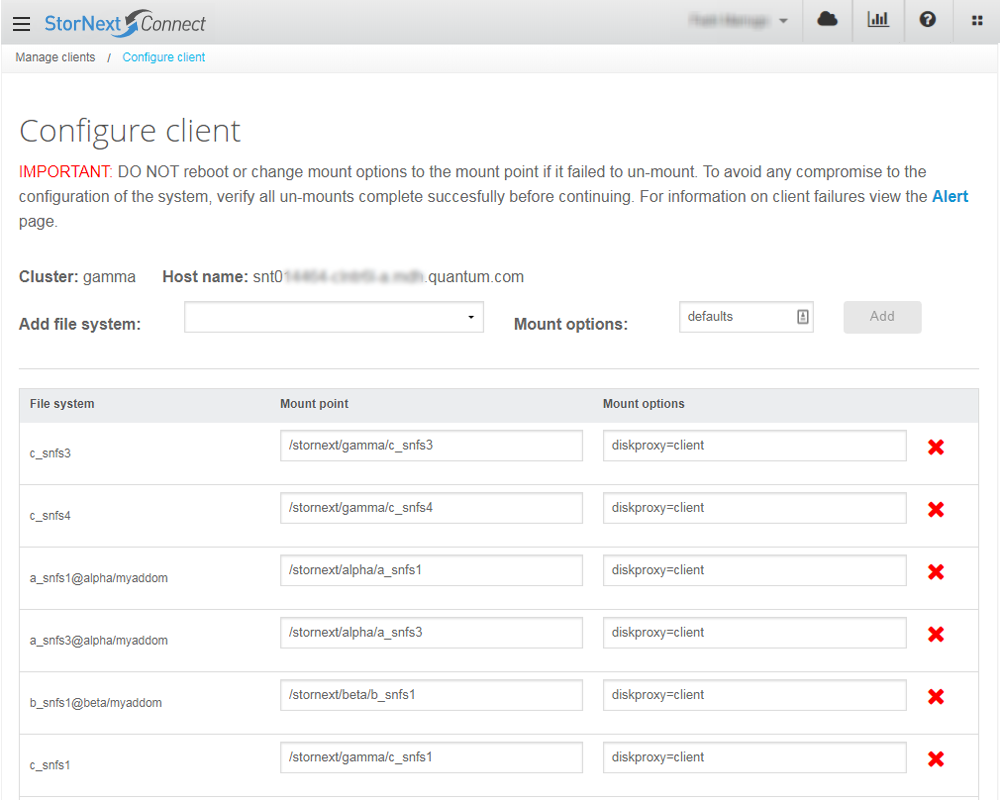
- In the Configure client page, complete the following steps.

- Select the volume to mount to the client from the Add volume (file system) drop-down list.
Additional Information
The HA file system may be listed and can be selected, but cannot actually be mounted to the client. Trying to mount the HA file system will result in an error message that can be dismissed, but will not cause any problems.
- Set the mount options in the Mount options box (for example, diskproxy=client). See the command MOUNT_CVFS(8) in the StorNext 6 Man Pages Reference Guide for additional information regarding mount options.
- Click Add to add the volume to the list of volumes to be mounted.
- Use the Mount point and Mount options boxes to modify the mount point (default is /stornext/[volume]) and mount options if changes are needed before mounting the volume.
- Repeat the previous steps to add more volumes to the list of volumes to be mounted. Click the "X" next to an added volume to remove it from the list of volumes to be mounted to the client.
- Click Update. The Configure StorNext clients page opens.
- Select the volume to mount to the client from the Add volume (file system) drop-down list.
- Launch the Discover Components application.
- In the Discover page, click Rediscover. A list of name servers for the workspace appears.
- Below the list of name servers, click Discover. Once the discovery is complete, the Discover button becomes a Continue button.
- Click Continue. The Discover page appears, displaying the workspaces and clients.
- Locate the client and verify that the mounted volumes appear in the Volumes (Workspaces) column. The page also displays what type of client the system is (SAN or LAN) in the Client column.