i7 RAPTOR Reports
Overview
The reports listed below provide valuable information. Each report allows you to define filters for more detailed information about your library. Report filters must exist if you want to configure automatic report notification.
| Report | Description |
|---|---|
| Cross-Partition Media Move |
Provides information as to which tape cartridges have moved from one partition to another. The report lists the necessary details to determine when a tape cartridge has moved from a standard partition to a library-managed partition, from a library-managed partition to a standard partition, or from one library-managed partition type to another library-managed partition type.
|
| Drive Cleaning |
Provides history information as to which drive was cleaned when by which cleaning tape cartridge. It provides information regarding the cleaning operation type, either library-initiated automatic cleaning or operator-initiated manual cleaning, or application-managed cleaning, as well as the result of the operation. No license is required to access this report. |
| Drive Utilization |
Provides information as to when tape drives were mounted and un-mounted, capturing how much data the drives read and wrote during the mount sessions. The report information provides all details to help you analyze which drives may be under- or over-utilized for tape cartridge load operations. It also provides read/write performance data to help you assess tape cartridge residency needs. An Advanced Reporting License is required to access this report. |
| EDLM Scan Test |
Shows which media was tested when, with which scan types, and what the results were. The report provides the necessary EDLM scan sub-test details to determine whether the media is healthy, suspect or failed. The test results can help you decide if data needs to be copied to another tape to assure data accessibility in the future. An Extended Data Lifecycle Management License is required to access this report. |
| EKM Media Status |
Provides encryption status information for all media currently present in the library, identifying media encryption status as either encrypted, not encrypted, or unknown. A Scalar Key Management License (SKM) or Encryption Key Management License (EKM) is required to access this report. |
| EKM Partition Activity |
Provides partition encryption method summaries, including historic information about when a library partition was enabled or disabled for library managed encryption. A Scalar Key Management License (SKM) or Encryption Key Management License (EKM) is required to access this report. |
| Library Configuration Change |
Provides date/time and configuration change history. The report details as to when and what configuration change happened. |
| Library Configuration Record |
Summarizes library component and partition configuration data, providing a hardware and firmware component inventory as well as storage slot usage summaries. |
| Login Activity |
Provides login and command request history. Specifically, the report details as to who logged in when and how, capturing command operations and command attempts to provide a library login audit trail. Note: The Login Activity report is viewable by an Admin user only. There is a 90 day data capture limit from the current date |
| Media Integrity Analysis |
Shows which drive reported which Tape Alert while being loaded with which tape cartridge. The report information provides details to help you analyze which media or drive may have caused media or drive failures. An Advanced Reporting License is required to access this report. |
| Media Inventory |
Provides a listing of all media detected within the library, showing tape cartridge location, barcode label identification, partition ownership as well as current media encryption status. |
| Media Security |
Shows which tape cartridges have been removed, either expectedly (properly exported) or unexpectedly (removed when a door was open or while the library was powered off) to help with tape cartridge inventory verifications. An Advanced Reporting License is required to access this report. |
| Media Usage |
Provides media information, including tape cartridge identification, media capacity and usage information, as well as unrecovered and recovered read/write error count statistics. An Advanced Reporting License is required to access this report. |
| Temperature/Humidity |
Provides system temperature and humidity over a specified time period. |
Layout
Lists each available report, including any required license, whether it can be charted, and its format. To see details about a report in the Information Panel, highlight the report. Selecting a report allows you to create a filter that can be viewed, saved or sent to selected email addresses. Reports that have filters defined will have a + next to the Report checkbox.
| Column | Description |
|---|---|
| Name | Report name. |
| License Requirement | Indicates if the report requires a specific library license to be installed on the library. For a list of all library licenses, see i7 RAPTOR Licenses. |
| Chartable | Indicates if the report can be seen in a graphical representation. |
| Format | Report file format type: .csv or .txt |
Lists all the details of a highlighted report.
Provides options for library interaction.
| Configuration | |
|---|---|
| Add |
Allows you to add a filter for a selected report. |
| Modify |
Allows you to modify a selected report filter. |
| Delete |
Allows you to delete a selected report filter. |
| Link | |
|---|---|
| View |
Allows you to view a selected report or filter. |
| Chart |
Allows you see a graphical representation of a selected report or filter. Only reports with a check mark in the Chartable column are available for this feature. |
| Actions | |
|---|---|
| Save/Send |
Allows you save or send a selected report or filter. |
Tasks
Configuration
The Add feature allows you to create a filter for a selected report. Depending on the type of report you select, these filters can include the number of days to report, a specific partition or drive as well as specific media. This data can then be automatically emailed to selected recipients (see Report Notifications) or manually sent to selected recipients (see Save/Send a Report). You can add multiple filters for each report.
From the Navigation panel, select Reports.
- In the North Panel, select the report you want to add a filter for.
-
In the Operations panel, select Add.
Report Name Filters Cross Partition Media Moves Filter Name (required): name the filter Day Range: the number of days to capture from the current date
Drive Cleaning Filter Name (required): name the filter Day Range: the number of days to capture from the current date
Drive Utilization Filter Name (required): name the filter
Day Range: the number of days to capture from the current date
Partition: select a specific partition or the entire physical library
Drive SN: the serial number of a specific drive. Leave this blank to include all the drives in the selected partition or in the entire library
Media Barcode: the barcode of a specific tape in the library
EDLM Scan Test Filter Name (required): name the filter
Day Range: the number of days to capture from the current date
Partition: select a specific partition or the entire physical library
Drive SN: the serial number of a specific drive. Leave this blank to include all the drives in the selected partition or in the entire library
Media Barcode: the barcode of a specific tape in the library
EKM Media Status Filter Name (required): name the filter Day Range: the number of days to capture from the current date
Partition: select a specific partition or the entire library
EKM Partition Activity Filter Name (required): name the filter Day Range: the number of days to capture from the current date
Partition: select a specific partition or the entire library
Library Configuration Filter Name (required): name the filter Login Activity Filter Name (required): name the filter Day Range: the number of days to capture from the current date. Range is 1-90 days.
Media Integrity Analysis Filter Name (required): name the filter Day Range: the number of days to capture from the current date
Drive SN: the serial number of a specific drive. Leave this blank to include all the drives in the selected partition or in the entire library
Media Barcode: the barcode of a specific tape in the library
Media Inventory Filter Name (required): name the filter Partition: select a specific partition or the entire library
Media Security Filter Name (required): name the filter Day Range: the number of days to capture from the current date
Media Barcode: the barcode of a specific tape in the library
Media Usage Filter Name (required): name the filter Day Range: the number of days to capture from the current date
Media Barcode: the barcode of a specific tape in the library
-
Click Apply to save your settings.
In the North Panel, a + appears next to the report. This indicates that a report filter has been created for the report.
-
Click Close to exit the window.
The Modify feature allows you to change a filter for a selected report. Depending on the type of report you select, modifiable filters can include the number of days to report, a specific partition or drive, and specific media. This data can then be automatically emailed to selected recipients (see Report Notifications) or manually sent to selected recipients (see Save/Send a Report). You can add multiple filters for each report.
- From the Navigation panel, select Reports.
- In the North Panel, select the report filter you want to modify. The filter appears below the report and is accessed by clicking the + next to the report.
- In the Operations panel, select Modify.
- Make the necessary changes to report filter. To see a list of fields for each report, see Add a Report Filter.
-
Click Apply to save your settings.
-
Click Close to exit the window.
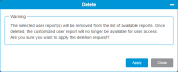
The Delete feature allows you to remove a filter from a specific report. Filters can only be deleted if they have been removed from any automatic email notifications. See Report Notifications for details.
- From the Navigation panel, select Reports.
- In the North Panel, select the report filter you want to modify. The filter appears underneath the report and is accessed by clicking the + next to the report.
-
In the Operations panel, select Delete.
-
Click Apply to save your settings.
-
Click Close to exit the window.

Link
The following reports are available in chart format:
- From the menu bar, select Reports. The Reports box becomes active in the Operations panel.
- In the North Panel, select the filtered report you want to modify. The filter appears underneath the report and is accessed by clicking the + next to the report.
- Click Chart.
- Click Apply. A filtered report displays in chart form.
- When you have finished viewing the chart, click the X at the top left next to the report name.
- Click Close to exit the Chart window.
- From the menu bar, select Reports. The Reports box becomes active in the Operations panel.
- In the North Panel, select the filtered report you want to view. The filter appears underneath the report and is accessed by clicking the + next to the report.
- Click View. The filtered report is displayed in a new tab on your browser.
Note: You must have popups enabled on your browser to see the filtered report.
Actions
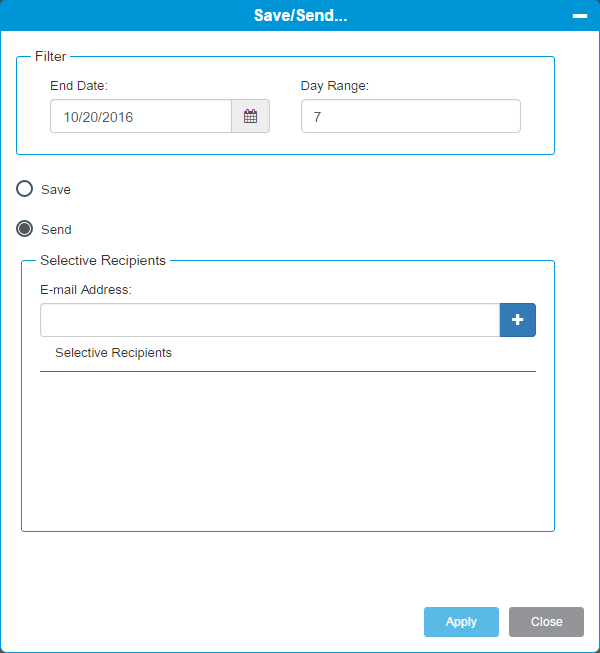
The Save and Send feature allows you to save a report or send that same report to selected email recipients. Parent reports are customizable by using filters and child reports use previously configured filter settings. Report end dates are always customizable.
- From the Navigation panel, select Reports.
- In the North Panel, select the filtered report you want to save. The filter appears underneath the report and is accessed by clicking the + next to the report.
-
In the Operations panel, click Save/Send.

Item Description Action End Date Allows you to enter the date you want the report to include data up to. Click the Calendar icon and use the arrows to navigate to the correct month and then select the desired day. Partition Allows you to select a specific library partition. Select a value from the drop-down menu. Media Barcode Allows you to enter a specific media barcode or barcode range. Enter text. Day Range Allows you to enter a day range for the chart. Enter text. Drive SN Allows you to enter a specific drive serial number. Enter text. Save The feature saves the report to your browser. Select the Save radio button and click Apply. The report is saved to your Downloads folder as a .csv file. Send This feature allows you send the report to any email address you want. Select the Send radio button. E-mail Address This field allows you to enter in an email address. Enter the desired email address and click the icon. Repeat this until all intended email recipients are displayed in the box below the E-mail Address field. When finished, click Apply to send the report. - Select the Save radio button.
- Click Apply. A save dialog box displays.
- Select the Save File radio button.
- Click OK. The filtered report is saved to your web browser's download folder.
- Click Close to exit the Save/Send window.
- From the Navigation panel, select Reports.
- In the North Panel, select the filtered report you want to send. The filter appears underneath the report and is accessed by clicking the + next to the report.
- In the Operations panel, click Save/Send.
- Select the Send radio button.
- Enter an email address.
- Click Apply.
- Click Close to exit the Save/Send window.
