i7 RAPTOR Media
Overview
The Media menu displays all media contained in your library. They are shown by partition or listed as unassigned. Any cleaning media can be found under System.
Media Care Guide
Click here to review the Quantum Media Care Guide. This guide explains how to properly handle and care for your media cartridges.
Important Information - Type M Media (M8) Format
The M format is used with LTO-8 tape drives and LTO-7 media. When LTO-7 media is M formatted by an LTO-8 tape drive, the data capacity of the LTO-7 media is 12TB native, compared to 9TB of a standard formatted LTO-7 tape.
To properly format M8 media, review the following:
- Using your backup application, write to your new LT0-7 M8 media. The IBM LTO-8 drive will format the new media as type M8 upon the first write.
- LTO-8 drives are prepared for the higher capacity formatting of an LTO-7 M8 tape. However, capacity formatting issues will occur if the drive is assigned as both the source and destination for the media.
Important Information - LTO-9 Media
LTO-9 media calibration is a new requirement for LTO-9 media. Calibration is a one-time requirement for new cartridges prior to first-time read/write operations; it is not a requirement for older generations including LTO-8. Due to continued LTO innovation, with LTO-9 there is an increased number of tracks used to write data on tape that requires greater precision. Media optimization creates a referenced calibration for each cartridge that enables the tape drive’s intelligent alignment to optimize data placement and enhances LTO tape long-term media durability.
For a more detailed description of the different possible scenarios with LTO-9, please reach out to your Quantum representative or solutions architect.
Q: Is there a difference between the terms, “optimization”, “initialization” and“calibration”, in reference to LTO-9 media?
A: No. Quantum chose to use “calibration” to describe this one-time LTO9 media event.
Q: What is Media Calibration?
A: Media calibration has been implemented in LTO-9 technology to optimize data placement to each LTO-9 cartridge characteristics. Brand new LTO-9 media requires a one-time step initialization prior to commencing read/write operations. LTO-9 media calibration enhances LTO tape long-term media durability.
Q: Once the LTO-9 media cartridge has been calibrated within the recommended environmental range, does it need to be re-calibrated when it is moved to a separate drive, separate library, separate data center or environment?
A: No, the LTO-9 calibration process is only required on the first load of a new and unused LTO-9 media, subsequent loads in any LTO-9 drive do not require calibration.
Q: Will LTO-8 media require calibration on first load to an LTO-9 tape drive?
A: No. Media calibration is required only on brand new LTO-9 media.
Q: How much time does the calibration add to the first-time load of a brand new cartridge?
A: Media calibration averages between 35 to 52 minutes per first load of a cartridge to a tape drive, could take up to 2 hours to complete the calibration.
Q: Why does the LTO-9 media require calibration?
A. Higher track densities (TPI) and longer tapes using thinner polymer base substrates in LTO-9 media achieve double digit Areal Densities and more than 21K TPI track density. A new tape calibration algorithm was introduced, ensuring data durability, compatibility and allowing for complex interchange requirements over the specified environmental conditions. The length of calibration is mainly for media optimum characterization and will vary based on these factors. This initial calibration, also, enables the tape drive’s intelligent alignment to optimize data placement.
Q: Does LTO-9 media calibration need to be performed in destination site?
A: It is recommended, due to environmental requirements, that calibration should be performed in the final installation destination where the drives and media are to be used to ensure optimized acclimation within recommended environmental range on Quantum product data sheets.
Q: Can the customer disable media calibration?
A: No, the one-time calibration cannot be disabled. In order for the tape to perform, it must be calibrated before first time use and one time only.
Q: Can I use uncalibrated LTO-9 media for IVT?
A: No, do not use uncalibrated LTO-9 media for IVT. The LTO-9 media needs to be calibrated before use with IVT.
Q: Can I use an Extended Data Life Management (EDLM) drive to calibrate new LTO-9 media?
A: No, the EDLM scan engine will recognize that the media is new and does not contain data and just unload it again without loading it. This mechanism will prevent the media from getting calibrated in an EDLM drive.
Q: Can I recalibrate an LTO-9 media cartridge?
A: Yes. The Format command with specific field settings will reinitiate calibration. However, regardless of recalibration, any Format command will result in loss of all existing data on the tape.
Layout
Lists all the media in your library.
| Column | Description |
|---|---|
| Partition | Indicates partition that selected media is assigned to. Will have a status of Unassigned if media is not assigned to a partition. |
| Barcode | Displays barcode of selected media. |
| Type | Displays media type: LTO-3, LTO-4, LTO-5, LTO-6, LTO-7, LTO-8, LTO-9, |
| Location | Library coordinates of selected media. Click here to learn more about library coordinates. |
| Encryption Status | Encryption status of select media: Encrypted, Not Encrypted, or Unknown. Partitions can have an encryption status of Library-Managed, Application-Managed, or N/A. |
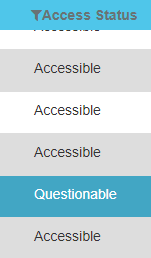
| Access Status |
There are three different access status for media: Accessible, Inaccessible, and Questionable. The Questionable status indicates that the media is accessible LTO-9 media for which LTO-9 calibration status is unknown. With this status, you can sort and select all questionable LTO-9 media to start a calibration job. |
Lists all the details of a highlighted piece of media.
| Detail | Description |
|---|---|
| Barcode | Displays barcode of selected media. |
| Domain | Domain type: Data or Cleaning |
| Type | Displays media type: LTO-3, LTO-4, LTO-5, LTO-6, LTO-7, LTO-8, LTO-9, |
| SCSI Element Address | SCSI logical element address of where the media is locate. |
| Current Partition | Name of partition media is assigned to. N/A if the media is unassigned to a partition. |
| Access Status |
There are three different access status for media: Accessible, Inaccessible, and Questionable. The Questionable status indicates that the media is accessible LTO-9 media for which LTO-9 calibration status is unknown. With this status, you can sort and select all questionable LTO-9 media to start a calibration job |
| Encryption Status | Encryption status of select media: Encrypted, Not Encrypted, or Unknown. |
| Calibration Status | Calibration status of selected media: Unknown, Calibrated or N/A (all non-LTO-9 media). |
| EDLM Status | Status of last EDLM scan. |
| Test Date | Last date when EDLM scan was last run on selected media. YYYY-MM-DD HH:MM:SS format. |
Displays a summary of media within your library.
Provides options for library interaction.
| Actions | |
|---|---|
| Import |
Allows you to import media into your library. Only available if media is located in an I/E slot. |
| Export |
Allows you to export media from your library to an I/E slot. Only available if media is selected in the North Panel. |
| Block | Allows you to enable logical blocking to one or more media tapes in the library. |
| Move |
Allows you to move a single piece of media from one slot to another in your library. Only available if a specific piece of media is selected in the North Panel. |
| Vault Storage |
Allows you to move a tape from a standard or library-managed partition to an Active Vault partition. |
| EDLM Test | |
| Vault Removal |
Allows you to move a tape from an Active Vault partition to a standard or library-managed partition. |
| EDLM Sessions | |
| Calibration | Allows you to calibrate selected LTO-9 media. |
| Exchange | Allows you to exchange media from a drive with accessible media in the library. |
Tasks
Actions
When you first start using your library, open the door and manually insert as many cartridges as you plan to use directly into the storage slots. The cartridges will not go back all the way if they are inserted incorrectly.
After your library begins operation, use the Import button to add cartridges without interrupting library operations. Place cartridges in the I/E . The scanner automatically reads the barcodes on new cartridges.
-
From the Navigation panel, select Media.
- In the North Panel, you will see all the partitions listed and any media that is currently unassigned to any partition. Click the + next to a partition name or the Unassigned media. The + will expand and all media assigned to that partition or unassigned will display.
- Select the check box next to the media you want to import. You can select multiple tapes to import but the media must be in an I/E before it can be imported.
-
In the Operations panel, click Import.
-
Click Apply to import the selected media to the correct partition. The North Panel is updated with the new location information for the media.
- Click Close to exit the Import window.
When partitions are created, specific I/E slots are associated with that partition. When you export cartridges in a library with partitions, cartridges are exported to the partition’s I/E slots. You can only export cartridges if I/E slots for that partition are empty.
-
From the Navigation panel, select Media.
- In the North Panel, you will see all the partitions listed and also any media that is currently unassigned to any partition. Click the + next to a partition name. The + will expand the partition and all media assigned to that partition will display.
- Select the check box next to the media you want to export. You can select multiple tapes to export but the number cannot exceed the number of assigned I/E or Extended I/E slots for the partition.
-
In the Operations panel, click Export. The Export window displays.
-
Click Apply to export the selected media to the I/E station. The North Panel is updated with the new location information for the media.
- Click Close to exit the Export window.
Media block (logical tape blocking) is an operation that can be applied to one or more tape cartridges in a magazine. A tape cartridge with media block applied cannot be accessed by the library robot for move operations.
Blocked Media - Important Information
-
Media in picker slots, I/E slots, and storage slots can be blocked. Media in drive locations cannot be blocked.
-
The media block operation will allow the block request for specified media, unless the specified media is assigned to the systems partition.
-
If a selected media list to block media consists of tapes that are unassigned, or assigned to a partition, or system-assigned media (such as cleaning tapes), then all media in the list gets blocked, except for the following media:
-
Media assigned to the system partition.
-
Media located in tape drives.
-
-
Any user-initiated operation (using the WebGUI, LUI, or Web Services) or SCSI operation that requests the movement of one or more tapes from one location to another that involves a blocked media will be rejected. Operations include:
-
Media moves.
-
Media import/export.
-
EDLM tests.
-
LTO-9 tape calibration requests.
-
Diagnostic test involving blocked scratch tapes.
-
Cleaning operations involving blocked cleaning tapes.
Library-initiated operations that perform internally directed media move operations, such as automatic cleaning operations, background EDLM tests, background calibration tests, and inventory requests in that may GET/PUT a tape for scanning purposes, or in-place GET/PUT tests during IVT tests will have access to blocked media, as such operations do not change the media location and keeps the media location in place.
-
-
Media blocks will be maintained after a library reboot or a power up initialization occurs. If the library is powered down and a blocked tape cartridge is manually removed from its known slot location in the library, the tape cartridge will not maintain a media block when the library is powered on.
-
From the Navigation panel, select Media.
- In the North Panel, you will see all the partitions listed and also any media that is currently unassigned. Click the + next to a partition name. The + will expand the partition and all media assigned to that partition will display.
- Select the media you wish to block.
-
In the Operations panel, click Block.
The Block window displays.
-
Click Apply to block the selected media. The North Panel is updated with the new location information for the media.
After media has been imported into the library, you can use the Move operation to transfer a single piece of media between tape drives and slots within a partition.
-
From the Navigation panel, select Media.
- In the North Panel, you will see all the partitions listed and also any media that is currently unassigned. Click the + next to a partition name. The + will expand the partition and all media assigned to that partition will display.
-
In the Operations panel, click Move.
Item Description Action Filter Allows you to filter by Location, Element Type, or SCSI Element Address Select the filter icon next to the column header. Display home slots for drive-mounted media The default is unchecked. This means any target slot selection displayed will not list home slots for any media currently mounted in tape drives. This keeps you from selecting the home slot of a tape as the new storage slot for the media selected in the North Panel.
Select the check box. This unnamed column allows you to select an available target slot to move the selected media. Select the check box next to the slot you want to move media to. Location Displays the coordinates where the available slot is located.
Display only. Element Type Displays what type of slot is available:
- Storage
- I/E
- Extended I/E
- Drive
Display only. SCSI Element Address Displays the element address for standard partitions only. If it's a library managed partition, it will display as N/A. Display only. -
Click Apply to save your settings.
-
Click Close to exit the window.
The Vault Storage feature allows you to move a tape from a standard or library-managed partition to an Active Vault partition.
- From the Navigation panel, select Media from the menu.
- In the North Panel, select the check box next to the media you want to vault.
-
In the Operations panel, click Vault Storage.
Item Description Action Target Partition Lists the available Active Vault partitions you can move the media to. The selected media will be moved to the first available storage slot(s) within the vault partition. Select the desired partition from the drop-down menu. -
Click Apply to save your settings.
-
Click Close to exit the window.
The EDLM Test provides for manual media selection to initiate an EDLM scan test to determine whether any selected media may be suspect, failed or in good condition.
You may wish to evaluate media outside of the EDLM automatic scanning policies. You can manually scan tape cartridges in the library at any time. Manual EDLM scans can be run on any tape in the library, as long the following conditions are met.
Additional Information
- An EDLM license must be installed on the library.
- The EDLM library managed partition must be configured on the library
- The media you want to scan must be capable of being read by a tape drive in the EDLM library managed partition.
-
Media encrypted by Application-Managed Encryption (AME) cannot be normal or full EDLM scanned in the EDLM drive due to the encryption key not being available to the library. Media encrypted by Library-Managed Encryption (LME) can be normal and full EDLM scanned in the EDLM drive (see i7 RAPTOR Media).
- The media can be located in any partition, including the EDLM library managed partition.
- The media must be located in a storage slot, not in a drive or I/E slot.
- If media is encrypted, the EDLM partition must be configured such that it can retrieve a required decryption key to read and verify the data in case of normal or full scan requests.
- From the Navigation panel, select Media.
- In the North Panel, select the check box next to the media you want to test.
-
In the Operations panel, click EDLM Test.

Item Description Action Scan Type Allows you to select the type of scan you want to perform. Options include:
-
Quick - Does not scan the tape. Evaluates data from the cartridge memory (CM) only. A quick scan takes less than one minute per tape.
-
Normal - Evaluates the cartridge memory (CM) and scans selected portions of the tape, focusing on areas most likely to indicate problems. Normal scan times are dependent on the media type.
Tape Normal Scan Time LTO-7 30 minutes LTO-M8 30 minutes LTO-8 30 minutes LTO-9 45 minutes LTO-10 45 minutes -
Full - Evaluates the cartridge memory (CM) and scans the entire tape where data is written. A full scan can take several hours depending on cartridge generation and amount of data on tape.-
Times assume the tape generation is scanned in the corresponding drive generation.
Tape Normal Scan Time LTO-7 8 hours LTO-M8 12 hours LTO-8 15 hours LTO-9 20 hours LTO-10 25 hours Additional Information
-
If there is only one drive for the media selected, the scan time is cumulative.
-
If there are multiple drives selected, the media scan times are spread among the applicable drives and the longest time for a drive is given.
-
Select the desired scan type from the drop-down menu. Priority Allows you to select the priority for starting a scan. Options include:
- Low
- Medium (default)
- High
Select the desired priority from the drop-down menu. Continue on Error Allows you determine whether you want a scan test to continue if errors are encountered that already determine a tape to be bad. You either enable or disable the feature. Select the desired option from the drop-down menu.
Note: To not continue on error shortens test time if an issue is found already and additional testing will not change result.
Session Status Displays the estimated completion time for the selected scan as well as the session ID.
Note: The Session ID identifies the session for the EDLM Sessions dialog listing.
-
-
Click Apply to save your settings.
-
Click Close to exit the window.
The Vault Removal feature allows you to move a tape from an Active Vault partition to a standard or library-managed partition.
- From the Navigation panel, select Media from the menu.
- In the North Panel, select the check box next to the vaulted media you want to remove.
-
In the Operations panel, click Vault Removal.
Item Description Action Target Partition Lists the available standard partitions you can move the media to. The selected media will be moved to the first available storage slot(s) within the target partition. Select the desired partition from the drop-down menu. - Click Apply to perform the operation.
-
Click Close to exit the window.
The EDLM Sessions feature allows you to view all currently scheduled EDLM scan sessions. Aside from listing status, you can decide whether you want them to continue, pause or cancel them. These options will be determined by the amount of time estimated for completion, what media are being scanned and whether you need to use that media to complete an operation.
- From the Navigation panel, select Media from the menu.
-
In the Operations panel, click EDLM Sessions.
- When viewing the list of scans in progress, select the radio button of what you want to do with the scan and click Apply.
-
Click Close to exit the window.
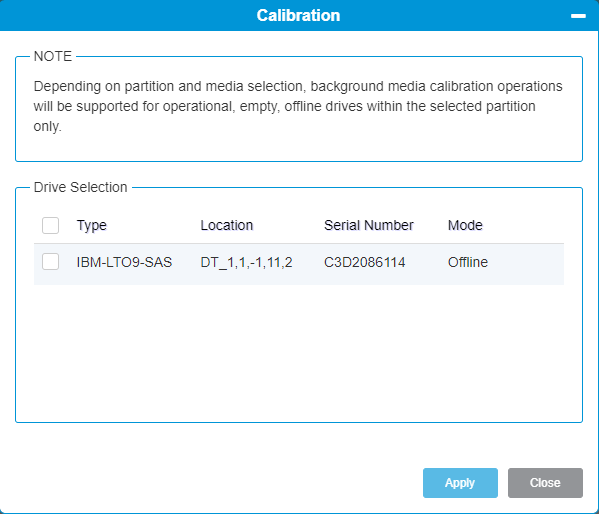
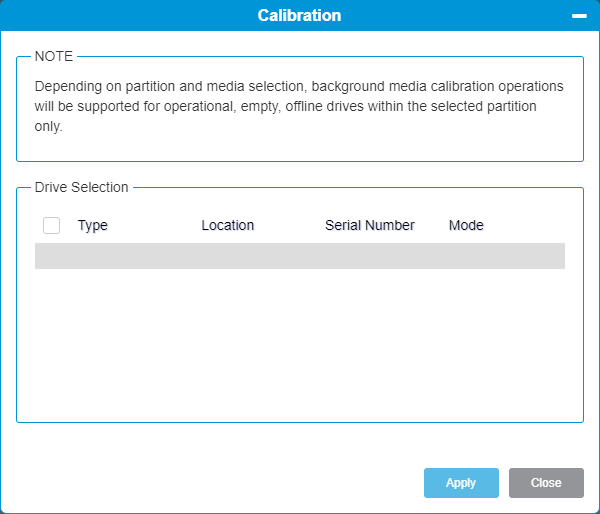
The LTO-9 media calibration feature allows you to use offline, empty, operational LTO-9 drive resources in a standard partition to perform calibration operations on selected LTO-9 media.
What is Calibration?
New LTO-9 tapes are sensitive to tape tension and humidity. When a new LTO-9 tape is loaded into a tape drive for the first time, the drive automatically calibrates it. This calibration process can take up to 2 hours.
This time period is not always accounted for in a host application that mounts a media for new write or format operations, as the application may not be prepared or expect the drive to report not being ready for media access during such a long calibration time period. The tape calibration feature allows LTO-9 tapes to be calibrated before a host application uses the tape.
Calibration is required when:
-
A new library is installed with new LTO-9 tapes.
-
New LTO-9 tapes are imported into an existing library.
-
A previously calibrated tape is replaced with a new tape with the same barcode.
Calibration is NOT required when:
-
Previously calibrated tapes are imported into a library.
Prerequisites
-
Calibration requests in EDLM, Vault, and AMP partitions are not supported.
-
You must have one or more LTO-9 drives assigned to the standard partition.
-
Selected media must be located in storage slots only.
-
Selected LTO-9 drives must be offline (see Take Drive Online or Offline ), empty (see Drive Unload), and operational/varied on (see Vary Drive On or Off) .
- From the Navigation panel, select Media from the menu.
-
From the North Panel, select one or more for eligible LTO-9 media for calibration operations. There are three different access status for media:
-
Accessible
-
Inaccessible
-
Questionable
The Questionable status indicates that the media is accessible LTO-9 media for which LTO-9 calibration status is unknown. With this status, you can sort and select all questionable LTO-9 media to start a calibration job.
The access status of the selected media appears in the North panel of the selected media.

-
-
In the Operations panel, click Calibration.
You must have LTO-9 drives taken offline to calibrate LTO-9 media in the partition. If you do not see any available drives, take one or more LTO-9 drives offline (see Take Drive Online or Offline).
In addition to being offline, eligible LTO-9 drives must be empty, have a good operational status, and be varied on.


-
Select one or more LTO-9 drives from the Drive Selection list.
-
Click Apply to start the calibration operation for all selected, eligible LTO-9 media to be calibrated.
Note: The library will reject LTO-9 media calibration requests if ALL specified media shows a status of inaccessible. Inaccessible media includes media that is ejected, or logically blocked.
Additional Information
-
An offline LTO-9 drive selected and applied for calibration operations will have a drive status of Calibrating.
-
To stop/cancel the LTO-9 calibration operations on a selected offline LTO-9 drive, switch all selected offline drives with a status of Calibrating back online (see Take Drive Online or Offline). The drive will complete the calibration process for any media mounted in the drive and will then discontinue any future calibration operations. A calibration operation may still take up to two hours before the drive will be dismounted and available for other operations in the partition.
-
The Media Calibration History Log will have calibration entries added each time media is successfully moved to a drive for a calibration attempt. In-accessible media at time of calibration attempt; such as media that moved to an I/E slot or drive location will be skipped and also recorded in this log as to why the media could not be calibrated (see i7 RAPTOR Logs)
-
A RAS ticket will be generated to report the successful completion or failure or cancellation of the media calibration attempts.
-
In the event of a library restart or unexpected power loss, any drive status or media indication of calibration in progress may be cleared and the assigned drives will return back to an online status. This will end all calibration attempts.
-
In the event of a drive failure, the drive calibration status will be cleared for the drive. This will end any calibration attempts on the failed drive.
The dual-picker in the Scalar i7 RAPTOR library allows a media exchange between accessible media in the library and media currently loaded into an LTO drive. This allows the robot to make two media move requests in a single exchange.
Note: Media must be supported by the LTO drive type for an exchange to occur.
-
From the Navigation panel, select Drives.
-
In the North Panel, select the accessible media that is supported by the LTO drive you want to exchange media.
-
From the Operations panel, click Exchange.

Item Description Action Location Displays the coordinates where the available drive is located.
Display only. SCSI Element Address Displays the element address for available drive. Display only. -
Select the drive that you to exchange media with.
-
Click Apply to save your settings.
-
Click Close to exit the window.