Remove and Replace an iBlade
The Scalar iBlade is a converged server platform for the Scalar
| Veeam Tape Server iBlade |
The Veeam Tape Server option eliminates the need for a dedicated external physical tape server. The Veeam Tape Server comes with Windows 2016 pre-installed. The customer provides and loads the Veeam software during installation. Caution: This is the only software that may be loaded on the Veeam Tape Server. |
| SLTFS/NAS iBlade | The SLTFS/NAS option creates a NAS tape archive for file-based unstructured data storage with integrated SLTFS. The SLTFS/NAS iBlade comes with CentOS and SLTFS software installed. The SLTFS iBlade is sometimes called the “LTFS iBlade.” |
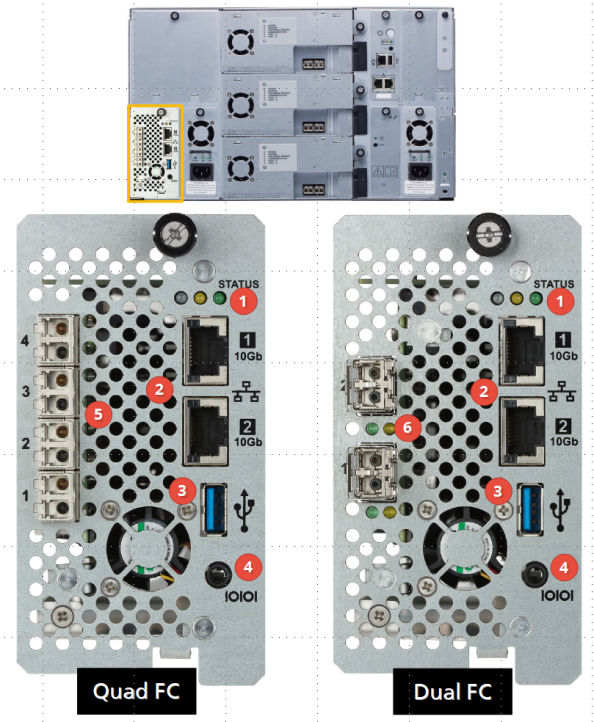
| Item | Name | Description |
|---|---|---|
|
1 |
Status LEDs |
Indicates the operating status of the iBlade. SLTFS/NAS iBlade normal indications:
SLTFS application not running:
Veeam Tape Server iBlade normal indications:
|
| 2 | Ethernet Ports | These are two dual speed 1Gb/10Gb Ethernet ports. These connect to the LAN/WAN and are used for data ingest and software installation. |
| 3 | USB Port | Reserved for Quantum engineering and manufacturing. |
| 4 | Serial Port | Reserved for Quantum engineering and manufacturing. |
| 5 | Quad Fibre Channel Connectors (16 Gbs) | Connects to up to four (4) FC drives. |
| 6 | Dual Fibre Channel Connectors | Connects to up to two (2) FC drives |
Before You Begin
Before you begin the removal procedure, take a snapshot of the library and save your library configuration. These will be used to restore your library if any issues occur after the removal and replacement procedure.
Your library has many configurable items, such as tape drive IDs, partitions, user accounts, Import/Export (I/E) slots, and cleaning slots. The Save/Restore window allows you to save your library's configuration and then restore the library’s firmware and configurable items to a previous state in the event of a hardware failure or firmware upgrade.
Restore a Configuration on the same Library
Before you restore a library configuration, review the following:
- If you have Logical System Addressing (LSA) enabled on the library, the saved configuration is specific to that library only. Do not attempt to clone the configuration to a different library.
- The library must have all the proper licenses installed before restoring a configuration.
Restore a Configuration on a new Library
Before you restore a library configuration, review the following:
- If you have LSA enabled and want to clone the configuration to a new library, you must first disable LSA and save the configuration (see Library Settings).
- If you want to clone a saved configuration to another library, you should only use the saved configuration upon initial installation of a new library. Once a the cloned configuration is on a new library, you should save a configuration specific to that new library.
- If you are cloning a saved configuration to a new library, the new library must have the same minimum license configuration as the library where the saved configuration came from.
- If you are cloning a saved configuration to a new library, the new library must have at least the same minimum module configuration. For example, if the library the saved configuration came from has 4 modules, the new library must have a least 4 or more modules.
| Item | Description | Action |
|---|---|---|
| Restore Configuration |
Restores library to the selected configuration. After the restore, the library will automatically reboot. |
Select the radio button. |
| Restore Filename | Allows you to select the name of the library configuration file you want to restore. | Click the Browse button and navigate to the configuration file you want to use. Click Apply to begin restoring the library configuration. |
| Save Configuration | Saves the current library configuration. | Select the radio button. Click Apply. The library configuration file is downloaded. You can then use the file locally or email it. |
Click Close to exit the window.
The Library Snapshot feature captures detailed information about the entire library in a single ASCII file that can be e-mailed to technical support personnel. The information consists of configuration data, status information, and trace logs for library components. Trace logs collect problem data and provide support personnel with vital library information for troubleshooting and solving problems.
You can e-mail the snapshot file from the WebGUI. You can also download the snapshot file to your computer. However, you cannot print snapshot files directly from the Web client. Depending on the library configuration and your connection speed, saving the snapshot file could take several minutes. The resulting file size can be large. In some cases, your firewall file-size limitations could prohibit you from emailing the file.
- Library SN
- Number of physical slots installed (all slots)
- Number of slots assigned to partitions (host and library managed)
- Number of assigned slots populated with media
- Number of general purpose drives, listed by drive manufacturer and LTO generation
- Drive utilization rate of general purpose drives (even if Advanced Reporting [AR] isn’t licensed)
- Number of EDLM drives
- Drive utilization rate of EDLM drives (even if AR isn’t licensed)
- Dual/single robot
- Number of yellow/red robot-related RAS tickets
- Redundant power – Y/N
- Advanced Reporting license – Y/N
- Number of I/E jobs done
- Largest number of media in a single I/E job
- Number of red/yellow RAS tickets associated with control or drive paths failing or losing connectivity
- From the Navigation panel, select Service.
-
In the Operations panel, click Library Snapshot.
Item Description Action Snapshot Type Select a Standard or Extended library snapshot. - Select Standard to collect the library data documented above.
- Select Extended to collect Standard library data, plus additional log history data and all collected tape drive data dumps.
Note: Extended snapshots cannot be send via email.
Save Allows you to save the snapshot file to a computer. Select the Save radio button and click Apply. Send This feature allows you send the snapshot to any email address you want. Select the Send radio button. E-mail Address This field allows you to enter in an email address. Enter the desired email address and click the icon. Repeat this until all intended email recipients are displayed in the box below the E-mail Address field. When finished, click Apply to send the snapshot. - Click Close to exit the window.
Review iBlade Power Status
Before you start an iBlade replacement, verify the power status of the iBlade.
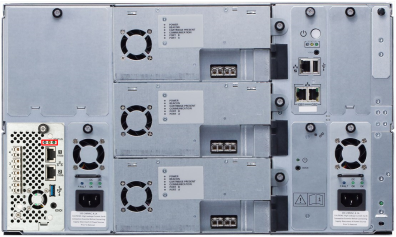
Go to the back of the library. Observe the iBlade LEDs. The iBlade is shut down when you see these indications:
- Blue: Solid on (SLTFS iBlade only) or off
- Amber: Off
- Green: Off
SLFTS iBlade Replacement
Once you have verified the power status of the iBlade, select from the following replacement procedures:
Follow this procedure if the SLFTS iBlade has power. If the SLFTS iBlade has no power, follow the no power instructions below.
Your iBlade has many configurable items, such as the NAS Share Name, Server Access and Idle Volume and Metadata retention timeouts. The Save/Restore window allows you to save your Scalar LTFS iBlade's configuration and then restore it to a previous state in the event of a failure or upgrade.
Note: If you are replacing a Veeam iBlade, skip this step and go to Step 2.
- From the Navigation panel, select Devices.
- In the North Panel, select the + next to the blade name and then select the check box next to iBlade.
-
In the Operations panel, click Save/Restore.
Item Description Action Save Configuration Saves the current iBlade configuration. Select the radio button. Click Apply. The iBlade configuration file is downloaded. You can then save the file locally or email it. -
Click Close to exit the window.
- On the Local User Interface (LUI), select Service > Maintenance > iBlade > Shutdown.
- Click OK to confirm that you want to shut down the iBlade.
-
Go to the back of the library. Observe the iBlade LEDs. The iBlade is shut down when you see these indications:
- Blue: Solid on (LTFS iBlade only) or off
- Amber: Off
- Green: Off
-
Write down the current iBlade cabling configuration. The cables must be returned to the same locations on the new iBlade.
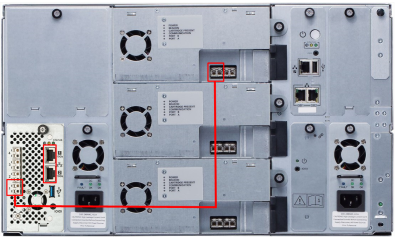
- Disconnect the cables from the iBlade. This includes drive and Ethernet cables.
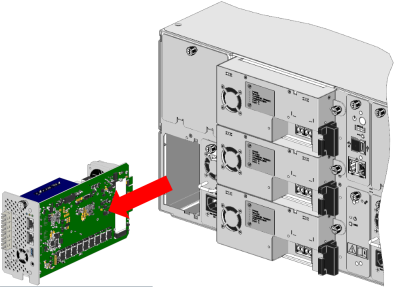
Loosen the thumbscrew and remove the iBlade from the library.
Caution: Before removing the iBlade, attach an ESD strap to your wrist and to an unpainted surface on the library.
Once the iBlade has been physically removed, you must also remove the iBlade from the WebGUI. Do the following:
- From the WebGUI Navigation panel, select Devices.
- In the North Panel, select the check box next to the iBlade.
- In the Operations panel, click Remove.
- Click Apply. The iBlade is removed from the list of devices.
- Click Close.
-
Slide the iBlade approximately ¾ of the way into the library.
Caution: Do not slide the iBlade all the way into the slot.
-
Using the cabling list you created earlier, reconnect the cables to the iBlade exactly as they were before.
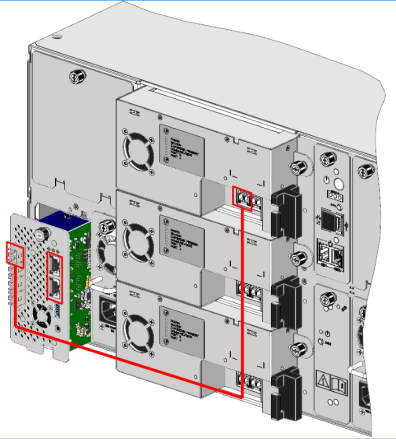
- Slide the iBlade in until you feel the iBlade connector slip into the library connector.
- Tighten the iBlade thumbscrew.
- Log in to the WebGUI.
- Select Devices from the Navigation panel.
-
Wait 10 minutes after replaceing the iBlade. After 10 minutes, select Devices to refresh the WebGUI display. When the iBlade is ready to be configured, it will show Online and Ready.
You must refresh the WebGUI display to see the Online and Ready indication.
- From the Navigation panel, select Devices.
- In the North Panel, select the + next to the blade name and then select the check box next to iBlade.
-
In the Operations panel, click Save/Restore.
Item Description Action Restore Configuration Restores the iBlade to the selected configuration. After the restore, the iBlade will automatically reboot.
Select the radio button. Restore Filename Allows you to select the name of the iBlade configuration file you want to restore. Click the Browse button and navigate to the configuration file you want to use. Click Apply to begin restoring the iBlade configuration. -
Click Close to exit the window.
- In the WebGUI, select Network from the Navigation panel.
-
Select the iBlade from the North Panel and click IPv4.
Note: The SLTFS iBlade does not support IPv6.
-
Complete the fields. See IPv4 for specific details.
Once the iBlade has been configured, save the library configuration.
-
In the WebGUI, select System from the Navigation panel.
-
Select Save/Restore from the Actions panel.
Follow this procedure if the SLFTS iBlade has no power. If the SLFTS iBlade has power, follow the no power instructions above.
Your iBlade has many configurable items, such as the NAS Share Name, Server Access and Idle Volume and Metadata retention timeouts. The Save/Restore window allows you to save your Scalar LTFS iBlade's configuration and then restore it to a previous state in the event of a failure or upgrade.
Note: If you are replacing a Veeam iBlade, skip this step and go to Step 2.
- From the Navigation panel, select Devices.
- In the North Panel, select the + next to the blade name and then select the check box next to iBlade.
-
In the Operations panel, click Save/Restore.
Item Description Action Save Configuration Saves the current iBlade configuration. Select the radio button. Click Apply. The iBlade configuration file is downloaded. You can then save the file locally or email it. -
Click Close to exit the window.
-
Write down the current iBlade cabling configuration. The cables must be returned to the same locations on the new iBlade.

- Disconnect the cables from the iBlade. This includes drive and Ethernet cables.
Loosen the thumbscrew and remove the iBlade from the library.
Caution: Before removing the iBlade, attach an ESD strap to your wrist and to an unpainted surface on the library.

Once the iBlade has been physically removed, you must also remove the iBlade from the WebGUI. To remove the iBlade from the WebGUI, you will need to install the replacement iBlade into the library.
- Slide the replacement iBlade in until you feel the iBlade connector slip into the library connector.
- Tighten the replacment iBlade thumbscrew.
- From the WebGUI Navigation panel, select Devices.
- In the North Panel, select the check box next to the iBlade.
- In the Operations panel, click Remove.
- Click Apply. The old iBlade is now removed from the list of devices.
- Click Close.
- Loosen the thumbscrew and remove the replacement iBlade from the library.
- From the WebGUI or LUI, restart the library.
-
Slide the iBlade approximately ¾ of the way into the library.
Caution: Do not slide the iBlade all the way into the slot.
-
Using the cabling list you created earlier, reconnect the cables to the iBlade exactly as they were before.

- Slide the iBlade in until you feel the iBlade connector slip into the library connector.
- Tighten the iBlade thumbscrew.
- Log in to the WebGUI.
- Select Devices from the Navigation panel.
-
Wait 10 minutes after replaceing the iBlade. After 10 minutes, select Devices to refresh the WebGUI display. When the iBlade is ready to be configured, it will show Online and Ready.
You must refresh the WebGUI display to see the Online and Ready indication.
- From the Navigation panel, select Devices.
- In the North Panel, select the + next to the blade name and then select the check box next to iBlade.
-
In the Operations panel, click Save/Restore.
Item Description Action Restore Configuration Restores the iBlade to the selected configuration. After the restore, the iBlade will automatically reboot.
Select the radio button. Restore Filename Allows you to select the name of the iBlade configuration file you want to restore. Click the Browse button and navigate to the configuration file you want to use. Click Apply to begin restoring the iBlade configuration. -
Click Close to exit the window.
- In the WebGUI, select Network from the Navigation panel.
-
Select the iBlade from the North Panel and click IPv4.
Note: The SLTFS iBlade does not support IPv6.
-
Complete the fields. See IPv4 for specific details.
Once the iBlade has been configured, save the library configuration.
-
In the WebGUI, select System from the Navigation panel.
-
Select Save/Restore from the Actions panel.
Veeam iBlade Replacement
Follow this procedure if the Veeam iBlade has power. If the Veeam iBlade has no power, follow the no power instructions below.
- On the Local User Interface (LUI), select Service > Maintenance > iBlade > Shutdown.
- Click OK to confirm that you want to shut down the iBlade.
-
Go to the back of the library. Observe the iBlade LEDs. The iBlade is shut down when you see these indications:
- Blue: Solid on (LTFS iBlade only) or off
- Amber: Off
- Green: Off
-
Write down the current iBlade cabling configuration. The cables must be returned to the same locations on the new iBlade.

- Disconnect the cables from the iBlade. This includes drive and Ethernet cables.
Loosen the thumbscrew and remove the iBlade from the library.
Caution: Before removing the iBlade, attach an ESD strap to your wrist and to an unpainted surface on the library.

Once the iBlade has been physically removed, you must also remove the iBlade from the WebGUI. Do the following:
- From the WebGUI Navigation panel, select Devices.
- In the North Panel, select the check box next to the iBlade.
- In the Operations panel, click Remove.
- Click Apply. The iBlade is removed from the list of devices.
- Click Close.
Before installing the new replacement Veeam iBlade, document the Windows Product Key located on the side of the iBlade. You will need this key to update your Microsoft Windows Product License.

-
Slide the iBlade approximately ¾ of the way into the library.
Caution: Do not slide the iBlade all the way into the slot.
-
Using the cabling list you created earlier, reconnect the cables to the iBlade exactly as they were before.

- Slide the iBlade in until you feel the iBlade connector slip into the library connector.
- Tighten the iBlade thumbscrew.
- Log in to the WebGUI.
- Select Devices from the Navigation panel.
-
Wait 10 minutes after replaceing the iBlade. After 10 minutes, select Devices to refresh the WebGUI display. When the iBlade is ready to be configured, it will show Online and Ready.
You must refresh the WebGUI display to see the Online and Ready indication.
- In the WebGUI, select Network from the Navigation panel.
-
Select the iBlade from the North Panel and click IPv4.
Note: The SLTFS iBlade does not support IPv6.
-
Complete the fields. See IPv4 for specific details.
Once the iBlade has been configured, save the library configuration.
-
In the WebGUI, select System from the Navigation panel.
-
Select Save/Restore from the Actions panel.
Once you have successfully installed your replacement Veeam iBlade, you will need to update the Windows product key to match the product key provided with the replacement iBlade.
-
Using a Remote Desktop Connection, log into your iBlade.
-
Using the Windows command line, run the following script:
C:\Users\Administrator> cscript.exe c:\windows\system32\slmgr.vbs -ipk [New Product Key]Example
New Product Key
BBMKN-QTRVW-YXMYC-2J3QD-GH87ICommand Line
C:\Users\Administrator> cscript.exe c:\windows\system32\slmgr.vbs -ipk BBMKN-QTRVW-YXMYC-2J3QD-GH87I -
The following message will appear if the product key is successfully installed:
C:\Users\Administrator> cscript.exe c:\windows\system32\slmgr.vbs -ipk [New Product Key]Microsoft (R) Windows Script Host Version 5.812
Copyright (C) Microsoft Corporation. All rights reserved.
Installed product key [New Product Key] successfully.
Follow this procedure if the Veeam iBlade has power. If the Veeam iBlade has no power, follow the no power instructions above.
-
Write down the current iBlade cabling configuration. The cables must be returned to the same locations on the new iBlade.

- Disconnect the cables from the iBlade. This includes drive and Ethernet cables.
Loosen the thumbscrew and remove the iBlade from the library.
Caution: Before removing the iBlade, attach an ESD strap to your wrist and to an unpainted surface on the library.

Once the iBlade has been physically removed, you must also remove the iBlade from the WebGUI. To remove the iBlade from the WebGUI, you will need to install the replacement iBlade into the library.
- Slide the replacement iBlade in until you feel the iBlade connector slip into the library connector.
- Tighten the replacment iBlade thumbscrew.
- From the WebGUI Navigation panel, select Devices.
- In the North Panel, select the check box next to the iBlade.
- In the Operations panel, click Remove.
- Click Apply. The old iBlade is now removed from the list of devices.
- Click Close.
- Loosen the thumbscrew and remove the replacement iBlade from the library.
- From the WebGUI or LUI, restart the library.
Before installing the new replacement Veeam iBlade, document the Windows Product Key located on the side of the iBlade. You will need this key to update your Microsoft Windows Product License.

-
Slide the iBlade approximately ¾ of the way into the library.
Caution: Do not slide the iBlade all the way into the slot.
-
Using the cabling list you created earlier, reconnect the cables to the iBlade exactly as they were before.

- Slide the iBlade in until you feel the iBlade connector slip into the library connector.
- Tighten the iBlade thumbscrew.
- Log in to the WebGUI.
- Select Devices from the Navigation panel.
-
Wait 10 minutes after replaceing the iBlade. After 10 minutes, select Devices to refresh the WebGUI display. When the iBlade is ready to be configured, it will show Online and Ready.
You must refresh the WebGUI display to see the Online and Ready indication.
- In the WebGUI, select Network from the Navigation panel.
-
Select the iBlade from the North Panel and click IPv4.
Note: The SLTFS iBlade does not support IPv6.
-
Complete the fields. See IPv4 for specific details.
Once the iBlade has been configured, save the library configuration.
-
In the WebGUI, select System from the Navigation panel.
-
Select Save/Restore from the Actions panel.
Once you have successfully installed your replacement Veeam iBlade, you will need to update the Windows product key to match the product key provided with the replacement iBlade.
-
Using a Remote Desktop Connection, log into your iBlade.
-
Using the Windows command line, run the following script:
C:\Users\Administrator> cscript.exe c:\windows\system32\slmgr.vbs -ipk [New Product Key]Example
New Product Key
BBMKN-QTRVW-YXMYC-2J3QD-GH87ICommand Line
C:\Users\Administrator> cscript.exe c:\windows\system32\slmgr.vbs -ipk BBMKN-QTRVW-YXMYC-2J3QD-GH87I -
The following message will appear if the product key is successfully installed:
C:\Users\Administrator> cscript.exe c:\windows\system32\slmgr.vbs -ipk [New Product Key]Microsoft (R) Windows Script Host Version 5.812
Copyright (C) Microsoft Corporation. All rights reserved.
Installed product key [New Product Key] successfully.


