Remove and Replace the SCB
Overview
The System Control Blade (SCB) is the main controller for all library operations. It contains the user interface operations, Web Services, and it stores the configuration.
The SCB is located in the Control Module (CM).

| Item | Name | Description |
|---|---|---|
|
1 |
Power Switch | The power switch initiates the shutdown procedure when you press it for two seconds. If you press it for five seconds, you will force a hard shutdown. It is solid green and illuminated when the library is powered on. |
| 2 | Status LEDs |
Normal indications:
|
| 3 | Serial Port | The serial port is for engineering use only. |
| 4 | Service Port | The service port allows you to connect directly to the library to perform service functions. |
| 5 | Service USB | The service USB port is not used at this time. |
| 6 | Ethernet Ports |
The Ethernet ports allow you to connect the library to a network. This allows you to connect to hosts and to configure and operate the library through the WebGUI. While the ports are identical in function, use Gb1 as your primary network connection and Gb2 as your secondary connection. There are two for redundancy. GB1 and GB2 correspond to the interface settings in the Scalar i3 Network Settings menu. |
Before You Begin
Before you begin the removal procedure, take a snapshot of the library and save your library configuration.
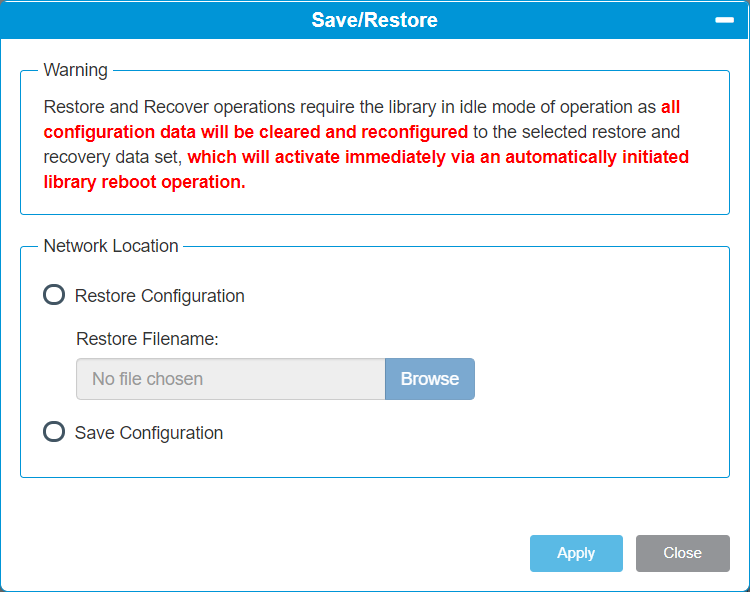
Your library has many configurable items, such as tape drive IDs, partitions, user accounts, Import/Export (I/E) slots, and cleaning slots. The Save/Restore window allows you to save your library's configuration and then restore the library’s firmware and configurable items to a previous state in the event of a hardware failure or firmware upgrade.
Restore a Configuration on the same Library
Before you restore a library configuration, review the following:
- If you have Logical System Addressing (LSA) enabled on the library, the saved configuration is specific to that library only. Do not attempt to clone the configuration to a different library.
- The library must have all the proper licenses installed before restoring a configuration.
Restore a Configuration on a new Library
Before you restore a library configuration, review the following:
- If you have LSA enabled and want to clone the configuration to a new library, you must first disable LSA and save the configuration (see Library Settings).
- If you want to clone a saved configuration to another library, you should only use the saved configuration upon initial installation of a new library. Once a the cloned configuration is on a new library, you should save a configuration specific to that new library.
- If you are cloning a saved configuration to a new library, the new library must have the same minimum license configuration as the library where the saved configuration came from.
- If you are cloning a saved configuration to a new library, the new library must have at least the same minimum module configuration. For example, if the library the saved configuration came from has 4 modules, the new library must have a least 4 or more modules.
| Item | Description | Action |
|---|---|---|
| Restore Configuration |
Restores library to the selected configuration. After the restore, the library will automatically reboot. |
Select the radio button. |
| Restore Filename | Allows you to select the name of the library configuration file you want to restore. | Click the Browse button and navigate to the configuration file you want to use. Click Apply to begin restoring the library configuration. |
| Save Configuration | Saves the current library configuration. | Select the radio button. Click Apply. The library configuration file is downloaded. You can then use the file locally or email it. |
Click Close to exit the window.
The Library Snapshot feature captures detailed information about the entire library in a single ASCII file that can be e-mailed to technical support personnel. The information consists of configuration data, status information, and trace logs for library components. Trace logs collect problem data and provide support personnel with vital library information for troubleshooting and solving problems.
You can e-mail the snapshot file from the WebGUI. You can also download the snapshot file to your computer. However, you cannot print snapshot files directly from the Web client. Depending on the library configuration and your connection speed, saving the snapshot file could take several minutes. The resulting file size can be large. In some cases, your firewall file-size limitations could prohibit you from emailing the file.
- Library SN
- Number of physical slots installed (all slots)
- Number of slots assigned to partitions (host and library managed)
- Number of assigned slots populated with media
- Number of general purpose drives, listed by drive manufacturer and LTO generation
- Drive utilization rate of general purpose drives (even if Advanced Reporting [AR] isn’t licensed)
- Dual/single robot
- Number of yellow/red robot-related RAS tickets
- Redundant power – Y/N
- Advanced Reporting license – Y/N
- Number of I/E jobs done
- Largest number of media in a single I/E job
- Number of red/yellow RAS tickets associated with control or drive paths failing or losing connectivity
- From the Navigation panel, select Service.
-
In the Operations panel, click Library Snapshot.

Item Description Action Snapshot Type Select a Standard or Extended library snapshot. - Select Standard to collect the library data documented above.
- Select Extended to collect Standard library data, plus additional log history data and all collected tape drive data dumps.
Note: Extended snapshots cannot be send via email.
Save Allows you to save the snapshot file to a computer. Select the Save radio button and click Apply. Send This feature allows you send the snapshot to any email address you want. Select the Send radio button. E-mail Address This field allows you to enter in an email address. Enter the desired email address and click the icon. Repeat this until all intended email recipients are displayed in the box below the E-mail Address field. When finished, click Apply to send the snapshot. - Click Close to exit the window.

Important Information: SCB and Control Module Replacements
If the existing SCB is being moved from an existing Control Module (CM) to a replacement CM, it must have a Reset to Factory Default performed on it to clear the old configuration on the existing CM.
The Factory Defaults feature will revert your library back to its initial configuration. This means that any partitions created, or users setup or slot allocation as well as many other features will be lost.
The only library configuration data that will be retained is IP address settings. You should only use this feature when approved of, or requested by,
- From the WebGUI Navigation panel, select Service.
- In the Operations panel, click Factory Defaults.
If you save the library configuration before removing the SCB, you can only restore it on an SCB that is going into the exact same CM. If you replace the CM and perform a Reset to Factory Default, you cannot restore the library configuration.
Remove the SCB
WARNING: Do not move SCBs from one library to another library. If you must replace the SCB in a library, contact Quantum and request a new SCB.
There are two (2) ways for you to power off your library:
| WebGUI |
Select Shut Down from the admin menu on the Menu Bar.
|
| LUI |
Navigate to Power > Shutdown.
|

Once you have shut down the library, unplug the library from its power source. Please note that an unplugged library will automatically restart once power is reapplied.
- Ethernet cables should be clearly labeled so they can be reconnected to the correct ports once the replacement SCB is installed.
- Once the cables have been labeled, disconnect them from the SCB.
-
Loosen the SCB thumbscrew.

- Use the thumbscrew to slide the SCB out of the module.
Replace the SCB
WARNING: Do not move SCBs from one library to another library. If you must replace the SCB in the library, contact Quantum and request a SCB CRU.
-
Gently slide the SCB into it's slot in the library until you feel the electrical connection slide in to place.

- Tighten the SCB thumbscrew until finger tight.
- Plug the power cords back into the power supplies. The library will automatically begin start up operations.
Reconnect the Ethernet cables to the new SCB.
Before you can restore the library configuration, you need access to the library.
If the library is on a network for with DHCP server, the library's LUI will display the new IP address of the system. Record the IP from the LUI and use it to log in again. Do not include any leading zeros displayed in the LUI when entering the address in a browser. For example, if the LUI presents you with the screen shown below, you enter the address 10.20.216.156 in your browser.
If the network does not have a DHCP server, the LUI will display the IP table in the LUI with no IP values entered in the cells. Connect to the library using the service port (see Connect to the Service Port).

- In the WebGUI, select System from the Navigation panel.
-
Select Save/Restore from the Actions panel.

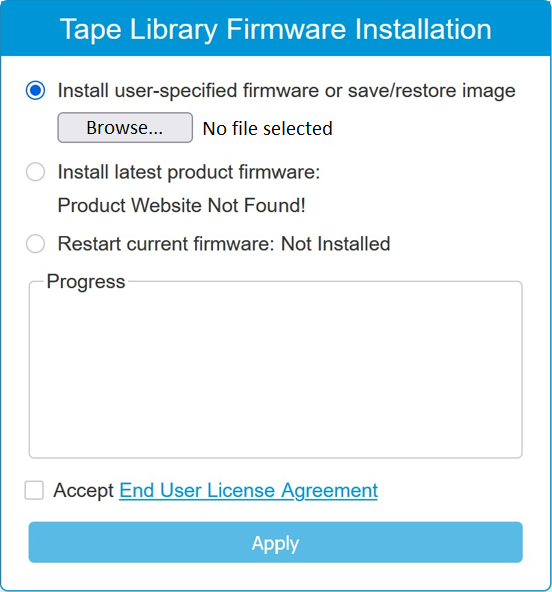
Item Description Action Install user-specified firmware or save/restore image. Restores library to the selected configuration. After the restore, the library will automatically reboot.
Select the Browse button to select your backup configuration.
-
Click Apply to upload your saved configuration to the system.
-
Click Close to exit the window.
