 minute read
Although we recommend using the FlexSync Dashboard to manage your FlexSync environment, you can also use the FlexSync CLI for the flexsyncadmin host.
The sections below describe how to complete keys tasks using the FlexSync GUI and using the CLI (as available).
Overview
You can access the the FlexSync GUI on port 9091 of any appliance that is connected to the StorNext server. If you cannot use port 9091 for the FlexSync GUI, you can manually reassign a port to the feature. See Manually Assign an Access Port.
Prerequisites
- You will need a FlexSync user account before you can log in to the GUI. See Step 4: Manage FlexSync Users.
- In order to access the FlexSync GUI, the appliance host name must be resolvable through a DNS name or IP address. If you use a DNS name, it must be resolvable on the DNS or it must have a local entry in the local appliance /etc/hosts file.
- Open a supported browser and navigate to https://<appliance_hostname>:9091.
If you manually assigned a different port, navigate to https://<appliance_hostname>:<port_number>.
- Confirm the security certificate, as needed.
- In the Username field, enter your user name.
- In the Password field, enter your password.
- Press Enter to display the FlexSync Dashboard. Alternatively, click Login.
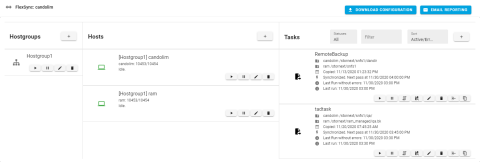
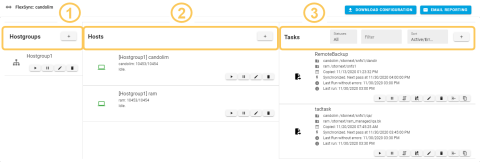
Use the FlexSync Dashboard (illustrated below) to configure and manage your replication tasks.

|
Dashboard Element |
Description |
|---|---|
|
Cogwheel
|
Click to automatically create and download a configuration backup file, which you can use to restore your most recent configuration if the information is lost or if you need to undo any changes. See Restore Your Configurationfor details. |
|
Hamburger icon
|
Click to access the following menu items:
|
|
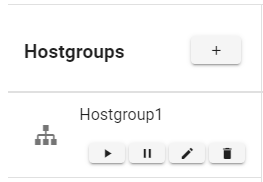
Hostgroups column |
Displays the name of the hostgroups. See Configure Replication and Manage Hostgroups. |
| Hosts column |
Displays the following:
See Configure Replication and Manage Hosts. |
| Tasks column |
Displays the following:
See Configure Replication and Manage Tasks. |
|
Plus button
|
Click to add hostgroups, hosts, or tasks. |


We recommend using the FlexSync Dashboard to complete tasks. However, under certain circumstances, you may prefer or need to use the FlexSync CLI instead. The following section provides information for using the FlexSync CLI.
Use the following FlexSync CLI commands to manage your FlexSync environment.
To view information about the FlexSync CLI commands, you must enable the FlexSync CLI command man pages. See Enable the FlexSync CLI Command man Pages.
flexsync
Use theflexsync command line interface to initiate non-recurring FlexSync replications. You can use flexsync command line options to configure all flexsyncd replication tasks.
Note: You must run the flexsync command on the destination node.
Example:
Where <hostname> is the hostname of the source node, and 10554 is the default port number which flexsyncd uses for SSL data traffic on the source node.
Alternatively, you could run:
The command above does not use SSL for the data transfer, and uses the port that flexsyncd is using by default for such transfers (10454).
You can configure the ports on the source node:
# echo "OPTIONS=-p 10689 -s 10789" > /etc/sysconfig/flexsyncd
# systemctl restart flexsyncd
Where -p is the non-SSL data port and -s is the SSL data port.
NAME
       flexsync - FlexSync mover CLI

SYNOPSIS
       Local:
	 flexsync [OPTION...] SOURCE_DIR DESTINATION_DIR
	 flexsync [OPTION...] SOURCE_DIR/ DESTINATION_DIR

       Remote:
	 flexsync [OPTION...] flexsync://HOST[:PORT]/SOURCE_DIR DESTINATION_DIR
	 flexsync [OPTION...] flexsync://HOST[:PORT]/SOURCE_DIR/ DESTINATION_DIR


DESCRIPTION
       flexsync is  the  command  line interface  for initiating  non-recurring
       FlexSync replications. All of the flexsyncd(8) task  configuration  options
       are available here as command line options.


GENERAL
       flexsync operates  in "pull" mode, so the source directory can be local or
       remote, but the destination directory must be visible locally on the desti‐
       nation host.

       If the source directory is specified with a trailing slash, the contents of
       the directory are synced to the destination directory. Otherwise, a  direc‐
       tory with the same name as the source directory is created under the desti‐
       nation directory, and the source contents are synced there.


OPTIONS
       Options that start with -- and take an argument can have the argument sepa‐
       rated by either a space or an equal sign, e.g.
	    --mode Mode
	    --mode=Mode
       are equivalant.


       --acls|-A
	      Preserve StorNext ACLs (super-user only and StorNext file systems
	      only).

       --archive|-a
	      Equivalent to -Dgoptr.

       --bwlimit=bytes_per_second
	      Limit I/O bandwidth usage to the specified number of bytes per  sec‐
	      ond.

       --credits
	      Print legal disclosures.

       --debug|-d
	      Enable debug logging.

       --delete
	      Delete extraneous files from destination.

       --devices
	      Preserve Unix device files (super-user only).

       -D     Same as --devices --specials.

       --exclude='PATTERN [PATTERN] ...'
	      Specify  shell  glob patterns, separated by a space, describing path
	      names to exclude. The patterns are applied in the order specified. A
	      pattern  starting with  the slash character is anchored to the top-
	      level source directory and will only match starting at  that  level.
	      For  example,  the  pattern '/dir1' will match /source/dir1, but not
	      /source/dir2/dir1, whereas the pattern 'dir1'  will  match  both of
	      those  directories.  Note that path names matching an exclusion pat‐
	      tern are not  considered for  any  operation on the  destination,
	      including removal via the --delete option.

       --group|-g
	      Preserve Unix group ID.

       --help|-h
	      Show usage message.

       --ignore-times|-I
	      Don't skip files where the  source and destination size and time
	      match.

       --license-server=HOST[:PORT]
	      Location of license server.

       --marker=FILE
	      Location for event marker file.

       --max-connections|-M #
	      Maximum number of network connections in use. Default is 8.

       --mode|-m MODE
	      Replication mode, either 'copy' or 'link'. Copy mode  always  copies
	      data; link mode uses hard links when possible.

       --dry-run|-n
	      Generate the change manifest, but do not modify the destination.

       --owner|-o
	      Preserve the Unix owner ID (super-user only).

       --password|-P
	      Password for network replication.

       --perms|-p
	      Preserve traditional Unix permissions.

       --progress
	      Show progress while estimating and transferring data.

       --recursive|-r
	      Recurse into directories.

       --specials
	      Preserve Unix special files.

       --ssl|-S
	      Always connect using SSL.

       --sync={none|soft|hard}
	      Controls how FlexSync  waits for modified files to be durable. If
	      sync mode is 'hard', then each file  is  made  durable  individually
	      using  fsync(). Hard  mode  can significantly decrease replication
	      performance.  If sync mode is 'soft', then a single call to  sync()
	      is made after all I/O is completed.  Soft mode has a much lower per‐
	      formance impact than hard mode, but is  not  effective  in  ensuring
	      durability in all cases.	If sync mode is 'none', then no sync calls
	      are made.	 The default value is 'none'.

       --times|-t
	      Preserve atime and mtime for non-directories.

       --username|-U
	      Username for network replication.

       --update|-u
	      Skip files that are newer on the destination.

       --version|-V
	      Show the FlexSync software version and exit.

       --verbose|-v
	      Show the paths being modified.

       --threads|-w #
	      Set number of flexsync worker threads. Default is the number of  CPU
	      cores.

       --http-threads|-W #
	      Set number of HTTP worker threads. Default is 8.

       --xattrs|-X
	      Preserve	extended  attributes. When source and destination both use
	      native Linux file systems such as ext4,  enabling	 this  option  may
	      preserve Posix ACLs as a side effect.

       --one-file-system|-x
	      Don't cross filesystem boundaries.

       --data-timeout SECONDS
	      Seconds before HTTP connections will time out after established

       --connect-timeout SECONDS
	      Seconds before HTTP connections will time out attempting to connect


EXAMPLES
       flexsync -a /sourcedir /destdir

       This will sync  the  contents of /sourcedir and all of its descendants to
       /destdir/sourcedir.

       For files that already exist in the destination, flexsync will try to mini‐
       mize  the  number of filesystem objects and the amount of data being synced
       by comparing sizes and timestamps. To override this optimization and resync
       everything, use the -I option, e.g.:

       flexsync -a -I /sourcedir /destdir
flexsyncd
Use the flexsyncd command to access the data mover management daemon. This daemon acts as the data mover for automated FlexSync tasks that have been configured using either the FlexSync Dashboard or the flexsyncadmin daemon.
In addition, you can use the flexsyncd command to do the following:
- Perform version management.
- Access task logs, audit logs, and task status.
NAME
       flexsyncd - FlexSync configuration and data moving daemon

SYNOPSIS
       flexsyncd [--adminport=Port|-a Port] [--dataport=Port|-p Port]
	      [--datasslport=Port|-s Port] [--data-timeout=SECONDS] [--connect-
	      timeout=SECONDS] [--max-concurrent-tasks=NUM|-cNUM] [--max-
	      connections=NUM|-MNUM] [--threads=NUM|-wNUM] [--http-
	      threads=NUM|-WNUM] [--foreground|-f] [--trace=FILE|-tFILE] [--fsid-
	      timer=SECONDS] [--version|-V] [--credits] [--help|-h] [--debug|-d]


DESCRIPTION
       flexsyncd is the management daemon and data mover  for  automated  FlexSync
       tasks  that  have  been configured  using the GUI or flexsyncadmin(8).
       flexsyncd also handles version management and acts as a server for  obtain‐
       ing task logs, audit logs, and task status.

OPTIONS
       Options that start with -- and take an argument can have the argument sepa‐
       rated by either a space or an equal sign, e.g.
	    --port Port
	    --port=Port
       are equivalant.


       --adminport|-a Port
	      Port for web services administration traffic. Default is 10453.

       --dataport|-p Port
	      Port for data traffic. Default is 10454.

       --data-timeout SECONDS
	      Seconds before HTTP connections will time out after established

       --connect-timeout SECONDS
	      Seconds before HTTP connections will time out attempting to connect

       --datasslport|-s Port
	      Port for data traffic. Default is 10554.

       --max-concurrent-tasks|-c #tasks
	      Maximum number of concurrently running tasks.

       --max-connections|-M #connections
       Maximum number of network connections in use. Default is 8.

       --threads|-w #threads
       Number of flexsyncd worker threads. Default is the number of CPU cores.

       --http-threads|-W #http-threads
       Number of HTTP worker threads. Default is 8.

       --foreground|-f
       Run flexsyncd in the foreground instead of as a daemon.

       --trace|-t FILE
       Trace JSON exchanges and output to FILE.

       --fsid-timer=SECONDS
       Maximum number of SECONDS a task is keep suspended on fsid mismatch.

       --version|-V
       Show the flexsyncd software version and exit.

       --credits
       Print legal disclosures.

       --help|-h
       Show the flexsyncd help message.

       --debug|-d
       Turn on debug logging.
flexsyncadmin
Use the flexsyncadmin command to manage FlexSync hostgroups, hosts, and tasks. You can also use this command to manage all versions created by FlexSync utilities.
NAME
       flexsyncadmin - Utility for FlexSync administration

SYNOPSIS
       flexsyncadmin [--username=USERNAME|-U USERNAME]
	      [--password=PASSWD|-PPASSWD] [--hostname=HOSTNAME|-H HOSTNAME]
	      [--port=PORT|-p PPRT] [--json|-j] [--timeout=SECONDS|-t SECONDS]
	      [--version|-V] [--help|-h] [--debug|-d] [--credits] [command]


DESCRIPTION
       flexsyncadmin can  be  used  to create,  configure,  remove,  and  observe
       FlexSync  hostgroups,  hosts,  and tasks. It can also be used to manage any
       versions created by FlexSync utilities including this one.

OPTIONS
       Options that start with -- and take an argument can have the argument sepa‐
       rated by either a space or an equal sign, e.g.
	    --hostname Hostname
	    --hostname=Hostname
       are equivalant.

       --username|-U USERNAME
	      Username for  flexsyncadmind(8). Created using flexsyncauth(8). If
	      not specified as a command option, the user will be prompted.

       --password|-P PASSWD
	      Password for flexsyncadmind(8). Created  using  flexsyncauth(8). If
	      not specified as a command option, the user will be prompted.

       --hostname|-H HOSTNAME
	      Hostname for web services.

       --port|-p Port
	      Port for web services.

       --json|-j
	      Enable JSON output for certain flexsyncadmin operations.

       --timeout|-t SECONDS
	      HTTPS operation timeout in seconds.

       --version|-V
	      Show the flexsyncadmin software version and exit.

       --help|-h
	      Show the flexsyncadmin help message.

       --debug|-d
	      Turn on debugging code.

       --credits
	      Print legal disclosures.

COMMANDS
       When  no  command is given following the options, flexsyncadmin runs in in‐
       teractive mode. Otherwise, flexsyncadmin executes the specified command and
       exits. Available commands are as follows:

       help   Show the available commands.

       add-hostgroup hostgroup_name
	      Add a hostgroup with the given name.

       edit-hostgroup hostgroup_name set name=new_name
	      Rename a hostgroup.

       remove-hostgroup hostgroup_name
	      Remove  the  hostgroup  with  the given name. Note that any hosts in
	      this hostgroup will remain, but they will not be visible.

       add-host hostgroup_name host_name DNS/IP [port] [username] [password]
	      Add a host to hostgroup_name. The host_name will be used as a  nick‐
	      name  during other commands. The host must be reachable at the given
	      DNS name or IP address or the add-host operation will fail.  Option‐
	      ally username and/or password can be specified.

       edit-host hostgroup_name dest_host_name [command]
	      When  no command is given, and flexsyncadmin is running interactive‐
	      ly, host editing mode is entered and changes  can  be  made  to  the
	      specified  host. Otherwise, flexsyncadmin executes the specified ed‐
	      it-host subcommand and exits. See the Task and Host Editing  subcom‐
	      mands section below.

       remove-host hostgroup_name host_name
	      Removes host_name from hostgroup hostgroup_name.

       add-task  source_host_name   dest_host_name   task_name	  source_directory
       dest_directory
	      Add a task named task_name  to the host dest_host_name .	 The  task
	      will be created with a sync_interval of zero (on-demand) so that op‐
	      tions can be configured with edit-task.

       add-default-task source_host_name dest_host_name task_name source_directory
       dest_directory
	      Similar  to  add-task,  except  that  the newly created task will be
	      scheduled to run using default settings for its options.

       remove-task [[[--dest] [--versions] [--audit]] | [--all]] [--DELETEMYDATA]
       dest_host_name task_name
	      Remove the given task from host dest_host_name. If --dest is specified,
	      the destination directory tree will be removed. If --versions is specified,
	      any versions that were created will  be  removed. If --audit is specified,
	      any audit information will be removed. --all is the same as
	      --dest --versions --audit.  If any of --dest, --versions, --audit, or --all
	      are specified, the task is not deleted, and all data is preserved unless the
	      --DELETEMYDATA option is also specified. If no options are given, the
	      destination directory, any version directories, and any audit trails will
	      be preserved.

       edit-task dest_host_name task_name  [command]
	      When  no command is given, and flexsyncadmin is running interactive‐
	      ly, task editing mode is entered and changes  can  be  made  to  the
	      specified  task. Otherwise, flexsyncadmin executes the specified ed‐
	      it-task subcommand and exits. See the Task and Host Editing  subcom‐
	      mands section below.

       start-task dest_host_name task_name
	      If  the  given task is currently idle, or it has been marked as sus‐
	      pended, it will start right away, even if its syncing  interval  has
	      not yet passed. The task will no longer be marked as suspended. Note
	      that  tasks  started  using  this command  are  exempt	from   the
	      flexsyncd(8)  maximum  concurrent	 task  limit,  which can result in
	      higher than normal system resource usage.

       start-scan dest_host_name task_name
	      Identical to start-task, except that the	resulting  task	 run  will
	      scan  the	 source,  even	if  that task run normally would have been
	      event driven.

       suspend-task hostgroup_name [dest_host_name [task_name]]
	      Suspend  a  single  task	named	task_name;   or	  all	tasks	on
	      dest_host_name; or all tasks in hostgroup_name.

       resume-task hostgroup_name [dest_host_name [task_name]]
	      Resume   a   single   task   named   task_name;	or  all	 tasks	on
	      dest_host_name; or all tasks in hostgroup_name.  Similar	to  start-
	      task, except that the task will not start until its syncing interval
	      has passed.

       reverse-task dest_host_name task_name
	      Create a task based on task_name such that the source  and  destina‐
	      tion  hosts and directories are reversed in a way that would restore
	      the source directory onto the source host. The reversed task will be
	      named  task_name-REVERSED. The task to be reversed must be suspended
	      before using this command. The sync_interval of  the  reversed  task
	      will  be	set  to	 zero, i.e. it requires a subsequent start-task to
	      run.
       clone-task dest_host_name task_name new_task_name
	      Create a clone of a task based on task_name named new_task_name.
	      The sync_schedule of the new task will be set to '0', i.e.
	      it requires a subsequent start-task to run.
       show-task-reports dest_host_name task_name
	      Show task activity reports.

       remove-task-report dest_host_name task_name timestamp
	      Remove the task report with the given timestamp, as shown	 by  show-
	      task-reports. For removing task sessions that created a version, use
	      remove-version instead.

       purge-task-reports hostgroup_name [dest_host_name [task_name]]
	      Remove task activity logs and audit logs for sessions that  did  not
	      create a version.

       show-versions dest_host_name task_name
	      List the versions created by FlexSync runs for this task.

       remove-version dest_host_name task_name version_name
	      Initiate	the  removal  of the directory tree for the given version.
	      Choices for version_name can be obtained from the show-versions com‐
	      mand.  This  command  cannot  be undone, so please use with caution.
	      Versions which are in the process of being removed will be displayed
	      by show-versions as (Delete in progress), e.g.:

	      source-12-10-2016-09:57:39   (Delete in progress)


       status [--active] [hostgroup_name [dest_host_name [task_name]]]
	      Display  status, optionally filtered by hostgroup, destination host,
	      or task. If --active is specified, only show status information  for
	      tasks that are currently either estimating or replicating.

       config-backup [hostgroup_name [host_name]] backup_pathname
	      Create  a	 backup	 of  all of the configuration information for this
	      flexsyncadmind(8) and all of its flexsyncd(8) hosts and store it	in
	      backup_pathname.	The  backup file is suitable for use with the con‐
	      fig-restore command. If a hostgroup_name is given, only back up that
	      hostgroup. If a hostgroup_name and host_name are given, only back up
	      that hostgroup and host.

       config-restore [hostgroup_name [host_name]] backup_pathname
	      Restore the flexsyncadmind(8) and	 flexsyncd(8)  configuration  from
	      backup_pathname.	A  partial  restore  can  be  done by specifying a
	      host_name and/or a hostgroup_name.

       show-email-reporting
	      Show the current email reporting configuration

       set-email-reporting   <enabled|disabled>	   [<smtp_hostname>    <smtp_port>
       <tls|none>   <none|username:password>   <sender	 address>   <recipient_ad‐
       dress[,recipient_address]> 'cron expression'
	      Set the email  reporting	configuration.	 Cron  expression  can	be
	      quartz style or traditional UNIX style.

	      Quartz style cron expressions have a seconds field:
		  second minute hour day_of_month month day_of_week

	      Traditional UNIX style cron expressions do not have a seconds field:
		  minute hour day_of_month month day_of_week

	      Refer to the crontab(5) man page for details about how to write cron
	      expressions.

TASK AND HOST EDITING SUBCOMMANDS
       show-options
	      Show the current task or host options.

       save   Save changes to options. For task changes, the new values will  take
	      effect  the  next	 time the task runs. Host changes will take effect
	      immediately.

       set option_name=value [ option_name=value ...]
	      Set the given option(s) to the specified value(s). Note that in  in‐
	      teractive	 mode, the save command is required to save any changes to
	      options.

       show-defaults
	      Show the option values that would be set by reset-defaults.

       reset-defaults
	      Reset this task or host's options to their default values.

       quit   Quit without saving changes.


EXAMPLES
       Set task1's sync interval to 120 seconds:

	  rock # flexsyncadmin -U admin -P password
	  > edit-task destination-host task1
	  edit> set sync_interval=120
	  edit> save
	  Changes will take effect when the task becomes idle.
	  edit>

       Set task1's cooldown interval to five minutes (300 seconds)  and automati‐
       cally save the change:

	  rock # flexsyncadmin -U admin -P password edit-task destination-host task1 set cool_down=300

       Change a host's DNS name/IP address:

	  rock # flexsyncadmin -U admin -P password edit-host destination-host set hostname=192.168.0.1

       Set  an	exclusion  list of glob patterns for a task. Note the use of back‐
       slash single quotes when specifying multiple patterns:


	  rock # flexsyncadmin -U admin -P password edit-task destination-host task1 set exclude=\´*.new *.tmp\´

       Note that path names matching an exclusion pattern are not  considered  for
       any operation on the destination, including removal via the delete option.

       To clear a task's exclusion list:


	  rock # flexsyncadmin -U admin -P password edit-task destination-host task1 set exclude=
flexsyncadmind
Use the flexsyncadmind command to access the FlexSync administrative daemon and web server, which do the following:
- Poll the flexsync daemon for each configured host to gather status information about the host and its tasks.
- Provide authentication and session management.
NAME
       flexsyncadmind - FlexSync administration daemon

SYNOPSIS
       flexsyncadmind [--interval=msecs|-I msecs] [--port=Port|-p Port]
	      [--pidfile=FILE|-P FILE] [--foreground|-f] [--version|-V]
	      [--credits] [--help|-h] [--debug|-d] [--data-timeout=SECONDS]
	      [--connect-timeout=SECONDS]


DESCRIPTION
       flexsyncadmind is the administrative daemon and web  server  for FlexSync,
       providing  hostgroup  and host configuration and management. It accumulates
       status information about hosts and tasks by polling flexsyncd(8) on each of
       the  configured hosts. It also provides authentication and session manage‐
       ment.

OPTIONS
       Options that start with -- and take an argument can have the argument sepa‐
       rated by either a space or an equal sign, e.g.
	    --port Port
	    --port=Port
       are equivalant.


       --interval|-I msecs
	      Interval at which flexsyncadmind polls each host.

       --port|-p Port
	      Port for web services.

       --pidfile|-P FILE
	      PID file to use for locking.

       --foreground|-f
	      Run flexsyncadmind in the foreground instead of as a daemon.

       --version|-V
	      Show the flexsyncadmind software version and exit.

       --credits
	      Print legal disclosures.

       --help|-h
	      Show the flexsyncadmind help message.

       --debug|-d
	      Turn on debug logging.

       --data-timeout SECONDS
	      Seconds before HTTP connections will time out after established

       --connect-timeout SECONDS
	      Seconds before HTTP connections will time out attempting to connect
flexsync_gather
Use the flexsync_gather command to collect FlexSync debugging information from a single host (in a typical multi-host configuration, you must run the command on each host).
The debugging information is staged in a directory under /tmp. However, if TMPDIR is specified to a directory, then the specified directory is used. See the command output for the location of the final tar ball.
NAME
       flexsync_gather - Collect debugging information for FlexSync

SYNOPSIS
       flexsync_gather [-d DIRPATH][-b]


DESCRIPTION
       The  flexsync_gather program is used to collect FlexSync debugging informa‐
       tion  from  a  single  host.  In a   typical   multi-host   configuration,
       flexsync_gather will need to be run on each host.

       The debugging information is staged in a directory under /tmp. If TMPDIR is
       set to a directory, that directory will be used instead. See  the  command
       output for the location of the final tar ball.

OPTIONS
       Option  -d allows to specify a custom location of staging area and destina‐
       tion location for the output file. If this option is provided and specified
       directory  does not exist, it will be created and used. If specified direc‐
       tory can't be created or used, default TMPDIR location  will  be used  in‐
       stead.

       Option  -b  disables  gathering into output tar ball file all flexsync exe‐
       cutable binaries files and libraries, they depend on. It will reduce output
       file size.
flexsyncauth
Use the flexsyncauth command to manage authentication with the flexsyncd and flexsyncadmind daemons. Before flexsyncadmin or the GUI can communicate with flexsyncadmind, you must create a username and password for flexsyncadmind. Similarly, before flexsyncadmind can communicate with flexsyncd, you must create a username and password for each instance of flexsyncd.
NAME
       flexsyncauth - FlexSync user administration command

SYNOPSIS
       flexsyncauth -a -d <flexsyncd|flexsyncadmind> -U <username> -P <password>

       flexsyncauth -r -d <flexsyncd|flexsyncadmind> -U <username>

       flexsyncauth -l -d <flexsyncd|flexsyncadmind>

       [--version|-V]


DESCRIPTION
       flexsyncauth  is used  to  manage authentication with the flexsyncd(8) and
       flexsyncadmind(8) daemons. Before flexsyncadmin(8) or the GUI can  communi‐
       cate  with  flexsyncadmind,  a  username and  password must be created for
       flexsyncadmind. Similarly,  before  flexsyncadmind  can  communicate  with
       flexsyncd,  a  username	and  password must be created for each instance of
       flexsyncd.

OPTIONS
       -a     Add a username/password pair to be used with the local  instance	of
	      the  specified  daemon.  This  option can also be used to change the
	      password for an existing username.

       -r     Remove a username/password pair from the local instance of the spec‐
	      ified daemon.

       -l     List  the	 users associated with the local instance of the specified
	      daemon.

       --version|-V
	      Show the flexsyncauth software version and exit.
flexsyncdump
Use the flexsyncauth command to manage authentication with the flexsyncd and flexsyncadmind daemons. Before flexsyncadmin or the GUI can communicate with flexsyncadmind, you must create a username and password for flexsyncadmind. Similarly, before flexsyncadmind can communicate with flexsyncd, you must create a username and password for each instance of flexsyncd.
NAME
       flexsyncdump - FlexSync database debug command

SYNOPSIS
       flexsyncdump -l [-d <flexsyncd|flexsyncadmind> |-p <pathtodatabase>]

       flexsyncdump -s <key> [-d <flexsyncd|flexsyncadmind> |-p <pathtodatabase>]

       [--version|-V]


DESCRIPTION
       flexsyncdump  is used  to  print documents from the flexsync configuration
       database.  It is intended only for debugging purposes.

OPTIONS
       -d <flexsyncd|flexsyncadmind>
	      If specified, the database path will be set to the default path  for
	      the indicated daemon

       -p <path to database>
	      An  explicit  path  to  a database  can be provided, eg one from a
	      flexsync_gather

       -l     List all the document keys in the database

       -s <key>
	      Print a document given its document key

       --version|-V
	      Show the flexsyncdump software version and exit.
To access information about a FlexSync command, such as the command synopsis and options, you need to enable the FlexSync CLI command man pages.
For a list of available FlexSync CLI commands, see CLI Commands.
- Log on to an SSH client, and connect to your system as the root user.
- At the prompt, enter the following command to edit the .bash_profile file:
vi ~/.bash_profile
- Within the editor, press
ito insert text. - Add the following lines to the bottom of the file:
MANPATH=$MANPATH:/opt/quantum/flexsync/man
export MANPATH
Example
# .bash_profile
# Get the aliases and functions
if q[ -f ~/.bashrc ]; then
. ~/.bashrc
fi
# User specific environment and startup programs
PATH=$PATH:$HOME/bin
export PATH
MANPATH=$MANPATH:/opt/quantum/flexsync/man
export MANPATH
-
Press Esc and then enter
:wto write the changes to the file. -
Press Esc and then enter
:qto exit the editor. - Log out of your system, and then log in to apply the changes.
- At the prompt, enter the following command to view a man page for a command:
man <command>
The following information displays for each command:
Command
Information
flexsync
- Name
- Synopsis
- Description
- General
- Options
- Examples
- See Also
flexsyncd
- Name
- Synopsis
- Description
- Options
- See Also
flexsyncadmin
- Name
- Synopsis
- Description
- Options
- Commands
- Task Editing SubCommands
- Examples
- See Also
flexsyncadmind
- Name
- Synopsis
- Description
- Options
- See Also
flexsync_gather
- Name
- Synopsis
- Description
- See Also
- Press the Spacebar on the keyboard to page through the man page.
- Type q and press Enter to exit the man page.
Before configuring your FlexSync replication tasks, review the following limitations and restrictions.
-
Caution: File names that are NOT UTF-8 compliant are NOT synchronized; you can scan your file names to determine if you have invalid file name characters. One reason your file name might not be UTF-8 compliant is because the file originated from a file system that allows non-compliant UTF-8 characters (for example, Latin-1 characters). To scan for invalid file name characters in your file system, use the snfsnamescanner -u command (see snfsnamescanner in the StorNext Man Pages Reference Guide); to convert your invalid file name characters in your file system to UTF-8, use the script (utf8FileNames.sh) that is generated by the snfsnamescanner command.
Example
# /usr/cvfs/lib/snfsnamescanner -u /stornext/test
Wed Feb 26 08:15:11 2020
Starting search in: /stornext/test
Scanning for:
invalid UTF8 names
Files/directories scanned: 1
Elapsed time: 00:00:00
0: File names with invalid UTF8 results in ./utf8FileNames.sh
A hostgroup's name cannot exceed 16 characters. Supported characters include alphanumeric characters, the hyphen symbol (-), and the underscore symbol (_).
-
You must create a hostgroup before creating a host.
- You can define a host for a single hostgroup only. Hosts cannot be shared between hostgroups
-
When naming a host, keep the following parameters in mind:
- You can configure only one name (alias/label) for a host.
- A host's name cannot exceed 16 characters.
- Supported characters include alphanumeric characters, the hyphen symbol (-), and the underscore symbol (_).
- For each host, you can only configure one hostname (DNS/IP). The hostname can correlate to an active Ethernet interface and must be a valid resolvable DNS entry or a valid IPv4 address. Hostnames cannot exceed 16 alphanumeric characters.
-
The default port for the Admin Port entry is 10453. This port is used for management communications.
-
The default port for the Data Port entry is 10554. This port is used for data port communications.
-
The default port for the SSL Port is 10554. This port is used for SSL communications.
-
Use the flexsycnd user name to access a defined host from the FlexSync CLI.
-
Use the flexsycnd password to access a defined host from the FlexSync CLI.
- You must create a hostgroup and a host before defining a task.
- A task's name cannot exceed 50 characters. Supported characters include alphanumeric characters, the hyphen symbol (-), and the underscore symbol (_).
- When you configure a replication task, you can only configure one task to write to a destination directory. In other words, you cannot overlap or run multiple tasks to run the same replication on the same directory structure concurrently/simultaneously.
-
FlexSync supports data movement to and from 3rd party file systems and disk mounts, such as NAS / SMB and NFS-based mounts.
Note: When you replicate between StorNext file systems, the advanced metadata capabilities within StorNext allow FlexSync to identify and copy only changed and new files without needing to scan the file system, dramatically shortening the time and resources needed to create a file replica. When you use FlexSync to replicate data from a third party file system, FlexSync must do a full scan of the third party file system to determine changes before it can create file replicas; this scan of the third party storage results in lower replication performance versus a native StorNext to StorNext replication task, and can have an impact on the metadata performance of the third party storage.
Access Control List (ACL) and Metadata
Depending on how an ACL and metadata is stored by an application, it is on a case by case basis if the information is preserved (for example, StorNext metadata in the file system versus user defined metadata within an application). If the information is saved as encoding within the file, then it is present. A file system ACL is not replicated since it is different from a StorNext file system ACL, but the files are replicated without any restraint.
Note: If StorNext is installed on both the target mount and the destination mount, the ACL is preserved. If one of the mounts does not have StorNext installed on it, then the ACL is not preserved.
If you use a StorNext file system as a replication target and your available disk space is limited, you might consider disabling automatic stripe alignment if it is currently enabled. If you disable automatic stripe alignment, then your system favors the capacity over the performance.
Note: Any performance degradation is usually minor.
Use either of the following procedures to disable automatic stripe alignment. Refer to Advanced Parameters > Allocation Tab in the Add a File System topic or the Edit a File System topic.
-
If the Allocation Session Reservation Size is non-zero, then automatic stripe alignment is already disabled.
Note: For file systems created with StorNext 6.0 (or later), the default value for the Allocation Session Reservation Size is 1 GiB, so many file systems already have automatic stripe alignment disabled.
- You can directly disable automatic stripe alignment by setting the Stripe Align Size equal to zero.
Configuration
There are three basic steps to configure FlexSync to replicate your data.
- Step 1: Configure a Hostgroup
- Step 2: Configure a Host
- Step 3: Configure a Task
To configure a replication task from the FlexSync Dashboard, complete the following steps.
The hostgroup is a container for the hosts that you assign as a source and as a target system. If you have multiple systems you want to replicate, you can configure multiple Hostgroups. To configure a replication task, you must first add a hostgroup.
- Log in to the FlexSync Dashboard. See Access the FlexSync GUI.
- In the Hostgroup column, click
 to display the Hostgroup configuration dialog box.
 - In the Name field, enter a label for the hostgroup.
- Click Submit to add the hostgroup.
Note: You can change the name of your hostgroup by clicking the cogwheel and then clicking the Edit icon.
You can now add one or more hosts to your hostgroup. A host is what you assign as either a source or target system.
Note: The host's flexsyncd daemon must be running and reachable at its configured DNS name or IP address to successfully complete this task.
- Log in to the FlexSync Dashboard. See Access the FlexSync GUI.
-
In the Hosts column, click
to display the Host configuration dialog box.Note: In the Hostgroups column, if you click a hostgroup, the hostgroup information is prepopulated in the Host configuration dialog box.
 Basic Tab
- In the Name field, enter a label for the host.
- In the Hostgroup field, select a hostgroup, unless it is already prepopulated.
-
In the Hostname field, enter the DNS name or IP address for the replication transport.
-
In the Admin port field, update the port number, as needed. The default port is 10453.
-
In the Data port field, update the port number, as needed. The default port is 10454.
-
In the SSL port field, update the port number, as needed. The default port is 10554.
-
In the Username field, enter your FlexSync user name.
-
In the Password field, enter your FlexSync password.
Advanced Tab
Select a check box to enable a setting or clear a check box to disable a setting, as needed:
Check Box
Description
Select this option to restrict the bandwidth across all of the active tasks for the selected host, to the specified value.
By default, bandwidth throttling is disabled. To enable:
- Check Bandwidth Throttling.
In the bandwidth limit field, enter a value.
Note: The minimum bandwidth limit value is 1 MiB per second (MiB/s).
- Select a data transfer rate from the list.
- Enter 0 to disable bandwidth throttling.
Note: If you enable bandwidth throttling, the rate I/O is not guaranteed. Initially, your data transfers might experience a bit of variation where the host’s transfer rate, as shown in the GUI, can be slightly higher or lower than the requested transfer rate. The transfer rate eventually settles in to the requested transfer rate. Also, the transfer rate shown by the GUI is an average across the running time of all active tasks. If you update the bandwidth limit mid-stream, then FlexSync throttles up or down to that limit immediately, but it might take an extended period of time for the average to reflect the updated bandwidth limit.
Caution: Use caution if you attempt to mix Bandwidth Throttling and Storage Manager. If you run FlexSync on a throttled link or if the link is substantially slower than the minimum tape drive read speed, see Considerations for Low Network Bandwidth Tape Retrieval for configuration options.
-
Click Submit to apply all of your changes and to add the host. The FlexSync dashboard now displays your configured hosts in the Hosts column. You can change the name of your hosts by clicking the cogwheel and then clicking the Edit icon.
- (Optional) Repeat the procedure for each host participating in file replication.
A Task defines what files and directories to replicate from your source system to a location you define on the target system(s).
Note: When you configure a replication task, you can only configure one task to write to a destination directory. In other words, you cannot overlap or run multiple tasks to run the same replication on the same directory structure concurrently/simultaneously.
- Log in to the FlexSync Dashboard. See Access the FlexSync GUI.
-
In the Tasks column, click
to display the Task Configuration dialog box.Note: In the Hosts column, if you click a host, the host information is prepopulated in the Task Configuration dialog box.
- On the Basic tab, complete the information to define the source and destination directories.Basic Tab
- In the Task name field, enter a label for the task.
- In the Hostgroup field, select a hostgroup.
- From the Source list, select the source host.
- In the /source/path field, enter the file system mount and relation path of the source host to replicate, such as /stornext/snfs1/data.
- From the Destination list, select the destination (or target) host.
In the /destnation/path field, enter the file system mount and relation path of the destination host to replicate data to, such as /stornext/snfs2/target.
Note: The target directory does not need to exist; the system automatically creates the directory if you do not include the last forward slash in the source directory path field.
Caution: Do not assign a StorNext file system mount point as a destination path. If you assign a StorNext file system mount point as a destination path, some FlexSync features behave unexpectedly (such as versioning and extraneous file deletion).
Additional Information
Keep in mind that the syntax of the directory path will determine how it is replicated.
Example 1: Replicate an Entire Directory
Source: /stornext/snfs1/data → Target: /stornext/snfs2/target
The entire source /stornext/snfs1/data directory is replicated to a new /stornext/snfs2/target/data directory on the target.
Example 2: Replicate All Files Within a Directory
Source: /stornext/snfs1/data/ → Target: /stornext/snfs2/target
All source files in the /stornext/snfs1/data/ directory are replicated directly to the /stornext/snfs2/target/ directory without the creation of a new /data directory.
(Optional) Click Allow mount point as a destination directory to confirm that you want to allow a mount point as a destination directory and disable a warning prompt, according to the rules below:
Caution: If you upgraded to FlexSync 2.2.0 (or later) and your configuration contains a destination that is also a mount point, then you MUST enable the Allow mount point as a destination directory option to edit your existing task.
- If your destination directory is a mount point, the source directory has a trailing slash and is NOT mounted then you receive a warning.
- If your destination directory is a mount point, the source directory has a trailing slash and is mounted, and the Delete extraneous files on destination option is enabled, then you receive a warning.
- If your destination directory is a mount point, the source directory has a trailing slash and is mounted, and the Delete extraneous files on destination option is NOT enabled, then you do NOT receive a warning.
- If you receive a warning prompt, then you must confirm to continue; the Submit button is disabled and you must do one of the following:
- Click Allow mount point as a destination directory to confirm.
- Configure your source or destination path by removing the trailing slash.
Note: If the destination path is a mount point and it is not mounted, then its contents and the results of a FlexSync replication can be hidden after it is mounted. If the destination path is a mount point and it is mounted, and the Delete extraneous files on destination option is enabled, then you can delete the files in the mounted directory.
- On the Schedule tab, modify the default task schedule, as needed.Schedule Tab
Edit the following values, as needed:
Value
Description
Synchronization Schedule
The schedule of replication passes. If the current replication runs beyond the next scheduled pass, the next pass starts immediately after the current pass ends.
- The default time is 15 minutes.
To configure the synchronization schedule, you can modify the following parameters:
- Minutes
- Hourly
- Daily
- Weekly
- Monthly
- Yearly
Advanced (You can optionally input a cron expression in the Schedule Cron Expression field in the Schedule > Advanced tab. See Construct a Cron Expression).
Expire Logs
The minimum amount of time before a replication pass log is deleted.
- The default is 30 days.
- Enter 0 to keep logs indefinitely.
Cool Down
The minimum file age before a file is replicated. Use this setting to skip replication of temporary files.
- The default is 5 minutes.
- Enter 0 to disables this option.
Force Rescanning
The number of days to force file system scans. FlexSync does not scan the file system with every replication pass.
- The default is 7 days.
- Enter 0 to disable file system scans.
Versioning
The smallest interval between version creations of replicated data.
- The default is 1 day.
- Enter 0 to disable this option.
Note: The versioning option is not supported if you attempt to configure it on a relation point.
Expire Versions
The period of time between when a version is created and when it is automatically removed.
Note: This option has no effect if the Versioning option is disabled.
- The default is 30 days.
- Enter 0 to disable this option.
Note: The Expire Versions feature is not supported if you attempt to configure it on a relation point.
- On the Attributes tab, modify the default values, as needed.Attributes Tab
Select a check box to enable a setting or clear a check box to disable a setting, as needed:
Check Box
Description
Preserve all
Preserve all standard attributes of the source.
Selecting this option selects all sub-values.
Note: This option must be selected separately.
Preserve Unix permissions Preserve original Unix file permissions of the source. Preserve Unix owner Preserve the source owner. Preserve Unix group Preserve the destination group name of the source. Preserve StorNext ACLs
Preserve StorNext ACL settings of the source.
Note: This option is only effective when source and destination file systems are both StorNext.
Preserve modification times
Preserve timestamps indicating the last time the source was updated.
Preserve Unix device files
Copy Unix device files from the source to the destination.
Preserve Unix special files
Transfer Unix named sockets and fifos from the source.
Preserve extended attributes
Copy extended attributes to the destination. When the source and the destination both use native Linux file systems such as ext4, enabling this option may preserve Posix ACLs as a side effect.
Note: This option is recommended for macOS clients
- On the Advanced tab, modify the default values, as needed.Advanced Tab
Select a check box to enable a setting or clear a check box to disable a setting, as needed:
Check Box
Description
Delete extraneous files on destination
Delete destination files not found on the source.
Ignore times
Force update even when the time and size of files on the source match those on the destination.
Extended logging
Enable auditing.
File System ID Check
This option is enabled by default.
The file system ID FSID is a file system identifier, and provides information about the underlying file system and if the file system has changed.
For example, the file system can change when you unmount a mount point or when you change the mount point. Another example is when you exchange a cartridge that you use in an R-series appliance, since the underlying device has a different FSID.
You must disable this option if you are using a work-flow where the source is a cartridge drive that can be exchanged.
Caution: Do not disable this option for any normal file system to file system operations.
Delta Compression
This option is enabled by default.
The Delta Compression feature allows you to store and transmit the data in the form of differences (deltas) between sequential data rather than complete files.
For example, this feature is particularly useful where archival histories of changes are required.
Caution: The primary advantage of the delta compression option is to save network bandwidth; however, you must consider the trade-off between bandwidth usage and overall performance. The delta compression option can decrease the duration of the replication process if network speed is slow because it only transfers changed data rather than the full files. If the network speed is fast, then the delta compression option might increase the duration of the replication process due to the additional disk reads and heavy calculations required to calculate the deltas between source and target files; in this case, it might be faster to transfer the entire files by disabling the delta compression option.
Skip newer files
Skip files that are newer on the destination.
Don't cross file system boundaries
Do not allow file system mount points to cross.
Transmit data using SSL
Enable encryption.
Forced durability Select one of the following options to define the durability of replicated data.
NoneThis option provides the least amount of durability to your replicated data.
Example
If you experience a power outage, you might lose content that has not been completely replicated. In addition, there might be gaps in data protection.
After each task runThe synchronization process does not wait for each file to synchronize before beginning the next replication pass. Instead, it waits for the whole file system to be synchronized at the end of the replication pass.
After each task run mode has a much lower performance impact than After each file mode, so we recommend it for transfers within a single appliance's file system. However, After each task run mode is not effective in ensuring durability in all cases, such as across multiple appliances sharing a StorNext file system.
Example
If the kernel experiences a problem with the synchronization process, you may not be able to troubleshoot an issue.
After each fileThe synchronization process waits for each file to finish writing and to be synchronized to the physical storage before beginning the next replication pass.
After each file mode can significantly decrease replication performance, but it offers the most durability to your replicated data. We recommend this setting for environments supporting multiple appliances sharing a StorNext file system.
Example
If you experience a power outage, the file(s) should be guaranteed to survive.
Exclusions
In the Exclusions field, you can specify an exclusion list of glob patterns, separated by a space, describing files the task should exclude.
Note: You cannot use a leading space, an ending space, a file name that contains a space, and/or a directory that contains a space.
Note: The pattern is applied in the order it is specified.
The example below excludes all files whose names end with ".tmp" and ".pdf", respectively.
Example
*.tmp *.pdf
You can also exclude a full path directory.
Note: All paths are relative to the source path of the task to exclude.
For example, to exclude the following directories:
/stornext/source/group1/dir0
/stornext/source/group1/dir01
/stornext/source/group2/dir0
/stornext/source/group2/dir01
Where the task source path is:
/stornext/sourceIn the Exclusions field, enter the pattern:
group?/dir*The pattern explicitly excludes any directory labeled group followed by a single character, along with any sub directory beginning with dir.
The pattern does not exclude the following directory:
/stornext/source/group3/mediaNote: Path names matching an exclusion pattern are not considered for any operation on the destination, including removal due to the Delete extraneous files on destination feature being enabled.
Caution: The Delete extraneous files on destination feature does not apply to files on the exclusion list. If you add an exclusion list to a task that contains the Delete extraneous files on destination feature enabled, then the task discontinues to make new versions of the specified file, but the destination still contains the existing versions of the file made prior to adding the exclusion.
-
Click Submit to add the task.The configured task appears on the FlexSync dashboard. A progress bar displays in the Tasks column, indicating an estimated amount of time for the replication task to complete.
To configure a replication task from the FlexSync CLI, use the flexsyncadmin command.
For examples of configuring large replication tasks from the FlexSync CLI, see Large Replication Task Examples.
- Log on to an SSH client, and connect to your system.
- At the prompt, enter the following command to create a hostgroup:
/opt/quantum/flexsync/bin/flexsyncadmin -U <username> -P <password> add-hostgroup <name>
Example
/opt/quantum/flexsync/bin/flexsyncadmin -U admin -P password add-hostgroup myhostgroup
Command Parameters
<username>User name for flexsyncadmind.
<password>Password for flexsyncadmind.
<name>Label for the hostgroup.
- Log on to an SSH client, and connect to your system.
- At the prompt, enter the following command to add a source host:
/opt/quantum/flexsync/bin/flexsyncadmin -U <username> -P <password> add-host <hostgroup_name> <host_name> <dns/ip> <username> <password> [admin_port data_port data_ssl_port]
Example
/opt/quantum/flexsync/bin/flexsyncadmin -U admin -P password add-host myhostgroup mdc1 10.12.345.678 root passw0rd
Command Parameters
<username>User name for flexsyncadmind.
<password>Password for flexsyncadmind.
<hostgroup_name>Label for the hostgroup for which you are adding a source host.
<host_name>Label for the source host.
<dns/ip>DNS name or IP address for the source host.
<username>User name to access the source host.
<password>Password to access the source host.
[admin_port](Optional) Update the Admin port number, as needed. The default port is 10453.
[data_port](Optional) Update the Data port number, as needed. The default port is 10454.
[data_ssl_port](Optional) Update the SSL port number, as needed. The default port is 10554.
- At the prompt, enter the following command to add a target host:
/opt/quantum/flexsync/bin/flexsyncadmin -U <username> -P <password> add-host <hostgroup_name> <host_name> <dns/ip> <username> <password> [admin_port data_port data_ssl_port]
Example
/opt/quantum/flexsync/bin/flexsyncadmin -U admin -P password add-host myhostgroup mdc2 10.12.345.679 root passw0rd
Command Parameters
<username>User name for flexsyncadmind.
<password>Password for flexsyncadmind.
<hostgroup_name>Label for the hostgroup for which you are adding a target host.
<host_name>Label for the target host.
<dns/ip>DNS name or IP address for the target host.
<username>User name to access the target host.
<password>Password to access the target host.
[admin_port](Optional) Update the Admin port number, as needed. The default port is 10453.
[data_port](Optional) Update the Data port number, as needed. The default port is 10454.
[data_ssl_port](Optional) Update the SSL port number, as needed. The default port is 10554.
- Log on to an SSH client, and connect to your system.
- At the prompt, enter the following command to add a task:
/opt/quantum/flexsync/bin/flexsyncadmin -U <username> -P <password> add-task <source_host_name> <dest_host_name> <task_ name> <source dir> <destination dir>
Example
/opt/quantum/flexsync/bin/flexsyncadmin -U admin -P password add-task mdc1 mdc2 project1 /stornext/snfs1/data /stornext/snfs2/backup
Command Parameters
<username>User name for flexsyncadmind.
<password>Password for flexsyncadmind.
<source_host_name>Label for the source host.
<dest_host_name>Label for the target host.
<task_name>Label for the task.
<source_dir>File system mount and relation path of the source host to replicate.
<destination_dir>File system mount and relation path of the destination host to replicate data to.
Caution: Do not assign a StorNext file system mount point as a destination path. If you assign a StorNext file system mount point as a destination path, some FlexSync features behave unexpectedly (such as versioning and extraneous file deletion).
For more information about task intervals, see Schedule Tab.
- Log on to an SSH client, and connect to your system.
- At the prompt, enter the following command to suspend the task:
/opt/quantum/flexsync/bin/flexsyncadmin -U <username> -P <password> suspend-task <hostgroup_name> [<dest_host_name> [<task_name>]]
Example
/opt/quantum/flexsync/bin/flexsyncadmin -U admin -P password suspend-task myhostgroup mdc2 project1
Command Parameters
<username>User name for flexsyncadmind.
<password>Password for flexsyncadmind.
<hostgroup_name>Label for the hostgroup for which you are suspending a task.
<dest_host_name>(Optional) Label for the target host for which you are suspending a task.
<task_ name>(Optional) Label for the task that you are suspending.
- At the prompt, enter the following commands to update task intervals:Replication Interval
/opt/quantum/flexsync/bin/flexsyncadmin -U <username> -P <password> edit-task <dest_host_name> <task_name> set sync_interval <sec>
Example
/opt/quantum/flexsync/bin/flexsyncadmin -U admin -P password edit-task mdc2 project1 set sync_interval 60
Command Parameters
<username>User name for flexsyncadmind.
<password>Password for flexsyncadmind.
<dest_host_name>Label for the target host for which you are updating the replication interval.
<task_ name>Label for the task for which you are updating the replication interval.
<sec>Number of seconds to which to update the replication interval.
Version Interval/opt/quantum/flexsync/bin/flexsyncadmin -U <username> -P <password> edit-task <dest_host_name> <task_name> set version_interval <sec>
Example
/opt/quantum/flexsync/bin/flexsyncadmin -U admin -P password edit-task mdc2 project1 set version_interval 300
Command Parameters
<username>User name for flexsyncadmind.
<password>Password for flexsyncadmind.
<dest_host_name>Label for the target host for which you are updating the replication interval.
<task_ name>Label for the task for which you are updating the replication interval.
<sec>Number of seconds to which to update the version interval.
Cool Down Interval/opt/quantum/flexsync/bin/flexsyncadmin -U <username> -P <password> edit-task <dest_host_name> <task_name> set cool-down <sec>
Example
/opt/quantum/flexsync/bin/flexsyncadmin -U admin -P password edit-task mdc2 project1 set cool_down 120
Command Parameters
<username>User name for flexsyncadmind.
<password>Password for flexsyncadmind.
<dest_host_name>Label for the target host for which you are updating the replication interval.
<task_ name>Label for the task for which you are updating the replication interval.
<sec>Number of seconds to which to update the cool down interval.
- At the prompt, enter the following command to resume the task:
/opt/quantum/flexsync/bin/flexsyncadmin -U <username> -P <password> resume-task <hostgroup_name> [<dest_host_name> [<task_name>]]
Example
/opt/quantum/flexsync/bin/flexsyncadmin -U admin -P password resume-task myhostgroup mdc2 project1
Note: The changes take effect when the task becomes idle.
- Log on to an SSH client, and connect to your system.
- At the prompt, enter the following command to check a task configuration:
/opt/quantum/flexsync/bin/flexsyncadmin -U <username> -P <password> status [--active] [<hostgroup_name> [<dest_host_name> [<task_name>]]
Example
/opt/quantum/flexsync/bin/flexsyncadmin -U admin -P password status
myhostgroup:
mdc1 (10.12.345.678:10453,10454): online
Task summary: (0 of 1 active) 0 bytes/sec 0 files/sec
mdc2 (10.12.345.679:10453,10454): online
Task summary: (0 of 1 active) 0 bytes/sec 0 files/sec
Task: project1
Source: 10.12.345.678:/stornext/snfs1/data
Dest: 10.12.345.679:/stornext/snfs2/backup
Copied: Thu Jun 8 12:28:42 2017
Versioned: Thu Jun 8 12:28:42 2017
Synchronized. Waiting 45 seconds for next pass...
Command Parameters
<username>User name for flexsyncadmind.
<password>Password for flexsyncadmind.
--active(Optional) Check status for active tasks only
<hostgroup_name>(Optional) Check status for tasks assigned to the specified hostgroup only.
<dest_host_name>(Optional) Check status for tasks assigned to the specified target host only.
<task_name>(Optional) Check status for the specified task.
To start a replication task from the FlexSync CLI, use the command for the flexsyncadmind host. Keep in mind that tasks started from the flexsyncadmind host command are exempt from the flexsyncd(8) maximum concurrent task limit. As a result, your system might experience higher than normal system resource usage.
- Log on to an SSH client, and connect to your system.
- At the prompt, enter the following command to start a task:
/opt/quantum/flexsync/bin/flexsyncadmin -U admin -P password start-task <dest_host_name> <task_name>
Example
/opt/quantum/flexsync/bin/flexsyncadmin -U admin -P password start-task mdc2 project1
Command Parameters
<username>User name for flexsyncadmind.
<password>Password for flexsyncadmind.
<dest_host_name>(Optional) Label for the target host for which you are starting a task.
<task_ name>(Optional) Label for the task that you are starting.
If your environment requires large configurations, review the following examples of simplified scripts to use in configuring and managing tasks from the FlexSync CLI.
You can easily modify and extend these examples to manage a more complicated configuration, and change the scripts to read the variables from a file or other source. The script must be executed on the host system that is running flexsyncadmind.
The following script adds 99 tasks for a source and target host pair. The source file system directory is based on the source host-name.
View Contents of .sh File
[root@mdc1 ~]# more taskcreate.sh
#!/bin/bash
hostgrp=$1
host1=$2
host2=$3
f1=$4
f2=$5
Command To Call Script
/opt/quantum/flexsync/bin/flexsyncadmin -U admin -P password add-task $hostgrp $host1 $host2 task$<nn> $f1/$host1$<nn> $f2
The parameter is:
|
|
Task 1-99 |
The following script edits the original 99 tasks by modifying the sync_interval, version_interval, and cool_down period parameters.
View Contents of .sh File
[root@dexter ~]# more taskedit.sh
#!/bin/bash
hostgrp=$1
host2=$2
Commands To Call Script
/opt/quantum/flexsync/bin/flexsyncadmin -U admin -P password edit-task $hostgrp $host2 task$<nn> set sync_interval 60
/opt/quantum/flexsync/bin/flexsyncadmin -U admin -P password edit-task $hostgrp $host2 task$<nn> set version_interval 90
/opt/quantum/flexsync/bin/flexsyncadmin -U admin -P password edit-task $hostgrp $host2 task$<nn> set cool_down 300
The parameter is:
|
|
Task 1-99 |
The following script starts the original 99 tasks.
View Contents of .sh File
[root@dexter ~]# more taskstart.sh
#!/bin/bash
hostgrp=$1
host1=$2
Command To Call Script
/opt/quantum/flexsync/bin/flexsyncadmin -u admin -p password start-task $hostgrp $host1 task$<nn>
The parameter is:
|
|
Task 1-99 |
The following script suspends the original 99 tasks.
View Contents of .sh File
[root@dexter ~]# more tasksuspend.sh
#!/bin/bash
hostgrp=$1
host1=$2
Command To Call Script
/opt/quantum/flexsync/bin/flexsyncadmin -u admin -p password suspend-task $hostgrp $host1 task$<nn>
The parameter is:
|
|
Task 1-99 |
The following script resumes the original 99 tasks.
View Contents of .sh File
[root@dexter ~]# more taskresume.sh
#!/bin/bash
hostgrp=$1
host1=$2
Command To Call Script
/opt/quantum/flexsync/bin/flexsyncadmin -u admin -p password resume-task $hostgrp $host1 task$<nn>
The parameter is:
|
|
Task 1-99 |
View the status of replication tasks from the FlexSync Admin Console.
- Log on to an SSH client, and connect to your system.
- At the prompt, enter the following command to access the FlexSync Admin console:
/opt/quantum/flexsync/bin/flexsyncadmin -U <username> -P <password>
- At the prompt, enter the following command to view replication task status:
status [--active] [hostgroup_name [dest_host_name [task_name]]]
Example
FlexSync Admin console
> status
MyHostGroup:
MyHost (mdc1.com:10453,10454): online
Task summary: (0 of 1 active) 0 bytes/sec 0 files/sec
Task: MyTask
Source: /stornext/snfs1/mydir
Dest: /stornext/snfs2/mydir
Initial copy pending
Suspended
Command Parameters
<username>User name for flexsyncadmind.
<password>Password for flexsyncadmind.
[--active](Optional) Display status only for tasks that are currently estimating replication requirements or that are actively replicating.
[<hostgroup_name>](Optional) Display status only for tasks within the specified hostgroup.
[<dest_host_name>](Optional) Display status only for tasks being run for the specified destination host.
[<task_name>](Optional) Display status only for the specified task.
This section provides information about how to prepare for a FlexSync host's network reconfiguration, when the host in question is already acting a source/destination for replication tasks.
Quantum recommends you do the following if you need to change an interface when both the old and the new interface are available:
- Verify connectivity between the new interface and the other hosts by using ping.
- Suspend the host that is to be reconfigured.
- Edit the host with the new IP address.
- Resume the host.
If you change the network interfaces for a host and the old interface must be removed before the new interface is available, you cannot edit the host after the old interface is no longer available. In this case, do the following:
- Before you remove the old network interface, save the configuration for that host using the flexsyncadmin config-backup command so that you can examine the resulting json file, if necessary.
- Delete the host.
- After the new network interface is available, recreate the host with the new network interface.
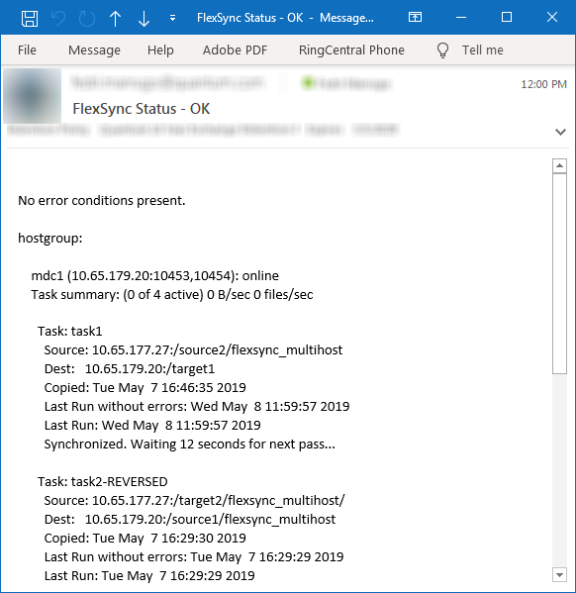
You can configure FlexSync to deliver an email notification to an email recipient (or multiple email recipients) which provides the status of your FlexSync configuration at a specified time (per a specified schedule).
Below is an example of a FlexSync status email notification:
You can configure the following parameters using both the GUI and the CLI:
- Sender Email Address
- Recipient Email Address(es)
- SMTP Hostname
- SMTP Port
- SMTP Username
- SMTP Password
- TLS Protocol
- Email Notification Delivery Schedule

The information contained within the body of the email notification is identical to the output from the flexsyncadmin status command:
Example
/opt/quantum/flexsync/bin/flexsyncadmin -U admin -P password status
No error conditions present.
myhostgroup:
mdc1 (10.12.345.678:10453,10454): online
Task summary: (0 of 1 active) 0 bytes/sec 0 files/sec
mdc2 (10.12.345.679:10453,10454): online
Task summary: (0 of 1 active) 0 bytes/sec 0 files/sec
Task: project1
Source: 10.12.345.678:/stornext/snfs1/data
Dest: 10.12.345.679:/stornext/snfs2/backup
Copied: Thu Jun 8 12:28:42 2017
Versioned: Thu Jun 8 12:28:42 2017
Synchronized. Waiting 45 seconds for next pass...
Important Considerations
- If an issue occurs with the delivery of an email notification, then the issue is logged to syslog by the flexsyncadmind daemon.
- If the flexsyncadmind daemon is not operational or is down, then an email notification is not delivered.
- You cannot configure the type of email notification to deliver or under what conditions; the email recipient receives an email notification per the email notification delivery schedule.
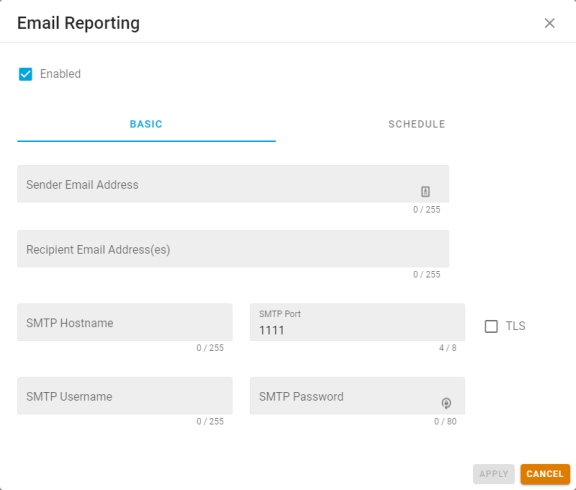
To configure (enable) or disable email reporting from the FlexSync Dashboard, complete the following tasks, respectively.
To configure (enable) email reporting from the FlexSync Dashboard, complete the following steps.
- Log in to the FlexSync Dashboard. See Access the FlexSync GUI.
-
Click the Hamburger icon, and then click Email Reporting. The Email Reporting dialog appears.
-
Select the Enabled check box.
-
Complete the Email Reporting form.
Note: To add multiple recipient email addresses, separate each email address with a comma.
Note: You can optionally input a cron expression in the Schedule (Cron Expression) field in the Advanced tab. See Construct a Cron Expression.
- Click Submit, or click Cancel to abort the operation and return to the previous page.
To disable email reporting from the FlexSync Dashboard, complete the following steps.
- Log in to the FlexSync Dashboard. See Access the FlexSync GUI.
-
Click the Hamburger icon, and then click Email Reporting. The Email Reporting dialog appears.
-
Clear the Enabled check box.
- Click Submit, or click Cancel to abort the operation and return to the previous page.
To configure (enable) or disable email reporting from the FlexSync CLI, use the flexsyncadmin command.
To configure (enable) email reporting from the FlexSync CLI, use the flexsyncadmin command.
- Log on to an SSH client, and connect to your system.
- At the prompt, enter the following command to configure email reporting:
/opt/quantum/flexsync/bin/flexsyncadmin -U <username> -P <password> set-email-reporting <enabled|disabled> <smtp_hostname> <smtp_port> <tls|none> <none|username:password> <sender address> <recipient_address,recipient_address> 'cron expression'
Example
/opt/quantum/flexsync/bin/flexsyncadmin -U admin -P password set-email-reporting enabled smtphostname.mycompany.com 25 tls smtpuser:smtppassword sender-email@mycompany.com recipient-email1@mycompany.com,recipient-email2@mycompany.com '0 0 * * *'
Command Parameters
<username>User name for flexsyncadmind.
<password>Password for flexsyncadmind.
<enabled|disabled>Enable or disable email reporting.
<smtp_hostname>The SMTP hostname. <smtp_port>The SMTP port number. <tls|none>Enable or disable TLS protocol. <none|username:password>The SMTP user name and the SMTP password. <sender address>Sender email address. <recipient_address,recipient_address>Recipient email address(es).
Note: To add multiple recipient email addresses, separate each email address with a comma.
'cron expression'A cron expression gives you more control over the frequency, compared to the default schedules available using the GUI.
For example, you could define a cron expression to notify you at 8:15 AM on the second Friday of every month.
A cron expression is a string of fields separated by spaces. The following table displays the fields of a cron expression, in the order that they must be specified (from left to right):
| Second | Minute | Hour | Day-of-month | Month | Day-of-week | |
|---|---|---|---|---|---|---|
| Allowed values | 0-59
|
0-59
|
0-23
|
1-31
|
1-12 or JAN-DEC |
1-7 or SUN-SAT |
| Allowed special characters | , - * /
|
, - * /
|
, - * /
|
, - * / ?
|
, - * /
|
, - * / ?
|
Note: Cron expressions are not case-sensitive.
For example:
The above expression literally translates to 0 second, 15 minute, 8 hour, any day of the month, January.
In other words, this represents 8:15 AM on every Monday during January.
Note: The ? character means "no particular value".
In this example, the Day-of-month is set to no particular value. We do not need to specify it, as we have specified a Day-of-week value. See Special Characters for more information about special characters.
See Examples of Cron Expressions for more examples of cron expressions and their explanations.
| Special Character | Usage |
|---|---|
,
|
Specifies a list of values. For example, in the Day-of-week field, 'MON,WED,FRI' means 'every Monday, Wednesday, and Friday'. |
-
|
Specifies a range of values. For example, in the Day-of-week field, 'MON-FRI' means 'every Monday, Tuesday, Wednesday, Thursday and Friday'. |
*
|
Specifies all possible values. For example, in the Hour field, '*' means 'every hour of the day'. |
/
|
Specifies increments to the given value. For example, in the Minute field, '0/15' means 'every 15 minutes during the hour, starting at minute zero'. |
?
|
Specifies no particular value. This is useful when you need to specify a value for one of the two fields Day-of-month or Day-of-week, but not the other. |
| Cron Expression | Description |
|---|---|
|
0 15 20 ? * * |
Every day at 8:15 PM. |
|
0 15 8 * * ? |
Every day at 8:15 AM. |
|
0 * 14 * * ? |
Every minute starting at 2:00 PM and ending at 2:59 PM, every day. |
|
0 0/5 14 * * ? |
Every 5 minutes starting at 2:00 PM and ending at 2:55 PM, every day. |
|
0 0/5 14,18 * * ? |
Every 5 minutes starting at 2:00 PM and ending at 2:55 PM, AND every 5 minutes starting at 6:00 PM and ending at 6:55 PM, every day. |
|
0 0-5 14 * * ? |
Every minute starting at 2:00 PM and ending at 2:05 PM, every day. |
|
0 0/10 * * * ? * |
Every 10 minutes, forever. |
|
0 10,44 14 ? 3 WED |
2:10 PM and 2:44 PM every Wednesday in the month of March. |
|
0 15 8 ? * MON-FRI |
8:15 AM every Monday, Tuesday, Wednesday, Thursday, and Friday. |
|
0 15 8 15 * ? |
8:15 AM on the 15th day of every month. |
To disable email reporting from the FlexSync CLI, use the flexsyncadmin command.
- Log on to an SSH client, and connect to your system.
- At the prompt, enter the following command to disable email reporting:
/opt/quantum/flexsync/bin/flexsyncadmin -U <username> -P <password> set-email-reporting <enabled|disabled>
Example
/opt/quantum/flexsync/bin/flexsyncadmin -U admin -P password set-email-reporting disabled
Command Parameters
<username>User name for flexsyncadmind.
<password>Password for flexsyncadmind.
To display the email reporting configuration from the FlexSync CLI, use the flexsyncadmin command.
- Log on to an SSH client, and connect to your system.
- At the prompt, enter the following command to display the email reporting configuration:
/opt/quantum/flexsync/bin/flexsyncadmin -U <username> -P <password> show-email-reporting
Example
/opt/quantum/flexsync/bin/flexsyncadmin -U admin -P password show-email-reporting
Command Parameters
<username>User name for flexsyncadmind.
<password>Password for flexsyncadmind.
Below is an example of the show-email-reporting command output if email reporting is enabled and configured:
SMTP Server: smtphostname.mycompany.com
SMTP Port: 25
TLS: true
SMTP Authentication: plain
SMTP Username: smtpuser
SMTP Password: <hidden>
Email Sender: sender-email@mycompany.com
Email Receipient(s): recipient-email1@mycompany.com,recipient-email2@mycompany.com
Schedule: 0 0 0 * * *
Below is an example of the show-email-reporting command output if email reporting is disabled:
Use the following tasks to manage hostgroups from the FlexSync Dashboard.
- Log in to the FlexSync Dashboard. See Access the FlexSync GUI
- In the Hostgroup column, hover over the Cogwheel to expand and display additional menu options.
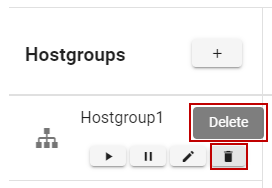
- Click the Trashcan to display a confirmation dialog.
- Click Delete to remove the selected hostgroup and its hosts and tasks.
- Log in to the FlexSync Dashboard. See Access the FlexSync GUI
- In the Hostgroup column, hover over the Cogwheel to expand and display additional menu options.
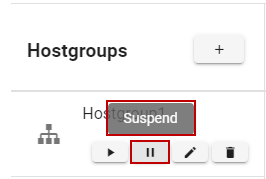
- Click Suspend to pause the replication tasks for the hostgroup.
- Log in to the FlexSync Dashboard. See Access the FlexSync GUI
- In the Hostgroup column, hover over the Cogwheel to expand and display additional menu options.
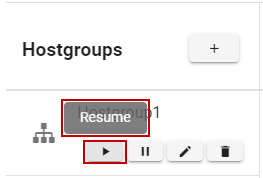
- Click Resume to restart the replication tasks for the hostgroup.
- Log in to the FlexSync Dashboard. See Access the FlexSync GUI
- In the Hostgroup column, hover over the Cogwheel to expand and display additional menu options.
- Click Edit to display the Hostgroup configuration dialog box.
- In the Name field, enter a label for the hostgroup.
-
Click Submit to apply your changes.
Use the flexsyncadmin command to manage FlexSync hostgroups.
See the man page for additional information.
Note: To view information about the command, you must enable the FlexSync CLI command man pages. See Enable the FlexSync CLI Command man Pages.
Use the following tasks to manage hosts.
- Log in to the FlexSync Dashboard. See Access the FlexSync GUI.
- In the Hosts column, hover over the Cogwheel to expand and display additional menu options.

- Click the Trashcan to display a confirmation dialog.
- Click Delete to remove the selected host.
- Log in to the FlexSync Dashboard. See Access the FlexSync GUI.
- In the Host column, hover over the Cogwheel to expand and display additional menu options.
- Click Suspend to pause the replication tasks for the hosts.
- Log in to the FlexSync Dashboard. See Access the FlexSync GUI.
- In the Host column, hover over the Cogwheel to expand and display additional menu options.
- Click Resume to resume the replication tasks for the selected host.
- Log in to the FlexSync Dashboard. See Access the FlexSync GUI
- In the Hosts column, hover over the Cogwheel to expand and display additional menu options.
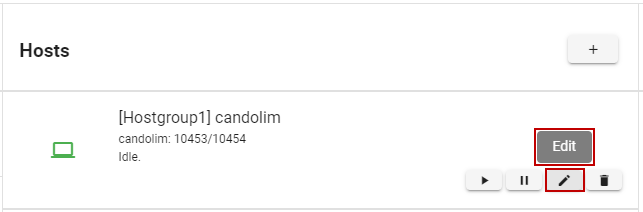
-
Click Edit to display the Host configuration dialog box.
Basic Tab
- In the Name field, enter a label for the host.
- In the Hostgroup field, select a hostgroup, unless it is already prepopulated.
-
In the Hostname field, enter the DNS name or IP address for the replication transport.
-
In the Admin port field, update the port number, as needed. The default port is 10453.
-
In the Data port field, update the port number, as needed. The default port is 10454.
-
In the SSL port field, update the port number, as needed. The default port is 10554.
-
In the Username field, enter your FlexSync user name.
-
In the Password field, enter your FlexSync password.
Advanced Tab
Select a check box to enable a setting or clear a check box to disable a setting, as needed:
Check Box
Description
Bandwidth Throttling
Select this option to restrict the bandwidth across all of the active tasks for the selected host, to the specified value.
By default, bandwidth throttling is disabled. To enable:
- Check Bandwidth Throttling.
- In the bandwidth limit field, enter a value.
- Select a data transfer speed from the list.
- Enter 0 to disable bandwidth throttling.
Note: If you enable bandwidth throttling, the rate I/O is not guaranteed. Initially, your data transfers might experience a bit of variation where the host’s transfer rate, as shown in the GUI, can be slightly higher or lower than the requested transfer rate. The transfer rate eventually settles in to the requested transfer rate. Also, the transfer rate shown by the GUI is an average across the running time of all active tasks. If you update the bandwidth limit mid-stream, then FlexSync throttles up or down to that limit immediately, but it might take an extended period of time for the average to reflect the updated bandwidth limit.
-
Click Submit to apply your changes.
Use the flexsyncadmin command to manage FlexSync hosts.
See the man page for additional information.
Note: To view information about the command, you must enable the FlexSync CLI command man pages. See Enable the FlexSync CLI Command man Pages.
Use the following tasks to manage tasks from the FlexSync Dashboard.
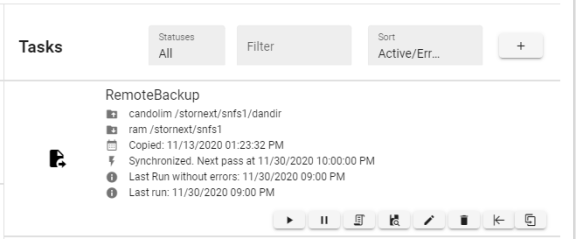
- Log in to the FlexSync Dashboard. See Access the FlexSync GUI.
- In the Tasks column, hover over the Cogwheel to expand and display additional menu options.
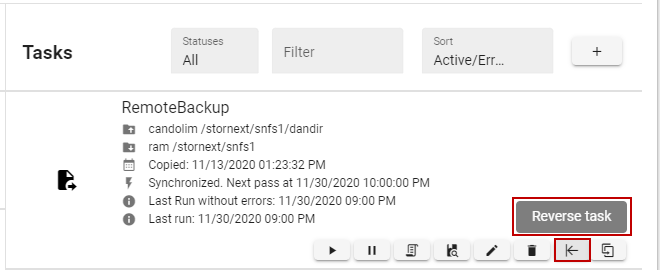
- Click Reverse task to reverse the direction of the replication.
WARNING: If you attempt to delete a task and you select the Remove destination directory tree option, you must delete all of the Storage Manager policies for any relation points on the destination. If you do not remove the Storage Manager polices, then the operation results in a failure to delete the task.
WARNING: If a task attempts to delete directories because the Delete extraneous files on destination option is enabled on the task, you must delete all of the Storage Manager policies for any relation points on the destination for directories that were deleted on the source. If you do not remove the Storage Manager policies, then the operation results in an error when it attempts to delete the extraneous files.
- Log in to the FlexSync Dashboard. See Access the FlexSync GUI.
- in the Tasks column, hover over the Cogwheel to expand and display additional menu options.
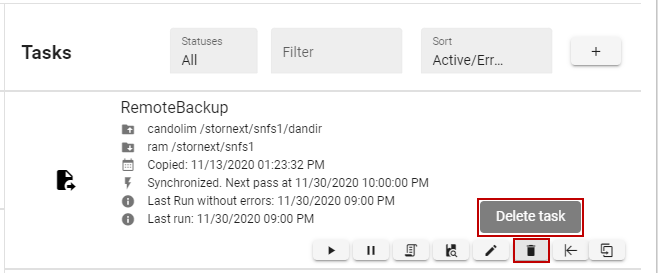
-
Click the Trashcan to display a confirmation dialog that contains the following additional options:
-
Remove destination directory tree
WARNING: If you select the Remove destination directory tree option, your data is permanently deleted. This process cannot be undone.
-
Remove version directories
WARNING: If you select the Remove version directories option, your data is permanently deleted. This process cannot be undone.
-
Remove audit trail
-
- A dialog appears and you are prompted with the following message, Are you sure you would like to delete task task-name?. If you are sure you want to proceed with the operation, enter DELETEMYDATA.
- Click Delete to remove the selected task and its respective data, or click Back to abort the operation and return to the previous page.
- Log in to the FlexSync Dashboard. See Access the FlexSync GUI.
- In the Tasks column, hover over the Cogwheel to expand and display additional menu options.
- Click Start task to initiate the replication task.
- Log in to the FlexSync Dashboard. See Access the FlexSync GUI.
- In the Tasks column, hover over the Cogwheel to expand and display additional menu options.
- Click Repair destination to perform a full cross-check between the source and the destination directories.
- Log in to the FlexSync Dashboard. See Access the FlexSync GUI.
- In the Tasks column, hover over the Cogwheel to expand and display additional menu options.
- Click Suspend to pause the replication task. The icon for the task changes from a laptop icon to a pause icon.
- Log in to the FlexSync Dashboard. See Access the FlexSync GUI.
- In the Tasks column, hover over the Cogwheel to expand and display additional menu options.
- Click Suspend, as needed.
- Click Edit to display the Task configuration dialog box.
- Update the task parameters, as needed. See Step 3: Add a Task
-
Click Submit to apply your changes.
- Click Resume task to resume the replication task, as needed.
- Log in to the FlexSync Dashboard. See Access the FlexSync GUI.
- In the Tasks column, hover over the Cogwheel to expand and display additional menu options.
- Click Clone task.
- In the dialog box, enter a name for you task.
-
Click Clone to apply your changes, or click Cancel to abort the operation and return to the previous page.
- Click Start task to resume the replication task, as needed.
- Log in to the FlexSync Dashboard. See Access the FlexSync GUI.
- In the Tasks column, hover over the Cogwheel to expand and display additional menu options.
- Click Task Report to display the Task reports for <task_name> dialog box.
- Review the displayed information for the task:
- Perform the following optional steps:
- Click the Cogwheel button to expand and display the Logfile and Delete Log options, as needed:
- Click Logfile to display the log file of the selected log entry, as needed.
- Click Delete Log to remove the log file of the selected log entry, as needed.
- Click Purge to clear the entire log file, as needed .
- Click the Cogwheel button to expand and display the Logfile and Delete Log options, as needed:
- Click Close to return to the previous page.
Additional Information for Task Logs
The following 2 icons identify a task log that contains an error:
Figure 1: Normal Error

Figure 2: Fatal Error

Use the flexsyncadmin command to manage FlexSync tasks.
See the man page for additional information.
Note: To view information about the command, you must enable the FlexSync CLI command man pages. See Enable the FlexSync CLI Command man Pages.
If you need to restore your FlexSync configuration to its original state, use the FlexSync configuration backup file.
Note: Beginning with FlexSync 2.2, you can only restore a FlexSync configuration from a configuration backup file that you generated using FlexSync 1.1.3 (or later).
FlexSync allows you to protect your FlexSync configuration with a backup file. This section describes the general process.
Using either the FlexSync Dashboard (see FlexSync Dashboard: Generate a FlexSync Configuration Backup File) or CLI (see FlexSync CLI: Generate a FlexSync Configuration Backup File), you must first create the FlexSync configuration to use for your backup file. After you have completed your FlexSync configuration, you can save it as the backup file in the backup_pathname directory of the flexsyncadmin daemon.
File Format
When generated, the FlexSync configuration backup file is in JSON format.
Example File
flexsync-backup.15-25-06-06-06-2017.json
The 15-25-06-06-06-2017 represents the time (hh-mm-ss) and date (mm-dd-yyyy) when the configuration backup file was generated.
You must use the FlexSync Admin console of the FlexSync CLI to restore your configuration from the backup file. See FlexSync CLI: Restore a FlexSync Configuration.
- Log in to the FlexSync Dashboard. See Access the FlexSync GUI.
- Click the cogwheel to display the Save configuration menu option.
- Click Save configuration to display the Configuration backup file dialog box.
- Click Download file to automatically create and download a FlexSync configuration backup file.
- Transfer the file to the backup_pathname directory.
- Log on to an SSH client, and connect to your system.
- At the prompt, enter the following command to access the FlexSync Admin console:
/opt/quantum/flexsync/bin/flexsyncadmin -U <username> -P <password>
- At the prompt, enter the following command to generate the backup file and save it in the
backup_pathnamedirectory.config-backup [<hostgroup_name>] [<host_name>] backup_pathname
Command Parameters
<username>User name for flexsyncadmind.
<password>Password for flexsyncadmind.
[<hostgroup_name>](Optional) Label for the hostgroup for which to generate the backup file.
[<host_name>](Optional) Label for the host for which to generate the backup file.
Below is a summary of the config-restore command.
- What is restored? The flexsyncadmind(8) and flexsyncd(8) configuration is restored. You can create a backup or properly restore your configuration if all necessary hosts are online. If your host is OFFLINE during the config-restore process (whether you include the
[--wipe]option or not), then the host is not included in the configuration restore even after it returns ONLINE; the host rejoins the configuration with its preconfig-restore configuration. Once the host is ONLINE, you can perform the config-restore operation on the host. Quantum recommends you perform a config-restore operation when all your hosts are ONLINE. - How do you perform a partial restore? You can perform a partial restore when you specify a
[<host_name>]and/or a[<hostgroup_name>]. - You can use the
[--wipe]option perform additional operations (see[--wipe]below).
Use the CLI and do the following to restore the flexsyncadmind(8) and flexsyncd(8) configuration from a specified backup file/directory (backup_pathname).
- Log on to an SSH client, and connect to your system.
- At the prompt, enter the following command to access the FlexSync Admin console:
/opt/quantum/flexsync/bin/flexsyncadmin -U <username> -P <password>
- At the prompt, enter the following command to restore a FlexSync configuration from the specified backup file/directory (
backup_pathname).config-restore [--wipe] [<hostgroup_name>] [<host_name>] backup_pathname
Command Parameters
<username>User name for flexsyncadmind.
<password>Password for flexsyncadmind.
[--wipe]Caution: (Optional) If you include this parameter, the following occurs before the restore operation begins:
- All of your existing tasks are deleted, including the respective destination content.
- If applicable, any versions are deleted.
- Any audit and task configuration parameters are deleted.
[<hostgroup_name>](Optional) Label for the hostgroup from which the backup file was generated.
[<host_name>](Optional) Label for the host from which the backup file was generated.
You can restore files or versions using tools such as Windows Explorer, Apple Finder, or CLI utilities like rcp. For example, you can use Windows Explorer, or Apple Finder to drag-and-drop the files being restored.
The file(s) being restored can have an alternate path (different from the original location), or can be placed back into the source using the same path.
Note: Typical directory and file access permissions apply – your local administrator is responsible for setting the permissions on the source and destination targets.
If you are concerned that the contents of your destination are out of sync with your source, then your local administrator can copy all of the files (on a per copy tasks basis) from the destination to the source. Your administrator can do this by using the FlexSync Dashboard, or the FlexSync CLI.
Do the following to migrate your FlexSync configuration to a different system.
Note: Beginning with FlexSync 2.2, you can only restore a FlexSync configuration from a configuration backup file that you generated using FlexSync 1.1.3 (or later).
- Log in to an SSH client, and connect to the system that you want to migrate from.
-
Generate a FlexSync configuration backup file (see FlexSync CLI: Generate a FlexSync Configuration Backup File).
-
Edit the configuration backup file as follows:
-
For any file systems that were migrated to the new host, delete the entire FSID entries for the dest_fsid and/or source_fsid fields that match the moved file systems. Otherwise, the tasks fail on the system you want to migrate to, since the parameters are not recognized.
Note: Multiple start-scan runs might be necessary if you do not correctly perform this step, to clear the FSID check errors.
Example (before)
"config": {
"dest_fsid": [
-1700978317,
-1553524400
],
"dest_host": {
"admin_port": 10453,
"data_port": 10454,
"data_ssl_port": 10554,
"hostname": "192.168.1.11",
"uuid": "55a37bfc-88ed-47eb-a086-ea902b5dca81"
},
"destination": "/target2",
"name": "task2",
Example (after)
"config": {
"dest_host": {
"admin_port": 10453,
"data_port": 10454,
"data_ssl_port": 10554,
"hostname": "192.168.1.11",
"uuid": "55a37bfc-88ed-47eb-a086-ea902b5dca81"
},
"destination": "/target2",
"name": "task2",
-
Edit the entries for the name fields to update the name from the old host to the new host. The nameentry exists in several locations depending on your configuration and number of tasks, so you must validate that all entries are updated; you can skip this step if the name is identical in both hosts.
Example (before, assuming the name is changing from mdc1 to mdc2)
},
"name": "mdc1",
"online": true,
Example (after)
},
"name": "mdc2",
"online": true
-
Edit the IP address entries for the hostname fields to reflect the IP address of the system you want to migrate to; otherwise, the task validation fails when you attempt to restore the configuration file on the system you want to migrate to. The hostname entry exists in several locations depending on your configuration and number of tasks, so you must validate that all entries are updated; you can skip this step if the IP address is identical in both hosts.
Example updating IP address (before)
"dest_host": {
"admin_port": 10453,
"data_port": 10454,
"data_ssl_port": 10554,
"hostname": "192.168.1.11",
"uuid": "c9cda13a-3156-44ad-968c-aa12c33b5dea"
},
Example (after)
"dest_host": {
"admin_port": 10453,
"data_port": 10454,
"data_ssl_port": 10554,
"hostname": "192.168.1.33",
"uuid": "c9cda13a-3156-44ad-968c-aa12c33b5dea"
},
-
Edit the path entries for the source and destination fields to reflect the replication paths of the system you want to migrate to. Verify the paths of your replication tasks exist on the system you want to migrate to; otherwise, the task validations fail when you attempt to restore the configuration file on the system you want to migrate to. You can skip this step if the paths are identical on the new host.
-
(Optional) Edit the entries for the email_reporting fields to reflect the parameters of the system you want to migrate to; however, you can edit these fields after the migration.
-
-
Install FlexSync on the system you want to migrate to (see Install, Upgrade, or Uninstall FlexSync).
-
Activate the FlexSync daemon(s) on the system you want to migrate to (see Activate the FlexSync Daemon(s)).
-
Add the FlexSync users on each host (see Add a FlexSync User).
-
On the system you want to migrate to, update the credentials for the admin daemon (see Update a FlexSync User's Password).
Note: Use the credentials from the system you want to migrate from.
-
-
Copy the configuration file to the system you want to migrate to, and then restore the configuration file (see FlexSync CLI: Restore a FlexSync Configuration) on that system.
-
Start your replication task (see Manage Tasks); you might need to use start-scan more than once to clear the FSID check errors. In the GUI, click Repair a Destination.
To perform a factory reset of your FlexSync configuration, use the reset-factory-defaults command.
Note: You can only perform this operation using the CLI.
Caution: This operation is not reversible. The following occurs if you perform this procedure:
- All of your existing tasks are deleted, including the respective destination content.
- If applicable, any versions are deleted.
- Any audit and task configuration parameters are deleted.
- Log in to an SSH client, and connect to your system.
- At the prompt, enter the following command:
/opt/quantum/flexsync/bin/flexsyncadmin -U <username> -P <password> reset-factory-defaults
Example
/opt/quantum/flexsync/bin/flexsyncadmin -U admin -P password reset-factory-defaults
Command Parameters
<username>User name for flexsyncadmind.
<password>Password for flexsyncadmind.
--force(Optional) This option allows you to bypass the prompt to confirm the factory reset of your FlexSync configuration and proceeds with the operation.
-
You are prompted to confirm that you want to proceed with the factory reset of your FlexSync configuration.
Note: If you include the
--forceoption in Step 2, you are not prompted to confirm the factory reset of your FlexSync configuration.
If you configured an API gateway and need to reload changes from your API gateway configuration, product key, or license without restarting your flexsyncadmind daemon, use the config-reload command.
Note: Your API gateway configuration parameters define the URLs and credentials you can use to register and unregister the API gateway. To configure your API gateway parameters, use the command /usr/cvfs/bin/snrest. See the snrest command in the StorNext Man Pages Reference Guide for details.
Note: You can only perform this operation using the CLI.
- Log in to an SSH client, and connect to your system.
- At the prompt, enter the following command:
/opt/quantum/flexsync/bin/flexsyncadmin -U <username> -P <password> config-reload
Example
/opt/quantum/flexsync/bin/flexsyncadmin -U admin -P password config-reload
Command Parameters
<username>User name for flexsyncadmind.
<password>Password for flexsyncadmind.
config-reloadThis option allows you to reload changes from your API gateway configuration, product key, or license without restarting your flexsyncadmind daemon.
-
If the command succeeds and the changes from your API gateway configuration are reloaded, then the following output appears:
Flexsyncadmind has reloaded config successfully.
If identical data exists on both your source and destination file systems, then you must verify the following to avoid resynchronization of your data:
-
The modification time of a file must be identical on both your source and destination.
-
The directory structure must be identical on both your source and destination.
-
The metadata attribute of a file and directory must be identical on both your source and destination. For example, you must preserve ACLs, extended attributes, set the mtime accordingly, and so on, to verify the metadata is identical.
Note: If the metadata is not identical, then FlexSync must read the entire file on your source and destination, exchange hashes in order to verify that the data is identical, and then update the metadata. This operation does not transmit the actual file data over a network pipe; however, the operation requires work and data to transmit.
-
If you enable the Versioning feature, FlexSync might duplicate data if the metadata is not identical. For example, if you use rsync to replicate your data and you do not preserve ACLs, then you must configure a FlexSync replication task that indicates versions and preserve ACLs. FlexSync might duplicate your data since the original copy does not contain ACLs and it cannot be changed if it is part of a version "snapshot".
Note: To avoid this issue, you must initially synchronize without the Versioning feature and then enable the Versioning feature after your replication tasks are operating successfully.
-
If Storage Manager contains a truncated file, then your configuration becomes complicated. This causes your file to be re-duplicated since delta compression from tape is not possible. In this case FlexSync transmits the entire file.
-
If your source and destination are both local to the same host, then your data is duplicated again since FlexSync does not perform delta compression.
