StorNext File System Pooling makes it easier for you to purchase and adopt NVMe storage to boost your performance, reduce data center footprint, and improve overall production storage efficiency; you can define pools of NVMe, SSD, and HDD within your file system and create policies to move files and folders between those pools automatically. As a result, files move seamlessly between pools for greater performance at a lower overall cost.
How? By allowing you to define "pools" of storage within your primary storage environment – these could be "fast" pools with NVMe, and "capacity" pools with less-expensive HDD storage. Then you can configure jobs to move files and folders between pools based on a policy. That way, if you require the highest performance levels, then you can work out of "fast" NVMe pools, while other data is kept on less-expensive HDD storage pools.
Organizations that need to ingest and process video, digital images, and other large unstructured data sets are increasingly turning to NVMe storage because of its dramatic performance advantages over traditional SSD and HDD storage. By implementing NVMe in a StorNext file system environment, StorNext accelerates throughput for streaming workloads, for fast ingest of large data sets and improved processing, editing, and analysis of video and other forms of unstructured data. NVMe is also enabling customers to gain back valuable data center space by replacing racks of HDD storage with compact NVMe storage servers.
- Non-linear video editing, especially at higher resolutions can require very significant bandwidth and can also benefit from being done on solid-state storage, which is not subject to seek latencies. However, the cost of this storage is still significantly higher than spinning disk and for much of its lifespan, content does not need the storage characteristics of solid-state devices. By making it simpler to move specific content between different types of storage, StorNext supports more demanding workflows without the cost of running the storage everywhere.
- Another potential use is to isolate project content from in-progress work. By dedicating a pool of storage to a project, you can avoid contention with other projects during times of activity and avoid unexpected contention on devices while still maintaining shared access to the content.
- High performance ingest where data cannot be dropped. Migrate content out of a higher performance storage using an age-out policy to make room for new content.
-
Primary file system pooling also works with QoS/QBM; see Quality of Service Bandwidth Management (QBM) for information on how to configure QBM.
Pooling moves data; it does not change any of the user metadata associated with files, nor does it move files in the namespace, or change their attributes when it relocates content. Content is moved between storage pools using either pooling jobs initiated by a user or administrator, or by a pooling policy configured by an administrator and executed automatically by the system. All processing is handled by the pooling daemon in the background.
A storage pool is a set of stripe groups with an associated name that represent the targets for data movement. Pools are generally associated with stripe groups using specific types of storage; for example, a fast pool for SSD or NVMe and a slow pool for spinning disk. However, there is nothing in the product which requires this be so. You can configure several pools out of the same type of storage.
A storage pool can be exclusive or non-exclusive. You can only use an exclusive pool by content specifically targeted to that pool, and you can only use a non-exclusive pool by both targeted and untargeted content.
You can place both files and directories in a pool. A file in a pool means its contents are placed on the devices in the pool. A directory in a pool means that new file content within the directory will also use the pool. The only limit on the number of pools is the number of data stripe groups in a file system.
A pooling job consists of instructions for the system to perform an action on specified content; the most common job is to move the data content to a specific storage pool. If you are granted access to the pooling system, you can initiate a job, or the job can also be triggered by a pooling policy.
Jobs have different controls to modify its behavior; details are described in a different section. A job can run immediately or at a specified time in the future. When a job is finished, a completion report is held in an internal database allowing the report to be emailed or viewed later.
A pooling policy consists of a request to run a job on a regular basis looking for work to do and executing the work.
Both jobs and policies define the content to be acted on using the same mechanisms, a set of content can either be explicitly referenced and filtered down by a set of rules, or you can use an internal query mechanism of the file system to look up candidates for processing.
All the execution of work for pooling is handled by a daemon; jobs are submitted to the daemon and policies are stored and run by the daemon. You can use the command line to access the service using a REST API.
You must run the daemon, sntierd, on a Linux-based StorNext client running either the RedHat 7 (or later) operating system or the CentOS 7 (or later) operating system. The system can be a customer supplied system, an MDC, or an Xcellis Workflow Extender.
Note: You must have sufficient storage bandwidth from the system to support the workload.
Multiple instances of the service may be run at the same time. The services are all independent systems and are not aware of each other. Each service can support running policies and jobs, and is capable of managing content in all the StorNext file systems configured with storage pools and mounted on the client host.
Each pooling service maintains a persistent state in a small internal database, which contains configuration information, jobs, and policies. If you restart the service while a job is running, those jobs are re-run after the service is restarted.
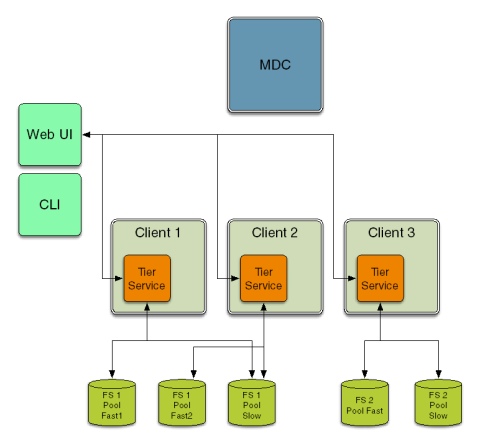
Each job runs on a single pooling service. Illustrated below, the CLI and Web UI can access the pooling service on multiple hosts; there are three pooling services, two of the services operate on FS1 and one service operates on FS2.
All command line access is via the sntier command that is installed under /usr/cvfs/bin; it has a hierarchical argument structure.
The pooling service is a standard feature and is disabled by default on all RedHat/CentOS 7 (or later) clients and the appliance.
To run a pooling service, your system must meet the following prerequisites.
- You must be running StorNext 7.0.1 (or later) on both the client system and the appliance.
-
You must enable Metadata Archive on the file system(s). See Edit a File System.
Note: If you do not enable Metadata Archive, then you run the risk of limiting the function of the File System Pooling feature. The primary example is the use of the search term in a policy operation; in order to find a small number of files in a large set which meet a policy criteria, then you must enable Metadata Archive. However, explicitly moving content between pools does not require you enable Metadata Archive.
- You must enable Web Services. See Web Services.
- Pooling can inter-operate with Storage Manager but does not require a managed file system to operate, or use any Storage Manager code.
- If you are using Storage Manager, you must not have Disk-to-Disk Relocation configured or enabled. See Storage Manager Policy.
-
Quantum recommends you have good bandwidth to the data stripe groups of the file system, since the host that runs a pooling service acts as a data mover for bulk content. It is not relevant what type of connectivity is used. Workloads that perform a checksum against content when it is copied require a significant amount of CPU power to perform efficiently. You can possibly use MD5 to utilize several CPU cores in parallel when you move data.
-
You must have some optional Python components that might not be installed on your system by default, since the pooling software uses Python. Verify you have installed the following RPM files:
- pyxattr
- python-requests
- python-dateutils
As the root user on your host system, do the following to enable and configure the pooling service for the first time. After you enable and configure the service, you can use the CLI or the GUI to perform all operation and administration functions from a remote host.
Note: You can create, queue, or delete a pool without enabling the pooling service, as it is processed on the file system stripe management level. All other pooling operations require that you enable the pooling service.
Use the StorNext user interface to discover your pooling node.
-
Click Discover Node.
-
Enter the following in the fields:
-
DNS name, host name, or IP address of your system.
-
Username.
-
Password.
-
-
Click Discover.
After the initial configuration, the daemon (sntierd) is running and is only accessible to the root user on the local system.
The pooling daemon is connected with the Linux pluggable authentication module (or PAM) system which can use any authentication system and users are configured for this. For example, if the host is connected to an active directory using PAM, then the pool of users and groups who can be granted access is those available to the active directory.
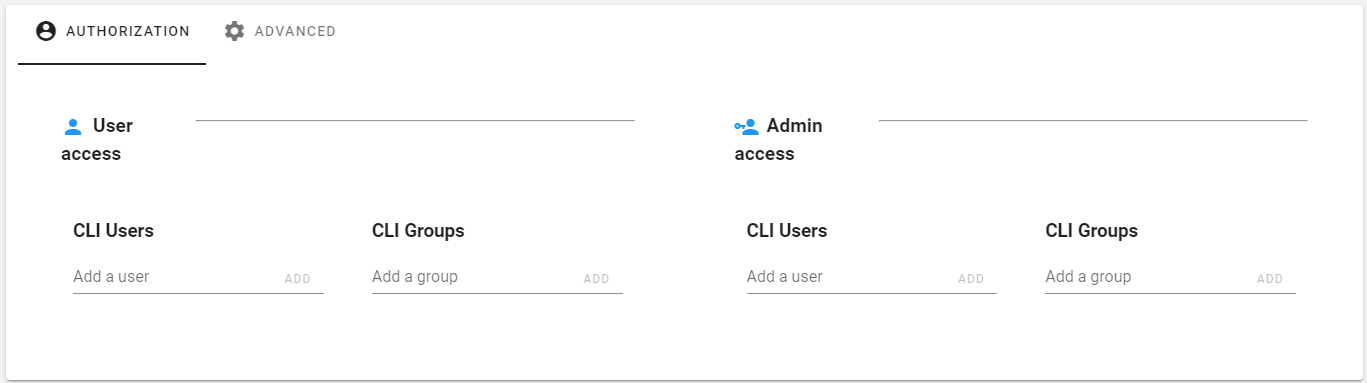
The pooling service supports role-based access control; there are two types of roles:
-
User. A user can submit jobs which move any content between pools, control their own jobs and view pools and policies.
Note: The user name for submitting a job does not relate to the permissions on the file system.
- Administrator. An administrator can perform any action, and can perform any configuration from any host where the sntier command is available.
Use the StorNext user interface to define who is a user or an administrator in terms of a user name or a group membership.
-
Click Services.

-
Click the service name associated with the pooling service type.
-
On the left navigation menu, click Configuration.
-
Click Authorization.
-
Under the User access or Admin access section, enter a user name and/or group associated with each role (user or administrator).
-
-
Click Add.
For example, the CLI command below configures user1, user2 and members of group1 to act as users and the user root to act as an administrator:
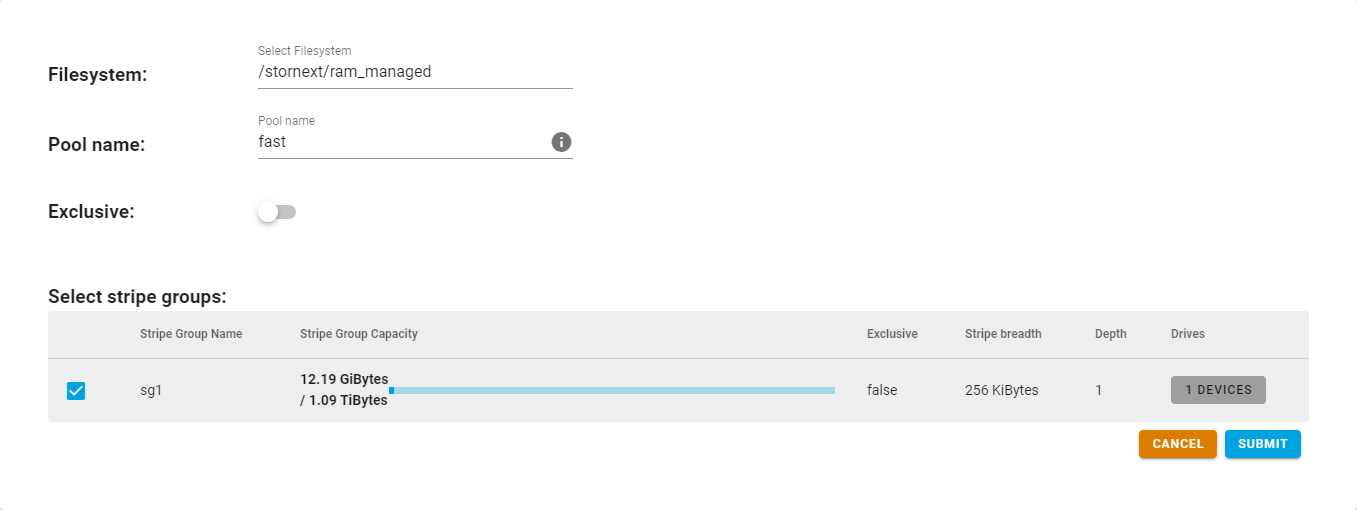
Use the StorNext user interface to configure a pool on any StorNext file system that is mounted on the host.
-
Click Services.
-
Click the service name associated with the pooling service type.
-
On the left navigation menu, click Pools and then click Create Pool.
-
Click a file system.
-
Enter a name for the pool (for example, fast or slow).
Note: A pool name must be lower case up to eight characters in length.
-
(Optional) Click to define if the pool is exclusive; a storage pool can be exclusive or non-exclusive. You can only use an exclusive pool by content specifically targeted to that pool, and you can only use a non-exclusive pool by both targeted and untargeted content.
-
Click the stripe group.
-
Click Submit.
-
You can also use the CLI to configure a pool on any StorNext file system that is mounted on the host, in an interactive manner, by using the sntier pool command.
When you execute the command, the output displays a list of mounted file systems and their data stripe groups (for file systems which have data stripe groups that are not allocated to a pool). Press the Up arrow key or the Down arrow key to highlight a file system; press the A key to add a pool to a file system or press the D key to delete a pool from a file system.
You are prompted to define a file system pool. The example below illustrates the output, with user input in bold letters:
sg1 4.91 TiB
sg2 372.60 GiB
Enter new pool name (up to 8 characters) slow
Exclusive space usage (y/n): n
Enter stripe group name: sg1
Enter stripe group name:
Enter new pool name (up to 8 characters) fast
Exclusive space usage (y/n): y
Enter stripe group name: sg2
Enter stripe group name:
Enter new pool name (up to 8 characters)
Assign pools? (y/n): y
Note: A pool name must be lower case up to eight characters in length.
If you press Enter, the process assigns the pool and displays the current configuration:
Mount: /stornext/tiered
PoolName    Capacity     Used   Exclusive   Stripe Groups
slow        4.91 TiB     2.16%  No          sg1
fast        372.60 GiB   0.00%  Yes         sg2
You can also execute the entire sequence from the command line. For example:
Repeat this for other file systems; the configuration of pools is persistent in the file system and visible from all hosts running the pooling service.
Note: If you use the CLI, you must define a complete pooling configuration in one step. You cannot add a new pool without deleting the old configuration and starting over. You cannot perform a stripe group offload on a stripe group which is part of a pool; you must redefine the a pool to not include the stripe group first.
You can optionally configure the following.
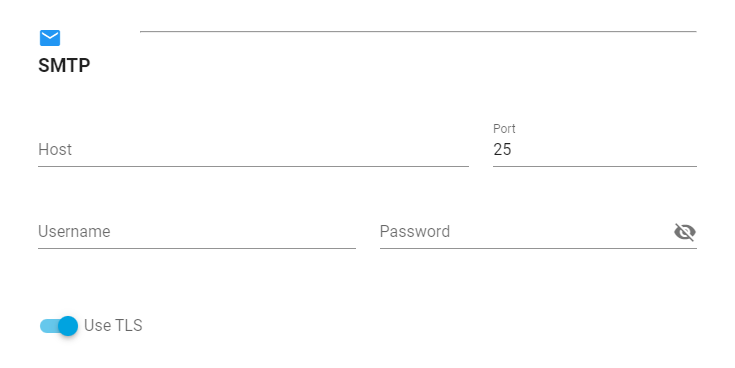
The pooling service can deliver an email to a single email address when a job is complete, as long as the service has access to an email server. If you do not configure email delivery, the service uses the mailx command, which attempts to find an open relay; in most modern deployments, an open relay does not exist and you must define an SMTP server.
A pooling email message is delivered from this account.
Note: The password must be an application password configured for the email account.
Use the StorNext user interface to configure email notifications.
-
Click Services.
-
Click the service name associated with the pooling service type.
-
On the left navigation menu, click Configuration.
-
Click Advanced.

-
Under the SMTP section, enter a host, port, user name and password for the SMTP server.
-
(Optional) Click to enable or disable TLS. By default, TLS is enabled.
-
-
Click Apply.
The CLI example below illustrates a configuration for a Microsoft Office 365 service:
sntier config --smtp_server smtp.office365.com --smtp_port 587 \
--smtp_tls --smtp_user user@company --smtp_passwd xxxx
You can use Storage Manager web services by pooling jobs to retrieve truncated content, as long as the pooling service has access to the account information for the web services. You must enable the Storage Manager web services using the StorNext GUI, and you must create a web service account along with a password.
Use the StorNext user interface to configure the web service account and password in the pooling service.
-
Click Services.
-
Click the service name associated with the pooling service type.
-
On the left navigation menu, click Configuration.
-
Click Advanced.
-
Under the Storage Manager section, enter the user name and password for the web service account.

-
(Optional) In the Batch field, enter the number of files to submit to Storage Manager in one request.
-
-
Click Apply.
You can also use the CLI to execute the following command to configure the web service account and password in the pooling service:
You do not need to configure the location of the web service address, as the pooling service locates it automatically.
Note: If you are accessing multiple managed MDCs from a single pooling service, the web service information must be identical amongst the MDCs as there is only one configuration for this information.
Directory tagging (directory‑level affinity) is required for file system pooling to behave as expected.
When you configure pools, you typically want a project or parent directory to use a specific pool (for example, a fast pool for active ingest). StorNext uses directory tags (affinities) on those directories to control where new files are allocated.
-
If a directory is tagged with an affinity that points to a pool, new files created in that directory are allocated from that pool.
-
If a directory is not tagged, StorNext allocates new files across all non‑exclusive stripe groups in the file system. In that case, new data can be spread across multiple pools, which may not match the intended performance or cost profile.
Best Practice
For each workload or project:
-
Identify the project’s parent directory (for example, /fs/projects/ProjectA).
-
Apply a directory affinity/tag that corresponds to the desired pool (for example, a fast affinity that maps to the fast pool).
-
Verify that the directory tag is set before you start ingesting data into that directory.
This ensures:
-
Ingest for that project uses the intended pool (for example, fast disk during production work).
-
File system pooling policies and jobs then manage movement of existing data separately from allocation of new data.
For background on how affinities work and how they are configured, see Affinities.
StorNext file system pooling (for example, using sntier policies or jobs) has two distinct goals:
-
Determine allocation during ingest
-
Controlled by directory tags / affinities on directories.
-
-
Move existing data between pools according to policy
-
Controlled by file system pooling jobs and their options.
-
File system pooling jobs can operate on:
-
Files (moving existing data between pools), and/or
-
Directories (changing directory tags / affinities, which changes where future files are allocated).
The following scenarios describe the three typical patterns when moving data between pools.
Scenario 1 – Move existing files, and send new files to the target pool
Goal:
Move all existing files to the target pool, and also have future files written into that same target pool.
Behavior:
-
Existing files in the selected directories are moved to the target pool.
-
Directory tags/affinities for those directories are updated to point to the target pool.
-
New files created in those directories are allocated from the target pool.
How to run:
-
Use both the files and directories options (for example):
--files --dirs
When to use:
-
Projects that are mostly complete and are being migrated to a slower or less expensive pool, where both existing data and new, occasional additions can live together on that pool.
Scenario 2 – Move existing files, but keep new files on the original pool
Goal:
Free space on the original pool by moving older data out, while keeping new ingest on the original (typically faster) pool.
Behavior:
-
Existing files are moved from the original pool to the target pool.
-
Directory tags/affinities remain unchanged, pointing to the original pool.
-
New files created in those directories continue to be allocated from the original pool.
How to run:
-
Operate on files only, for example:
--files
When to use:
-
You want to reclaim capacity on the original pool to make room for new work.
-
You want to move older content off the fast pool, but keep all new writes on the fast pool.
Scenario 3 – Keep existing files on the original pool, but send new files to the target pool
Goal:
Leave historical data where it is, but change the pool used for future files.
Behavior:
-
Existing files remain on the original pool.
-
Directory tags/affinities are updated to point to the target pool.
-
New files created in those directories are allocated from the target pool.
How to run:
-
Operate on directories only, for example:
--dirs
When to use:
-
You want to start writing new data to a different pool without moving older data immediately.
-
Example: start writing new files to a faster pool for active work while keeping historical files on a slower or existing pool, or vice versa.
-
Any action that changes directory tags (--dirs or combined --files --dirs) affects future ingest for those directories.
-
If directories are moved or retagged to a slower or archival pool without careful planning, new files might be written only to that slower pool, which can impact performance.
-
To avoid unexpected ingest behavior, use:
-
--files when you want to move existing data but keep ingest behavior unchanged.
-
--dirs only when you intentionally want to change where new files are allocated.
-
--files --dirs when both existing data and future ingest should be on the same new pool.
-
This section provides information about the various components related to a pooling job.
There are several types of jobs for managing content, and many options to select which content is processed and what is done with the content. This type of job is known as an action.
The basic operation is a move and the basic operation on each file is as follows:
- A second copy of the file contents is made on the target pool, this copy is part of the same file and is visible in the file system namespace or as a temporary file.
- The two copies are exchanged.
- The old version is discarded.
This process is completed by using an internal interlock mechanism in StorNext which protects against an external change during the process. If a change is detected, then the new copy is removed, and the original live copy is retained. In addition, it is possible to run a checksum; the checksum of the original content is created during the read, after the second copy is created, it is read back and a checksum is created. If the two checksums match, then the exchange takes place. The checksum operation requires significant CPU and extra disk I/O; therefore, it is expensive to run.
This process operates at the file and not at the block level; the whole content of a file is moved, not partial content.
In a scenario where you must move content to a high performance storage (for a read operation), and then you move the content back at a later time, there is a different approach which trades off doing less I/O against increased space usage. A promote job allows you to keep the original copy of the content as well as the new one. This job performs Step 1 and Step 2 of the move. Once the high-performance copy is no longer needed, then you can perform a demote operation; as long as there are no changes to the file, the two copies are exchanged and the high performance one is discarded. This is a metadata-only operation and the bandwidth overhead of moving back is dramatically reduced, allowing less turn-over time between reuse of the high performance storage. If changes are detected, or a file is found with no secondary copy, then a move is performed on the file.
The table below provides information about the job types.
|
Job Type |
Action |
|---|---|
|
move |
This job moves the content to a target pool by making a new copy there and the old copy is discarded. |
|
promote |
This job moves the content to a target pool by making a new copy in the target pool and the old copy is retained. |
|
demote |
This job exchanges a new copy and an old copy, the new copy is discarded, unless the file changed, in which case a move is performed. |
|
remove |
This job removes the tiering label from files and directories; file content is left in its current location, and any alternate copy is removed from the file system. |
|
inventory |
This job counts the files and directories on each pool and generates a report. |
|
checksum |
This job reads and performs a checksum of the files using a specified algorithm and stores the information in an extended attribute on the file. |
|
validate |
This job reads and performs a checksum of the files using a specified algorithm, compare the checksum against the stored one, and reports the mismatches. |
Note: A checksum job is different than running a checksum during a move operation. There are modifiers to the action.
- A job that moves content needs a target pool to move to.
- A data movement job uses allocation sessions to maintain sequential content between files in a directory.
-
You can specify a checksum algorithm on a move which is used to validate the data movement before it is committed. The pooling service supports all algorithms supported by OpenSSL (MD5 and SHA256 are most common algorithms).
Note: Since the checksum process is CPU intensive, the pooling service also supports a much faster algorithm, known as xxHash. The xxHash algorithm only maintains a 32 bit or a 64 bit key. You can execute the xxHash algorithm at several Gbytes/sec on a single core.
-
You can also run an estimate pass before you execute a move. This process scans the files, calculates the space needed and does not proceed unless the target pool contains the minimum required free space. If there is not enough free space, the content is not moved.
Note: This process does not a guarantee a successful move since competing jobs might use the free space concurrently.
-
If a truncated file is found within a managed file system, the pooling service can use Storage Manager web services to trigger a batch retrieve of the content to the specified pool.
Note: This allows end user batch retrieves of contents from a Linux client.
- You can flag managed files so that they are not considered as truncate or store candidates by Storage Manager. You can then reverse this process. In other words, you can move managed content to a location for editing, without the danger of having Storage Manager make copies or truncating out from under the application until the files are flagged as store or truncate candidates again.
A job can locate content using one of the following mechanisms:
- An end user specifies a list of locations to retrieve the content from.
- Use the Metadata Archive (mdarchive) capability of StorNext to search for files that match the specified criteria.
A content list can be any of the following:
- One or more directories to scan and process non-recursively.
- One or more directories to scan and process recursively.
- A list of files to process.
The simplest scenario is to specify a directory to process recursively; all the contents of the directory and its child directories are treated as part of the job. If you specify multiple directories or files, then they must all be within the same file system or the job is rejected.
If you search using Metadata Archive, you can specify a directory within a file system and all content within that directory and its children are considered for processing.
Note: When you specify a directory to scan, the presence of a terminating forward slash (/) determines what to scan.
For example, the string below scans the contents of dir1 and processes recursively into its sub-directories and so on.
The example below scans only the direct contents of dir1; sub-directories are not processed.
The job contents are examined based on a set of criteria and only files and directories which match the criteria are actually processed.
Why two mechanisms? When you specify a directory to scan, the pooling service crawls through the directory hierarchy specified and compares all files and directories against the criteria, before proceeding with a file. A user job typically uses this mechanism. In the search model, the internal metadata archive copy of the metadata is used to perform a more efficient search based on the criteria specified. This is more likely the correct form for a regularly running policy submitting jobs to complete its work. A user job is more likely going to impact most of the contents specified and the number of files referenced is probably a relatively small tree within the file system.
In the case of a policy, we might request it look for a small subset of content and perform the request on a recurring basis. In this type of operation, the metadata archive is more efficient at finding matches and places less overhead on the system.
File system scanning is done as efficiently as possible and the pooling service processes several thousand files per second, running a scan over millions of files is expensive and has a noticeable impact on other activities. Perform this scale of operation during non-business hours using a scheduled job.
The metadata archive search already has most of the criteria applied; however, the scan model does not. All the returned content is compared against the criteria before being considered part of the job.
Important Considerations
Files that are written to a directory that is moved to a pool are written to that pool.
-
If you only want to move old files and want to write new files to the original pool, do not change the directory pool and add the criteria File only to the jobs and/or the policy.
-
If you created a policy or a job that moves directories to a given pool and want to move them to a different pool, create a single-use job that addresses only the directories defined by the criteria Dir only to move them to a specified pool.
Note: You cannot edit a policy or a template; however, you can delete and create a new policy or a template that contains fixed parameters.
The table below provides information about the supported criteria.
Note: All the criteria must match.
| Supported Criteria | Description |
|---|---|
| Minimum size | Only files greater than or equal to the size are considered. |
| Maximum size | Only files less than or equal to the size are considered. |
| Newer than | Only files which have been accessed or changed within an amount of time are included. |
| Older than |
Only files that have not been accessed or changed within an amount of time are included. Note: You can use both Newer than and Older than but having newer be more recent than older signifies nothing matches. |
| File only | Do not consider changing the pool on a directory. |
| Dir only | Do not consider changing the pool on a file. |
| Pool | Only content on the specified pool is considered. |
| Match regex | Only files that match a regex are included. |
|
Exclude regex |
Files that match this regex are excluded. |
The following criteria only impact directories:
- Pool
- File only
- Dir only
If you do not specify a criteria, then all the specified content is processed. You cannot use the regex options with metadata archive-based search content jobs.
Also, there are two optional parts of a job:
- An email address to send a completion report to.
-
A time to run the job at.
Note: If you do not schedule a run time for a job, then the job executes as soon as it is submitted.
See The sntier CLI Command Reference for regular expression syntax.
-
Click Services.
-
Click the service name associated with the pooling service type.
-
On the left navigation menu, click Jobs.
-
Click + New Job.
-
Click a file system.
-
Click the action to perform.
-
Specify the content directory, and then click Next.
-
(Optional) Specify the selection criteria, and then click Next.
-
Define the schedule; you can configure a job to run at a later date (at a specified time), or now.
-
-
Click Submit.
You can also use the CLI to run a job; use the following command:
See The sntier CLI Command Reference for additional details. You can use short form commands to specify the action, pool and paths in a less verbose form. The example below illustrates how to submit a move job and specify a directory without a criteria specified:
The example below illustrates how to use the short form syntax to achieve the same result:
Note: Jobs that request to perform an action without an effect will check files, but do not act on them if they are already in the required state. In other words, if you attempt to move content to a pool which it is already on, then the action is not processed.
By default, a job runs as soon as possible; however, you can configure the job to run at a later time. You can also configure the service to deliver an email report when a job is complete.
Note: The email report and job completion information provide a summary of the amount of content that is processed, the amount of time required to process the job, and any errors that occurred during the job.
If you do not schedule a run time for a job, then the job runs as soon as it is submitted. The pooling daemon can run multiple jobs in parallel. A job that is large, or that scans directories recursively is split into multiple sub-jobs that run in parallel. A new job is actually in the same queue as these sub-jobs; depending on the backlog, it might appear to not make any progress.
You cannot prioritize the order to run a job.
Note: The only control mechanism is to temporarily suspend other jobs that are running.
You can configure the service to deliver an email report when a job is complete.
Note: The email report and job completion information provide a summary of the amount of content that is processed, the amount of time required to process the job, and any errors that occurred during the job.
Below is an example of the output from a policy initiated job:
Type: move
State: completed

Job initiated by policy slow
Mount:	/snfs/flexsync/

Queued:	Fri Sep 13 09:52:03 2019
Started:		Fri Sep 13 09:52:03 2019
Finished:	Fri Sep 13 09:52:16 2019

Elapsed Time 13.329 seconds
Files
  scanned:	8
  moved:	8
  skipped:	0

Data Rate:	779MBytes/sec
Data Moved:	10GBytes
An inventory job counts the files and directories on each pool and generates a report.
Below is an example of the output from an inventory job:
Host: localhost Job: 3450      completed

Action:   inventory
Submitter:   admin
Paths:   /snfs/flexsync/

Queued:   Fri Sep 13 10:44:44 2019
Started:   Fri Sep 13 10:44:44 2019
Finished:   Fri Sep 13 10:44:50 2019
Elapsed:     5.95 seconds

Scanned:    42801 files

Pool	 Dirs	   Files        Data          Copies     Copy Space
fast    2978      272          8.86 MiBytes
slow    23	   42529        108.39 GiBytes
Below is an example of the output from a user initiated job with filtering applied to the content:
Job:     7191
Action: move to pool fast
State: completed

 Job initiated by slord
 Paths:	/snfs/flexsync/slord/

Criteria:
   Min file size: 16KBytes
   Match pattern: @(*.c|*.h|CMakeLists.txt)

 Queued:		Wed Sep 18 14:49:05 2019
 Started:		Wed Sep 18 14:49:05 2019
 Finished:	Wed Sep 18 14:49:06 2019

 Elapsed Time 0.829 seconds
 Files
   scanned:	943
   moved:		943
   skipped:	40966

 Data Rate:	71MBytes/sec
 Data Moved:	59MBytes
A policy consists of instructions to run a job on a recurring basis. The policy has similar controls to a job, in addition to a few extra capabilities.
A template is a partial job, or policy that you can use as input to create a policy or a job. An example of a template might be one that prepares content for editing (it might specify the job action):
- Move to pool fast and a set of modifiers and criteria suitable to the specific workflow.
You can then use the template in combination with a set of content and get the expected behavior for a particular task. Templates also work with policies, but are less likely in that policy creation is an infrequent task in comparison with job submission.
A difference between a job and a policy is that a policy must have a schedule associated with it that defines when it must run; this could be an interval such as every five minutes or a time of day or week when it should execute. A policy runs based on a schedule and executes a job.
There are two criteria that are policy-specific:
- A fill level that relates to a specified pool; a policy only runs when a pool is above a specified fill level. A policy execution is a very light-weight operation at other times as it looks at space utilization.
- A policy can limit the amount of work it performs. This occurs automatically with the fill level – it only operates to decrease the fill level to the required threshold. You can explicitly configure a policy to state the maximum amount of content it relocates per run. This is an approximation, as whole files are always processed and this might cause more than the specified amount of data to move.
An example policy might be to search the file system for files that are located on a pool labeled fast when its fill level is above 80%, that are older than one week, and then move the files to a pool labeled slow. This policy could run on a regular interval of five minutes using the search mechanism as the cost of finding work is mostly independent of the size of the content to be searched.
Caution: Quantum does not recommend you look for content by scanning a million files every five minutes.
Do the following to create a policy for the pooling service.
-
Click Services.
-
Click the service name associated with the pooling service type.
-
On the left navigation menu, click Policies.
-
Click + New Policy.
-
Enter a name for the policy, and then click Next.
-
Click a file system.
-
Click the action to perform.
-
Specify the content directory, and then click Next.
-
Specify the selection criteria, and then click Next.
-
Define the schedule; you can configure a policy to run daily or weekly at a specified time, or based on a time interval (for example, every 10 minutes or hours).
-
-
Click Submit.
Do the following to create a policy for the pooling service.
-
Click Services.
-
Click the service name associated with the pooling service type.
-
On the left navigation menu, click Templates.
-
Click + New Template.
-
Enter a name for the template, and then click Next.
-
Click the action to perform, and then click Next.
-
Specify the selection criteria, and then click Next.
-
-
Click Submit.
Regarding performance tuning, the pooling service uses multiple threads and buffers to perform efficient I/O and scanning. There are various tuning parameters which can impact the throughput you can achieve. The default values suffice, but you might be able to achieve more throughput by configuring certain tuning parameters. After content is available, you might want to experiment with the various tuning parameters outlined below (from the sntier config output):
StorNext Pooling configuration for localhost
     Job split size:    128 Files
                       1.00 GiBytes  (16.00 MiBytes minimum)
            Workers:      8 Scan threads
                          2 IO threads per scan thread
     IO buffer size:   4.00 MiBytes (4 per scan thread)

 Account based authorization: Enabled
         Auth token lifespan: 1 hour
                 User access:
                      Groups: cvfs
                Admin access:
                       Users: root

 SMTP mail delivery configuration:
                      Server: smtp.office365.com:587
                         TLS: enabled
                   SMTP user: user@quantum.com
                 SMTP passwd: XXXXXXXX

           Policy query size: 25000
         Job history to keep: 1 week
Default time report encoding: Epoch time
  Email content presented as: text
                  Log detail: verbose
All command line access is via the sntier command that is installed under /usr/cvfs/bin; it has a hierarchical argument structure.
The top level of the hierarchy consists of the following:
You can also use optional arguments to monitor and control the pooling on a host:
-h, --help show this help message and exit
--host host Pooling host to use, default localhost
--user user User name for authentication, default is login name
--passwd passwd Password for authentication, will prompt if needed
The following are sub-commands:
jobs Monitor and control pooling job status
template Create/monitor pool template definition
policy Create/monitor pool policies
submit Submit pooling job
move Submit move pooling job
promote Submit promote pooling job
demote Submit demote pooling job
inventory Submit inventory pooling job
checksum Submit checksum pooling job
validate Submit checksum validation job
location Report on pool location of file contents
pool Monitor and manage storage pools
config View pool service configuration
configreset Reset pool service configuration
service Enable or disable pooling on local host
setup set default host and user to use for pooling
Note: Each sub-command has its own set of options.
You can use several of the main options without arguments to enter a curses like refreshing.
- Use the sntier jobs command to display a list of pending, running and completed jobs. The output also displays a detailed view and control over user jobs.
- Use the sntier policy command to display a list of policies, details of the policies, when a policy was executed and when a policy is scheduled to execute.
- Use the sntier pool command to display a list of the mounted file systems, their pools and the current fill level of those pools.
By default, the sntier command attempts to communicate with the pooling service on a local host and utilizes the identity of a local user for authentication.
Note: For the root user on the same host as the pooling service, you do not require authentication as private authentication mechanism is used.
In all other cases, you must enable remote access. You can use the --host and the --user options to access a remote host and a different user account than the current user. If you are logged in remotely, or as a non-root user, you are prompted for a password (unless you provide the password using the command line). The name and password are used to obtain an authentication token. The token is stored locally and you can use it for a certain period of time (by default, you can use the token for one hour) to access the service using the same credentials.
If you want to use the service remotely, then you can define the default account and the host you want to communicate with:
sntier setup -h
usage: sntier setup [-h] [--setuser user] [--sethost host]
You can also use optional arguments:
-h, --help show this help message and exit
--setuser user Set default account to use for pooling
--sethost host Set default host to use for pooling
You can use the optional arguments in place of the local account and the host for this user, unless you use the --host and or the --user argument on an invocation.
Use the sntier jobs command to monitor and control a job. Without the extra arguments, the process enters a refreshing display:
Jobs (host: localhost)
jobId   User    Action   Target State     Files   Finish Time
1326    policy  move     slow   completed  8      Sep 10 11:08:25
1323    admin   move     fast   completed  8      Sep 10 11:02:32
1112    policy  move     slow   completed  40779  Sep 09 14:54:19
1111    policy  move     slow   completed  287    Sep 09 14:51:57
1108    admin   move     fast   completed  41066  Sep 09 14:46:56
1104    policy  move     slow   completed  8      Sep 09 14:38:44
1100    admin   move     fast   completed  8      Sep 09 14:32:15
1099    admin   validate  --    completed  41235  Sep 09 14:31:27
1098    admin   inventory --    completed  41235  Sep 09 14:31:04
1097    admin   checksum  --    completed  41235  Sep 09 14:30:44
1095    admin   move     slow   completed  8      Sep 09 14:30:07
1094    admin   move     fast   completed  0      Sep 09 14:29:44
1092    policy  move     slow   completed  0      Sep 09 14:26:11
1091    admin   move     fast   completed  0      Sep 09 14:26:10
1005    jdoe    inventory --    completed  42801  Sep 09 11:10:16
1002    policy  move     slow   completed  41066  Sep 09 11:05:44
1000    jdoe    move     fast   completed  41066  Sep 09 10:59:25
- To navigate highlight a job, press the Up arrow key or the Down arrow key.
- To view the detail about a job, press the space bar.
- To delete, press the D key.
- To suspend, press the S key.
- To resume, press the R key.
- To quit, press the Q key.
Host: localhost Job: 1112       completed

      Action:   move to pool slow
   Submitter:   policy slow
       Email:   user@quantum.com
      Search:   /snfs/flexsync/
    Criteria:
         From pool: fast
        Older than: 5 minutes
      Process only: Files

      Queued:   Mon Sep  9 14:53:56 2019
     Started:   Mon Sep  9 14:53:56 2019
    Finished:   Mon Sep  9 14:54:19 2019
     Elapsed:    23.32 seconds

     Scanned:    40779 files

       Moved:    40779 files          2.94 GiBytes
                                    128.91 MiBytes/sec
- To delete, press the D key.
- To suspend, press the S key.
- To resume, press the R key.
- To exit, press the Q key or the space bar.
You can do the following to a running job belonging to a user (or any job for an administrator):
- Press the D key to delete a job. This process stops the job.
- Press the S key to suspend (pause) a job.
- Press the R key to resume a job.
You can configure the amount of time that a job history is retained after the job is complete. If you delete a job sooner than the configured time, the record is not retained. You can configure what jobs are allowed to be deleted when you press the D key.
Below is the complete set of options for the sntier jobs command:
usage: sntier jobs [-h]
[--list | --show job_id | --delete job_id | --suspend job_id | --resume job_id | --wait job_id | --watch job_id]
You can also use optional arguments:
-h, --help show this help message and exit
--list list jobs
--show job_id job details
--delete job_id delete job
--suspend job_id suspend job
--resume job_id resume job
--wait job_id wait for job done
--watch job_id monitor job details
If you do not use the options, then this enters the curses-based full screen display of jobs:
- The --list option displays the same information; one line per job on stdout.
- The --show jobid option reports the complete job status in json.
- The --delete jobid option deletes a completed, suspended or pending job from the system. If a job is running, then it stops the job from executing and places it in a cancelled state.
- The --suspend jobid option stops a job from executing and places it in a suspended state.
- The --resume jobid option resumes a job that was placed in a suspended state.
- The --wait jobid option blocks the CLI until a job is complete. The CLI polls the pooling service to determine the state of a job.
- The --watch jobid option enters the full screen refreshing job details display.
Note: You can view any job, but can only control your own job. An administrator can view and control any job.
Use the sntier submit command to execute a job. You can also use shortcut commands to common operations for different job types by using the move, promote, demote, inventory, checksum and validate commands.
The following are options for the sntier submit command:
usage: sntier submit [-h]
[--paths paths | --search search_path | --pathfile file]
[--action {move,promote,demote,remove,inventory,checksum,validate}]
[--target pool] [--checksum algorithm] [--estimate]
[--iosize I/O size] [--pin] [--sessions] [--retrieve]
[--smstore | --no-smstore] [--smtrunc | --no-smtrunc]
[--min bytes] [--max bytes] [--newer secs] [--older secs]
[--pool poolname] [--match regex] [--exclude regex]
[--files | --dirs] [--email address]
[--format {text,json}] [--verbose] [--runat time]
[--template template] [--wait | --watch]
You can also use optional arguments:
-h, --help show this help message and exit
--template template template job name
--wait wait for job completion
--watch monitor submitted job
You can specify the following content options:
--paths paths job paths
--search search_path job search directory
--pathfile file file containing job paths
You can specify the following task options:
--action {move,promote,demote,remove,inventory,checksum,validate}
job action
--target pool Target storage pool
--checksum algorithm checksum algorithm to use
--estimate estimate work first
--iosize I/O size buffer size for I/O
--pin pin content to storage pool
--sessions use allocation sessions during movement
--retrieve retrieve truncated storage manager content
--smstore enable storage manager copy creation
--no-smstore disable storage manager copy creation
--smtrunc enable storage manager file truncation
--no-smtrunc disable storage manager file truncation
You can configure the following selection criteria:
--min bytes minimum file size in bytes to process
--max bytes maximum file size in bytes to process
--newer N process files changed or accessed in the last N seconds
--older N process files not changed or not accessed in the last N seconds
--pool poolname process content in named pool only
--match regex process files matching regex
--exclude regex skip files matching regex
--files only process files
--dirs only process directories
You can configure the following reporting options:
--email address email completion report
--format {text,json} email format
--verbose more verbose reporting
You can configure the following scheduling options:
If a job submission is successful, then the command reports a job sequence number that you can use to control or query the job status. You can use the --wait or the --watch option to silently wait for a job to complete. You can also enter a job's details display to view activity about a job.
Many parameters of a job are checked upon submission. If an error is returned, then it is printed out and the command aborts with non-zero exit status.
You can use shortcut commands to specify the action and paths to scan directly without extra command line options. In the case of a movement operation, you specify the target pool inline. In the case of a checksum or a validate job, you specify the checksum algorithm inline.
The following two examples execute the same job:
You can use all other optional arguments on these commands.
- For a movement operation, you specify the target pool after one or more paths.
- For an inventory operation, you specify a path immediately.
- For a checksum or a validate operation, you specify the checksum algorithm before a path.
-
You can include or exclude a file name from consideration in a job by using the --match or the --exclude option. A regular expression syntax is similar to the syntax in a Unix shell.
Note: When you run a command from a shell, you must wrap a regular expression in quotes to prevent the shell from evaluating it. The quotes are not part of the pattern itself.
For example, the following expression matches all files with the extension mxf:
"*.mxf"You can also match a set of characters using square brackets.
For example, the following expression matches all files ending with .c or .h:
"*.[ch]"You can define a complex expression for multiple patterns.
For example, the following expression matches all files ending with .mxf, .dpx and .xml:
"@(*.mxf|*.xml|*.dpx)"
Use the sntier policy command to view and control a policy. If you do not specify an argument, the command enters a display of all the configured policies. You can select a policy and view its details. An administrator can delete a policy from this view. A policy detail view displays the policy configuration and information about its schedule:
Host: localhost Policy: 4d595a97-cbfd-45bd-afd4-cb4e405a9a5b
Last scan time: Fri Sep 13 09:58:03 2019
Last run time: Fri Sep 13 09:52:03 2019
Next scan time: Fri Sep 13 10:00:03 2019
Policy name: slow
Policy name: slow to pool slow
Action: move to pool slowm.com
Email: user@quantum.com
Schedule: run every 120 seconds
Search: /snfs/flexsync/
Criteria: pool: fast
From pool: fastnutes
Older than: 5 minutes
Process only: Files
The time values display when the policy last performed a scan, when the policy last executed a run, and when the policy is scheduled to perform the next scan.
You can specify the following options:
usage: sntier policy [-h] [--add name | --list | --delete pol_id]
[--template name]
[--paths paths | --search search_path | --pathfile file]
[--action {move,promote,demote,remove,inventory,checksum,validate}]
[--target pool] [--checksum algorithm]
[--iosize I/O size] [--pin] [--sessions] [--retrieve]
[--smstore | --no-smstore] [--smtrunc | --no-smtrunc]
[--min bytes] [--max bytes] [--newer secs] [--older secs]
[--pool poolname] [--fill percent] [--maxmove space]
[--files | --dirs] [--email address]
[--format {text,json}] [--verbose] [--interval secs]
[--runat time]
You can also use optional arguments:
-h, --help show this help message and exit
--add name add new policy
--list list policies
--delete pol_id delete policy
--template name template for policy contents
You can use content options:
--paths paths policy paths
--search search_path policy search directory
--pathfile file file containing policy paths
You can use task options:
--action {move,promote,demote,remove,inventory,checksum,validate}
policy action
--target pool Target storage pool
--checksum algorithm checksum algorithm to use
--iosize I/O size buffer size for I/O
--pin pin content to storage pool
--sessions use allocation sessions during movement
--retrieve retrieve truncated storage manager content
--smstore enable storage manager copy creation
--no-smstore disable storage manager copy creation
--smtrunc enable storage manager file truncation
--no-smtrunc disable storage manager file truncation
You can use selection criteria:
--min bytes minimum file size in bytes to process
--max bytes maximum file size in bytes to process
--newer secs process files changed or accessed in the last N seconds
--older secs process files not changed or not accessed in the last N seconds
--pool poolname process content in named pool only
--fill percent minimum fill percentage for pool
--maxmove space maximum content bytes to move
--files only process files
--dirs only process directories
You can use reporting options:
--email address email completion report
--format {text,json} email format
--verbose more verbose reporting
You can use scheduling options:
--interval secs policy run interval
--runat time time to run policy
Creating a policy is very similar to submitting a job and you must configure a schedule of when the policy must run. You can use the sntier policy --add name command to define a policy with a name; however, the name is convenient for reporting displays. Internally, a policy contains a unique ID that you can use to delete a policy.
Note: There is no check on a supplied policy name being unique.
To delete a policy by its ID, use the --delete option. To create a complete dump of the information about a policy, use the --list option.
Note: The output is only available in JSON format.
A template is a partial definition of a job or a policy that is stored by the system with a unique name. You can use a template to fill in a subset of the details of a job and combine it with other content that you provide. The options for the template command are the same as for creating a policy. Usually, a template does not include a content definition - you provide the content definition when you submit a job or if you use a policy command that specifies the template.
Below are the main controls for the template command:
--add name add new template
--list list templates
--delete name delete template
Use the sntier location command to examine files in the file system and provides information about their location in storage pools.
Note: The location command does not interact with the pooling service.
The location command retrieves a list of files or directories as input and provides information about their pool location:
# sntier location *
vidio_000000 pool: slow
vidio_000001 pool: slow
vidio_000002 pool: slow
vidio_000003 pool: slow
vidio_000004 pool: slow
vidio_000005 pool: slow
vidio_000006 pool: slow
vidio_000007 pool: slow
Use the sntier pool command to view the current status of a pool, to define a pool, and to remove a pool from a file system. Any authorized user can view the state of a pool but only an administrator can modify the pool. If you do not specify an argument, the sntier pool command enters a refreshing display that provides information about the current mounted file systems on the pooling service host and their pool status:
Pool status host localhost
Mount: /snfs/flexsync
PoolName Capacity Used Exclusive Stripe Groups
slow 4.91 TiB 2.16% No sg1
fast 372.60 GiB 0.00% Yes sg2
Mount: /snfs/wotan
PoolName Capacity Used Exclusive Stripe Groups
slow 6.54 TiB 0.26% No sg1
fast 208.60 GiB 25.64% Yes sg2
The complete command line syntax is:
usage: sntier pool [-h] [--add | --list | --delete] [--mount mountpnt] [--sg name [sg ...]] [--sgexcl name [sg ...]] [--json]
You can also use optional arguments:
-h, --help show this help message and exit
--add define pools for filesystem
--list list pools for file system
--delete delete pools from file system
--mount mountpnt mount point
--json output in json
You can configure pool specifications:
--sg name [sg ...] Define non-exclusive stripe group
--sgexcl name [sg ...] Define exclusive stripe group
Use the command line to define a pool or use the full screen display.
To configure pooling, you must enable the service and then configure the run time for the service (see Install and Configure). On the pooling host, use the sntier service command to enable or disable the pooling service.
You can also use optional arguments:
-h, --help show this help message and exit
--enable enable pooling
--disable disable pooling
If you disable the pooling service, then the service stops and it does not restart on a service restart. It does not remove the internal database for configuration information that resides under /usr/cvfs/data/tier_db.dat.
After it is enabled, the sntier config command covers all other aspects.
Note: You must locally enable authentication.
After you enable remote access, you can run a command remotely.
Below is the set of options:
usage: sntier config [-h] [--users [username [username ...]]]
[--groups [groupname [groupname ...]]]
[--admins [username [username ...]]]
[--admin_groups [groupname [groupname ...]]]
[--expiry secs] [--job_size size] [--job_min size]
[--job_files files] [--workers [8-64]]
[--iosize I/O size] [--smtp_server address]
[--smtp_port port] [--smtp_tls]
[--smtp_user email account]
[--smtp_passwd email password] [--snsm_user user]
[--snsm_passwd passwd] [--snsm_batch count]
[--history [1-30] days] [--query_size results]
[--email {text,json}] [--logging {quiet,verbose}]
[--json]
You can use optional arguments:
-h, --help show this help message and exit
--json output in json
You can configure authorization settings:
--users [username [username ...]] accounts allowed access
--groups [groupname [groupname ...]] groups allowed access
--admins [username [username ...]] accounts allowed admin access
--admin_groups [groupname [groupname ...]] groups allowed admin access
--expiry secs expiry time for authentication sessions
You can configure a job processing setting:
--job_size size Maximum job split data size
--job_min size Minumum job split data size
--job_files files Maximum files in job split
--workers [8-64] Content scan threads
--iosize I/O size I/O buffer size (default 4 Mbytes)
You can configure SMTP email settings:
--smtp_server address Host address of mail service
--smtp_port port Port number of mail service
--smtp_tls Use TLS for email communication
--smtp_user email account Email account name to use
--smtp_passwd email password Email account password
You can configure Storage Manager web service settings:
--snsm_user user Web service user id for retrieves
--snsm_passwd passwd Web service password for retrieves
--snsm_batch count Web service request batch size
You can configure pool settings:
--history [1-30] days Days of job history to keep
--query_size results Max search query results from file system
--email {text,json} email report format
--logging {quiet,verbose} logging level
You can configure an individual setting or a group of settings in a single command. You must configure email settings, Storage Manager, or authentication settings as a group. If a change is successful, the current pooling configuration is displayed and you can also see it by using the sntier config command without any options:
StorNext Pooling configuration for localhost
Job split size: 128 Files
1.00 GiBytes ( 16.00 MiBytes minimum)
Workers: 8 Scan threads
2 IO threads per scan thread
IO buffer size: 4.00 MiBytes (4 per scan thread)
Account based authorization: Enabled
Auth token lifespan: 1 hour
User access:
Groups: cvfs
Admin access:
Users: root
SMTP mail delivery configuration:
Server: smtp.office365.com:587
TLS: enabled
SMTP user: user@quantum.com
SMTP passwd: XXXXXXXX
Policy query size: 25000
Job history to keep: 1 week
Default time report encoding: Epoch time
Email content presented as: text
Log detail: verbose
You can use the sntier configreset command to reset parts of, or all of the configuration to the default setting:
You can specify optional arguments:
-h, --help show this help message and exit
--email reset email configuration
--auth reset authorization configuration
--snsm reset storage manager configuration
--all reset all configuration
Note: If you change or reset an authentication setting, then you also impact the remote access to the service. You can change an authentication setting remotely, but if you inadvertently remove an administrator account, then you must locally execute the config command.
