 minute read
Before you perform either File System Expansion or Migration, you must first perform a check on the file system you plan to use for these features. This operation could take a significant amount of time depending on the size of the file system, so plan accordingly.
Also, this operation could consume a significant amount of space on the local file system. For example, for large file systems you should allow at least 20GB of free space on the local file system for temporary files.
Certain file system maintenance tasks require an amount of free-unused disk space to allow the operation to be completed. For example these maintenance tasks could include:
- Repairing the file system using the command, cvfsck; space used for this can be specific on an alternate file system.
The command, cvfsck, uses a combination of scratch storage space and in memory caching to optimize its operation. The location of the scratch storage can be controlled using the option, -T directory. The option, -T directory, specifies the directory where all temporary files created by cvfsck are placed. If this option is omitted, then all temporary files are placed in the system's default temporary folder.
Note: The command, cvfsck, does honor the use of TMPDIR/TEMP environment variables.
The command, cvfsck, attempts to estimate the amount of space it consumes based on the amount of metadata in the file system, and checks the amount of available space at the designated location. If there is less than the estimated amount, then a warning is issued and you are asked if you wish to proceed or specify a different location.
The command, cvfsck, does not require free space in the actual file system, unless it is repairing damage which requires reconnecting inodes to the file system. This may require an amount of available metadata space to complete successfully.
- Defragmentation operations also require additional space.
- Data migration operations also require space.
Quantum recommends a small percentage of the file system in question should be kept free. Running at high levels of capacity may induce additional levels of fragmentation.
For pre-StorNext 5 file systems, Quantum strongly recommends you upgrade, as you may need additional space for these maintenance operations and upgrades.
For more information about file system expansion, refer to the StorNext online help.
There are two ways to check file systems:
- Checking while the file system is offline
- Checking while the file system is active
When the file system is offline, you can run the check in either traditional mode or read-only mode. Read-only mode typically completes faster, but is not as thorough.
When the file system is active, you must run the check in read-only mode. The advantage of this method is that you don’t have to take the file system offline to run the check.
Note: Running a check on an active file system could result in false errors which occur because you are running the check while the file system is still running.
Whenever you run the check in read-only mode, Quantum strongly recommends also running the Recover Journal step before you check the file system. Running Recover Journal ensures that all operations have been committed to disk, and that the metadata state is up to date.
Regardless of which method you choose to check the file system, you should plan carefully when to run a file system check and plan accordingly.
Use the following procedure to perform a file system check.
Note: If you plan to run the check while the file system is offline, before you begin the following procedure you should first stop that file system as described in the StorNext online help.
-
On the Tools menu, click File Systems, and then click Check File System. The Tools > Check > [file system name] page appears.
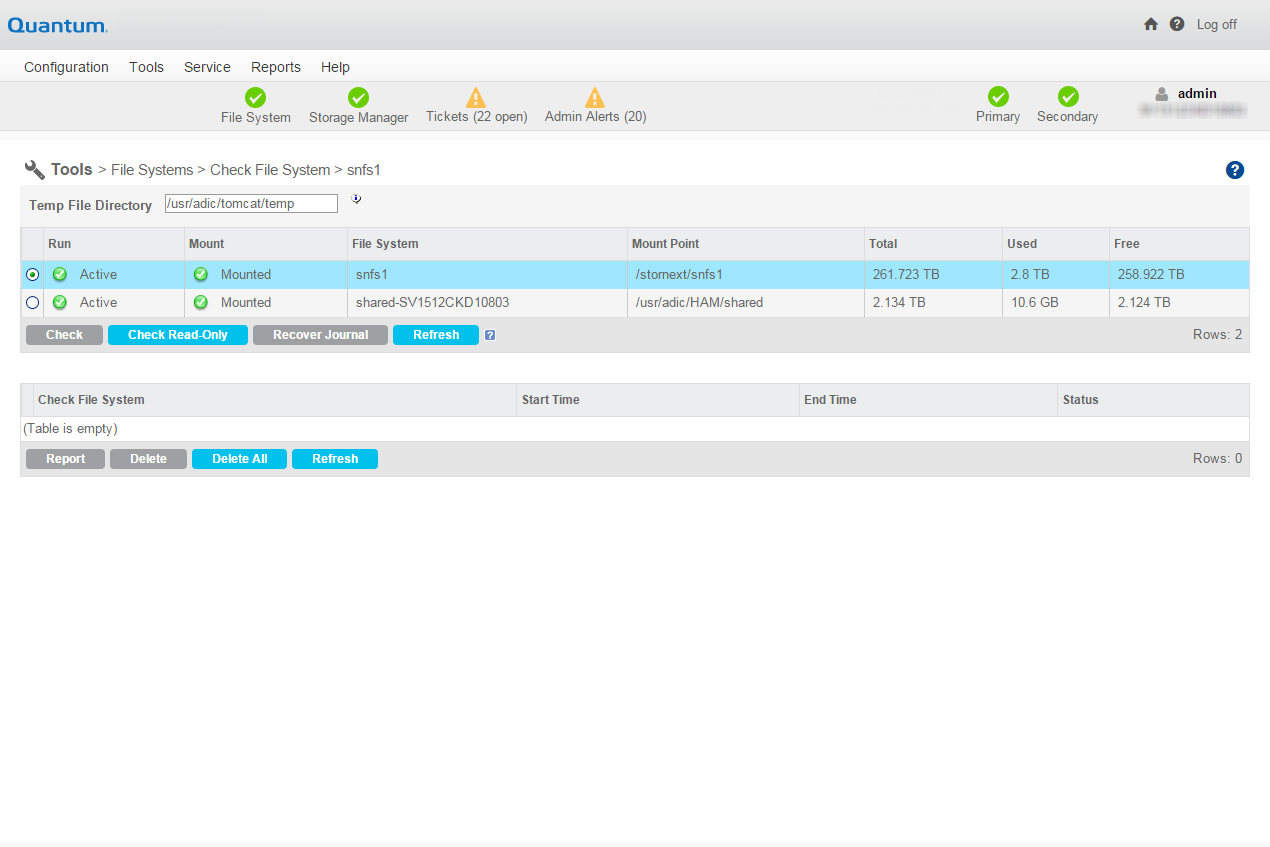
- At the Temp File Directory field, enter a new directory if the specified directory does not have enough space to perform the check. The checking process on large file systems can take hundreds of megabytes or more of local system disk space for working files.
- Select the file system you want to check.
- If you plan to run the check in read-only mode, Quantum recommends running Recover Journal by clicking Recover Journal. When a message asks you to confirm that you want to run Recover Journal, click Yes to proceed or No to abort.
- Do one of the following:
- If the file system you want to check is active, click Check Read-Only to check the file system in read-only mode.
- If the file system you want to check is offline, click Check to check the file system in “regular” mode, or Check Read-Only to check in read-only mode.
After you have run at least one file system check, information about the process appears at the bottom of the screen: file system name, the time the check was initiated and completed, and the status of the check. To view details about a specific check, select the desired check at the bottom of the screen and then click Report. When you are finished viewing the report, click Done to return to the previous screen.
To delete a check report from the list, select the check you want to delete and then click Delete. To delete all previously run checks listed, click Delete All.
If you do not want to use StorNext to view output from the file system check, you can view output in two files:
| File | Example |
|---|---|
|
/usr/cvfs/data/<fsname>/trace/cvfsck-<timestamp> |
/usr/cvfs/data/snfs1/trace/cvfsck-02_22_2010-12_15_19 |
|
/usr/adic/gui/logs/jobs/CHECK_FS-<timestamp>-<jobid> |
/usr/adic/gui/logs/jobs/CHECK_FS-20100222_121519-77 |
