 minute read
- If you have not already done so, click Storage Policies from the Configuration menu.
- Click New.
- Enter the following fields:
Policy Class: The name of the new policy you are creating. The policy class name must be unique. You cannot enter the name of an existing policy class.
Note: If you use upper-class characters when entering the policy class name, the name is converted to lower-case characters when the policy class is created.
- Policy Type: Click the Storage Manager tab to create a policy for StorNext Storage Manager.
- Click Configure... to continue.
- Enter information on the General, Relocation, Steering, Schedule and Associated Directories tabs. See the sections following for more information about fields on these tabs.
- When you are finished entering information about the new policy, click Apply, or click Cancel to exit without saving.
- After the Status page informs you that the policy was created successfully, click OK.
The General tab contains parameters that apply to all storage policies. Fields marked with an asterisk are required. Enter additional fields as desired, or accept the displayed default values.
The General tab contains the following fields:
| Parameter | Description |
|---|---|
| Default Media Type |
Select the media type that applies to devices associated with this policy. When creating a policy, the Default Media Type you select applies to all defined copies in the policy unless overridden in the policy. For additional information, see The Steering Tab. To configure a Disk-to-Disk relocation policy, click DISK from the list. Note: This DISK media type does not support the parameters and options associated with the General tab, the Schedule tab, and the Steering tab. Those parameters and options are disabled. If you select a media type other than DISK, then the parameters and options associated with the General tab, the Schedule tab, and the Steering tab are enabled and you have full access to the policy options. See The Relocation Tab for additional information. |
| File Age Before Copy is Made |
This value determines the minimum number of minutes, hours or days a file must reside unmodified on disk before it is considered a candidate for copying to storage media. Enter the number in the first field, and the unit of measure in the second pull-down field. The minimum value is 1 minute. The default value is 5 minutes. Note: A minimum of one hundred files is required to trigger the copy after 1 minute. |
| File Age Before Truncation | This value determines the minimum number of minutes, hours or days a file must reside on a disk unaccessed before it is considered a candidate for truncation. Truncation removes the disk blocks of a stored file, but not the file itself. Enter the number in the first field, and the unit of measure in the second pull-down field. The minimum value is 5 minutes. |
| Clean Inactive Versions |
If you enable this option, then the inactive file versions in this policy are removed when they reach the specified age. If you do not enable this option, then the inactive file versions for the class are removed at the system default of 7 years. Note: This option does not affect current file versions on media or on disk. You can restore any file that was deleted and still has inactive versions, to disk. |
| Age of Inactive Versions to Clean | This value defines a time in Days, Weeks, or Years when all inactive versions for a deleted file are automatically removed from the database. |
| Truncate File Immediately After Store | Enable this option (check this box) to truncate files immediately after they are stored. |
| Clean Database When File Removed | If this option is enabled (the box is checked), StorNext cleans or consolidates the database after a file is removed. |
| Generate Checksum |
If this option is enabled, (the box is checked), checksums are generated and retained in the database for files stored by the corresponding policy. Note: If you enable checksum, then it might not be possible to keep the drives with compression enabled, running at their highest rate due to the overhead of generating the checksum. |
| Validate Checksum |
If this option is enabled (the box is checked), checksums are compared to retained values for the files retrieved by the corresponding policy. The Checksum feature consumes additional space in the StorNext database whether it is enabled or not. When disabled, this feature consumes approximately 2 bytes per stored file; when enabled, this feature consumes approximately 18 bytes per stored file. The database stores data in files on the host computer, so the increase in database size translates to a corresponding increase in disk space requirements. The exact amount of space consumed (whether the feature is enabled or disabled) may vary. Note: If you enable checksum, then it might not be possible to keep the drives with compression enabled, running at their highest rate due to the overhead of generating the checksum. |
| Alternate Store Location | Provides an automatic system for copying files from a main instance of StorNext to a remote instance of StorNext at the same time as copies are made to tertiary storage at the main site. |
| Maximum Inactive Versions |
The maximum number of inactive versions of a file StorNext keeps track of for recovery purposes. Note: Beginning with StorNext 6.2, Storage Manager keeps track of 2 versions of a file (the default is 2). For releases prior to StorNext 6.2, Storage Manager keeps track of 10 versions of a file (the default is 10). |
| Tape Drive Pool | Specifies the drive pool to use with the policy. If you specify a drive pool, the drive pool name must be defined before any data operation can occur. |
| Media Email Warning Limit | The warning limit for the number of media that can be allocated in the policy class. If you specify an amount at this field, when the storage disk reaches the number of media you specify, you receive an email message warning that the device is nearing the capacity for the number of media. The maximum number for the limit is 65,000. |
| Media Limit | The maximum number of media that are allowed in this policy class. When this limit is reached you will receive an email message warning. Files can still be stored in the policy class as long as there is room on the media that have already been used to store files in that policy class. The maximum number for the limit is 65,000. |
| Media Cleanup | This option determines the action StorNext applies to storage media after media are cleaned. Select return to scratch pool or keep in policy. |
| Stub Files | Select this option to enable the Stub File feature. When this feature is enabled, third-party applications can gather information about a file by reading a portion of the file (called a stub) rather than reading the entire file. When you enable stub file support for a storage policy, you must specify the size of the stub file (in kilobytes). When stub file support is enabled, the beginning portion of the file (up to the size you specified) remains on disk after data blocks are freed during policy management or space management. |
| Stub File Size (KB) | When the Stub File feature is enabled, specify the target size for the stub file in kilobytes. |
| Delay File Storage |
Click to enable or disable the Delay File Storage option. Note: The Minimum File Size option works in conjunction with the Maximum File Age option. |
| Minimum File Size (1 to 999 in MB or GB) |
This value determines the minimum size (in megabytes or gigabytes) that all valid store candidates in the policy class combined must reach before they are stored. This field is enabled only if the Delay File Storage option is also enabled. The store candidates in the policy class must add up to the Minimum File Size before any of the files will be stored. When this option is enabled, files are stored based on the Minimum File Size parameter. The purpose of the Minimum File Size option and the Maximum File Age option is to limit the number of tape drive mount/dismount by delaying the store until one of the two conditions is met. Example
Using the above values:
|
| Maximum File Age (Hours) |
This option works in conjunction with the Delay File Storage option so that files are stored based on the Minimum File Size parameter. As soon as any file in the policy class reaches the Maximum File Age, the files are stored. This value determines the time after which any valid store candidate in the policy is stored. The purpose of the Minimum File Size option and the Maximum File Age option is to limit the number of tape drive mount/dismount by delaying the store until one of the two conditions is met. Example
Using the above values:
|
| Retrieve to Affinity | This field enables you to indicate that you want StorNext to retrieve files to an affinity other than the primary affinity. To retrieve to an alternative affinity, select the desired affinity from the drop down list. To retrieve to the primary affinity, select None, which is the default value. |
| Encryption |
This option enables encryption of the data associated with the policy. Server AES256 S3 requests server-side AES256 encryption with S3-managed keys and is valid only if supported by the Object Storage system. Server AES256 KMS requests server-side AES256 encryption using the AWS Key Management Service. By default, the AWS account default customer master key (CMK) will be used for encryption. Alternatively, a CMK that has been registered with the AWS Key Management Service may be specified with the Encryption Master Key parameter. Note: The enabled encryption type must be compatible with the encryption setting on the object storage system. If the encryption types are not compatible, then Storage Manager might write-protect the media to prevent further unauthorized access. |
| Encryption Master Key |
This option allows you to enter an optional customer master key for the Server AES256 KMS encryption type. |
The Relocation tab enables you to configure the Disk-to-Disk relocation feature. Disk-to-Disk relocation allows you to move data from one set of disks (disk stripe group) to another without affecting the file name space. In order to use this feature you must have a managed file system with at least two affinities configured.
Note: The Disk-to-Disk Relocation feature limits managed file system configurations to no more than two affinities. Additionally, all file systems managed by the same Storage Manager instance are limited to using the same two affinity names. By default, the affinity names for managed file systems are Tier 1 and Tier 2. For additional reference, see Add a File System and Edit a File System.
Note: If you enable Disk-to-Disk Relocation on certain directories in a file system, and the file system contains other directories that will not use relocation, consider setting the Exclusive flag on the user data stripe group associated with the first affinity. This prevents files in the non-relocation directories from unexpectedly consuming space in that first user data stripe group. See Affinities for additional information and details on how to set this parameter.
The sections below provide information about how Storage Manager Disk to Disk relocation works and when data is relocated.
For context, Tier 1 is being defined as the initial tier that the file is written to and Tier 2 as the tier that the file is migrated to. Usually Tier 1 is the fast tier and Tier 2 is the slow tier.
Note: The term tier and affinity are used interchangeably; a tier represents a single affinity.
As part of the policy class definition, you must configure the File Age Before Relocation (see Configure Disk-to-Disk Relocation using the GUI). This is the time that a file must reside un-accessed on Tier 1 before being considered a candidate for relocation to Tier 2.
Beginning with StorNext 6.3, you can define the media type to DISK using the GUI; which specifies the policy class is a Disk-to-Disk only solution.
Note: You define the policy class on a directory under the mount point.
Files are not relocated as soon as the File Age Before Relocation time passes.
There are four ways files are relocated from one tier to another, as follows:
-
Nightly Relocation Policy: Each night a relocation policy is run (according the scheduled time configured using the fsschedule command). At that time, it relocates all files that have been on Tier 1 longer than the File Age Before Relocation time.
- Manual Relocation Policy: You can run a manual relocation policy. This policy performs the same function as the Nightly Relocation Policy.
-
Space Based Relocation Policy: For Tier 1, if that tier hits the high use percentage as defined in the file systems file, the space based policy runs and relocates items from Tier 1 to the low use percentage , given that the File Age Before Relocation is met.
Note: If files do not meet the File Age Before Relocation time, then relocation does not occur.
Note: The percentage values are the percent value for that specific tier/affinity and not the entire file system percentage.
- Manually Relocate using the CLI: You can run the fsrelocate command to manually relocate files from one affinity to another (and back).
Data blocks are not “moved” one by one when the relocation occurs. This might leave your system in an odd state in the event of a crash or failure.
Instead, when a file is relocated, the data blocks are first copied from one tier to the other. After the copy is done, an “extent swap” is done to point the file to the new tier and the original data blocks are removed.
- If you use a storage tier (for example, tape, sdisk, object storage), you can configure a policy such that if a file is truncated and retrieved, then you can specify which affinity that file comes back to upon retrieval.
- As indicated above, you can run the fsrelocate command to manually relocate a file from one tier to the other. You can use the command in either direction, for example, relocating from Tier 1 to Tier 2 or from Tier 2 to Tier 1.
-
You can use the fsaffdf command to determine the amount of space taken up for each tier/affinity on a file system.
Note: Use these percentages for the space based relocation policies.
- When you look at the file system as a whole and the percentage of space being used, it is a combination of both tiers/affinities.
- For example, if a file system has 2 tiers/affinities of the exact same size and Tier 1 is 80% full and Tier 2 is 40% full, then the overall file system is at approximately 60% full.
- You can use the fsschedlock command to lock out a scheduled relocation policy (Nightly Relocation Policy) to prevent it from running.
- The fsrelocate command has multiple options on moving the data and which files to select. See the fsrelocate man page for more information.
- See the fsaddclass and fsmodclass man pages for more information on relocation and the various configuration settings.
The Relocation tab in the GUI contains the following fields:
| Parameter | Description |
|---|---|
| Disk-to-Disk Relocation | To enable this feature, from the drop-down list, select the destination disk to which you want to move data. Select None, the default value, to disable this feature. |
| File Age Before Relocation | When Disk-to-Disk relocation is enabled, specify the number of seconds, minutes, hours or days a file must reside on a disk before file relocation commences. Enter the number in the first field, and the unit of measure in the second pull-down field. The minimum value is 5 minutes. |
The Steering tab enables you to configure file steering, which allows you to direct a copy of a file to a designated drive pool. This is normally used when you want to direct two or more copies of a file to different archives by putting the tape drive in separate pools and then setting the copy number of the file to go to that pool. You can also use this feature to route copies of the file to different media types, including storage disks. In addition, you can manage the number of tape drives to use per store policy and define the copy order on retrieves.
Note: This DISK media type does not support the parameters and options associated with the General tab, the Schedule tab, and the Steering tab. Those parameters and options are disabled. If you select a media type other than DISK, then the parameters and options associated with the General tab, the Schedule tab, and the Steering tab are enabled and you have full access to the policy options. See The Relocation Tab for additional information.
The Steering tab contains the following fields:
| Parameter | Description |
|---|---|
| Media Type | For each copy (1 - 4), from the Media Type list, select the media type for devices in the drive pool. This can be an actual device type such as LTO, Lattus, S3COMPAT, or a Storage Disk. If you select None for a given copy, the Media Format, Tape Drive Pool, and Drive Limit lists for that specific copy are grayed out, and you cannot configure the parameters for that specific copy. |
| Media Format | For each copy (1 - 4), from the Media Format list, select the media format for LTO devices in the drive pool. Select ANTF or LTFS. ANTF is the Quantum internal tape format. LTFS is the Linear Tape File System specification tape format. ANTF will format media with a single partition containing ANTF volume labels. This data partition will store StorNext file data. LTFS will format media with two partitions containing LTFS volume labels. The index partition will store LTFS metadata and the data partition will store StorNext file data. |
| Tape Drive Pool | For each copy (1 - 4), from the Tape Drive Pool list, select the specific drive pool to which you want to write that copy's data. A Tape Drive Pool must be defined before it can be selected. For more information, see Tools > Storage Manager > Drive Pools. |
| Drive Limit | For each copy (1 - 4) in the Drive Limit list, select the number of tape drives to use per policy and copy. The Drive Limit feature allows you to manage the number of drives used per store policy. The default is None; no limit will be set and all drives will be used on stores. The Drive Limit feature is not supported for Storage Disks or Object Storage. |
| Retrieve Order | For each copy (1 - 4) in the Retrieve Order list, select the order in which the copy should be used on a retrieve. For additional information, see About Retrieve Order. |
| Copy Expiration |
For each copy (1-4), enter a numerical duration and duration unit for the amount of time that a file remains unreferenced before the copy number can be removed by the Copy Expiration feature. For additional information, see About Copy Expiration. Note: All copy numbers may be separately configured for expiration, in which case the file is automatically removed after all copies have expired. Copy expiration configuration changes to the class policy apply immediately to all the files in the class. Select one of the following duration values, and enter the number of units of that duration:
If you want your copy expiration process to run automatically, then you must create a schedule for the process (see Tools > Storage Manager > Scheduler). Note If you add a copy expiration process to an existing policy where a file is already stored, then the copy expiration process only applies to a new file; in other words, the process does not apply to an existing file. In order for an existing file to participate in a copy expiration process, run the following command to rebuild a file list and apply the copy expiration process to an existing file: fspolicy -b -y filesystemmountpoint -C Caution: If you do not rebuild a file list, then the copy expiration process does not apply to an existing file. |
| Restore On Reference |
For each copy (1-4), you may enable the Restore On Reference feature to restore the expired copy after a file is referenced. Note: After the file is restored, the file's access time is updated. For additional information, see About Copy Expiration. |
| Multi-Stream Min Size |
Defines the minimum file size for using multiple streams. Your value can include one of the following suffixes:
Note: The minimum file size you can configure for using multiple streams is 20 MiB. You cannot enter a value less than 20 MiB. Note: You can configure multiple streams on all object storage providers except for LATTUS:AXR. All other media types (LTO, SDISK, and LATTUS:AXR) display N/A. |
| PUT Streams |
Defines the number of streams to use for stores when a file in the request is equal to or larger than the size defined with the Multi-Stream Min Size option. The valid range of values is from 0 to 64. The default is 0 if you do not specify a value. Note: You can configure multiple streams on all object storage providers except for LATTUS:AXR. All other media types (LTO, SDISK, and LATTUS:AXR) display N/A. |
| GET Streams |
Defines the number of streams to use for retrieves when a file in the request is equal to or larger than the size defined with the Multi-Stream Min Size option. The valid range of values is from 0 to 64. The default is 0 if you do not specify a value. Note: You can configure multiple streams on all object storage providers except for LATTUS:AXR. All other media types (LTO, SDISK, and LATTUS:AXR) display N/A. |
| Metadata |
For each copy (1-4), you may enable the Metadata feature to store user-defined metadata along with each stored object. For additional information, see About Metadata. The metadata is stored as key-value pairs and includes the copy number, last modification time, file offset, file key, path, segment number, and version. The path is URL encoded if it contains non-ASCII characters. Note: The Metadata feature is supported for Object Storage media types only, with the exception of LATTUS:AXR. |
Storage Manager persists data archived to object or cloud storage as key:value objects, each keyed on a globally unique identifier generated by the Linux library uuid_generate(). There is at least one distinct object for each archived version of each file, but may be more, since large files might be segmented.
In order to provide additional information about the object, the Metadata feature can be enabled to store user-defined metadata along with each stored object. The metadata is stored as key-value pairs and includes the copy number, last modification time, file offset, file key, path, segment number, and version. The path is URL encoded if it contains non-ASCII characters.
The metadata allows the file path for the object to be identified and provides the information needed to restore the object.
Each object storage system supports user-defined metadata, prefixed to distinguish them from system headers:
|
REST API |
Metadata Prefix |
|---|---|
|
S3 |
x-amz-meta- |
|
Azure |
x-ms-meta- |
|
|
x-goog-meta- |
If you enable Metadata for a policy, headers are added on upload requests, allowing the object to be restored, if needed. The following data, represented as key-value pairs, are added for each object:
|
Name |
Description |
S3 User Metadata |
Azure User Metadata |
Google User Metadata |
|---|---|---|---|---|
|
cpynum |
Copy number. |
x-amz-meta-cpynum |
x-ms-meta-cpynum |
x-goog-meta-cpynum |
|
mtime |
Last modification time. |
x-amz-meta-mtime |
x-ms-meta-mtime |
x-goog-meta-mtime |
|
offset |
Byte offset in the file where the object begins. |
x-amz-meta-offset |
x-ms-meta-offset |
x-goog-meta-offset |
|
oneup |
Database file key. |
x-amz-meta-oneup |
x-ms-meta-oneup |
x-goog-meta-oneup |
|
path |
Absolute file pathname. |
x-amz-meta-path |
x-ms-meta-path |
x-goog-meta-path |
|
segnum |
File segment number of object. |
x-amz-meta-segnum |
x-ms-meta-segnum |
x-goog-meta-segnum |
|
version |
Version number of the file. |
x-amz-meta-version |
x-ms-meta-version |
x-goog-meta-version |
You can enable user-defined metadata with each stored object either by using the Metadata feature on the Steering tab or when you enable object metadata using the policy class commands, fsaddclass and fsmodclass.
For example, to enable object metadata on all object storage copies for policy class class1:
To modify a policy class to enable object metadata on copy 2:
You can manage the order in which copies are used for retrieval either by using the Retrieve Order feature on the Steering tab or by defining the order using the policy class commands, fsaddclass and fsmodclass. If the retrieve order is not explicitly defined, the default retrieve order is used, which retrieves the copies in the order of their copy number, with the exception that copy 2 is always retrieved last.
For example, to create a policy class class1 with three copies enabled, using the first available copy in the order copy 2, copy 1, and then copy 3:
To modify a policy class to retrieve copy 2 first, followed by copy 3 and then copy 1:
Overview
The Copy Expiration feature provides for automatic removal of copies based on the time since the last access of a file, which allows file copies to be stored on mid-range-performance storage without requiring excessive capacity or excessive administration. This simplifies management of high-performance low-capacity storage tiers.
Old data can be purged automatically to make room for new data. When a file copy has expired and needs to be retrieved from a lower-performance tier, the copy can be stored again and then deleted again after a configurable amount of inactivity. For example, consider a class policy that calls for the storage of two copies: one on sdisk and one on tape. The class copy configuration could state that the sdisk copy should be expired after a file has not been accessed for 30 days. This would free sdisk for use by more recently accessed files, which could improve retrieve-latency performance for data that has been removed from disk.
Operating Characteristics
The Copy Expiration feature is configurable per class per copy. Individual copy numbers may be configured to be expired when a file has not been referenced for a specified amount of time, and optionally to be restored after the file is referenced, which updates the file's access time. All copy numbers may be configured for expiration, in which case the file is automatically removed after all copies have expired.
Note: Copy expiration configuration changes to the class policy apply immediately to all files in the class.
The automatic aging and deletion process is driven by an expiration-time value that is added to the access-time value of each file, to be compared to the current time to determine the eligibility of a copy for deletion.
For example, you could have two policies which are schedule to perform the following:
- One policy identifies the eligible copies.
- One policy deletes the eligible copies.
- When a new file or a new version of an existing file is created, Copy Expiration does not apply until after all of the file's copies have been made.
- When a copy number is expired, all versions of that copy number are removed.
- When a file that has expired copies is accessed, expired copies that have been configured for restore-on-reference are recreated. The effect is delayed when the file is on disk as compared to when the file is truncated. Accessing the on-disk file does not need to initiate a retrieval, so the Storage Manager subsystem is not notified of the file activity. The next notification and opportunity for action occurs when the file is being truncated, at which point the truncation is delayed while the copies have been restored.
Note: You can also manually delete copies. The results are the same as with automatic deletions, except that the expiration-time value is irrelevant.
Important
The process of removing copies places a heavy burden on the Storage Manager metadata database, which is proportional to the total number of file copies and the total number of files in the policy class. Quantum recommends that you schedule the copy removal during periods of low demand on the StorNext Metadata Controller.
Example
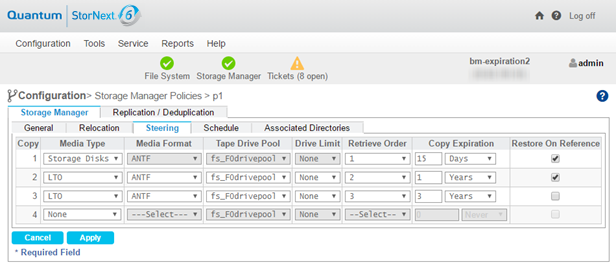
In the image below, the StorNext GUI is used to configure three copies to sdisk (1), tape (2), and tape (3), which expire in 15 days, 1 year, and 3 years after the last access respectively. The Restore On Reference option is enabled for the first two copies, which means that the copies will be recreated for the current version if the file is accessed after one or both of the copies has expired. The third copy may have more than one version, but only the current version will be recreated. Because all copies are configured for expiration, the file automatically will be removed from disk after the last copy expires.
Note: The policy may also be configured to immediately truncate the file on disk after the last copy expires.
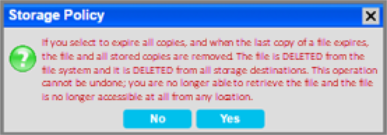
Note: If you configured a policy that contains copies that have all been configured for Copy Expiration, the following confirmation dialog appears:
"If you select to expire all copies, and when the last copy of a file expires, the file and all stored copies are removed. The file is DELETED from the file system and it is DELETED from all storage destinations. This operation cannot be undone; you are no longer able to retrieve the file and the file is no longer accessible at all from any location."
Configuration Using the Command Line Interface
You can use any of the following commands to configure the Copy Expiration feature:
- Execute the
fsmodclasscommand to configure copies to expire per class. -
Execute the
fsschedulecommand to configure scheduled processing.Note: You can use the StorNext GUI to schedule a copy expiration event to run automatically based on a specified schedule. See Tools > Storage Manager > Scheduler.
- Execute the
fsclassinfocommand to display, for each class, the expiration and restore-on-reference settings per copy and the expire-all-copies setting. - Execute the
fsexpcopycommand for manual expirations and file deletions (when all copies are expired). -
Execute the
fsfileinfocommand to display the expiration status for a file in the Expired Copies field with a value for the number of expired copies followed by a parenthesized comma-separated list of copy numbers that are expired. - Execute the
fsschedulecommand to schedule processing of all Storage Manager features.
For additional information on all the commands listed above, refer to the StorNext Man Pages Reference Guide.
Log Messages
The following are examples of the /usr/adic/TSM/logs/tac/tac_00 log messages from the scheduled running of the fsexpcopy feature. In the example below, both copies can be expired, which results in the deletion of the file from the file system.
fsexpcopy ... FILEnm: NA key: 33 ino: 72 gen: 1 - … : 1 expired
fsexpcopy ... FILEnm: NA key: 33 ino: 72 gen: 1 - … : 2 expired
fs_async ... FILEnm: /stornext/snfs1/p1/foo key: 33 ino: 140737488355400.1 - removed from disk (NOT recoverable)
In the following example, a file with copies 1 and 2 is in a policy configured for 3 copies with expiration for copies 1 and 2, but not for copy 3. An error is logged for the file because the policy is not configured to expire all copies, which is what would happen if copies 1 and 2 expire. A file can be in this state if it was created when the policy was configured to make 2 copies and then the policy was changed to 3 copies. The expiration feature is designed to prevent expiration of the last copy unless policy is explicitly configured to allow that. In this example, either copy 1 or copy 2 could be the last copy remaining, depending on configured expiration intervals and on manual expirations that were executed before automatically scheduled ones.
The Schedule tab allows you to enable or disable the Store Files Automatically feature. When this feature is enabled, StorNext automatically stores files for the current storage policy. If this feature is disabled, Quantum recommends that the files for the policy class be stored by scheduled events. (Scheduled events are certain activities which you can set up to run at specified times using StorNext’s schedule. For more information, see Tools > Storage Manager > Scheduler.
Note: This DISK media type does not support the parameters and options associated with the General tab, the Schedule tab, and the Steering tab. Those parameters and options are disabled. If you select a media type other than DISK, then the parameters and options associated with the General tab, the Schedule tab, and the Steering tab are enabled and you have full access to the policy options. See The Relocation Tab for additional information.
The Schedule tab contains the following field:
- Store Files Automatically: Select this option to enable the Store Files Automatically feature.
The Associated Directories tab enables you to view or delete existing relation points (directories) in the file system for the policy, and to add new relation points.
Note: Review the
content for the CLI command fsaddrelation, in the
latest version of the StorNext Man Pages Reference Guide for information on limitations and constraints.
The Associated Directories tab contains the following fields:
- File System: From the drop-down list, select the file system for which you want to view, delete or add relation points.
- Directory: Select the directory you want to add, or type the name of a new directory in the field to the left of the Create Directory button. Click Add to add that directory as a new relation point.
- Associated Directories: This area displays any existing associated directories.
To delete a directory (relation point) listed under the Associated Directories heading, select the desired one and click Delete.
Note: The directory must be empty before you can delete it.
Caution: This particular delete function does not provide a confirmation message, so be absolutely sure you want to delete the selected relation point before you click Delete. The selected relation point is permanently deleted after you click Delete.
