Getting Started
This section provides the procedures required to begin using SWS V2 web services. The procedures assume you have access to the StorNext Graphical User Interface (GUI).
Enable Web Services
Enable or disable the SWS V2 web services using the StorNext GUI. Ensure the GUI is accessible via a supported browser (see Prerequisites). If StorNext is installed and configured correctly, access the StorNext GUI from https://<mdc_ip_address>>[:<<mdc_port>>].
- On the StorNext GUI, click Service, and then click Web Services (V2). The Service > Web Services (V2) page appears.
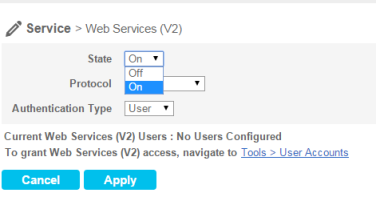
- In the State box, select On to enable web services.
- Click Apply.
Figure 1: Enable Web Services
Configure Protocol for Access
- On the StorNext GUI, click Service, and then click Web Services (V2). The Service > Web Services (V2) page appears.
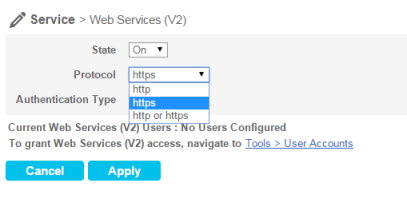
- In the Protocol box, select the protocol (http, https or http or https).
- Click Apply.
Figure 2: Configure Web Services Protocol
Configure Authentication Type
Configure Web Services to authenticate web service requests with a username and password by configuring the authentication type to User.
Note: If User is selected, all web service requests require a valid username and password. For this purpose, a valid web service user needs to be created. To grant Web Services (V2) access, on the StorNext GUI navigate to Tools > User Accounts.
- On the StorNext GUI, click Service, and then click Web Services (V2). The Service > Web Services (V2) page appears.
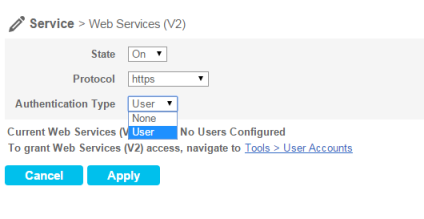
- In the Authentication Type box, select the type (User, or None).
- Click Apply.
Figure 3: Configure Authentication for Web Services
Create the SWS V2 Web Service User
-
On the Tools menu, click User Accounts. The Tools >User Accounts page appears. All existing users and the admin are shown.
-
Click New. The Tools >User Accounts > New page appears.
-
In the User Name field, type the name the new user will enter at the User ID field when he or she logs on to StorNext.
-
In the Password field, type the password the new user will enter when logging on to StorNext.
-
In the Session Timeout field, type a number, and then select Minutes or Hours as unit of time measurement from the drop-down. The Session Timeout specifies the predetermined amount of time that should elapse before the user is logged out of the system. The default is 30 minutes, and the valid range is from 10 minutes to 12 hours.
Note: Access to the Session Timeout feature is available when a user has the Manage Users privilege checked within the Admin Functions section.
-
Roles are grouped according to Admin Functions, Operator Functions and General User Functions. You can automatically pre-select all the functions for one of these three roles by clicking at the Access Control field Admin Defaults, Operator Defaults, General User Defaults or Web Services. Selecting one of these roles for the new user makes it easy for you to automatically add or remove functions.
- Under Access Control, click Web Services.
-
Under General User Functions, click Use Web Services.
-
When you are satisfied with the permissions you have assigned, click Apply to save your changes. To exit without saving, click Cancel.
-
When a message informs you that the new user was successfully added, click OK.