Configuring Object Storage
The Object Storage devices and media must be configured before they can be used by Storage Manager. There are two ways to configure Object Storage:
- Use the StorNext GUI, see Setting Up Object Storage Destinations.
- Use the CLI, see The fsobjcfg Command.
When configuring Object Storage for use, the typical order of events is:
- Add the appliance.
- Add the controller node.
- Add the I/O path.
- Add the namespace.
Note: Before you create an Object Storage device in Storage Manager, the namespaces/buckets/containers you plan to use must already exist in an Object Storage appliance or system.
The fsobjcfg Command
The fsobjcfg command is used to configure Storage Manager's view of an Object Storage system. The attributes include the host address, TCP/IP port number, network protocol, I/O paths and various namespace attributes and credentials. These together with an object identifier, form the required
URL to create/write/read/delete objects in the Object Storage appliance.
Refer to the MAN Pages Reference Guide for additional information on the
fsobjcfg command, command syntax usage, and examples.
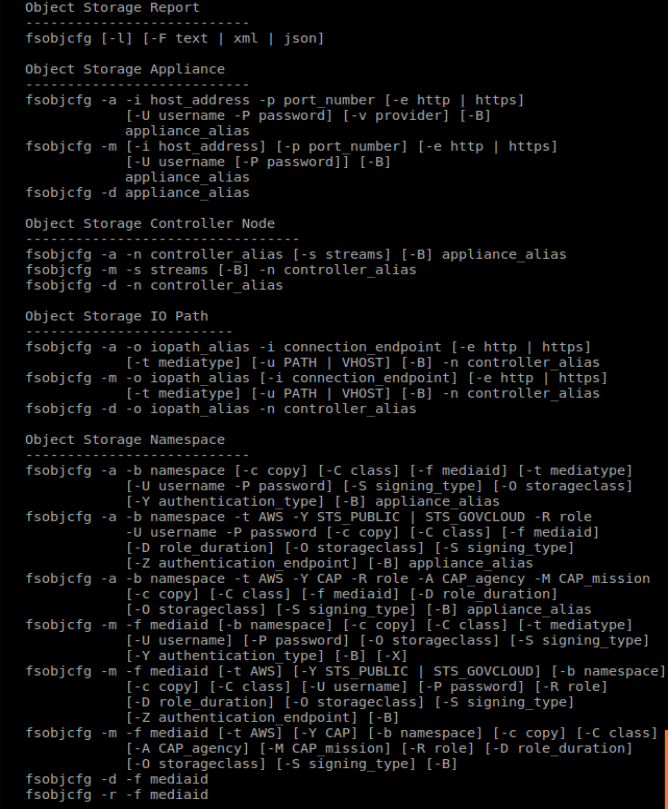
The usage output from the fsobjcfg -h command:
How to Route Backup Files to Object Storage for Easier Recovery
If you use Object Storage media for system backups, use the procedure to create a special backup namespace and assign it to the backup policy. Use the GUI and follow the procedure below to route backup files to an Object Storage media and into backup-exclusive namespaces/containers.
Note: Quantum recommends you create a specific namespace/bucket/container for system backup data.
- On the Configuration menu, click Storage Destinations, and then click the Object Storage tab.
-
Select an existing Object Storage system that has been previously
configured and Click Edit.
- In the Containers section, click Add to create an Object Storage container for each copy number that is required for backup to Object Storage. Complete all required options to configure the namespace. In the Policy Class option, select "_adic_backup" from the drop down list for the option. The container is now assigned exclusively for backup and not shared with any other SM policies.
-
On the Configuration menu, click Storage Policies, and then click
the Storage Manager tab.
- Click the _adic_backup Policy Class, and then click Edit....
- In the General tab, for the Default Media Type option, select the media type of the container configured specifically for backup in Step 2. Also, for the Media Cleanup option, select "keep in policy" so that the container stays assigned to the backup policy after a complete policy cleanup and the container gets emptied.
- In the Steering tab, for each copy to be configured, select the media type of the container which you intend to use.
How to Route File Copies to a Specific Object Storage Namespace
By default, namespaces can be used by any policy class configured with the same media type as the namespace. If desired, the namespace can be restricted to the exclusive use of a specific policy class by specifying that policy in the namespace configuration. The steps to accomplish this are as follows:
- On the Configuration menu, click Storage Policies, and then click the Storage Manager tab.
- Click New to create a new policy, or click on an existing policy and click Edit to edit the policy.
- In the General tab, for the Default Media Type option, select the media type of the container to be configured specifically for the policy. Also, for the Media Cleanup option, select keep in policy if the container needs to remain with the policy after it is emptied.
- In the Steering tab, for each copy to be configured, select the media type of the container which you intend to use.
- On the Configuration menu, click Storage Destinations, and then click the Object Storage tab.
- Select an existing Object Storage system that has been previously configured and click Edit.
- In the Containers section, click Add to create an Object Storage container for each copy number that is required for the policy configured in Step 1 for storing file copies to Object Storage. Complete all required options to configure the namespace. When configuring the Policy Class option, select the policy configured in Step 1 from the drop-down list for the option. The container is now assigned exclusively to the policy configured in Step 1, and not shared with any other Storage Manager policies.
Note: If the same namespace is to be used for both system (_adic_backup) and user backups, do not set the the policy class association.
You can also use the fsobjcfg command's option -C or the fschmedstate command's option -c to assign an Object Storage media to a policy class, as long as the media is still blank. See the man pages of these two commands in the MAN Pages Reference Guide for additional details.
The MAX_STORE_SIZE System Parameter
The system parameter, MAX_STORE_SIZE, set in file /usr/adic/TSM/config/fs_sysparm_override, specifies the maximum size of a file that will be recognized as a candidate for automatic storage by fspolicy. Storage of files larger than this size can be carried out manually using the fsstore command.
StorNext provides support for a maximum object size of 16 TiB (bytes) when storing to LATTUS media, 5 TiB when storing to AWS S3 compatible media or Q-Cloud media, and 195 GiB when storing to AZURE media. Since the default value for system parameter MAX_STORE_SIZE is set at 2 TB, this system parameter must be reset to a higher value for StorNext fspolicy to archive the largest object sizes supported by LATTUS AXR and AWS S3 protocols.
The MAX_STORE_SIZE is specified in gigabytes, unless qualified by a suffix specifying one of the multipliers detailed in Table 1 .
Refer to the /usr/adic/TSM/config/fs_sysparm.README file for the proper syntax of the MAX_STORE_SIZE system parameter.
