Special Considerations for StorNext LAN Clients
As with any client/server protocol, StorNext LAN performance is subject to the limitations of the underlying network. Therefore, it is strongly recommended that you use Gigabit (1000BaseT) or 10GbE. Both TCP Offload and jumbo frames are recommended for 10GbE performance.
Hardware Configuration
A StorNext LAN can easily saturate several Gigabit Ethernet connections with data, so take special care when selecting and configuring the switches used to interconnect StorNext LAN Clients and gateway servers. Ensure that your network switches have enough internal bandwidth to handle all of the anticipated traffic between all StorNext LAN Clients and gateway servers connected to them.
A network switch that is dropping packets will cause TCP retransmissions. This can be easily observed on both Linux and Windows platforms by using the netstat -s command while the StorNext LAN Client is reading or writing data to the file system. Reducing the TCP window size used by the LAN might also help with an oversubscribed network switch. The Windows client Distributed LAN tab and the Linux dpserver file contain the tuning parameter for the TCP window size. Note that the gateway must unmount and remount the StorNext file system.
It is best practice to have all StorNext gateways directly attached to the same network switch. A router between gateways could be easily overwhelmed by the data rates required.
It is critical to ensure that speed/duplex settings are correct, as this will severely impact performance. Most of the time auto-negotiation is the correct setting. Some managed switches allow setting speed/duplex, such as 1000Mb/full, which disables auto-negotiation and requires the host to be set exactly the same. However, performance is severely impacted if the settings do not match between switch and host. For example, if the switch is set to auto-negotiation but the host is set to 1000Mb/full, you will observe a high error rate and extremely poor performance. On Linux the ethtool command can be very useful to investigate and adjust speed/duplex settings.
In some cases, TCP offload seems to cause problems with the StorNext LAN Clients by miscalculating checksums under heavy loads. This is indicated by bad segments indicated in the output of netstat -s. On Linux, the TCP offload state can be queried by running ethtool -k, and modified by running ethtool -K. On Windows it is configured through the Advanced tab of the configuration properties for a network interface.
The internal bus bandwidth of a StorNext Gateway Server can also place a limit on performance. A basic PCI- or PCI-X-based workstation might not have enough bus bandwidth to run multiple Gigabit Ethernet NICs at full speed; PCI Express is recommended but not required.
Similarly, the performance characteristics of NICs can vary widely and ultimately limit the performance of the StorNext LAN Client. For example, some NICs might be able to transmit or receive each packet at Gigabit speeds, but not be able to sustain the maximum needed packet rate. An inexpensive 32-bit NIC plugged into a 64-bit PCI-X slot is incapable of fully utilizing the host's bus bandwidth.
It can be useful to use a tool like netperf to help verify the performance characteristics of each StorNext LAN Client. (When using netperf, on a system with multiple NICs, take care to specify the right IP addresses in order to ensure the network being tested is the one you use for the StorNext LAN. For example, if netperf -t TCP_RR -H <host> reports less than 4,000 transactions per second capacity, a performance penalty might be incurred. Multiple copies of netperf can also be run in parallel to determine the performance characteristics of multiple NICs.
Software Tuning and Configuration
Full line speed is typically achievable for small configurations without tuning. However, when scaling to larger configurations (for example, 10GbE), tuning is often required for maximum performance. The following contains a set of tunables for such environments. The applicability of each tunable will depend on ecosystem details and application behavior. In some cases, experimentation may be required to determine optimal values.
Modifying the grub.conf File
A fix is required prior to installing the StorNext file system and Storage Manager. This fix avoids potential clock jumps and temporary system freezes on some systems. This fix only affects RedHat Linux releases 6.0, 6.1, 6.2 and their CentOS counterparts on systems with Intel processor versions identified by the internal codename Nehalem.
Follow the steps below to modify the grub.conf file so that the Intel sleep state is disabled. Making this change could result in increased power consumption, but it helps prevent problems which result in system hangs due to processor power transition.
| 1. | For the above systems, prior to installation: Add the following text to the "kernel" line in /boot/grub/: |
grub.conf:idle=poll intel_idle.max_cstate=0 processor.max_cstate=1
| 2. | Reboot the system for the change to take effect. |
When creating a new file system, use Stripe Breadth values of 512K or larger
|
Where to Set This |
On the StorNext MDC |
|
How to Set This |
Use the StorNext GUI, the Windows File System Cfg tool, or run the command |
|
How This Helps |
While the value of |
|
Notes and Caveats |
Using a value larger than 512K will not improve performance over 512K for DLC. The Stripe Breadth of a Stripe Group cannot be changed after a file system has been created without re-initializing the file system. While a value of 512K or larger is optimal for DLC network transfers, depending on the RAID type and configuration, it may not be optimal for SAN disk I/O. |
Use the maximum value (512) for transfer_buffer_size_kb in the dpservers file
|
Where to Set This |
On Gateway systems |
|
How to Set This |
Run the command |
|
How This Helps |
The DLC is more efficient when larger transfer buffers are used. |
|
Notes and Caveats |
The transfer buffer size is artificially capped when smaller stripe breadths are used. See When creating a new file system, use Stripe Breadth values of 512K or larger. Also, using a large values for |
Use a larger than default value for transfer_buffer_count in the dpservers file
|
Where to Set This |
On Gateway systems |
|
How to Set This |
Run the command |
|
How This Helps |
Having additional buffers may allow for better pipe-lining and processing multiple requests from a single client. |
|
Notes and Caveats |
Using a large values for |
Use the default value (0) for tcp_window_size_kb in the dpservers file
|
Where to Set This |
On Gateway systems |
|
How to Set This |
Run the command |
|
How This Helps |
TCP performance is limited when the advertised receive window is less than the delay-bandwidth product of the underlying network. The optional Note: You must have auto-tuning enabled on your Linux host. |
|
Notes and Caveats |
In order for this to be effective, systems must have TCP Window Scaling (RFC1323) enabled. See additional tunables below. Very low-end networking components may not support or have resource capacity to handle large TCP windows. |
Set the cache buffer size to 512K in the file system mount options
|
Where to Set This |
On DLC clients |
|
How to Set This |
On Linux: Edit the file On Solaris: Edit the file On Windows: Open the Client Configuration tool, double-click the file system, navigate to the Advanced Cache Options tab, and set the |
|
How This Helps |
Using larger cache buffer sizes allows the file system to make larger requests to gateway systems when buffered I/O is used. A value of 512K allows transfers up to the maximum value of |
|
Notes and Caveats |
Increasing the cache buffer size may negatively impact the performance of small, random I/Os. For this tunable to be effective, |
Note: The following information applies to systems configured with StorNext NAS.
The default StorNext file system mount options are not optimized for Shared Content Product. If Shared Content Product performance is not optimal, you may need to tune StorNext to optimize performance.
We recommend tuning the following.
The cache buffer size is the amount of data that will be processed as a single block from the StorNext file system.
- Recommended setting for sequential I/O: See the mount_cvfs and cvtune man pages.
- Recommended setting for random I/O (such as database applications): typical read/write size
Example
If your typical read/write size is small (less than 32 KB) and random, set the cache buffer size to 64 KB.
-
Default setting: See the mount_cvfs and cvtune man pages.
Important
- Keep in mind that when you set the cache buffer size value, the StorNext file system will read/write the entire buffer size if the I/O is within EOF. If the workflow is writing I/O within a file that is only 4 KB and does not write the rest of the "cachebufsize", the system must read-modify-write the entire cachebufsize data block.
- When you increase the cache buffer size, you should also consider the buffer cache cap. See buffercachecap.
- You must optimize the raid array performance. See The Underlying Storage System in the StorNext 7 Documentation Center.
The buffer cache cap is the total amount of memory reserved for caching data. The reserved cache memory is shared by all mount points with the same cache size.
- Recommended Setting (dependent upon the amount of available memory): See the mount_cvfs and cvtune man pages.
- Default Setting: See the mount_cvfs and cvtune man pages.
When reserving cache memory, you need to take into account all processes that run on your system, such as smbd and FSM, so that you don't oversubscribe your system.
The directory cache size sets the size of the directory information cache on the Shared Content Product System. By increasing this value, the Shared Content Product System is able to keep more directory structure data in memory, dramatically improving the speed of readdir operations by reducing metadata network message traffic between it and FSM.
- Recommend Setting: 32 MB
- Default Setting: 10 MB
The buffer cache I/O daemons setting defines the number of background daemons used for performing buffer cache I/O.
- Recommended Setting: 16
- Default Setting: 8
Use large values for “auto_dma” settings in the file system mount options
|
Where to Set This |
On Linux and Windows DLC clients |
|
How to Set This |
On Linux: Edit the file On Solaris: Does not apply. On Windows: Open the Client Configuration tool, double-click the file system, navigate to the Advanced Cache Options tab, and set the |
|
How This Helps |
By default, StorNext uses DMA when performing large, well-formed I/Os. This is typically a performance win for SAN-client access, but the additional latencies in LAN client often cause DMA to under-perform buffered I/O. By increasing the |
|
Notes and Caveats |
With these settings in place, additional CPU and memory bandwidth utilization may occur when large, well-formed I/Os are used compared with allowing such requests to use DMA. On modern systems with increased memory bandwidth and CPU cores, this additional overhead often does not have a significant impact. |
Enable TCP Window Scaling (RFC1323)
|
Where to Set This |
On DLC clients and gateway systems |
|
How to Set This |
On Linux: Modern versions of Linux have TCP window scaling enabled by default. However, the value can be set explicitly using the On Solaris: Newer versions of Solaris have TCP window scaling enabled by default. However, the value can be set explicitly using the On Windows: For Vista and newer, TCP window scaling is enabled by default. For previous version of Windows including Windows 2003 and Window XP, add or set the
To the value of |
|
How This Helps |
When Window scaling is enabled, the advertised TCP receive window can be larger than 64K. This is required to achieve maximum per-connection bandwidth when high-speed or high-latency networks are used. |
|
Notes and Caveats |
Window scaling must be enabled on both ends of a connection to be effective. In the case of DLC, this means the gateway and LAN client. |
Increase the system maximum TCP Window size
How to Set This
On Linux: Run the sysctl command to adjust rmem_max and wmem_max.
For example, sysctl -w net.core.rmem_max=4194304sysctl -w net.core.wmem_max=4194304
The exact syntax may vary by Linux version. For details, refer to the documentation for your version of Linux.
On Solaris: Run ndd. For example, ndd -set /dev/tcp tcp_max_buf 4194304
The exact syntax may vary by Solaris version. For details, refer to the documentation for your version of Solaris.
On Windows: Systems running Vista or newer do not require adjustment. For older versions of Windows, add or set the DWORD keys: HKEY_LOCAL_MACHINE\SYSTEM\CurrentControlSet\Services\Tcpip\Parameters\TcpWindowSize
KEY_LOCAL_MACHINE\SYSTEM\CurrentControlSet\Services\Tcpip\Parameters\GlobalMaxTcpWindowSize
These should both be set to a value of 4MB (0x400000 or 4194304) or greater.
How This Helps
High-speed and high-latency networks require large TCP windows to achieve full bandwidth. The tcp_window_size_kb tunable is supposed to set the window for the connection but it can be capped to a smaller value due to the system-imposed maximum.
Notes and Caveats
Most modern operating systems set the maximum to a large enough value by default.
Use Jumbo Frames (aka large MTU)
|
Where to Set This |
On DLC clients and gateway systems |
|
How to Set This |
On Linux: To modify the setting temporarily, use the On Solaris: This is typically done by configuring the setting On Windows: Refer to the driver documentation for your NIC. |
|
How This Helps |
For large data transfers, Jumbo frames reduce the number of Ethernet frames that need to be processed and increase the percentage of payload data on the wire. This results in higher payload bandwidth and lower CPU overhead. |
|
Notes and Caveats |
To be effective, Jumbo frames must be supported and enabled on all networking hardware and software components between the sender and receiver. Not all Jumbo frame implementations are compatible. When specifying a larger MTU, depending on the context, the value may need to include the header. For example, |
Use TCP offload features
|
Where to Set This |
On DLC clients and gateway systems |
|
How to Set This |
refer to the documentation for your NIC driver. |
|
How This Helps |
TCP processing is very CPU intensive. Most modern NICs contain special hardware for offloading some or all TCP processing. This may include: Transmit Checksum Offload Receive Checksum Offload Large Segment Offload Full TCP Stack Offload (on Windows this is called Chimney) |
|
Notes and Caveats |
Use of offload features may cause system instability or degraded performance in some cases. In most cases, full TCP stack offload cannot be used when host-based software firewalls (such as Windows Firewall) are enabled. When Full TCP stack offload is used, TCP connections will use congestion control and other TCP algorithms that are hard-wired in the NIC which may be sub-optimal depending on the TCP stack being used by the other end of the connection. |
Tune Proxypath based on workload
|
Where to Set This |
On DLC clients |
|
How to Set This |
On Linux or Solaris: Edit the file On Windows: Open the Client Configuration tool, double-click on the file system, navigate to the Distributed LAN tab and select the appropriate value from the pull-down menu labeled Proxypath Mount Option. |
|
How This Helps |
Depending on the application profile, the default value of file sticky balance may not be appropriate. If most I/O is to one or a few files, the balance option will probably do better at load balancing to the servers. |
|
Notes and Caveats |
For additional information on Linux or Solaris, refer to the description of |
Network Configuration and Topology
For maximum throughput, a StorNext LAN Client can use multiple NICs on StorNext Gateway Servers. In order to take advantage of this feature, each of the NICs on a given gateway must be on a different IP subnetwork (this is a requirement of TCP/IP routing, not of SNFS - TCP/IP can't utilize multiple NICs on the same subnetwork). An example of this is shown in the following illustration.
Figure 1: Multi-NIC Hardware and IP Configuration Diagram
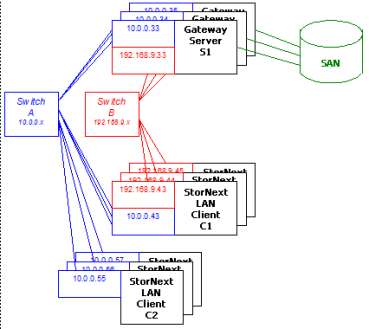
In the diagram there are two subnetworks: the blue subnetwork (10.0.0.x) and the red subnetwork (192.168.9.x). Servers such as S1 are connected to both the blue and red subnetworks, and can each provide up to 2 GByte/s of throughput to clients. (The three servers shown would thus provide an aggregate of 6 GByte/s.)
Clients such as C1 are also connected to both the blue and red subnetworks, and can each get up to 2 GByte/s of throughput. Clients such as C2 are connected only to the blue subnetwork, and thus get a maximum of 1 GByte/s of throughput. SNFS automatically load-balances among NICs and servers to maximize throughput for all clients.
Note: The diagram displays separate physical switches used for the two subnetworks. They can, in fact, be the same switch, provided it has sufficient internal bandwidth to handle the aggregate traffic.
Scheduling requests across multiple subnetworks and multiple servers via multiple network ports can be challenging. In particular, multiple streams of large disk read requests, because of the additional latency from disk, can lead to an imbalance of traffic across a client's network ports. In some cases, it may be possible to tune this scheduling for a particular application mix using the proxypath mount options. In other cases, changing the network configuration might help. Matching the number of server ports to the number of client ports, thereby reducing the number of path choices, has been shown to improve the performance of multiple streams of large reads.
For a detailed description of the proxypath mount options, see the mount_cvfs man page.
