Configuring SNMP Traps
The DXi SNMP agent automatically collects traps when service tickets are created. The agent then sends the traps to the registered SNMP manager.
Considerations
Review the following considerations before configuring the DXi to send traps.
- The DXi-Series systems support SNMP v2 traps as defined by RFC 1157. You must set the timeout settings for SNMP requests to the system to 10 seconds or greater (command line parameter-t).
- Only one application per UDP port can listen for traps.
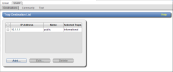
- From the DXi remote management console, select Configuration > Notifications > SNMP > Destinations to display the Trap Destination List page.
Figure 1: Trap Destination List Page
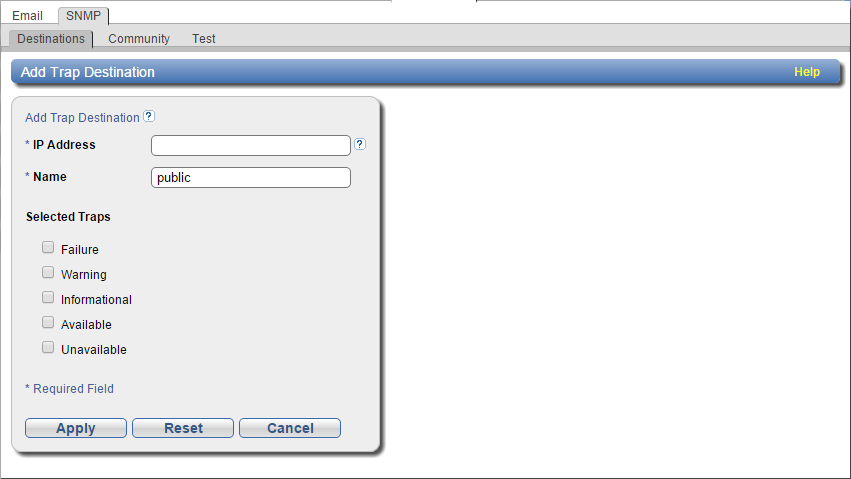
- Click Add to display the Add Trap Destination page.
Figure 2: Add Trap Destination Page
- Populate the following fields:
Field
Description
IP Address
Enter the IP address of the host system on which the SNMP manager resides. This system receives the traps generated by the DXi SNMP agent.
Note: When entering IP addresses, never use an address that is in a reserved IP address range. To see a list of reserved IP address ranges, click the Quick Tip icon.
Figure 3: Quick Tip Icon

Name
Enter the name of the host system on which the SNMP manager resides.
Selected Traps
Select one or more types of traps to send from the DXi SNMP agent to the host system.
- Failure – Sends a trap when the system fails.
- Warning – Sends a trap when the system is in distress.
- Informational – Sends a non-distress trap regarding the system's state.
- Available – Sends a trap when the system transitions from an unavailable to an available state.
- Unavailable – Sends a trap when the system transitions from an available to an unavailable state.
- Click Apply to configure the trap.