 minute read
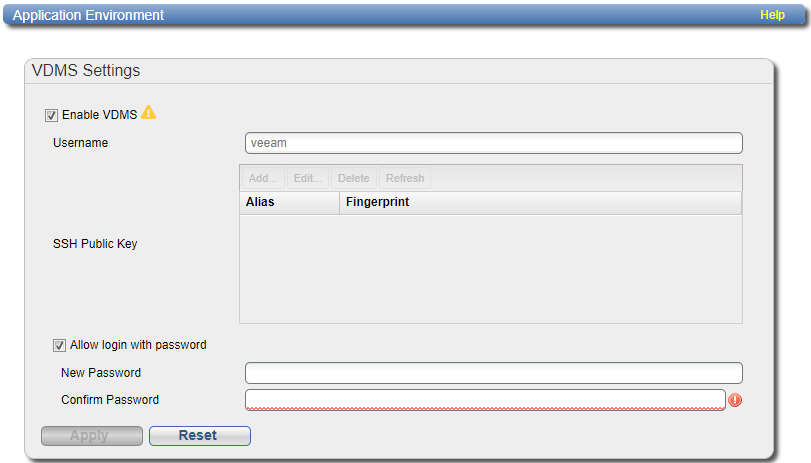
App Environment
The App Environment page allows you enable and disable Veeam on the DXi.
To access the App Environment page, on the System page, click the App Environment tab.
Veeam Data Mover Server (VDMS)
The VDMS feature on DXi allows the system to perform backup and replication with VDMS software on VMware vSphere and Microsoft Hyper-V virtual environments.
DXi Software 5.2 and above also supports Veeam 13. This allows connections from Veeam 13 and later with Veeam Backup & Replication (VBR).
Note: Veeam (Application Environment) requires a minimum of 32 GB memory.
Tasks
Use the App Environment page to perform the following tasks:
- Enable VDMS on the DXi. See Enable VDMS.
- Add an SSH Public Key to a VDMS User. See VDMS - Add an SSH Public Key.
- Disable VDMS on the DXi. See Disable VDMS.
Important Information
-
A reboot is required when first enabling the VDMS connection or any Veeam 13 EDM connections. A reboot is required when all connections are disabled.
- When enabling Veeam for the first time, a password will be required.
- Public SSH keys cannot be configured until after Veeam has been enabled and the system has been rebooted.
- When enabling any additional VDMS connection or additional Veeam 13 EDM connections, a password will be required if no public SSH keys have been configured.
- Click here for the Best Practices Guide for Veeam Backup & Replication
To enable VDMS:
WARNING: Enabling Veeam creates a local account named 'veeam'. If the associated LDAP/AD server has a user defined as ‘veeam’, you must first disjoin from the AD domain and/or disable LDAP (See LDAP/AD).
-
Select one or more of the following check boxes.
Veeam 12 and Below
-
Select the Enable VDMS check box if you are using Veeam 12 or any prior version below Veeam 12.
- Select the Allow login with password check box. Before disabling this option, an SSH key must first be added to the user. SSH keys cannot be added until Veeam has been enabled and the system is rebooted.
Veeam 13 and Above
-
Under Veeam 13 Support, use the check boxes select one or more Veeam 13 connections. You can select up to five connections.
This allows connections from Veeam 13 and later with Veeam Backup & Replication (VBR) for the Enhanced Data Mover (EDM) on the noted ports. When adding a Linux Server in VBR use the ports listed for SSH connection and the Network Settings Components ports.
-
-
Enter the following information:
New Password Enter the new password.
Confirm Password Enter the new password again to confirm it. Additional Information
-
Passwords can be up to 64 characters. Alphanumeric characters and special characters are allowed.
-
If you are enabling Veeam for the first time, you must enter a user password.
-
If Veeam is already enabled, you are adding additional Veeam connections, and you have a SSH Public Key configured, you do not need to re-enter a password.
-
If Veeam is already enabled, you are adding additional Veeam connections, and no SSH Public Key configurations are available, you will need to re-enter a password.
-
-
Click Apply.
If this is the initial enabling of Veeam, a A Save Changes dialog box appears stating that the system will require a reboot.
Select one of the following options.
Option Description Defer Reboot Defers the system reboot. A Reboot Required alert message will appear in the GUI banner until the system is rebooted.
Deferring a reboot is only recommended if additional system changes that require a reboot need to be made (Network, Application Environment, Data Encryption changes) or ingest (backup jobs) are currently in progress on the system.
Note: Once a reboot is in a deferred state, the applied changes cannot be reset.
Reboot Now Starts the system reboot. A system reboot can take up to 15 minutes.
Cancel No reboot occurs and the Application Environment page reappears. Changes made to the settings remain but are not applied. Click the Veeam Settings Reset to reset settings to their original state. Note: If this is not the first Veeam connection to be enabled, clicking Apply will enable the selected connection, and no system reboot will be required.
-
After a system reboot is completed, log back into the DXi.
-
Navigate back to the App Specific page (Configuration > System > App Specific). Your selected Veeam connection options will now be enabled with a status of Running or Not Running.
Note: If you had to disjoin from the AD domain and/or disable LDAP before enabling Veeam, you can now rejoin the AD domain and/or enable LDAP. (See LDAP/AD).
If Veeam is not running, refer to the Troubleshooting Veeam section below.
If you encounter problems when enabling the Veeam feature, see the table below for troubleshooting steps:
| Problem | Corrective Action |
|---|---|
| System alerts | Review any Admin Alerts or Service Tickets that were generated when enabling Veeam. See Admin Alerts and Service Tickets. |
| System memory | Depending on the current system configuration, additional memory may be required to run Veeam, or the additional memory was installed incorrectly. |
Once one or more Veeam connections are enabled, the Veaam user account may be configured with Secure Shell (SSH) key-based authentication.
To add an SSH Public Key:
-
Click Add.
The Add Public Key page displays.
-
Enter an SSH Alias for the public key.
Additional Information
- An alias can be up to 20 characters.
- Alias must be an alphanumeric string (no spaces or special characters).
- It is OK to have the same alias for different accounts (CLI Administrator and CLI Viewer).
-
Copy and paste the Public Key generated from a SSH key.
Additional Information
- A public key should be in the following form: <key-type> <base64 encoded string>.
- A public key length can be up to 16kb.
-
Click Apply.
The new SSH public key appears under the Veeam username.
The SSH public key contains the following information:
Alias Name of key. Fingerprint Short sequence of bytes used to identify a public key.
To disable Veeam:
-
Clear the following check boxes.
Veeam 12 and Below
-
Clear the Enable VDMS check box.
Veeam 13 and Above
-
Under Veeam 13 Support, clear one or more Veeam 13 connection check boxes.
-
-
Click Apply.
If this is the final Veeam connection option to be disabled, a Save Changes dialog box appears stating that the system will require a reboot.
Select one of the following options.
Option Description Defer Reboot Defers the system reboot. A Reboot Required alert message will appear in the GUI banner until the system is rebooted.
Deferring a reboot is only recommended if additional system changes that require a reboot need to be made (Network, Application Environment, Data Encryption changes) or ingest (backup jobs) are currently in progress on the system.
Note: Once a reboot is in a deferred state, the applied changes cannot be reset.
Reboot Now Starts the system reboot. A system reboot can take up to 15 minutes.
Cancel No reboot occurs and the Application Environment page reappears. Changes made to the settings remain but are not applied. Click the Veeam Settings Reset to reset settings to their original state. Note: If this is not the final Veeam connection to be disabled, clicking Apply will disable the selected connection only, and no system reboot will be required.
-
After a system reboot is completed, log back into the DXi.
- Navigate back to the App Specific page (Configuration > System > App Specific). Veeam will now be disabled if the final connection was disabled and a reboot was required.
