 minute read
DXi T10 System Installation
Overview
This guide provides hardware installation and initial system configuration instructions for the Quantum DXi T10 disk backup system.
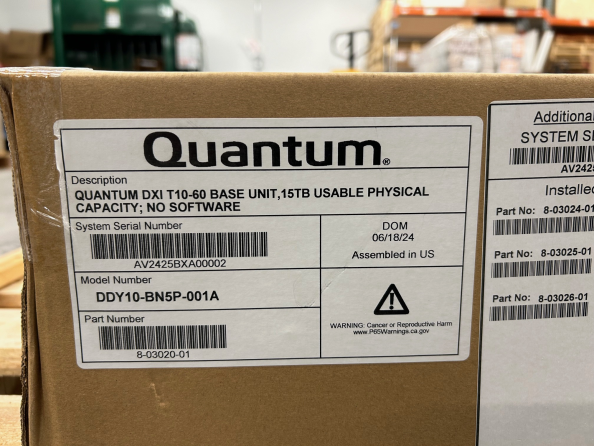
Note: Your DXi T10 has been configured at Quantum and the components in your Node are listed on a label on the Node outer box. Please review this list to confirm your system's components.
The Quantum DXi T10 can be ordered in the following configurations:
|
Model Number |
Configuration |
| Quantum DXi T10-60 |
|
| Quantum DXi T10-120 |
|
| Quantum DXi T10-240 |
|
| Quantum DXi T10-480 |
|
Choose a Location
Quantum recommends installing the system in a controlled or restricted area to prevent access by untrained personnel. In addition, Quantum recommends that system installation be performed only by qualified IT personnel.
When choosing an installation site for the DXi T10 system, consider the following requirements:
Review DXi T10 Site Planning to ensure that your site meets the installation requirements for the DXi T10.
The DXi T10 is installed into a customer-supplied rack. Use the guidelines in this section to choose an appropriate rack mounting solution.
Note: The absolute minimum depth requirement for the DXi T10 is 42.12 in (1070 mm). However, Quantum recommends selecting a rack with a minimum depth of 48 in (1200 mm) to allow for proper PDU installation and cable routing.
Use the following additional guidelines when choosing a rack mounting solution for the DXi T10:
|
System Dimensions |
Select a rack mounting solution that has the appropriate depth to accommodate the following:
|
|
DXi T10 Rail Kits |
|
|
System Weight |
Select a rack mounting solution that can withstand the following:
|
| Cable Management | The system is designed so the cables are wired at the back of the system. Ensure that the system cabling can be routed safely and efficiently through the selected route. |
| Grounding | Ensure that both the electrical components used to power the system and the rack itself can be grounded safely. |
The installation site must have the following environmental conditions:
|
Operating Temperature |
10°C ~ 35°C (50°F ~ 95°F) |
|
Non-operating Temperature |
-40°C to 60°C (-40°F to 140°F) |
|
Operating Relative Humidity |
8% to 90% (non-condensing) |
| Non-operating Relative Humidity | 5% to 95% (non-condensing) |
The front and rear of the system must be clear of any materials that could block or disrupt system airflow. Disruption of airflow can cause performance issues or system damage due to overheating.
Use the following guidelines to ensure proper system airflow:
-
The airflow in and out of the equipment must not be restricted.
-
Controlled air conditioners that are functional and can sufficiently maintain specified system operating temperatures should be located in the facility where the system will be installed.
-
If rack doors will be used, ensure that the solution used with the system does not prevent airflow from the cold aisle from entering the system freely.
Prepare for the Installation
WARNING: To prevent the risk of electrical shock, bodily injury, or damage to the equipment, read all instructions and warnings in the Product Information Guide that shipped with your system.
Before you begin the installation procedure, make the preparations described in the following sections:
The following tools are required for unpacking and installing the DXi T10 system:
- Anti-static mat or anti-static foam.
- Box cutter
- #2 Phillips screwdriver
- Small flat head screwdriver
- VGA monitor
- USB keyboard and mouse
- Notebook computer
Some components within the DXi T10 system contain static-sensitive parts. To avoid damaging these parts while performing installation procedures, always observe the following precautions:
- Keep the system turned off during all installation procedures.
- Keep static-sensitive parts in their original shipping containers until ready for installation.
- Do not place static-sensitive parts on a metal surface. Place them inside their protective shipping bag or on an anti-static mat.
- Wear anti-static wrist bands when unpacking and handling the units, and avoid touching connectors and other components.
Note: Dry climates and cold-weather heating environments have lower relative humidity and are more likely to produce static electricity.
Review this section before you begin the DXi T10 installation.

-
The system should be situated in a clean, dust-free area that is well ventilated. Avoid areas where heat, electrical noise and electromagnetic fields are generated.
-
Leave enough clearance in front of the rack so that you can open the front door completely and clearance in the back of the rack to allow sufficient space for airflow and access when servicing.
-
This product should be installed only in a Restricted Access Location (dedicated equipment rooms, service closets, etc.).
-
This product is not suitable for use with visual display workplace devices according to §2 of the German Ordinance for Work with Visual Display Units.
-
Ensure that the leveling jacks on the bottom of the rack are extended to the floor so that the full weight of the rack rests on them.
-
Always make sure the rack is stable before extending a server or other component from the rack.
| Issue | Description |
|---|---|
| Ambient Operating Temperature | If installed in a closed or multi-unit rack assembly, the ambient operating temperature of the rack environment may be greater than the room's ambient temperature. Therefore, consideration should be given to installing the equipment in an environment compatible with the manufacturer’s maximum rated ambient temperature (TMRA). |
| Airflow | Equipment should be mounted into a rack so that the amount of airflow required for safe operation is not compromised. |
| Mechanical Loading | Equipment should be mounted into a rack so that a hazardous condition does not arise due to uneven mechanical loading. |
| Circuit Overloading | Consideration should be given to the connection of the equipment to the power supply circuitry and the effect that any possible overloading of circuits might have on overcurrent protection and power supply wiring. Appropriate consideration of equipment nameplate ratings should be used when addressing this concern. |
| Reliable Ground |
A reliable ground must be maintained at all times. To ensure this, the rack itself should be grounded. Particular attention should be given to power supply connections other than the direct connections to the branch circuit (i.e. the use of power strips, etc.). Caution: To prevent bodily injury when mounting or servicing this unit in a rack, you must take special precautions to ensure that the system remains stable. The following guidelines are provided to ensure your safety:
|
-
Determine the placement of each component in the rack before you install the rails.
-
Install the heaviest server components at the bottom of the rack first and then work your way up.
-
Use a regulating uninterpretable power supply (UPS) to protect the server from power surges and voltage spikes and to keep your system operating in case of a power failure.
-
Allow any drives and power supply modules to cool before touching them.
-
When not servicing, always keep the front door of the rack and all covers/panels on the servers closed to maintain proper cooling.
Unpack the DXi T10
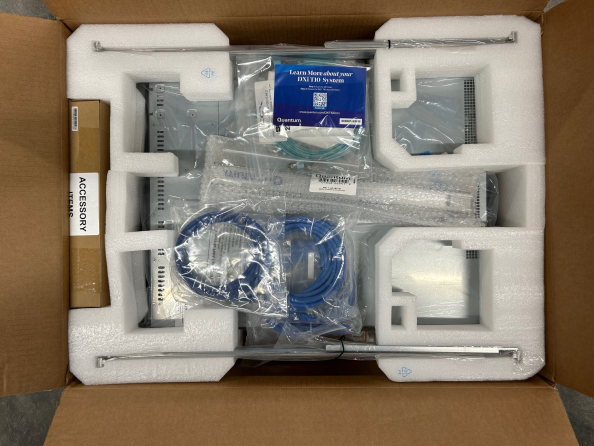
By following these unpacking instructions, you help ensure that the system will continue to be safeguarded after it arrives at the installation site:
Note: Make sure to retain all packing materials, as well as the documentation and other items included in the shipping box. The packaging materials must be used if the system is relocated.
The DXi T10 system is shipped on a pallets and contains the following:
| Carton | Description |
|---|---|
| 1U12 Server |
|
The unpacking process involves alternating between unpacking and inspecting components. This sequence will help catch problems that might have occurred during packaging or shipping.
Because the requirements of every data center or customer installation are different, you might have to unpack the system in a different sequence than described. If this occurs, ensure that the installation team has thoroughly reviewed the information provided in this section and follows all safety and inspection steps.
As you unpack the DXi T10system, look for obvious signs of damage. The following scenarios are the most common ways a package can be damaged:
-
Crushed corners caused by dropping the package.
-
Split seams caused by excessive shearing force placed on the container.
-
Punctures caused by a sharp object striking the packaging.
-
Water damage caused by contact with a water source or storage in an overly humid environment.
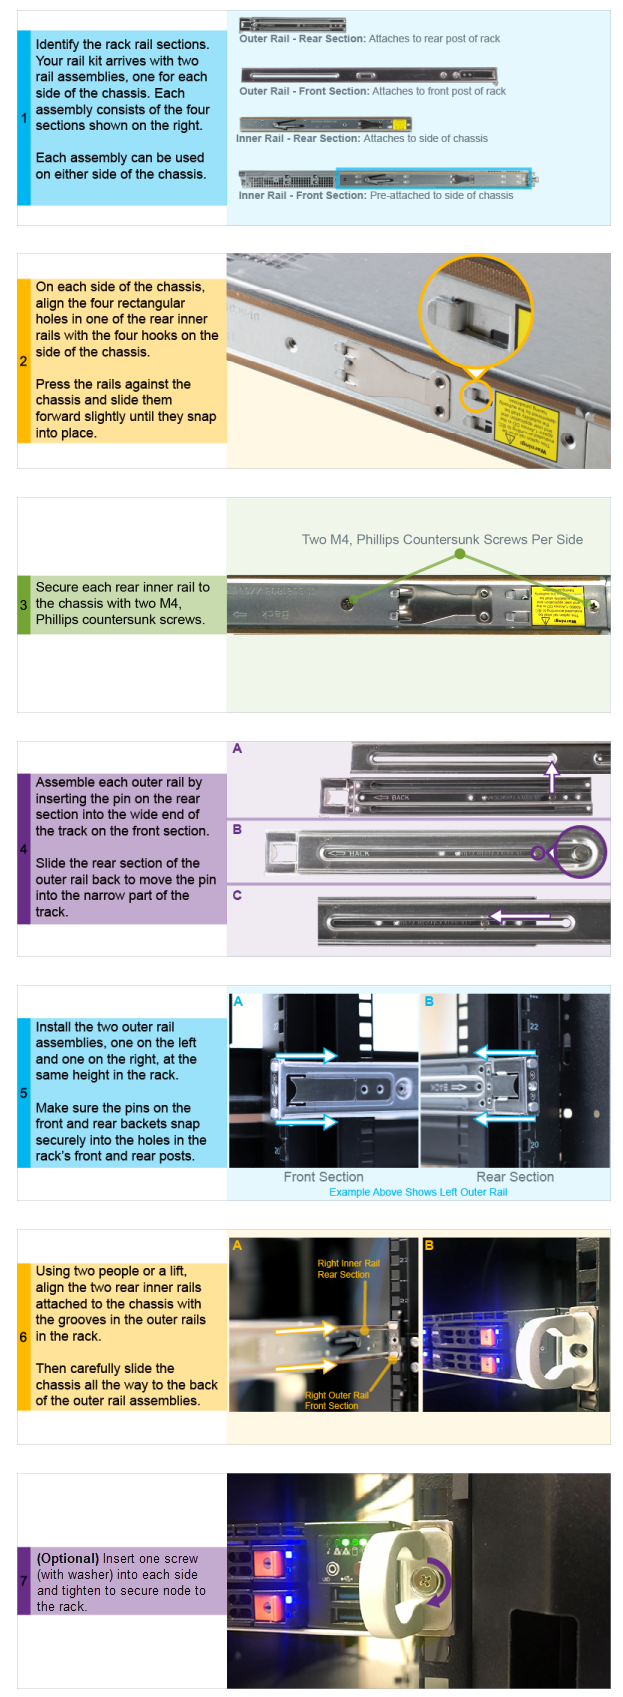
Install the DXi T10 System in the Rack
Installing the DXi T10 in a rack consists of the following steps:
Caution: Due to the weight of the DXi T10 chassis, Quantum recommends that two people lift and move the chassis.
Important Information
-
The DXi T10 chassis rail kits work with the EIA 310 Rack Standard square rack mounting holes only. The rail kits are pre-configured for direct installation into the square mounting holes.
-
Slide rail mounted equipment is not to be used as a shelf or a work space.
-
The rail kit comes with two M4 screws. In step 3 below, Quantum recommends using four M4 screws (two for each inner rail attached to the chassis.
Each outer rail comes in two sections that you must assemble before you can mount into the rack.
Follow these steps to cable the DXi T10:
Connect each power supply to a primary and secondary AC power source using the provided power cables. Quantum recommends connecting each power cord to a separate AC circuit to ensure system availability in case of a power failure. Power supplies should be checked periodically for audible and LED warnings.
Additional Information
- Quantum recommends connecting each power cord to a separate AC circuit to ensure system availability in case of a power failure. Power supplies should be checked periodically for audible and LED warnings.
- Use the attached straps to secure the power cords to the chassis.

If the DXi T10 has Fibre Channel cards, connect Fibre Channel cables to each Fibre Channel port. If there is a port cover on the port, you must remove it before connecting a cable.
Additional Information
- All Fibre Channel ports are configured for VTL by default. PTT ports can be configured in the Remote Management console once the system is operational.
- Review the SAN Configuration Recommendations below.
Fibre Channel Cabling (VTL/PTT Configurations Only)

| Item | Description |
|---|---|
| 1 | To PTT or VTL (optional) |
| 2 | To PTT or VTL (optional) |
| 3 | To PTT or VTL (optional) |
If the DXi T10 contains Ethernet cards, connect the Ethernet cables to the DXi T10 as follows:
Depending on configuration, there are 10/25 GbE and 100 GbE (SFP28 optical or DAC copper) for NAS, Application Specific, OST, and replication connectivity) available. Connect the appropriate cable for your system:
| Option | Description |
|---|---|
| Optical/DAC |
Insert an SFP+ unit into the 10/25 or 100 GbE ports and connect up to 6 10/25 GbE or 4 100 GbE SFP28 optical or DAC copper cables. Note: Quantum DXi T10 systems support 100 or 10/25 GbE optical cable lengths of up to 300 meters with OM3 cables and up to 100 meters with OM2 cables. Quantum recommends using the DXi T10 10 meter LC to LC optical cable type that are shipped with the DXi T10 system. Consult your Optical switch/SFP documentation for additional information on optical cable requirements. |
| CAT6 | Connect up to 2 CAT6 Ethernet cables to the RJ-45 100/1000BASE-T ports. |
Note: The Ethernet cables are used for remote management, NAS, Application Specific, OST, and Replication connectivity. Review to determine the number of Ethernet cables to attach. When connecting and disconnecting Ethernet cables or making configuration changes, it is normal for the Admin Alert indicator to display on the remote management console.
Caution: Ethernet and Fibre Channel cables can be damaged when tightened with plastic zip ties. Use hook and loop cable straps instead.
25 or 100 GbE Ethernet Cabling
| Item | Description |
|---|---|
| 1 | To 10/25 GbE network card (optional). |
| 2 | To 100 or 10/25 GbE network card (optional). |
| 3 | To 100 or 10/25 GbE network card (optional). |
Perform Initial Configuration
Before the DXi T10 is operational, you must configure the system through the remote management console. You must also configure your backup software.
Configuring the DXi T10 consists of the following steps. See the following subsections for detailed instructions for completing each step:
Note: You will need a notebook computer and an Ethernet cable to complete the initial configuration.
The DXi T10 management ports are set to DHCP configuration by default. If the DXi T10 will not be connected to a switch or will not be configured for DHCP, you can set a static IP address on one of the management ports to access the Remote Management Console.
To access the DXi T10 remote management console using DHCP:
-
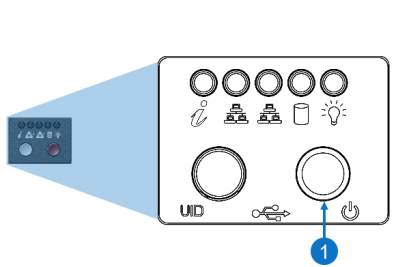
Press the power button once. The server control board will initiate the power up sequence.

-
Using an Ethernet cable, connect the management port on the rear of the DXi T10 to a network switch configured with DHCP.

-
Connect a VGA monitor to the DXi T10.

-
Connect a USB keyboard and mouse to the DXi T10.

-
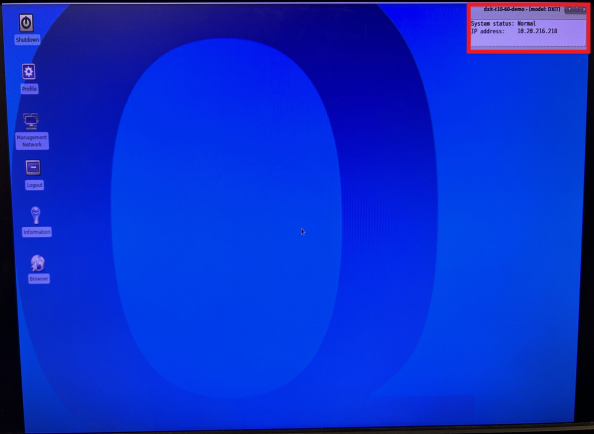
Once you have connected a keyboard, mouse, and monitor, you will be able to view the DHCP address for the system. Verify that the system status is Normal and record the IP address.
-
Disconnect the keyboard, mouse, and monitor from the DXi T10.
-
On your computer, open a supported Web browser, type the IP address recorded in step 5 in the Address box, and press Enter.
The Login window displays.

Additional Information
- The DXi GUI is compatible with Chromium-based web browsers. Quantum-tested Chromium-based browsers include Brave, Google Chrome, Microsoft Edge, Opera and Vivaldi. Mozilla Firefox is also compatible with the GUI.
- If the Login window does not display, verify that you entered the correct IP address (10.17.21.1) and that the network settings on the computer are correct. Wait 10 minutes, then try again. If the Login window still does not display, contact Quantum Customer Support.
- If you are using the Firefox browser and find that after you have entered your credentials, the Login button is grayed (inactive), try using Backspace to delete your Password entry, then press Enter, re-enter your Password and click Login.Quantum also recommends disabling the saved login credentials feature when using the Quantum DXi T10 through Firefox. If you encounter further login problems, contact your system administrator.
Continue with the next section to log on to the system and complete the Getting Started wizard.
To access the DXi T10 remote management console using a Static IP address:
-
Press the power button once. The server control board will initiate the power up sequence.
-
Using an Ethernet cable, connect the management port on the rear of the DXi T10 to a network switch configured with DHCP.
-
Connect a VGA monitor to the DXi T10.
-
Connect a USB keyboard and mouse to the DXi T10.
-
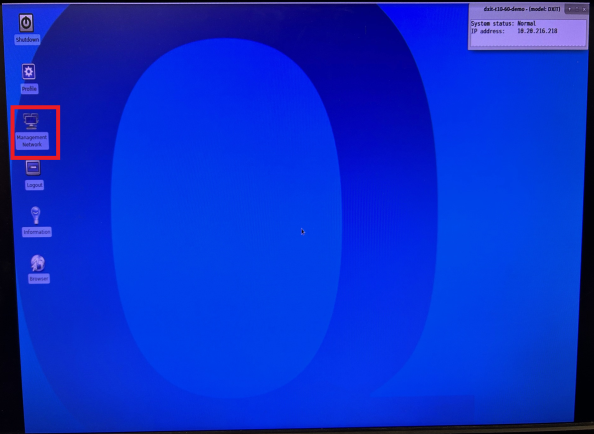
Once you have connected a keyboard, mouse, and monitor, you will be able to view the screen below.
-
Select Management Network. The Networking dialog box appears.
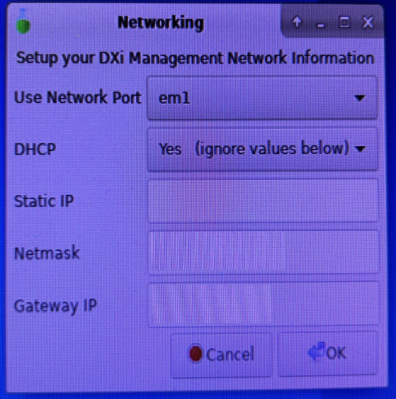
- Enter the following information in the Network dialog box.
Use Network Port - em1
DHCP - No
Static IP - 10.17.21.2
Netmask - 255.255.255.0
Gateway IP - 10.17.21.1
-
Click OK. The em1 port is now set with a static IP address.
-
Disconnect the keyboard, mouse, and monitor from the DXi T10.
-
Using an Ethernet cable, connect your computer to the DXi T10 using the Ethernet port (em1) below.
-
Configure the network settings on the computer:
Note: This procedure assumes you are running Windows 10 on the computer. The steps might be different if you are using another operating system.
- Access the Network Connections control panel. To do this, use the Search field in Windows, type view network connections, and press Enter.
-
Right-click the network connection that corresponds to the Ethernet port on the computer (for example, Local Area Connection), and click on the View Network Connections (Control Panel) in the search results.
-
Select Internet Protocol Version 4 (TCP/IPv4) in the list of connections, and then click Properties.
The Internet Protocol Version 4 (TCP/IPv4) Properties window displays.
-
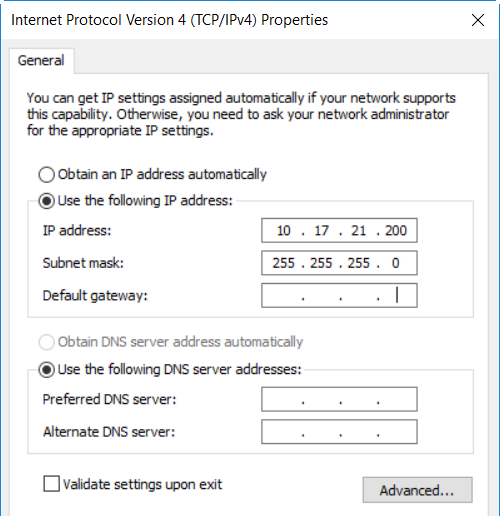
Select Use the following IP address and then enter the following information:
Caution: Before changing the IP address information, write down the original settings. This will be used later to reset the network configuration.
- IP address - 10.17.21.200
- Subnet mask - 255.255.255.0
-
Click OK, and then click Close.
-
Wait at least two minutes for the computer to set the IP addresses on the local computer.
-
On the computer, open a supported Web browser, type 10.17.21.1 in the Address box, and press Enter.
The Login window displays.
Additional Information
- The DXi GUI is compatible with Chromium-based web browsers. Quantum-tested Chromium-based browsers include Brave, Google Chrome, Microsoft Edge, Opera and Vivaldi. Mozilla Firefox is also compatible with the GUI.
- If the Login window does not display, verify that you entered the correct IP address (10.17.21.1) and that the network settings on the computer are correct. Wait 10 minutes, then try again. If the Login window still does not display, contact Quantum Customer Support.
- If you are using the Firefox browser and find that after you have entered your credentials, the Login button is grayed (inactive), try using Backspace to delete your Password entry, then press Enter, re-enter your Password and click Login.Quantum also recommends disabling the saved login credentials feature when using the Quantum DXi T10 through Firefox. If you encounter further login problems, contact your system administrator.
Continue with the next section to log on to the system and complete the Getting Started wizard.
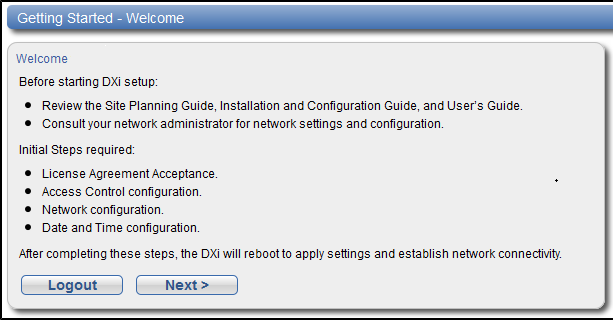
To complete the DXi T10 Getting Started wizard:
-
Select the login user name and password.
- User name - Type your user name in the field.
- Password - Type password in the field at your first system login.
-
If you log in as a user assigned to the Admin role (local or LDAP) and there were previous unsuccessful DXi T10 logins, a dialog box appears indicating the previous number of unsuccessful login attempts for both the current account and all accounts on the DXi T10.
- Click OK to continue.
-
Click View Admin Log to access the Administrative Activity Log page. See Administrative Activity Log.
Note: Accessing the Administrative Activity Log page will cause the security message banner and service ticket banner (if applicable) to not display.
- Click Reset Counts to reset the unsuccessful login count to zero.
-
Read the information about the wizard, and then click Next to continue.
The License Agreement page displays.
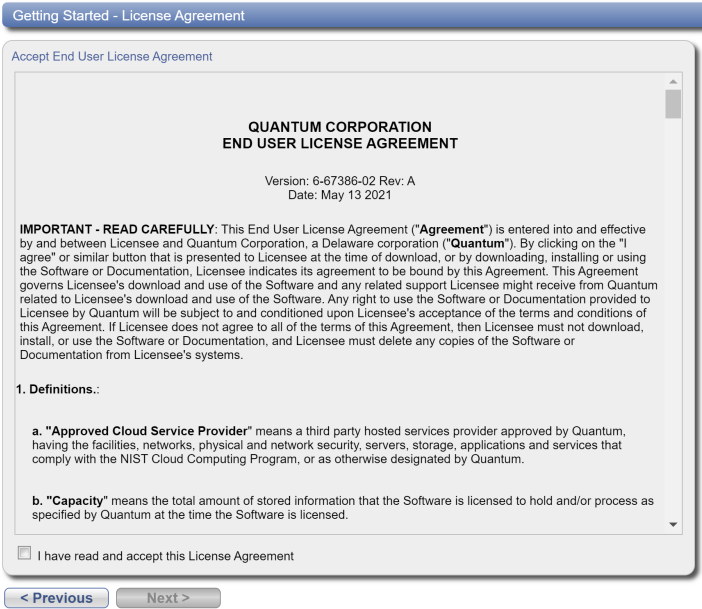
-
Select the I have read and accept this License Agreement check box, and then click Next to continue.
Note: If you do not accept the license agreement, the DXi T10 will not function.
The Access Control page displays.
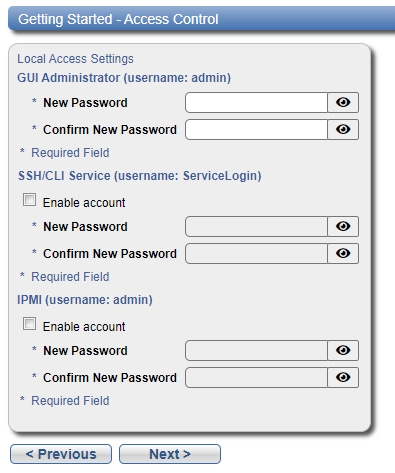
-
Create a new password for the GUI Administrator user account:
- Enter the Old Password (password).
-
Enter a New Password.
Note: The GUI Administrator password can be up to 32 characters. Alphanumeric characters and special characters are allowed.
- Enter the new password again in Confirm New Password.
-
Create a new password for the Service SSH (ServiceLogin) user account:
-
Enter a New Password.
Additional Information
- The Service SSH password can be up to 20 characters. Alphanumeric characters and special characters are allowed.
- The Access Control page in the Remote Management Console allows you to change the password of the SSH Service account.
- Enter the new password again in Confirm New Password.
-
-
Create a new password for IPMI access:
-
Enter a New Password.
Additional Information
- The Service SSH password can be up to 20 characters. Alphanumeric characters and special characters are allowed.
- The Access Control page in the Remote Management Console allows you to change the password of the IPMI account.
-
Enter the new password again in Confirm New Password.
-
-
Click Next to continue.
The Network page displays.
IMPORTANT - READ BEFORE CONTINUING
Steps 7-12 below provide an example of configuring network settings on the DXi T10. In this example, the DXi T10 is configured as follows:
- All Ethernet ports are configured as individual devices (Not Bonded).
- A single network interface with one IP address is configured for eth1.
- All traffic types (management, data, and replication) travel over the single network interface.
- All other settings are at default values.
The actual network settings you will enter depend on the configuration of your company’s network and may differ from those below. Work with your network administrator to determine the correct settings for integrating the DXi T10 into your company’s network.
If you set up the DXi T10 using the example below, you can always change the network settings as needed at a later time. For more information, see the “Network” section in the Quantum DXi T10 User’s Guide.
Caution: For effective bonded network use, a properly configured network switch is required. (A network switch is not supplied with the DXi T10). The DXi T10 bonding settings must match the switch settings. If the switch settings and the DXi T10 settings do not match, your system may become inaccessible through the switch.
Note: The figure below is for illustrative purpose only. The Network page will reflect the actual number of physical ports in the system.
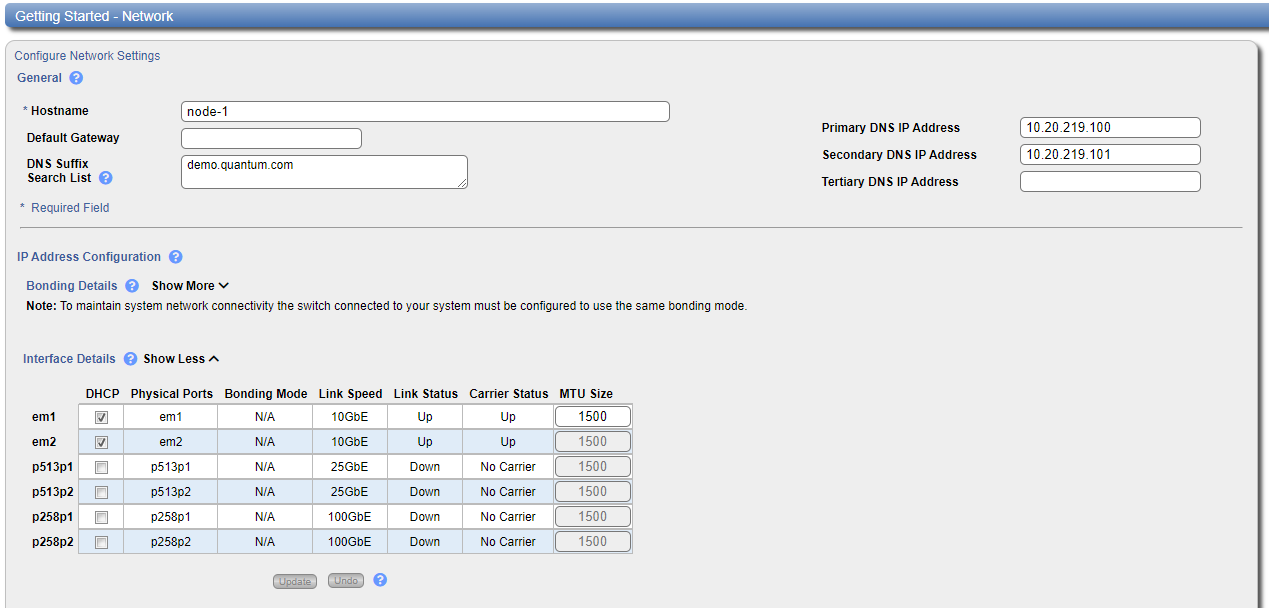
-
Under General, enter the following network information as provided by your network administrator:
-
Enter the Hostname used to identify the DXi T10 system.
The Hostname cannot be blank and must contain only letters [ A–Z, a–z ], numbers [ 0–9 ], hyphens [ - ], underscores [ _ ], and dots [ . ].
-
(Optional) Enter the Default Gateway IP address.
Specifying a default gateway is optional if all access is local to a particular subnet. For example, if the DXi T10 and all of its clients are on the same subnet, you do not need to specify a default gateway.
Caution: Specifying a default gateway is required to enable connectivity with all subnets other than those that the DXi T10 is directly connected to. For example, if the DXi T10 and its clients are on different subnets, you must specify a default gateway.
-
(Optional) In the DNS Suffix Search List box, enter the local domain to search first when resolving domain names.
The domain suffix is a single domain name. The domain name may contain only letters (A–Z), numbers (0–9), dots (.), and hyphens (-).
-
(Optional) In the Primary, Secondary, and Tertiary DNS IP Address boxes, enter the IP address of up to three DNS servers used to resolve domain names and translate them into IP addresses.
Caution: You must specify a DNS IP address if you plan to use hostname format when configuring an NTP time server, outgoing e-mail server, replication sources and targets, and other information.
-
-
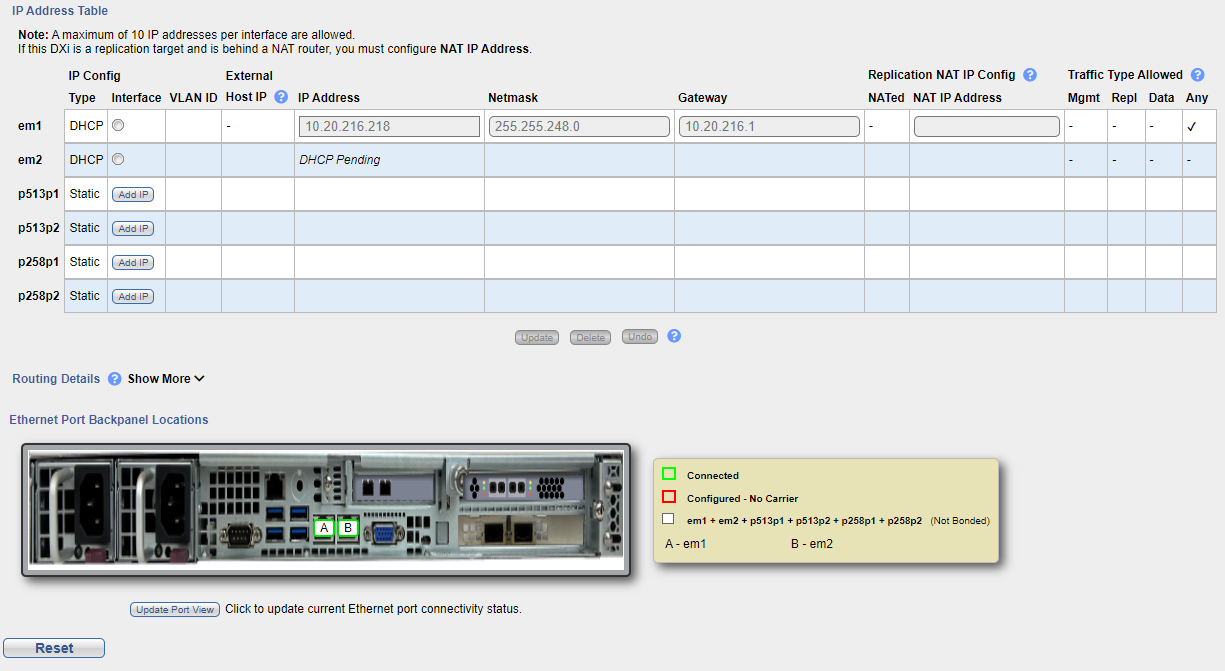
Under IP Address Configuration > Bonding Details, configure each Ethernet port as a separate network device:
- If necessary, click the Show link to show the bonding details table.
- In the Not Bonded row, make sure each Ethernet port is selected (eth1, eth2, and so on).
- If necessary, click Update to save the changes you made to the Bonding Details table.
- Do not make any changes under IP Address Configuration > Interface Details unless directed by your network administrator. (For more information about the VLAN tag and MTU size options, see the “Network” section in the Quantum DXi T10 User's Guide.
-
Under IP Address Configuration > IP Address Table, enter network information for the eth1 device:
Note: Do not make any entries in the VLAN ID, External Host IP, NATed, or NAT IP Address columns unless directed by your network administrator.
- Select the eth1 row in the table. Or, if necessary, click Add IP in the eth1 row to enable entry in the IP Address box.
-
Enter the following network information as provided by your network administrator (all fields are required):
Caution: Make sure you enter the correct IP address information and that you write this information down. If you enter the incorrect IP address information and reboot, you will not be able to access the system.
- IP Address - The IP address of the DXi T10.
- Netmask - The network mask of the DXi T10.
- Gateway - The gateway of the DXi T10. (This is usually not the same as the default gateway.)
- Select the Any check box to allow all traffic types (management, replication, and data) on the interface.
- Click Update to save the changes you made to the IP Address table.
-
Do not make any changes under IP Address Configuration > Routing Details unless directed by your network administrator.
Note: If the DXi needs to communicate with another subnet that is not reachable using the default gateway, a route must be added under the Routing Details section. (For more information about interface routing, see the “Network” section in the Quantum DXi T10 User's Guide.
-
Click Next to continue.
The Date & Time page displays.
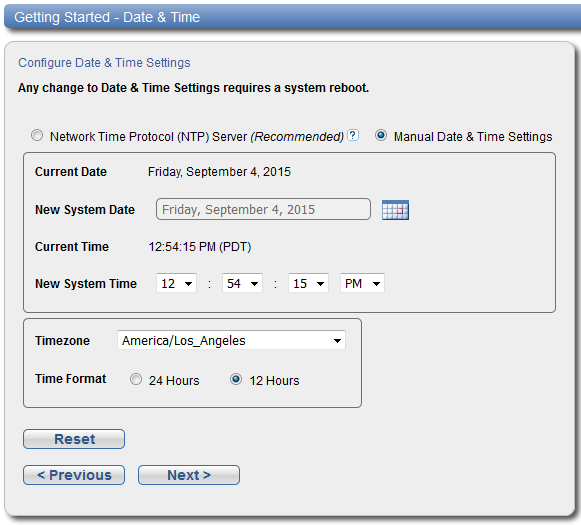
-
If necessary, select Manual Date & Time Settings to manually set the system date and time.
Specify the New System Date by clicking Calendar. Specify the New System Time using the drop-down boxes.
Note: You can also choose to synchronize the system time with an NTP time server.
- In the Timezone drop-down box, select the time zone where the DXi T10 is located.
- Next to Time Format, select the format to use when displaying times (24 hours or 12 hours).
-
Click Next to continue.
The Confirm page displays.
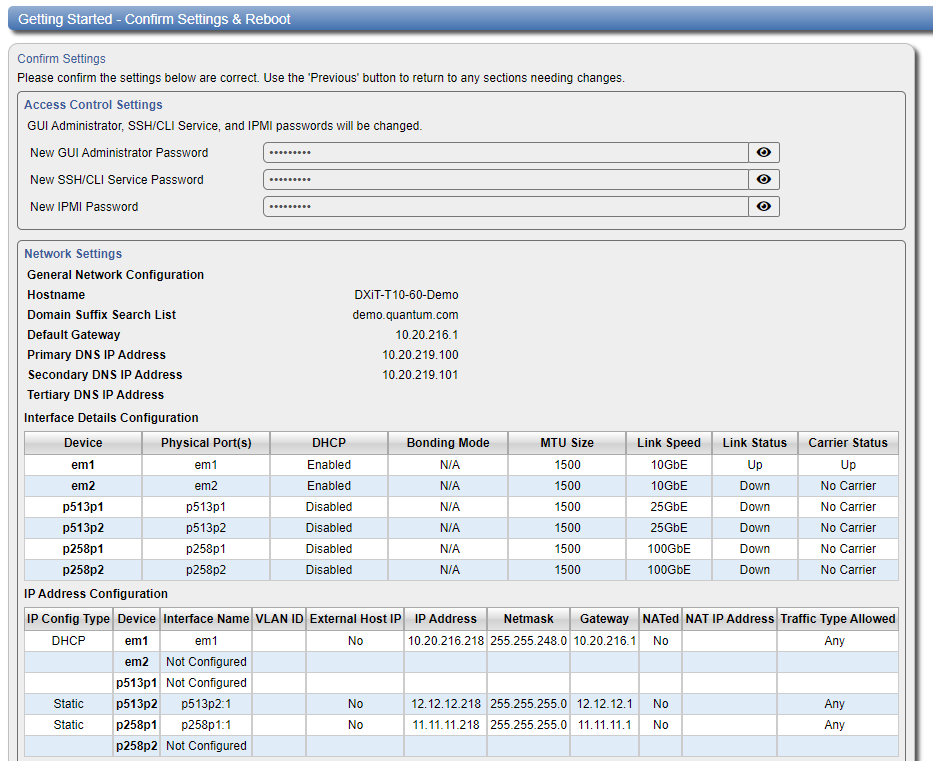
- Review the settings you selected to make sure they are correct. If necessary, click Previous to return to a previous step to make changes
-
After you have confirmed all settings, click Finish.
A message appears stating that completing the setup will restart the system.
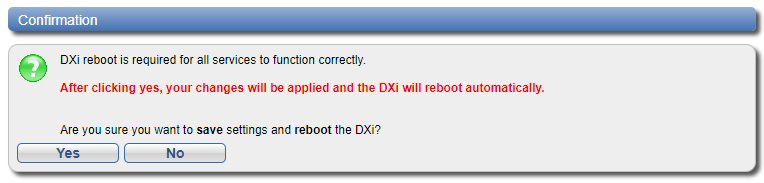
- Click Yes to restart the system.
- Disconnect the computer from the Ethernet port. Reset the computer network settings back to the default values.
-
Wait for the system to fully restart. This can take up to 30 minutes.
Continue with the next section to connect the Ethernet cables.
The Welcome page displays.
Note: If a message on the page indicates the DXi is in Limited Mode, wait ten minutes, and then log on again.
Install the protective bezel on the front of the DXi T10. The bezel snaps into place on the front of the Node to prevent the removal of the system from the rack.
- Insert the right side of the bezel into the slots on the right side of the Node.
- Snap the left side of the bezel into place.
Note: To remove the bezel, lift the latch on the left side of the bezel.
Before you begin using the DXi T10 for backups, you must configure the system. Here are next steps the customer can take:
Quantum recommends enabling Email Reports after you install your DXi. When enabled, Email Reports periodically sends system configuration and status information to Quantum, including any software upgrades you have installed using the Software Upgrade Utility. Quantum Support can use this information to provide a better support experience in the future.
To configure Email Reports:
- Make sure a valid outgoing e-mail server is specified on the Configuration > Notifications > Email > Server page. Also make sure to select the Enable automatic emails to Quantum check box on this page.
- (Optional) Specify any additional recipients to receive the reports on the Configuration > Notifications > Email > Email Reports > Recipients page.
- Make sure a weekly Email Reports schedule is configured on the Configuration > Scheduler page. Configure two weekly recurring events: one for Status reports and one for Configuration reports.
Use the Configuration Wizards on the Wizards menu to configure the DXi for backups, and to configure additional features:
To learn more about using the Configuration Wizards, refer to the DXi T10 User's Guide or access the online help by clicking Help from any page in the wizard.
| Wizard | Description |
|---|---|
|
NAS |
Helps you configure the system as a NAS (Network Attached Storage) appliance. NAS shares can be added using CIFS/SMB or NFS protocols. See NAS Wizard. |
| Application Specific | Helps you add and configure shares as application-specific Oracle RMAN or AccentFS shares. See Application-Specific Shares Wizard. |
|
VTL |
Helps you configure the system to present its storage as one or more VTL (Virtual Tape Library) partitions for use with a backup application. See Application-Specific Shares Wizard. |
|
OST |
Helps you configure the system to present its storage as one or more OST (OpenStorage) storage servers for use with a backup application. See OST Wizard. |
|
Replication |
Helps you configure the system to send replicated data to or receive replicated data from another DXi system. See Replication Wizard. |
| Users |
Helps you configure the system to manage users for Application Specific shares, OST storage servers, PTT Backups, Share Administrators, and Workgroup Users for CIFS/SMB shares. See Users Wizard. Note: The Operator user type has limited access to system resources and must be setup via CLI commands or in the system, on the Configuration > System > Security > Users screens. See Manage Users' Server, Share and Partition Access for instructions. |
| Email Alerts |
Helps you configure the system to automatically send notifications and reports to selected recipients. See Email Alerts Wizard. |
|
Support |
Helps you enable licensed features on the DXi , register your system with DXi , and perform other tasks that will aid Quantum customer support in assisting you. See Support Wizard. |
- To configure your backup application to begin performing backups to the DXi, refer to your backup application documentation.
- To learn more about operating the DXi T10, refer to the DXi T10 User's Guide or access the online help from the remote management console by clicking Help > Help Contents.
- To enable data replication to another DXi™-Series system, refer to Chapter 6, DXi T10 Replication in the DXi T10 User's Guide.
Quantum recommends ensuring that the latest version of DXi software is installed. See the Software Upgrades section in your DXi T10 User's Guide for more information.
Appendix
If you encounter problems while installing or configuring the DXi T10, see the table below for troubleshooting steps.
| Problem | Corrective Action |
|---|---|
| The system does not power on. | Make sure all power cords are connected to a grounded electrical outlet and the power switches located on the back of the power supplies are on. |
| You are unable to log on to the remote management console using a laptop connected to the DXi T10. |
Make sure the laptop is connected to the Ethernet ports on the DXi T10 and that the network settings on the laptop are properly configured. Make sure to wait at least 30 minutes after turning on the system before attempting to log on. Try a different Ethernet cable. |
| The following message displays when you log on to the remote management console: There are service tickets that require attention. | Click OK to display the Service Tickets page, or navigate to the Alerts > Service Tickets page. Click a ticket number to view details about the service ticket. Perform any suggested steps listed in the ticket details. |
| The Home page does not display the expected total Disk Capacity. | Make sure the storage capacity license is installed. |
| The storage capacity license is correctly installed, but the Home page still does not display the expected total Disk Capacity. |
|
Quantum recommends the following to ensure a stable Storage Area Network (SAN) operation with virtual or physical tape drive appliances.
Note: The information provided below is for informational purposes only. Quantum is not responsible for issues related to applying the recommendations described below. Check with your software vendor and SAN administrator to verify these recommendations for your specific production environment.
| SAN Item | Recommendations |
|---|---|
| Disable |
|
| Drivers |
|
| Fibre Channel (FC) |
|
| LUNs |
|
| Ports |
|
| Tools |
|
| Zoning |
|
