Hardware
DXi T10 utilizes a Software RAID. Previous DXi products (DXi4800/DXi9000) use a Hardware RAID solution. With a Software RAID, you can monitor and manage disk status, identify failed disks, and replace them using the Remote Management Console or the Command Line Interface.
The DXi T10 has two different RAID configurations: RAID 6 and RAID 1.
RAID 6
The 10 external 15 TB NVMe SSD drives utilizes a RAID 6 configuration. The external drive slots are numbered in the RAID as follows:

A RAID 6 configuration can tolerate up to two disk failures. More than two disk failures can result in data loss.
RAID 1
The two internal 960 GB SSD M.2 NVMe drives are located on the system motherboard and are used to run the DXi T10 operating system.
A RAID 1 configuration can tolerate one internal disk failure. More than one internal disk failure will cause the DXi T10 to be inoperable.
Contact Quantum Support for assistance if an internal drive does not have a status of Healthy.
To access the Hardware page, click the Utilities menu, and then click the Hardware tab.

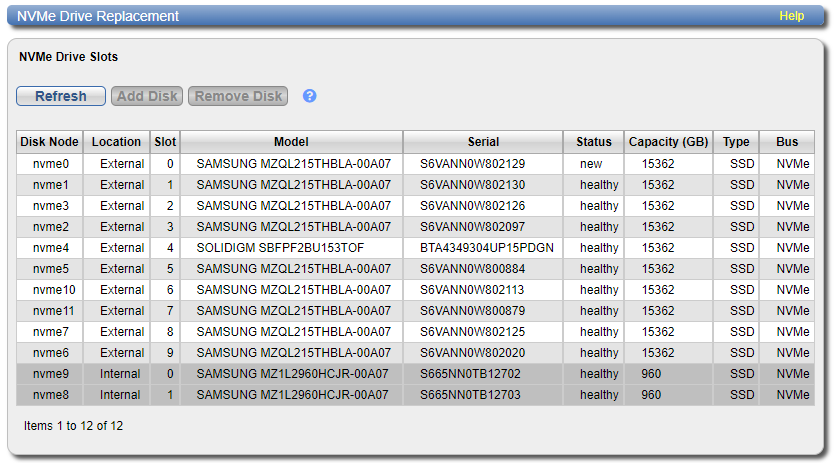
The Hardware page displays the following information about NVMe disks:
| Category | Description |
|---|---|
| Disk Node | Disk node name. |
| Location |
Indicates that selected drive is an external (15 TB NVMe) or internal (960 GB M.2 SSD) drive. |
| Slot |
Indicates slot location for the selected drive. External drives are in slot locations 0-9. Internal drives are in slot locations 0-1. |
| Model | Drive model. |
| Serial | Drive serial number. |
| Status |
Current drive status:
|
| Capacity | Indicates drive capacity. The external drives are 15 TB (15362 GB) and the internal drives are 960 GB. |
| Type | All drives in DXi T10 are solid state drives (SSD). |
| Bus |
All drives in DXi T10 are NVMe drives. |
Tasks
Use the Hardware page to perform the following tasks:
- Refresh drive status. See Refresh.
- Add a disk to the RAID 6 array. See Add a Disk .
- Remove a disk from the RAID 6 array. See Remove a Disk.
Select the Refresh button to update the latest status of the DXi T10 external and internal disks in the NVMe Drive Replacement table .
Note: The add disk feature is for external disks only.
The Add button will add a disk the software RAID that is not currently a part of the RAID. A disk that is not currently part of the software RAID will have a status of New.
To add a disk:
-
Select the disk in the table to be added to the RAID. The disk will have a status of New.
-
Click the Add button. A dialog box appears asking if you want to add the disk to the RAID. Click Yes.

Once the disk has been added to the RAID, the drive will have a status of Healthy. If a disk in the RAID fails, the status will change from Healthy to Failed. You will then need to remove the disk from the RAID (see Remove a Disk).
Note: The remove disk feature is for external drives only.
The Remove button will remove a failed disk the software RAID.
To remove a disk:
-
Select the failed disk in the table to be removed from the RAID. The disk will have a status of Failed.
-
Click the Remove button. A dialog box appears asking if you want remove the disk from the RAID. Click Yes.

After removing a failed disk, the disk's status will no longer be available through the software RAID. Until the failed drive is physically removed from the system and replaced with a new drive, the failed disk status will appear as New in the NVMe Drive Replacement table.
Once the failed drive has been physically removed and replace with a new drive, you can add the new disk back into the RAID (see Add a Disk ).
