VTL Wizard
The VTL Configuration Wizard provides guided assistance for configuring the DXi9000 Series to present its storage as one or more VTL (Virtual Tape Library) partitions for use with a backup application. The wizard guides you through the process of adding one or more VTL partitions, adding virtual media, discovering hosts, and mapping partitions to hosts.
Additional Information
You cannot use the VTL wizard to edit or add media to existing partitions, or to edit existing host access groups. For more information about working with VTL partitions, see VTL Configuration.
To begin the VTL wizard, on the Wizards menu, click VTL.
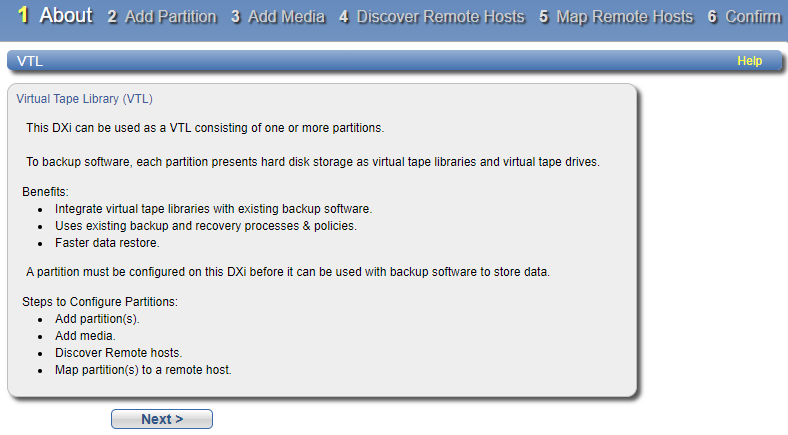
- Read the information about the wizard.
- Click Next to continue.
Note: At any time while using the wizard, you can click Previous to return to the previous step.
-
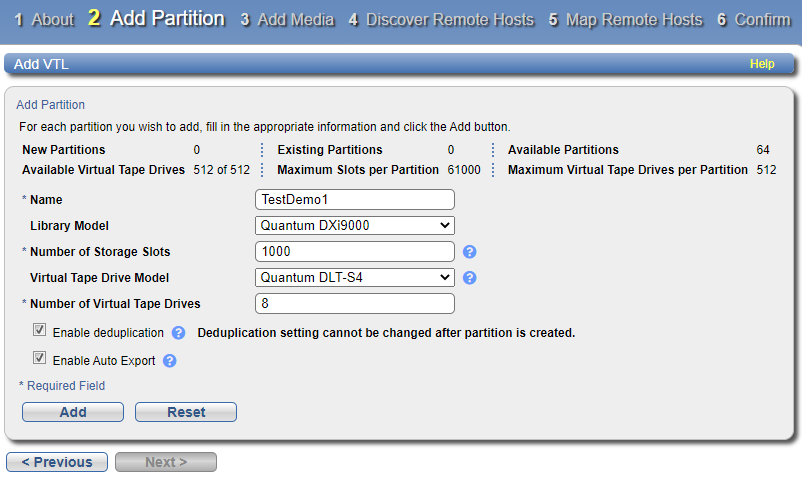
Under Partition Settings, enter information about the partition:
Partition Setting Description Name
Enter the name of the VTL partition.
Library Model
Select the library model emulated by the partition. The library model determines the inquiry string returned to the host by the DXi9000 Series.
 The following library models are available:
- ADIC Scalar 100, ADIC Scalar i2000, or ADIC Scalar i500
- ADIC Pathlight VX
- Quantum Scalar i40/i80 or Quantum Scalar i6000
- Quantum DXi6700, Quantum DXi6900, Quantum DXi6800, Quantum DXi4700, Quantum DXi4800, Quantum DXi4601, QuantumDXi4500, Quantum DXi750, Quantum DXi9000, Quantum DX9200, or Quantum DXi T10.
- Quantum DX3000 or Quantum DX5000
- Quantum PX500 or Quantum PX720
- ATL M2500, ATL P1000, or ATL P7000
If you select a library such as the ATL P1000 or ATL P7000, the DXi9000 Series appears as the selected library to the host and backup application.
Note: Check your software compatibility guide to verify supported library models.
Number of Storage Slots Accept the default number of storage slots (based on model), or enter the number of storage slots in the partition (up to 61,000).
One I/E slot is created for each storage slot up to a maximum of 240 I/E slots.
Virtual Tape Drive Model Select the tape drive model emulated by the virtual drives in the partition. All virtual tape drives in a partition must be the same model.
 The following tape drive models are available:
- Quantum DLT-S4, SDLT600, SDLT320, or DLT7000
- Certance LTO-2 and LTO-3
- IBM LTO-1, LTO-2, LTO-3, LTO-4, and LTO-5.
- HP LTO-1, LTO-2, LTO-3, LTO-4, and LTO-5.
Number of Virtual Tape Drives Accept the default number of tape drives (based on model), or enter the number of virtual tape drives in the partition.
Note: If all tape drives are currently assigned to other partitions, you must remove one or more tape drives from an existing partition to make them available for use in a new partition.
Enable deduplication Select the check box to enable data deduplication. Quantum recommends that you enable data deduplication to optimize disk usage.
Note: Data deduplication is enabled by default. You cannot enable or disable data deduplication after the partition is added.
Enable Auto Export Select the check box to enable auto export. When a tape is exported by the backup application, it is placed in a virtual I/E slot. After this, one of the following actions occurs:
- (Default) If Auto Export is enabled, the media is removed from the virtual I/E slot.
- If Auto Export is disabled, the media remains in the virtual I/E slot.
- Click Add.
- (Optional) To add additional partitions, repeat Steps 1–2.
- Click Next to continue.
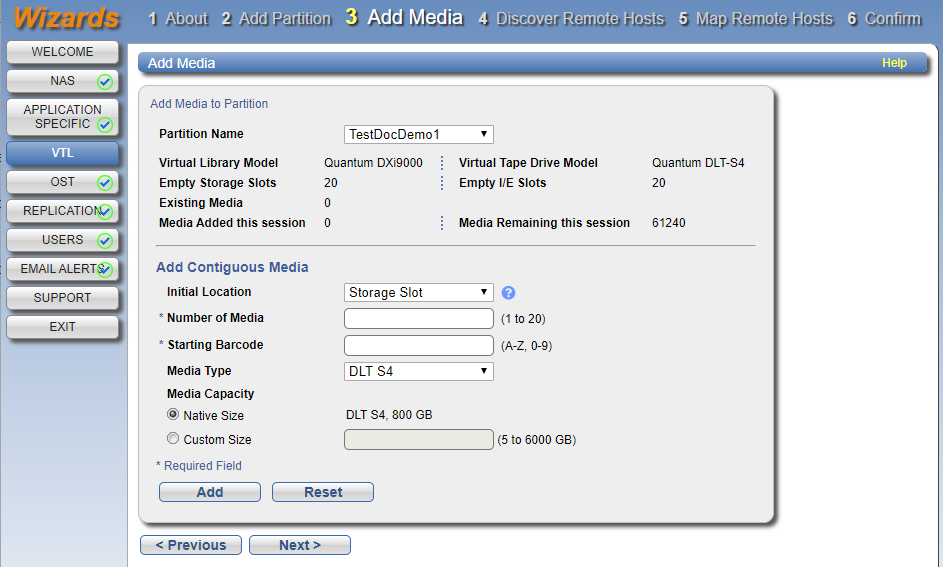
- In the Partition drop-down box, select the partition where the media will be created.
-
Under Add Contiguous Media, enter information about the media:
Media Setting Description Initial Location The initial location for cartridges after they are created (Storage Slot or I/E Slot).
Note: You cannot create more cartridges than the number of available slots in the initial location. For example, if 50 I/E slots are available, you cannot create more than 50 cartridges if the initial location is set to I/E Slot.
Number of Media The number of cartridges to create in the partition.
Starting BarcodeThe first barcode number in the cartridge sequence.
You can enter any alpha-numeric string for the starting barcode. Subsequent barcodes are incremented accordingly. For example, if you enter AA, the cartridges are numbered AA0000, AA0001, AA0002, and so on. If you enter a starting barcode with less than 6 characters, zeroes are appended to the barcode to make it 6 characters long.
Media TypeThe media type of the cartridges.
Note: The available media type options are determined by the type of tape drive selected when the partition was created. See Adding a VTL Partition.
Media Capacity The capacity of the cartridges. Select an option:
- Native Size - The capacity is determined by the selected media type.
- Custom Size - The capacity is a custom value. Enter the custom cartridge capacity in the box. Make sure the value is within the acceptable range displayed next to the box.
- Click Add.
- (Optional) To add additional media, repeat Steps 1–3.
- Click Next to continue.
-
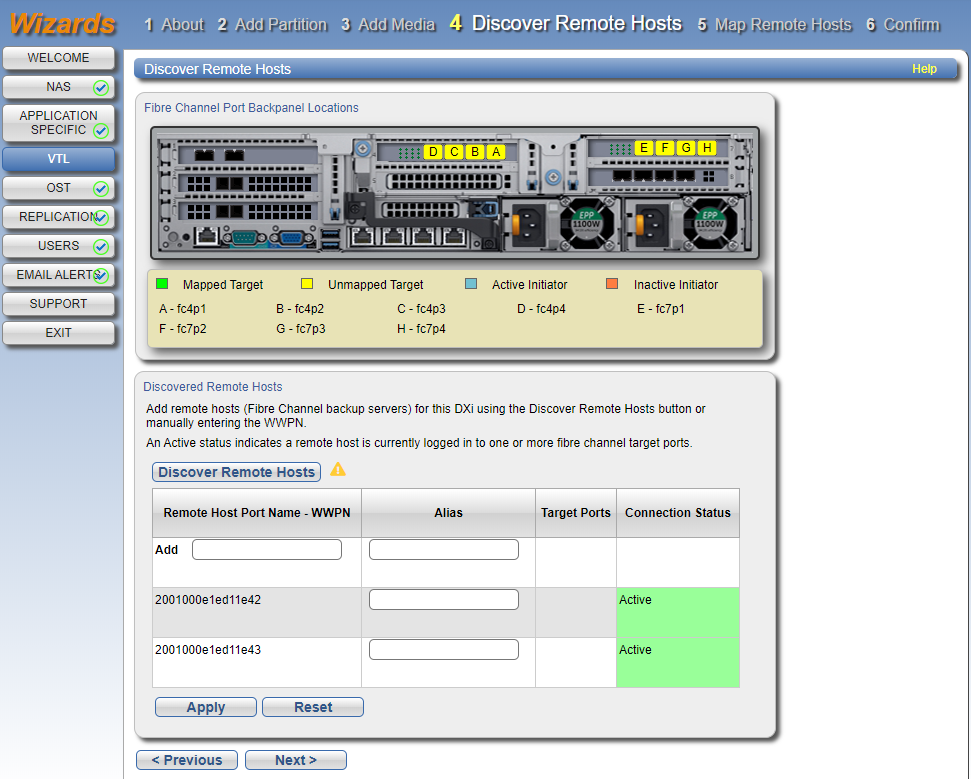
Click Discover Remote Hosts to list all hosts that are known to the DXi9000 Series.
A host is made known to the DXi9000 Series if you enter the host ID on this page, or if the host logs on to one or more Fibre Channel target ports.
If you do not see the world wide name (WWN) of the host, make sure the host is connected to a Fibre Channel port on the DXi9000 Series and click Discover Remote Hosts again.
The Backpanel Locations section displays a graphical representation of the Fibre Channel and Ethernet ports as they appear on the rear of the system.
Note: An Active status indicates the host is currently logged on to one or more Fibre Channel target ports.
-
Enter information about the host:
Host Information Description Remote Host WWPN Enter the World Wide Port Name (WWPN) of the host.
Alias Enter a descriptive alias for the host
- Click Apply.
- (Optional) To discover additional hosts, repeat Steps 1–3.
- Click Next to continue.
-
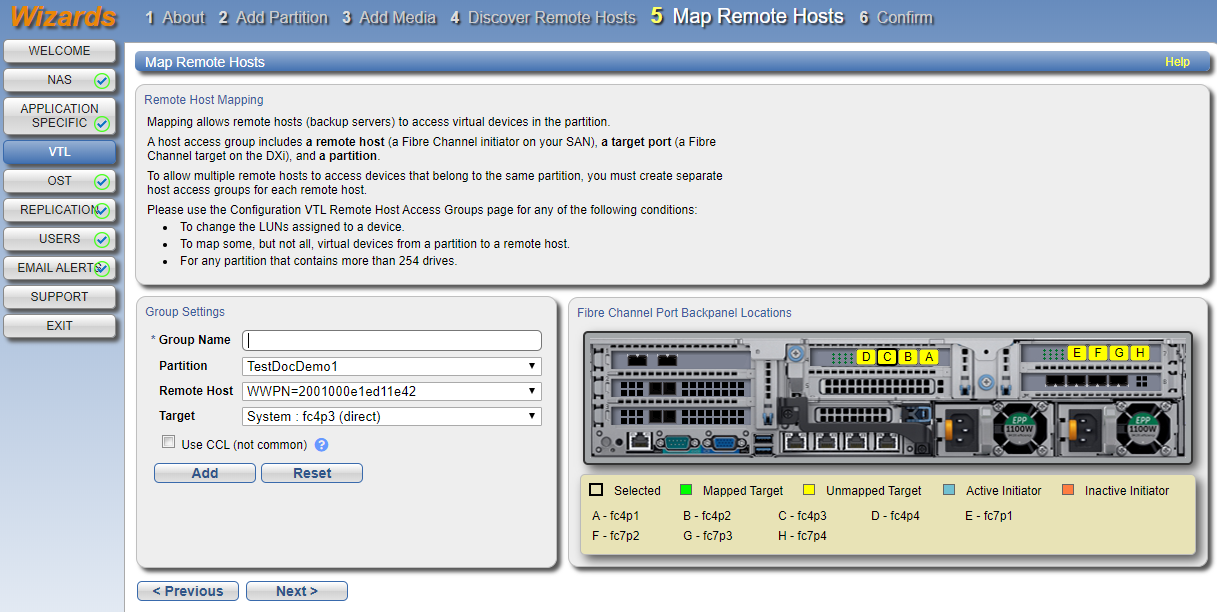
Enter information about the host access group:
Host Access Information Description Group Name Enter a name for the group.
Partition Select the partition to associate with the group.
Remote Host Select the host (initiator) to associate with the group.
Target Select the target (port) to associate with the group.
Note: The Backpanel Locations section displays a graphical representation of the Fibre Channel and Ethernet ports as they appear on the rear of the system. A dark border displays around the currently selected target.
To change the LUN numbers assigned to a device, or to map virtual devices to a host, use the Configuration > VTL > Host Access > Host Mapping page. See Remote Host Mapping.
-
(Optional) Select the Use CCL check box to use the Command and Control LUN.
Note: The CCL (Command and Control LUN) is not used in most environments. This option is recommended for host access groups that contain an HP-UX host. It can also be used if hosts that are not assigned to any host access group exist in the SAN. The CCL is accessible to hosts only through LUN 0.
Caution: If you are not sure if you should use CCL, contact Quantum Customer Support before you enable this option.
- Click Add.
- (Optional) To map additional hosts, repeat Steps 1–3.
- Click Next to continue.
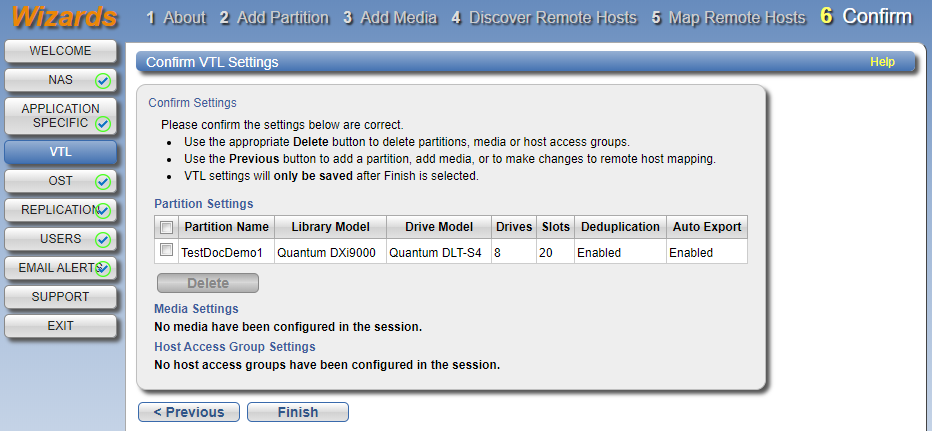
- Review the settings you selected to make sure they are correct. If necessary, click Previous to return to a previous step to make changes.
- To make changes to a VTL partition, media, or host access group you added, first select the item and click Delete to delete it. Then click Previous to return to the appropriate step and add a new item.
- After you have confirmed all settings, click Finish. The wizard configures the DXi9000 Series with the settings you selected.
