 minute read
RMAN Plug-in Configuration
Overview
Oracle™ Recovery Manager (RMAN) allows Oracle servers to integrate with DXi disk backup systems. Once installed and configured, an Oracle server can manage backups through the DXi system and take advantage of the system’s capabilities such as data deduplication and replication.
Installing and configuring the DXi and Oracle server for operation consists of the following major steps. See the following sections for detailed instructions for completing each step:
Before you can configure the DXi with Oracle Recovery Manager (RMAN), you must download and install the RMAN Plug-in on the Oracle server. The following versions of Oracle are currently supported: 11, 12, 18 and 19.
To download the correct version of the RMAN Plug-in for your DXi configuration and media server operating system:
- On the DXi remote management console, navigate to the Configuration > System > Client Plug-Ins page.
-
Click Client Plug-in Download
The Quantum Client Plug-in download page displays.
You can also access the Client Plug-in download page at:
-
Click the links to download the latest Quantum RMAN Plug-in and RMAN Plug-in Installation Instructions.
Make sure to download the correct RMAN Plug-in for the operating system installed on the Oracle server.
The RMAN Plug-in Installation Instructions contain the installation procedure for the RMAN Plug-in. This procedure is different for each media server operating system platform. Follow the instructions to install the RMAN Plug-in on the Oracle server. When you are finished, continue to the next section.
DXi RMAN Configuration
You must create Application Specific (RMAN) shares on the DXi remote management console before you configure the Oracle server. See the following sections to configure the DXi for RMAN.
Note: You can also use the NAS Wizard to configure the DXi for Oracle RMAN shares. To learn more about using the Configuration Wizards, refer to the User’s Guide for your DXi model.
Configuring the DXi consists of the following major steps. See the following subsections for detailed instructions for completing each step:
To authenticate the RMAN shares on an Oracle server, you must create RMAN user credentials.
The Manage Users page in the DXi remote management console allows you to create and manage local authenticated users for use with Oracle Recovery Manager (RMAN).
To create RMAN user credentials:
- Log on to the DXi remote management console.
-
Navigate to the Configuration > System > Manage Users page.

Tasks
Use the Manage Users page to perform the following tasks:
- View information about local authenticated RMAN users (see Manage Authenticated Users List).
- Add a local authenticated RMAN user (see Adding an Authenticated User).
- Edit a local authenticated RMAN user (see Editing an Authenticated User).
- Delete a local authenticated RMAN user (see Deleting an Authenticated User).
The Manage Authenticated Users list displays the following information for all local authenticated RMAN users:
| Name | The name of the local authenticated user. |
| Description | A brief description of the local authenticated user (if available). |
Note: To update the list with the latest information, click Refresh.
Add an authenticated user to create local RMAN user credentials. The user credentials are required to authenticate the Oracle server.
To add an authenticated user:
-
Click Add.
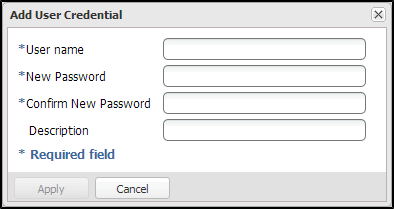
The Add User Credential window displays.
-
Enter information about the authenticated user:
User name Enter the name of the authenticated user. New Password Enter the password for the authenticated user. Confirm New Password Enter the password again to confirm it. Description (Optional) Enter a brief description of the authenticated user. - Click Apply.
Edit an authenticated RMAN user to change the user's password or description.
To edit an authenticated RMAN user:
-
Select the user and click Edit.
The Edit User Credentials window displays.
-
Enter information about the authenticated user:
Note: If you are editing an authenticated user, you cannot change the User name.
New Password Enter the password for the authenticated user. Confirm New Password Enter the password again to confirm it. Description (Optional) Enter a brief description of the authenticated user. - Click Apply.
Delete an authenticated RMAN user if the user credentials are no longer needed to authenticate the Oracle server.
To delete an authenticated user, select the user and click Delete.
Note: You can select multiple users to delete at once.
To create and configure RMAN shares:
- Log on to the DXi remote management console.
- From the DXi Home page, click the Configuration menu on the left side of the screen, then click the Application Specific tab.
- View information about existing Application Specific shares (see Application Specific Shares List).
- Add a new Application Specific share to the system.
- Edit properties for an existing Application Specific share.
- Delete a Application Specific share from the system.
Tasks
Use the Application Specific page to perform the following tasks:
The Application Specific Shares List displays the following information for all application-specific shares on the DXi:
| Shares | The number of shares that have been added to the system. |
| Maximum | The maximum number of shares that can be added to the system. |
| NFS | The number of existing shares configured to use the NFS protocol (for Linux networks). |
| CIFS/SMB | The number of existing shares configured to use the CIFS/SMB protocol (for Windows networks). |
| Application Specific | The number of existing shares configured to use Oracle Recovery Manager (RMAN) or AccentFS. |
| Share Name | The name of the share. |
| Protocol |
Application Specific is the default protocol for application-specific shares. |
| Export Path | The export path of the share. |
| Permissions | The permissions in use on the share (Read & Write or Read Only). |
| Access | The access type of the share (all hosts or specific users). |
| Deduplication | The data deduplication state of the share (Enabled or Disabled). |
| Replication |
The current state of replication for the share:
|
| Targets | The destinations (targets) where the share is configured to replicate. |
| Description | A brief description of the Application Specific share (if available). |
Additional Information
- Click a column heading to sort the rows in the table by that column. Click the column heading again to reverse the sort order.
- Click the Information button (
 ) next to a share to display detailed information about the share and recent replication activity.
To add an RMAN share:
-
Click Add.
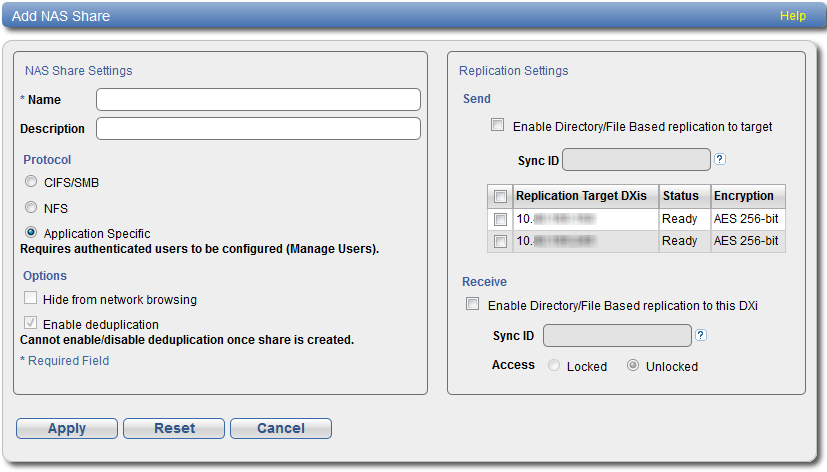
The Add NAS Share page displays .
-
Under NAS Share Settings, enter information about the Application Specific/RMAN share:
Name Enter the name of the NAS share.
Note: RMAN share names are not case-sensitive. For example, if you create a share named rman1, you cannot create another share named RMAN1.
Description (Optional) Enter a brief description of the share. Protocol Select the Application Specific export protocol for the RMAN share:
Enable deduplication Deduplication of RMAN shares is enabled by default and cannot be changed.
-
(Optional) Under Replication Settings, specify replication settings.
For more information about configuring replication for a share, or to set up replication for the share at a later time, refer to the appropriate DXi User's Guide at www.quantum.com/documentation.
- Click Apply.
Edit an RMAN share to modify the settings for the share, for example, to change the description of the share or to select different options.
To edit an RMAN share:
-
Select the share and click Edit.
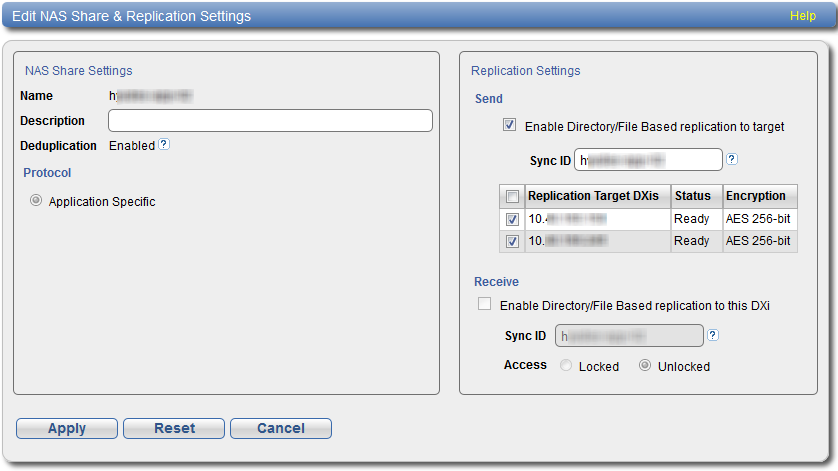
The Edit NAS Share & Replication Settings page displays.
-
Under NAS Share Settings, enter information about the share:
Note: If you are editing an RMAN share, only the Description option can be changed.
Description (Optional) Enter a brief description of the share. -
(Optional) Under Replication Settings, specify replication settings.
For more information about configuring replication for a share, or to set up replication for the share at a later time, refer to the appropriate DXi User's Guide.
- Click Apply.
Delete an RMAN share if it is no longer needed. When you delete a share, all data stored on the share is lost, and any schedules associated with the share are deleted.
To delete a NAS share:
-
Select the share and click Delete. You can select multiple shares to delete at once.
- Click Yes to confirm the deletion.
Oracle Configuration
There are two methods the Oracle server can use to authenticate to DXi while using Oracle Recovery Manager (RMAN).
Within either the static CONFIGURE or dynamic ALLOCATE CHANNEL, use one of the following options to call within the PARMS section.
The following parameters are used to establish connection to the DXi application specific (RMAN) share.
| Parameter | Description |
|---|---|
|
BACKUP_CREDID |
User credentials saved by setting credentials (see Set Credentials). |
|
BACKUP_HOST |
IP address of the DXi. |
|
BACKUP_SHARE |
The application specific (RMAN) share you to wish to engage. |
|
BACKUP_PASSWORD |
Authenticated user password created in the DXi GUI. |
|
BACKUP_USER |
Authenticated user created in the DXi GUI. |
|
SBT_LIBRARY |
Identifies the MMS library for the Quantum RMAN plug-in. |
Use BACKUP_USERNAME=<username>,BACKUP_PASSWORD=<password>
Allocate Channel Example Run On the Oracle Server
{
allocate channel dev2 type 'sbt_tape' parms 'SBT_LIBRARY=see table below,ENV=(BACKUP_HOST=10.10.123.10,BACKUP_SHARE=rman1,BACKUP_USERNAME=sampleuser,BACKUP_PASSWORD=123)';
backup as backupset database format '%U_%p';
release channel dev2;
}
|
Linux/AIX |
libQuantumobk.so |
|
Windows |
C:\Windows\Quantum\orasbt.dll |
This approach removes the plain text user/pass from the allocate channel calls in the RMAN scripts and/or from the static CONFIGURE method.
creds [-s|--set|-g|--get|-d|--delete] -c|--cred <cred_id> -H|--host <hostip> -u|--user <username> -p|--password <password>
Note: The creds command must be run from the Oracle server via an Oracle RMAN run block.
-s or --set credentials will create an entry recording host IP address (or host name), user, and password.
Note: Setting user credentials is only required once per user.
--set Credentials Example
ALLOCATE CHANNEL CH1 DEVICE TYPE 'sbt_tape' parms 'SBT_LIBRARY=see table below';
send 'creds --set --cred sampleuser --host 10.10.123.10 --user sampleuser --password 123';
release channel CH1;
}
|
Linux/AIX |
libQuantumobk.so |
|
Windows |
C:\Windows\Quantum\orasbt.dll |
If this authentication method is employed, future allocate channel calls would then replace the BACKUP_USERNAME and BACKUP_PASSWORD variables (both) with a single BACKUP_CREDID=<credid>.
Backup Username and Password Replacement Example
run
{
ALLOCATE CHANNEL CH1 DEVICE TYPE 'sbt_tape' parms 'SBT_LIBRARY=see table below,ENV=(BACKUP_HOST=10.10.123.10,BACKUP_SHARE=rman1,BACKUP_CREDID=sampleuser)';
backup as backupset database format '%U_%p';
release channel CH1;
}
|
Linux/AIX |
libQuantumobk.so |
|
Windows |
C:\Windows\Quantum\orasbt.dll |
Automatic Channel Configuration
An example of RMAN automatic channel configuration is below.
Automatic Channel Configuration Example
RMAN> show all;
RMAN configuration parameters for database with db_unique_name ORCL are:
CONFIGURE RETENTION POLICY TO RECOVERY WINDOW OF 15 DAYS;
CONFIGURE BACKUP OPTIMIZATION OFF;
CONFIGURE DEFAULT DEVICE TYPE TO 'SBT_TAPE';
CONFIGURE CONTROLFILE AUTOBACKUP OFF;
CONFIGURE CONTROLFILE AUTOBACKUP FORMAT FOR DEVICE TYPE 'SBT_TAPE' TO '/home/oracle/snap/%F';
CONFIGURE CONTROLFILE AUTOBACKUP FORMAT FOR DEVICE TYPE DISK TO '%F'; # default
CONFIGURE DEVICE TYPE 'SBT_TAPE' PARALLELISM 4 BACKUP TYPE TO BACKUPSET;
CONFIGURE DEVICE TYPE DISK PARALLELISM 1 BACKUP TYPE TO BACKUPSET; # default
CONFIGURE DATAFILE BACKUP COPIES FOR DEVICE TYPE 'SBT_TAPE' TO 1;
CONFIGURE DATAFILE BACKUP COPIES FOR DEVICE TYPE DISK TO 1; # default
CONFIGURE ARCHIVELOG BACKUP COPIES FOR DEVICE TYPE 'SBT_TAPE' TO 1;
CONFIGURE ARCHIVELOG BACKUP COPIES FOR DEVICE TYPE DISK TO 1; # default
CONFIGURE CHANNEL 1 DEVICE TYPE 'SBT_TAPE' PARMS 'SBT_LIBRARY=libobk.so,BLKSIZE=1048576,ENV=(BACKUP_HOST=10.10.123.10,BACKUP_SHARE=rman1,BACKUP_CREDID=sampleuser)';
CONFIGURE CHANNEL 2 DEVICE TYPE 'SBT_TAPE' PARMS 'SBT_LIBRARY=libobk.so,BLKSIZE=1048576,ENV=(BACKUP_HOST=10.10.123.10,BACKUP_SHARE=rman1,BACKUP_CREDID=sampleuser)';
CONFIGURE CHANNEL 3 DEVICE TYPE 'SBT_TAPE' PARMS 'SBT_LIBRARY=libobk.so,BLKSIZE=1048576,ENV=(BACKUP_HOST=10.10.123.10,BACKUP_SHARE=rman1,BACKUP_CREDID=sampleuser)';
CONFIGURE CHANNEL 4 DEVICE TYPE 'SBT_TAPE' PARMS 'SBT_LIBRARY=see table below,BLKSIZE=1048576,ENV=(BACKUP_HOST=10.10.123.10,BACKUP_SHARE=rman1,BACKUP_CREDID=sampleuser)';
CONFIGURE CHANNEL DEVICE TYPE 'SBT_TAPE' FORMAT '/orcl_20160831_123621_%U_XX.bck';
CONFIGURE MAXSETSIZE TO UNLIMITED;
CONFIGURE ENCRYPTION FOR DATABASE OFF;
CONFIGURE ENCRYPTION ALGORITHM 'AES128';
CONFIGURE COMPRESSION ALGORITHM 'BASIC' AS OF RELEASE 'DEFAULT' OPTIMIZE FOR LOAD TRUE ; # default
CONFIGURE ARCHIVELOG DELETION POLICY TO NONE;
CONFIGURE SNAPSHOT CONTROLFILE NAME TO '/home/oracle/snap/%U_%P.snapf';
|
Linux/AIX |
libQuantumobk.so |
|
Windows |
C:\Windows\Quantum\orasbt.dll |
Get Credentials
-g or --get credentials will query to see if credentials exist.
Successful Credential Query Example
Recovery Manager: Release 11.2.0.4.0 - Production on Thu Sep 29 17:27:08 2016
Copyright (c) 1982, 2011, Oracle and/or its affiliates. All rights reserved.
RMAN> connect target *
2> run
3> {
4> ALLOCATE CHANNEL CH1 DEVICE TYPE 'sbt_tape' parms 'SBT_LIBRARY=see table below';
5> send 'creds --get --cred sampleuser --host 10.10.123.10';
6> release channel CH1;
7> }
8>
9>
connected to target database: ORCL (DBID=1442450746)
using target database control file instead of recovery catalog
allocated channel: CH1
channel CH1: SID=12 device type=SBT_TAPE
channel CH1: Quantum MMS for RMAN 1.0.0.3204
sent command to channel: CH1
released channel: CH1
Recovery Manager complete.
|
Linux/AIX |
libQuantumobk.so |
|
Windows |
C:\Windows\Quantum\orasbt.dll |
Credential Query Failure Example
Recovery Manager: Release 11.2.0.4.0 - Production on Thu Sep 29 17:28:23 2016
Copyright (c) 1982, 2011, Oracle and/or its affiliates. All rights reserved.
RMAN> connect target *
2> run
3> {
4> ALLOCATE CHANNEL CH1 DEVICE TYPE 'sbt_tape' parms 'SBT_LIBRARY=see table below';
5> send 'creds --get --cred sampleuser --host 10.10.123.10';
6> release channel CH1;
7> }
8>
9>
connected to target database: ORCL (DBID=1442450746)
using target database control file instead of recovery catalog
allocated channel: CH1
channel CH1: SID=152 device type=SBT_TAPE
channel CH1: Quantum MMS for RMAN 1.0.0.3204
released channel: CH1
RMAN-00571: ===========================================================
RMAN-00569: =============== ERROR MESSAGE STACK FOLLOWS ===============
RMAN-00571: ===========================================================
RMAN-03002: failure of send command at 09/29/2016 17:28:24
ORA-19559: error sending device command: creds --get --cred sampleuser --host 10.10.123.10
ORA-19557: device error, device type: SBT_TAPE, device name:
ORA-27194: skgfdvcmd: sbtcommand returned error
ORA-19511: Error received from media manager layer, error text:
Requested credentials are not found.
Recovery Manager complete.
|
Linux/AIX |
libQuantumobk.so |
|
Windows |
C:\Windows\Quantum\orasbt.dll |
Delete Credentials
-d or --delete credentials will delete an entry corresponding to the host IP address (or host name), user, and password.
Delete Credentials Success Example
[oracle@oel72rman1 temp]$ rman cmdfile=credsdelete.cmd
Recovery Manager: Release 11.2.0.4.0 - Production on Thu Sep 29 17:30:52 2016
Copyright (c) 1982, 2011, Oracle and/or its affiliates. All rights reserved.
RMAN> connect target *
2> run
3> {
4> ALLOCATE CHANNEL CH1 DEVICE TYPE 'sbt_tape' parms 'SBT_LIBRARY=see table below';
5> send 'creds --delete --cred sampleuser --host 10.10.123.10';
6> release channel CH1;
7> }
8>
9>
connected to target database: ORCL (DBID=1442450746)
using target database control file instead of recovery catalog
allocated channel: CH1
channel CH1: SID=12 device type=SBT_TAPE
channel CH1: Quantum MMS for RMAN 1.0.0.3204
sent command to channel: CH1
released channel: CH1
Recovery Manager complete.
|
Linux/AIX |
libQuantumobk.so |
|
Windows |
C:\Windows\Quantum\orasbt.dll |
Delete Credentials Failure Example
Recovery Manager: Release 11.2.0.4.0 - Production on Thu Sep 29 17:31:29 2016
Copyright (c) 1982, 2011, Oracle and/or its affiliates. All rights reserved.
RMAN> connect target *
2> run
3> {
4> ALLOCATE CHANNEL CH1 DEVICE TYPE 'sbt_tape' parms 'SBT_LIBRARY=see table below';
5> send 'creds --delete --cred sampleuser --host 10.10.123.10';
6> release channel CH1;
7> }
8>
9>
connected to target database: ORCL (DBID=1442450746)
using target database control file instead of recovery catalog
allocated channel: CH1
channel CH1: SID=152 device type=SBT_TAPE
channel CH1: Quantum MMS for RMAN 1.0.0.3204
released channel: CH1
RMAN-00571: ===========================================================
RMAN-00569: =============== ERROR MESSAGE STACK FOLLOWS ===============
RMAN-00571: ===========================================================
RMAN-03002: failure of send command at 09/29/2016 17:31:31
ORA-19559: error sending device command: creds --delete --cred sampleuser --host 10.10.123.10
ORA-19557: device error, device type: SBT_TAPE, device name:
ORA-27194: skgfdvcmd: sbtcommand returned error
ORA-19511: Error received from media manager layer, error text:
Requested credentials are not found.
Recovery Manager complete.
|
Linux/AIX |
libQuantumobk.so |
|
Windows |
C:\Windows\Quantum\orasbt.dll |
| Serial Backup Tape (SBT) |
|
| RMAN Client Side Encryption |
|
| Backup format outlay |
|
| Plug-ins |
|
| Replication |
|
| RMAN Client Side Compression |
|
After the plug is successfully installed, run sbttest to verify communication between the RMAN plug-in and DXi.
To run sbttest, do the following from an Oracle server terminal as the Oracle user:
-
Export or set the following environment variables:
Linux/AIX
export BACKUP_HOST=<ip address of DXi>
export BACKUP_SHARE=<application specific share on DXi>
export BACKUP_USERNAME=<user name>
export BACKUP_PASSWORD=<password>
Windows
set BACKUP_HOST=<ip address of DXi>
set BACKUP_SHARE=<application specific share on DXi>
set BACKUP_USERNAME=<user name>
set BACKUP_PASSWORD=<password>
-
Run the following command:
Linux/AIX
sbttest <arbitrary string used to identify test> -libname libQuantumobk.so
Windows
sbttest <arbitrary string used to identify test> -libname C:\Windows\Quantum\orasbt.dll
-
Verify the test passes without any reported errors.
[oracle@rman1 ~]$ sbttest test -libname libQuantumobk.soThe sbt function pointers are loaded from libQuantumobk.so library.
-- sbtinit succeeded
-- sbtinit (2nd time) succeeded
sbtinit: vendor description string=Quantum MMS for RMAN 1.2.1.4146
sbtinit: Media manager is version 1.0.0.132
sbtinit: Media manager supports SBT API version 2.0
sbtinit: allocated sbt context area of 3888 bytes
-- sbtinit2 succeeded
-- regular_backup_restore starts ................................
-- sbtbackup succeeded
write 100 blocks
-- sbtwrite2 succeeded
-- sbtclose2 succeeded
sbtinfo2: SBTBFINFO_NAME=test
sbtinfo2: SBTBFINFO_METHOD=stream
sbtinfo2: SBTBFINFO_SHARE=multiple users
sbtinfo2: SBTBFINFO_CRETIME=Wed Sep 21 13:42:47 2016
sbtinfo2: SBTBFINFO_LABEL=10.20.165.14_sdk
-- sbtinfo2 succeeded
-- sbtrestore succeeded
file was created by this program:
seed=457752398, blk_size=16384, blk_count=100
read 100 buffers
-- sbtread2 succeeded
-- sbtclose2 succeeded
-- sbtremove2 succeeded
-- regular_backup_restore ends ................................
-- sbtcommand succeeded
proxy copy is not supported
-- sbtend succeeded
*** The SBT API test was successful ***
Once the sbttest utility confirms successful communication between DXi system and the Oracle server, you can begin using the DXi system to backup your Oracle Database.
See the Oracle Database Backup and Recovery User's Guide for information about Oracle Recovery Manager (RMAN) installation and basic configuration on an Oracle Server.
https://docs.oracle.com/cd/E11882_01/backup.112/e10642/toc.htm
Additional RMAN Configuration
The RMAN plug-in supports the DEBUG_LEVEL Linux/Unix configurable debugging option. The following values can be set in DEBUG_LEVEL to help define the log message output level:
EMERGENCYALERTCRITICALERRORWARNINGNOTICEINFODEBUG
By default, DEBUG_LEVEL is set to INFO.
The RMAN Plug-in logs various messages to log files under usr/Quantum/log directory on a Linux or Unix database server. To enable verbose logging, set the DEBUG_LEVEL value to DEBUG.
Example
INFO - 20200727 16:26:26.546 8069 rman_pgn_api.cpp:3010 Quantum MMS for RMAN 1.2.1.4146
INFO - 20200727 16:26:26.546 8069 rman_pgn_api.cpp:3011 1.2.1.4146 Quantum RMAN plugin initialized.
INFO - 20200727 16:26:26.546 8069 rman_pgn_api.cpp:3012 (C) 2016-2019 Quantum Corporation. All rights reserved.
INFO - 20200727 16:26:26.546 8069 pgnconfig.cpp:432 IO_PATH=Accent
INFO - 20200727 16:26:26.546 8069 pgnconfig.cpp:433 OPDUP_TIMEOUT=43200 secs
INFO - 20200727 16:26:26.546 8069 pgnconfig.cpp:434 OPDUP_MBYTES=1024
INFO - 20200727 16:26:26.546 8069 pgnconfig.cpp:435 ADMIN_ALERT_TIME=300
INFO - 20200727 16:26:26.546 8069 pgnconfig.cpp:436 ADMIN_ALERT_LIMIT=1
INFO - 20200727 16:26:26.546 8069 pgnconfig.cpp:437 LOG_LIMIT=104857600
INFO - 20200727 16:26:26.546 8069 pgnconfig.cpp:438 LOG_FILE_LIMIT=10
INFO - 20200727 16:26:26.546 8069 pgnconfig.cpp:440 WRITE_CACHE_SIZE=16777216
INFO - 20200727 16:26:26.546 8069 pgnconfig.cpp:442 READ_CACHE_SIZE=16777216
INFO - 20200727 16:26:26.546 8069 pgnconfig.cpp:444 SERVER_READ_BUFFERED=1
INFO - 20200727 16:26:26.546 8069 pgnconfig.cpp:446 DATA_CONNECTION_BUSY_TIMEOUT=300
INFO - 20200727 16:26:26.546 8069 pgnconfig.cpp:447 SERVER_ENCRYPTION=1
INFO - 20200727 16:26:26.546 8069 pgnconfig.cpp:448 ENCRYPTION_REQUIRED=0
INFO - 20200727 16:26:26.546 8069 pgnconfig.cpp:450 PATH_OPTIMIZATION_BLACKLIST=
INFO - 20200727 16:26:26.546 8069 pgnconfig.cpp:452 PATH_OPTIMIZATION_PROBE_TIMEOUT_MS=1000
INFO - 20200727 16:26:26.546 8069 pgnconfig.cpp:461 TCP_RCVBUF=4294967295
INFO - 20200727 16:26:26.546 8069 pgnconfig.cpp:462 TCP_SNDBUF=4294967295
INFO - 20200727 16:26:26.546 8069 pgnconfig.cpp:463 TCP_NODELAY=current OS setting
INFO - 20200727 16:26:26.546 8069 pgnconfig.cpp:467 TCP_KEEPIDLE=current OS setting
INFO - 20200727 16:26:26.546 8069 pgnconfig.cpp:476 TCP_KEEPCNT=current OS setting
INFO - 20200727 16:26:26.546 8069 pgnconfig.cpp:485 TCP_KEEPINTVL=current OS setting
INFO - 20200727 16:26:26.546 8069 pgnconfig.cpp:492 DMC_READ_AHEAD_SIZE_MB=-1
INFO - 20200727 16:26:26.546 8069 pgnconfig.cpp:494 LEGACY_BACKUP_OPT=10
Transmission Control Protocol (TCP)
The TCP Keep Alive settings can be configured from the Oracle server side to prevent an RMAN connection termination.
| Parameter | Description | Default | Max |
|---|---|---|---|
|
TCP_KEEPIDLE |
Set the TCP option TCP_KEEPIDLE for socket connections. This is equivalent to tcp_keepalive_time. |
System settings | 276446 |
|
TCP_KEEPCNT
|
Set the TCP option TCP_KEEPCNT for socket connections.This is equivalent to tcp_keepalive_probes. |
System settings | 1215752191 |
|
TCP_KEEPINTVL |
Set the TCP option TCP_KEEPINTVL for socket connections. This is equivalent to tcp_keepalive_intvl. |
System settings | 276446 |
Accent Path Optimization is on by default, but can be turned off using either the PATH_OPTIMIZATION_BLACKLIST setting noted in the following table, or in the DXi GUI under Configuration > System > Client Plugins. See the User Guide in your product's Documentation Center for more information.
| Parameter | Description | Default | Max |
|---|---|---|---|
|
PATH_OPTIMIZATION_BLACKLIST |
A comma-separated list of IP addresses or hostnames which should not participate in path optimization.
|
Empty | N/A |
|
PATH_OPTIMIZATION_PROBE_TIMEOUT_MS |
The maximum time to spend determining which interfaces on the server are reachable. | 1000 | 65000 |
Troubleshooting
An Oracle supplied test utility called sbttest can be used to troubleshoot and debug the RMAN plug-in. This utility checks and diagnoses the media management API. To verify and authenticate the Quantum RMAN plug-in:
Note: Backup share, user, and password should already exist on the DXi specified in BACKUP_HOST.
export BACKUP_HOST=<ip address of DXi>
export BACKUP_SHARE=<application specific share on DXi>
export BACKUP_USERNAME=<user name>
export BACKUP_PASSWORD=<password>
sbttest test -libname libQuantumobk.so
If sbttest fails to authenticate, it will report the reason why the authentication failed. In the example below, the authentication failed due to an incorrect exported password.
In addition to failed authentication, there are other descriptive errors that could occur, such as a missing file, missing share, missing directory, etc.
sbttest Authentication Failure Example
[oracle@oel72rman1 temp]$ sbttest fail -libname libQuantumobk.so
The sbt function pointers are loaded from libQuantumobk.so library.
-- sbtinit succeeded
-- sbtinit (2nd time) succeeded
sbtinit: vendor description string=Quantum MMS for RMAN 1.2.1.4146
sbtinit: Media manager is version 1.0.0.132
sbtinit: Media manager supports SBT API version 2.0
sbtinit: allocated sbt context area of 3888 bytes
MMAPI error from sbtinit2: 7501, sbtinit2: authentication to server 10.20.165.14 username = chuck failed: MI_STS_EAUTH
-- sbtinit2 failed
For additional information on Recovery Manager (RMAN) trouble shooting, refer to the Recovery Manager Troubleshooting section of the Oracle Database Backup and Recovery Advanced User's Guide:
https://docs.oracle.com/cd/B19306_01/backup.102/b14191/rcmtroub.htm#BRADV012
Quantum service can access RMAN logs contained in the /usr/Quantum/log directory. Log level control is similar to Veritas OST plug-in, with different settings modified in the QuantumPlugin.conf file.
The rman.log will also identify an Oracle trace file to review.
Trace file logging can be accomplished by adding a trace <0-2> to the end of the allocate channel call when setting up the data transfer. This log (sbtio.log) will be needed when troubleshooting RMAN failures.
The trace file log usefulness depends on the trace level set by the user during the allocate channel call. If an operation repeatedly fails, the trace level should be increased to help identify the root cause of the issue.
By default, tracing occurs at level 0.
