DXi4800 SSD Drive Replacement
Overview
The DXi4800 system contains one 480 GB solid state drive (SSD) mounted in the rear of the Node. This SSD, used as a write-thru cache for filesystem and blockpool metadata, increases system performance.
Before you begin the drive replacement procedure, review the following information:
- Use only the Quantum-supplied replacement drive to perform the replacement procedure. Do not use any other drive (not even one taken from another DXi).
- The DXi4800 system can function (with some performance degradation) with a failed or removed SSD.
- The 480 GB SSD is not hot-swappable. You must power down the DXi system to replace the failed drive.
- Installing the replacement drive will take approximately 30 minutes.
Follow the steps below to replace the 480 GB SSD in the DXi4800.
Take ESD Precautions
Some components within the DXi system contain static-sensitive parts. To avoid damaging these parts while performing installation procedures, always observe the following precautions:
- Keep static-sensitive parts in their original shipping containers until ready for installation.
- Do not place static-sensitive parts on a metal surface. Place them inside their protective shipping bag or on an anti-static mat.
- Wear anti-static wrist bands when unpacking and handling the units, and avoid touching connectors and other components.
- Dry climates and cold-weather heating environments have lower relative humidity and are more likely to produce static electricity.
The DXi4800 480 GB SSD is located at the rear of the Node in PCI Slot 12.
480 GB SSD Location

The 480 GB SSD drive carrier has two LED indicators. Before removing the drive, review the LED activity to verify that the drive has failed.
SSD LEDs
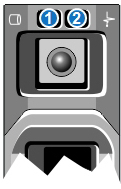
| 1 - Drive activity indicator (green) | 2 - Drive status indicator (green and amber) |
| LED Indicator | Activity |
|---|---|
| Drive activity indicator (green) |
|
| Drive status indicator (green and amber) |
|
Important Information
- If a SSD drive that has not failed is removed and re-inserted while the system is running, all backup and replications jobs will fail and the system may enter into a diagnostic state. A system reboot will resolve the issue.
- If a SSD drive fails when backup and replication jobs are running, all jobs will fail and the system may enter into a diagnostic state. A system reboot will bring the system back up into a normal state but system performance will be degraded.
To shut down the system:
Caution: Before shutting down the DXi4800, make sure that all backup and replication jobs are finished, and that space reclamation activity is complete.
-
In the remote management console, navigate to the Utilities > Reboot & Shutdown page.
For information about accessing the remote management console, see the DXi4800 User Guide.

-
Select Shutdown and click Apply.
-
Close the browser window.
-
After the Node shuts down, turn off both power switches on the back of all installed Expansion modules (JBODs).

To remove the failed SSD in the DXi4800 Node:
Caution: Use appropriate ESD precautions, including the use of a grounding strap, when performing this procedure.
-
Press the release button on the front of the drive carrier to open the release handle.
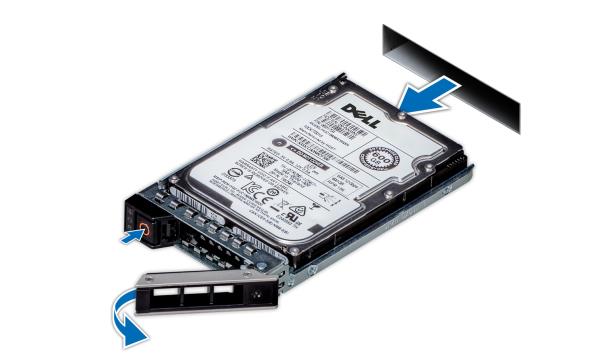
- Slide the hard-drive carrier out until it is free of the drive slot.
To install the replacement SSD in the DXi4800 Node:
Caution: Use appropriate ESD precautions, including the use of a grounding strap, when performing this procedure.
-
Press the release button on the front of the drive carrier to open the release handle.

- Insert the drive carrier into the drive slot and slide until the drive connects with the backplane.
- Close the drive carrier release handle to lock the drive in place.
To power on the system:
-
Turn on the DXi4800 system components in the following order:
-
Turn on both power switches on the back of each Expansion module. Wait 30 seconds for the Expansion modules to initialize. Verify on the front panel that the modules have power and there were no hard drive failures (Drive status indicator on hard drive blinks amber four times per second).
-
Press the power button on the front of the Node. Wait for the system to boot before continuing with the procedure. (This can take up to 30 minutes.)

Note: The system may reboot one or more times depending on the components that were installed. If all components are properly installed and cabled, the LEDs on all hard drives in the Node and the Expansion modules will be lit. (The top LED will be solid and the bottom LED will blink.)
Note: Once a new SSD drive is installed, the SSD will not appear in the system until the next cache check occurs. Cache checks occur every 12 hours at 04:30 and 16:30. To make the SSD drive appear before the cache checks, reboot the system.
-
