DXi4800 Drive Replacement
Overview
Before you begin the drive replacement procedure for a Gen2 Expansion module, review the following information:
- You can perform this procedure only if there is a single failed drive in the DXi. If there are multiple drive failures, contact Quantum Support.
- Use only the Quantum-supplied replacement drive to perform the replacement procedure. Do not use any other drive (not even one taken from another DXi).
- The drives in the DXi are hot-swappable. Do not power down the DXi system to replace the failed drive.
- Installing the replacement drive will take approximately 30 minutes.
- After the replacement drive is installed, the drive rebuilding process automatically begins. You may use the DXi normally while the drive rebuilds, but system performance may be reduced.
Important Information
- This procedure is for Gen2 Expansion modules only. If you need a drive replaced in a Gen1 Expansion module, contact Quantum Support.
- Do not remove the failed drive completely from the DXi until instructed to do so. If you remove the failed drive but do not insert a replacement drive within a few minutes, the enclosure may overheat.
- Make sure to remove only the failed drive from the DXi. If you remove a drive that has not failed, multiple service tickets will occur. Re-insert the drive, and then contact Quantum Support.
Take ESD Precautions
Some components within the DXi system contain static-sensitive parts. To avoid damaging these parts while performing installation procedures, always observe the following precautions:
- Keep static-sensitive parts in their original shipping containers until ready for installation.
- Do not place static-sensitive parts on a metal surface. Place them inside their protective shipping bag or on an anti-static mat.
- Wear anti-static wrist bands when unpacking and handling the units, and avoid touching connectors and other components.
- Dry climates and cold-weather heating environments have lower relative humidity and are more likely to produce static electricity.
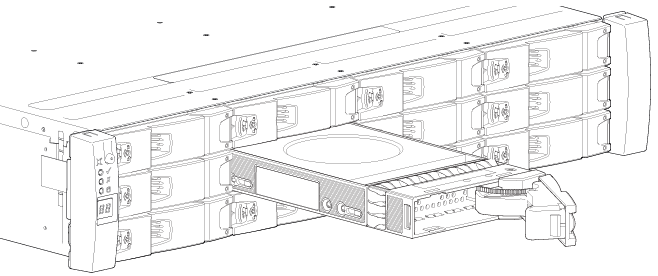
The DXi4800 Gen2 Expansion modules (JBODs) each support twelve high capacity 16 TB hard disk drives (HDDs).
DXi9000 SD Expansion Module Drive Slot Numbering

Locate the failed drive by observing the status LEDs on the front of each drive carrier in the Gen2 Expansion module.

The asterisk (*) indicates a fault condition.
| Color | State | Status |
|---|---|---|
|
Amber |
On* |
The drive module has a hardware fault. Replace as soon as possible. |
| The power control circuit has a hardware fault. | ||
| Fast Flash (1 second on, 1 second off. | Unit identification (UID) bit is set. | |
| Slow flash* (3 seconds on, 3 seconds off. | Failed array. | |
|
Off |
Drive is functioning normally. | |
| No AC power is present. |
-
Locate the drive with a fault condition.
-
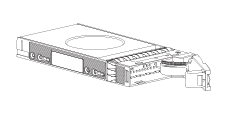
Using a thumb and forefinger, squeeze the drive carrier release latch to release the connection to the midplane.
-
Grasping the carrier handle, pull it outward approximately 1 in. (25mm) and wait for 30 seconds.
-
Using one hand to support the weight of the drive carrier and the other to pull the handle outwards, remove the drive until it is free of the drive bay.
-
Hold the replacement drive carrier in one hand, and with your other hand touch an exposed metal surface on the rack where the DXi is installed to discharge any static electricity buildup.
-
Using a thumb and forefinger, squeeze the carrier release latch on the replacement drive carrier to release the carrier handle.
-
Use one hand to support the weight of the driver carrier and the other hand to hold it against the bottom of the drive slot.
-
Insert the drive carrier into the drive slot and slide until the drive is flush with the chassis.
-
Firmly press the handle closed until you hear an audible click as it engages with the midplane and locks in place.
-
Confirm the that the drive fault condition LED is off and the operator's (ops) panel is clear of any fault conditions.
