DXi4700 Veeam Installation
|
|
Create a PDF |
Overview
This document provides instructions for installing and configuring Veeam™ Linux Repository on DXi4700, DXi6900, and DXi6900-S systems.
Veeam
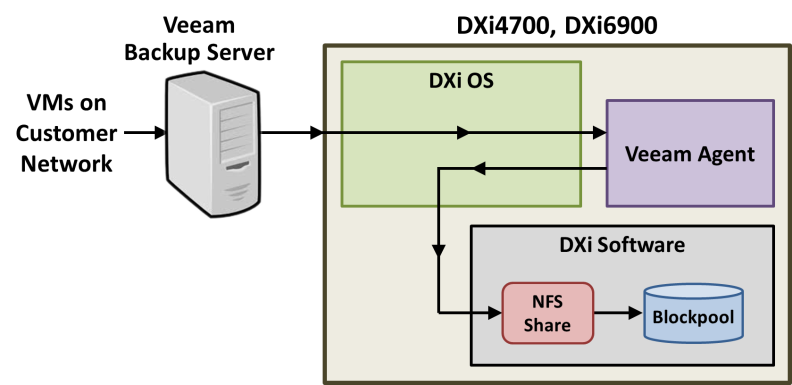
The Veeam feature on the DXi allows the system to perform backup and replication with Veeam software on VMware vSphere and Microsoft Hyper-V virtual environments.
The Veeam Agent runs in the DXi process space with direct access to DXi resources, providing better performance than Veeam running against a DXi NAS share as a shared folder.
The simplified block diagram below shows the data flow in a typical Veam installation. Management communication is omitted for simplicity. The VMs on the Customer Network are identified by the Veeam Backup Server. The backups can be full or incremental using the Veeam Agent changed block tracking. At the scheduled backup, the Veeam Agent works with the Veeam Backup Server to facilitate the data movement from the backup sources to the DXi. The backup data is sent by the Veeam Agent to the NFS Share for deduplication and storage in the Blockpool.
Preparing for the Installation
Before you begin the Veeam installation, make the following preparations:
The following items are required to successfully install and configure Veeam on a DXi system.
| Requirement | Description |
|---|---|
|
CLI Admin User |
Optional - The CLI Admin (cliadmin) account must be enabled on the DXi if you wish to configure Veeam support using the CLI. |
|
Veeam License |
A Veeam License must installed on the DXi system. |
|
DXi Software |
DXi systems using:
|
| GUI Admin User | You must have the GUI Administrator user account password. |
|
Memory |
Depending on the current DXi system memory, a memory upgrade may be required. |
|
NAS Support |
The DXi must have NAS support. The following systems support NAS:
|
Make sure the following conditions are met before you continue with Veeam installation:
- All backup jobs are completed and there is no pending I/O.
- All replication jobs are completed, and replication is paused (Replication > Actions page).
- All space reclamation tasks are completed without errors (Utilities > Space Reclamation page).
- All healthchecks are completed without errors (Utilities > Space Reclamation page).
- All components in the system display Normal status (Status > Hardware page).
- All outstanding administration alerts are deleted (Alerts > Admin Alerts page).
- All service tickets are closed (Alerts > Service Tickets page).
For more information, click Help in the remote management console to display the DXi online help. To access remote management, see Accessing Remote Management).
To access the remote management console, do the following:
-
Launch a supported Web browser on a workstation that has network access to the DXi
The DXi remote management console supports the following Web browsers:
- Mozilla Firefox 36 or later
- Google Chrome 40 or later
- Microsoft Internet Explorer 11.
- In the browser address box, type the IP address of the DXi, and then press <Enter>.
- If the Login window does not display, verify that the IP address is correct and that the network path to the DXi system is valid. Also verify that you are using a supported Web browser. Then try again. If you are still unable to access the Login window, contact the DXi GUI administrator.
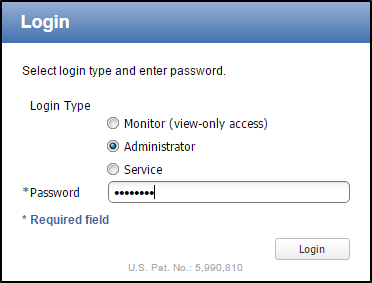
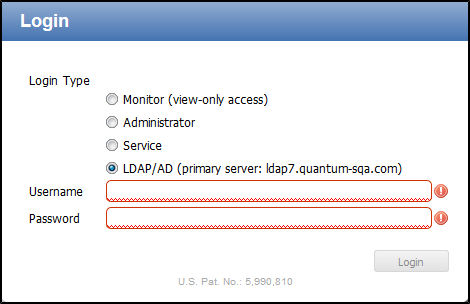
- Select Administrator and enter the GUI Administrator user password.
- Click Login.
- If a security banner message has been specified for the DXi, click Accept.
The Login window displays.
The Home page displays.
To perform the Veeam configuration on the DXi system, complete the following steps in order:
| Step | Description | Procedure to Complete |
|---|---|---|
| 1 | The DXi requires DXi 3.4 Software and above to complete the Veeam installation. Review the current software version and perform an upgrade if necessary. |
Go to Software Upgrades. |
| 2 | Review the Veeam memory requirements and install additional DXi memory if necessary. |
Go to Install Additional Memory. |
| 3 | Install the Veeam License on the DXi. | Go to Install the DXi4700 License. |
| 4 | Create a NAS share on the DXi. | Go to Create a NAS Share. |
| 5 | Enable the Veeam feature on the DXi. | Go to Enable Veeam on the DXi. |
Software Upgrades
The DXi system requires DXi 3.4.0 Software and above to successfully complete a DXi4700 installation. If the system is already running DXi 3.4.0 Software and above, go to Install Additional Memory.
There are two methods for upgrading the DXi software:
| Check for an upgrade (Home page) |
The DXi can automatically check for software upgrades on the Home page, or you can manually perform an upgrade check. If an upgrade is found, you can choose to download and install it. This is the recommended method for upgrading, but it requires that the DXi be able to access the Internet. Caution: Configure your firewall so that the DXi can send data to and received data from updates.quantum.com using port 80 (HTTP). |
| Upload a software upgrade file (Software Upgrade page) |
You can download a software upgrade file from the Quantum Service and Support Web site and then manually upload it to the DXi using the Software Upgrade page. You can use this method if the DXi cannot access the Internet. Note: Uploading a software upgrade file may be useful if you are upgrading multiple DXi systems, as the file only needs to be downloaded once. Also, this method assures that all systems will be running the same software version following the upgrade. |
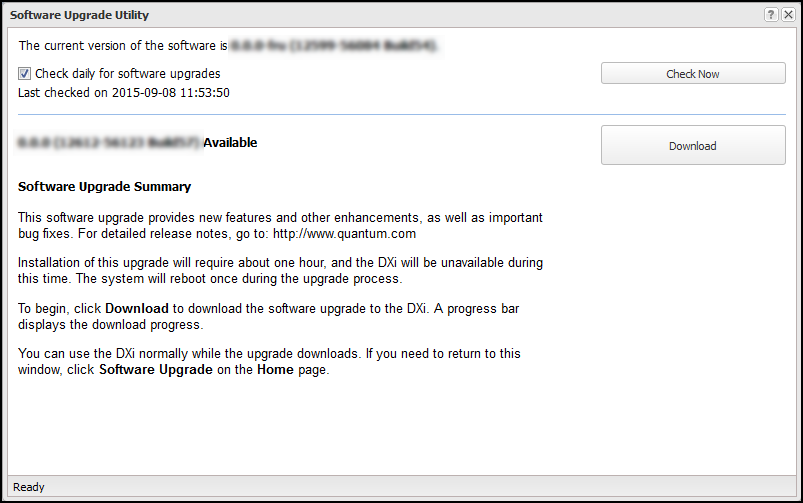
The Software Upgrade Utility (accessible from the Home page) allows you to check for available DXi software upgrades and, if available, download and install them. You can also configure the DXi4700 to automatically check for software upgrades.
Note: To check for and download software upgrades, the DXi must be able to access the Internet. If the DXi cannot access the Internet, see Uploading a Software Upgrade File.
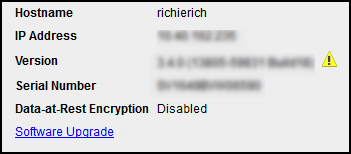
To access the Software Upgrade Utility, click Home on the main menu, and then click the Software Upgrade link.
Tasks
Use the Software Upgrade Utility to perform the following tasks:
- Configure the DXi4700 to automatically check for software upgrades (see Automatically Checking for Upgrades).
- Manually check for software upgrades (see Manually Checking for Upgrades).
- Download and install available software upgrades (see Downloading and Installing Upgrades).
The DXi4700 can automatically check for available software upgrades on a daily basis. If a software upgrade is found, you will be notified by an admin alert as well as by a Quick Tip icon on the Home page, next to the current software version.
On the Software Upgrade Utility, select the Check daily for software upgrades check box to enable automatic upgrade checking. Automatic upgrade checking is enabled by default. To disable automatic upgrade checking, clear the Check daily for software upgrades check box (not recommended).
To check for available software upgrades at any time, on the Software Upgrade Utility, click Check Now.
If a software upgrade is available, you can read information about the contents of the upgrade and, if you choose, download and install it.
If a software upgrade is available (after automatically or manually checking for upgrades), a summary describing the upgrade displays on the Software Upgrade Utility.
To download and install an available software upgrade:
-
On the Software Upgrade Utility, click Download.
The bottom status bar displays download progress. It will take several minutes to download the upgrade, depending on network speeds. You can use the DXi normally while the upgrade downloads. If you need to return to this window, click Software Upgrade on the Home page.
When the download is complete, a list of pre-upgrade actions displays. These are important actions you should take prior to installing the upgrade.

-
To ensure the system is healthy before upgrading, read and follow the instructions in each of the pre-upgrade actions. The pre-upgrade actions can differ depending on the type of upgrade, but typical actions include the following:
- Address and delete all outstanding administration alerts.
- Resolve and close all outstanding service tickets.
Note: Quantum recommends taking the following actions before upgrading.
- Stop all active backup jobs (see your backup application). Any backup jobs that are run during the upgrade will fail.
- Make sure all replication jobs are complete. If replication or synchronization jobs are nearly complete, Quantum recommends allowing them to complete before upgrading.
- Make sure space reclamation is complete. If space reclamation is nearly complete, Quantum recommends allowing it to complete before upgrading.
- Download a system diagnostics file and transfer the file to a safe repository off of the DXi . The system diagnostics file can help in resolving problems if they occur.
-
Confirm that you have completed all pre-upgrade actions by selecting the Ready to install check box.
Note: The Ready to install check box and the Install button are disabled if there are any outstanding administration alerts or service tickets.
-
To begin the upgrade process, click Install.
Read the onscreen information to learn what to expect during the upgrade. The bottom status bar displays installation progress, and a message displays if a reboot is required.
Depending on the type of upgrade, the DXi may be placed in service mode for about an hour. While in service mode, the system will shut down all backup and replication services. If necessary, the DXi will restart one or more times to complete the upgrade.
Note: If you decide not to install the software upgrade after downloading it, click Remove Software Upgrade File to remove the current download from the DXi .
Important - Clear Your Web Browser Cache
It is important to clear your Web browser cache before logging on to the remote management console for the first time following the software upgrade. This will ensure the remote management console displays correctly.
The Software Upgrade page allows you to upload and install a software upgrade file on the DXi4700.
Before you begin, download the software upgrade file on a computer connected to the Internet, and then copy the software upgrade file (.fw) to the computer you will use to access the DXi remote management console.
http://www.quantum.com/ServiceandSupport/Index.aspx
To access the Software Upgrade page, click the Utilities menu, and then click the Software Upgrade tab.
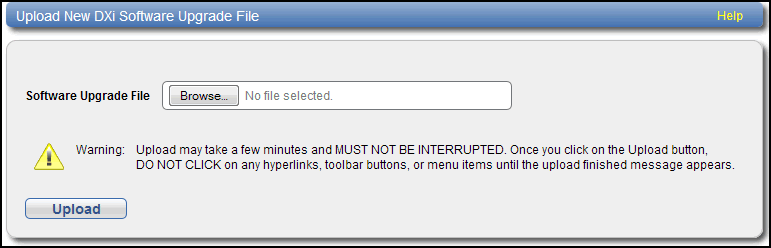
To upload a software upgrade file:
- Click the Browse button to browse the system and locate the software upgrade file.
- Click Upload.
-
Click Start to begin the upload process.
Do not close the window until the uploading and unpacking process is complete. An Information message displays stating the software upgrade file was uploaded successfully.
-
Click OK.
The Software Upgrade page indicates that a software upgrade file has been uploaded .
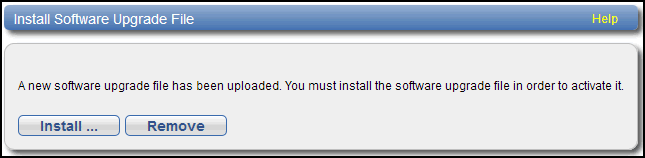
-
Click Install.
Additional Information
- If necessary, click the link to delete any outstanding administration alerts before proceeding.
- If you decide not to install the software upgrade file after uploading it, click Remove on the Utilities > Software Upgrade page to remove the uploaded software upgrade file from the DXi .
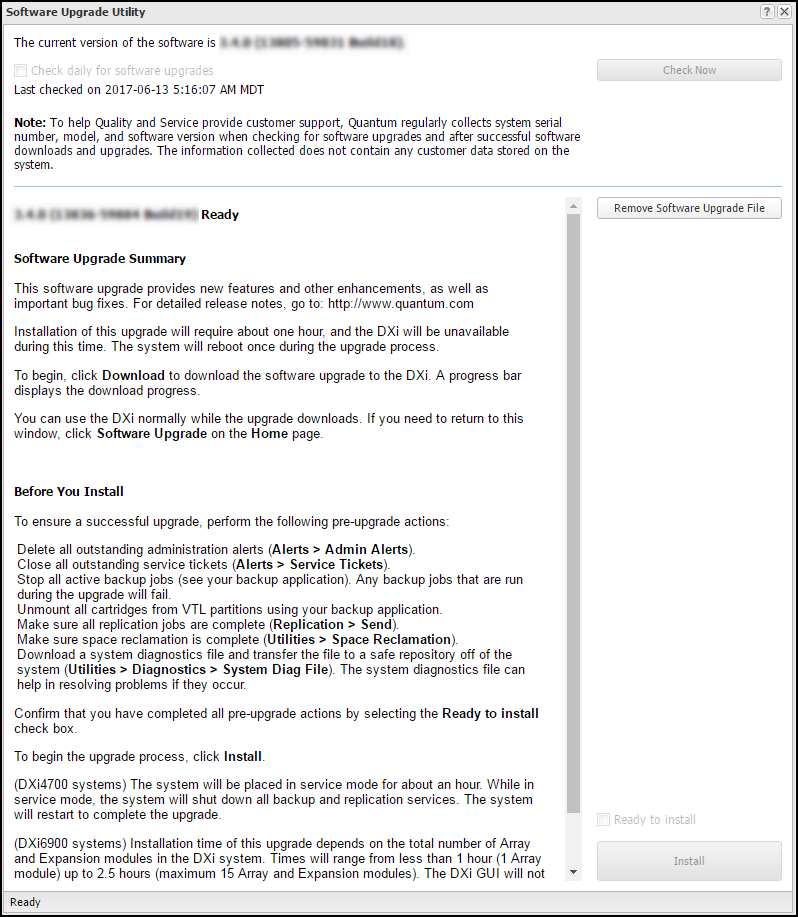
The Software Upgrade Utility displays.
-
To ensure the system is healthy before upgrading, read and follow the instructions in each of the pre-upgrade actions. The pre-upgrade actions can differ depending on the type of upgrade, but typical actions include the following:
- Address and delete all outstanding administration alerts.
- Resolve and close all outstanding service ticket.
Note: Quantum recommends taking the following actions before upgrading.
- Stop all active backup jobs (see your backup application).
- Make sure all replication jobs are complete. If replication or synchronization jobs are nearly complete, Quantum recommends allowing them to complete before upgrading.
- Make sure space reclamation is complete. If space reclamation is nearly complete, Quantum recommends allowing it to complete before upgrading.
- Download a system diagnostics file and transfer the file to a safe repository off of the DXi . The system diagnostics file can help in resolving problems if they occur.
-
After you have completed all pre-upgrade actions, confirm that you are ready to continue by selecting the Ready to install check box.
Note: The Ready to install check box and the Install button are disabled if there are any outstanding administration alerts or service tickets.
-
To begin the upgrade process, click Install.
Read the on-screen information to learn what to expect during the upgrade. The bottom status bar displays installation progress, and a message displays if a reboot is required.
Depending on the type of upgrade, the DXi may be placed in service mode for about an hour. While in service mode, the system will shut down all backup and replication services. If necessary, the DXi will restart one or more times to complete the upgrade.
Important - Clear Your Web Browser Cache
It is important to clear your Web browser cache before logging on to the remote management console for the first time following the software upgrade. This will ensure the remote management console displays correctly.
Install Additional Memory
WARNING: The DXi system must be running DXi 3.4.0 Software or higher before installing additional memory (see Software Upgrades).
A DXi system may require the installation of additional memory modules to support Veeam. Please review the tables below to verify if the DXi requires additional memory.
If the DXi already has the correct memory configuration, continue to Install the DXi4700 License.
Additional Information
Before beginning the replacement procedure, make sure that you have the required replacement kit. The appropriate memory module kit will be provided by Quantum Customer Support.
You will need the following items to perform this procedure:
Replacement memory module kit provided by Quantum Customer Support.
ESD grounding wrist strap (included in the replacement kit)
Table 1: DXi4700 DXi4700 Memory Module Installations
| Current Capacity | Current Memory |
Current DIMM Configuration |
DXi4700 Memory Installation |
Total New Memory | Procedure |
|---|---|---|---|---|---|
|
5-27 TB
|
32 GB
|
8 x 4 GB
|
|
64 GB | |
|
45-99 TB |
64 GB |
16 x 4 GB |
|
96 GB | |
|
117-135 TB |
96 GB |
24 x 4 GB |
|
128 GB |
Table 2: DXi6900 DXi4700 Memory Module Installations
| Current Capacity | Current Memory |
Current DIMM Configuration |
DXi4700 Memory Installation |
Total New Memory | Procedure |
|---|---|---|---|---|---|
|
34-102 TB
|
128 GB
|
8 x 16 GB
|
|
256 GB |
Note: DXi6900-S systems and DXi600 G1/G2 systems with 136-510 TB do not require additional memory.
Before shutting down the DXi, make sure that all backup and replication jobs are finished, and that space reclamation activity is complete.
-
Shut down the system from the remote management console using the Shutdown option on the Utilities > Reboot & Shutdown page.
Note: Shutting down the system can take up to 15 minutes. Only the Node will completely shut down.
- After the Node shuts down, turn off both power switches on the back of each Array module (DXi6900) or Expansion modules (DXi4700). Wait until the seven segment display on the rear of the module turns off.
- (DXi6900 only) Turn off both power switches on the back of each Expansion module (EBOD).
- You do not need to remove the Node from the rack to remove and replace internal components. Using the DXi sliding rail system, you can pull the Node out on the sliding rails until you have enough space to remove the Node chassis top and access the internal components.
- IMPORTANT: If you leave the Node in the rack, you still must disconnect both power cables from the Node prior to opening the Node cover.
To remove the DXi Node from the rack and remove the top cover:
- Shut down the DXi Node (see Turn off the DXi).
- If installed, remove the front bezel from the Node by lifting the latch on the left side of the bezel.
- Remove all power, SAS, Ethernet, and Fibre Channel cables from the rear of the Node. Make sure to label the cables so they can be easily identified when they are re-connected to the Node after the replacement procedure is complete.
- Press the locking tab on either side of the Node, and pull the Node out from the rack until the inner rails lock.
- Locate the lock levers on the sides of the inner rails. Unlock each lever by rotating it up to its release position.
- Grasp the sides of the Node firmly and pull it forward until the rail standoffs are at the front of the J-slots.
- Lift the Node up and away from the rack and place it on a level surface.
- Press and hold the power button on the front of the Node for three seconds to fully drain the system of stored power prior to removing the cover.
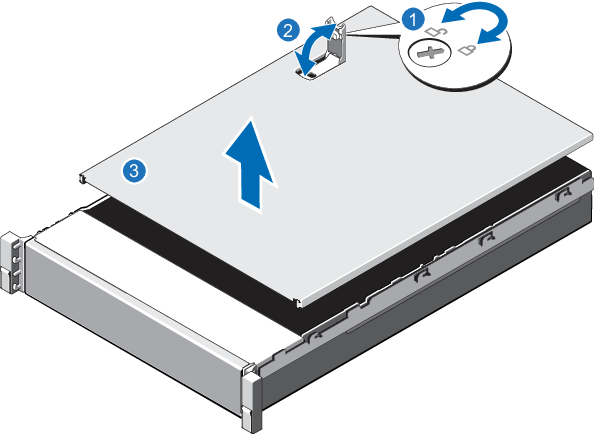
- On the Node cover, rotate the latch release lock counterclockwise to the unlocked position.
- Lift the latch on top of the Node and slide the cover back.
- Grasp the cover on both sides, and carefully lift the cover away from the Node.
- Remove the cooling shroud by holding the touch points and lifting the shroud away from the Node .
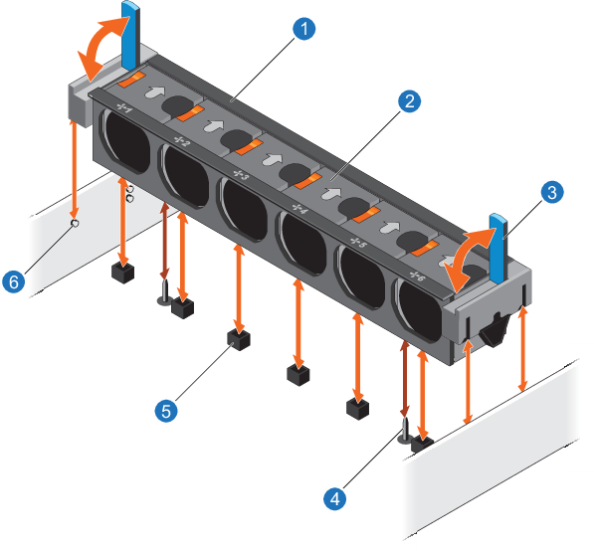
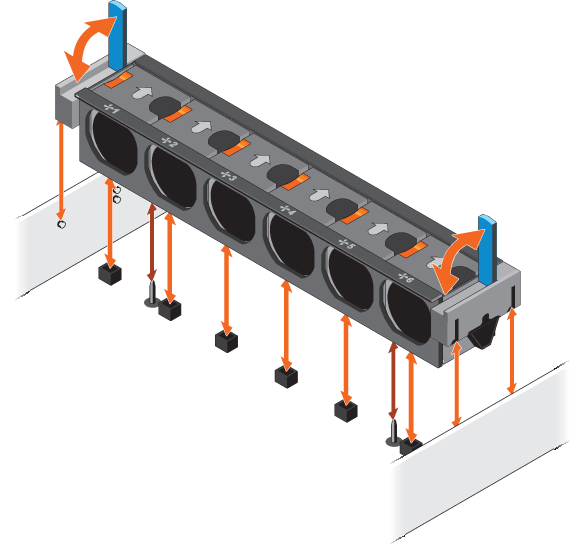
- If you are replacing memory modules, remove the cooling-fan assembly by lifting the release levers upwards.
- Lift the cooling-fan assembly out of the Node.
Caution: Do not use excessive force when pulling the chassis forward to fully extend the Node or Expansion Module in the rack rails. Using excessive force could bypass the slide rail stop mechanism.
Note: If necessary, remove the optional screws securing the Node to the front of the rack (behind the locking tab).
Figure 1: Removing the DXi Node from the Rack
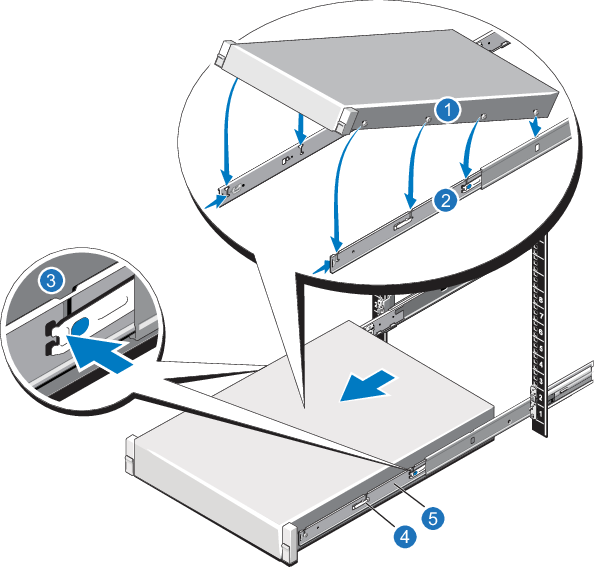
| Item | Description |
|---|---|
| 1 | Rear rail standoffs |
| 2 | Rear rail J-slots |
| 3 | Slide-release lock button |
| 4 | Lock lever |
| 5 | Inner slide rails |
WARNING: A minimum of two people are required to lift the DXi node chassis.
Figure 2: DXi6900 Node Power Button

| 1. Power Switch |
| Item | Description |
|---|---|
| 1 | Latch release lock |
| 2 | Latch |
| 3 | Node cover |
Removing and Replacing the Cooling Shroud
| Item | Description |
|---|---|
| 1 | Cooling shroud |
| 2 | Touch point |
| Item | Description |
|---|---|
| 1 | Cooling-fan assembly |
| 2 | Cooling fan |
| 3 | Release lever (2) |
| 4 | Guide pin on the system board (2) |
| 5 | Cooling-fan connector (6) |
| 6 | Guide pin on the chassis (6) |
To remove a memory module from the DXi Node:
WARNING: The memory modules are hot to the touch for some time after the system has been powered down. Allow time for the memory modules to cool before handling them.
- Locate the memory module.
- Press down and out on the ejectors on each end of the socket until the memory module pops out of the socket.
Figure 3: Removing and Installing a Memory Module
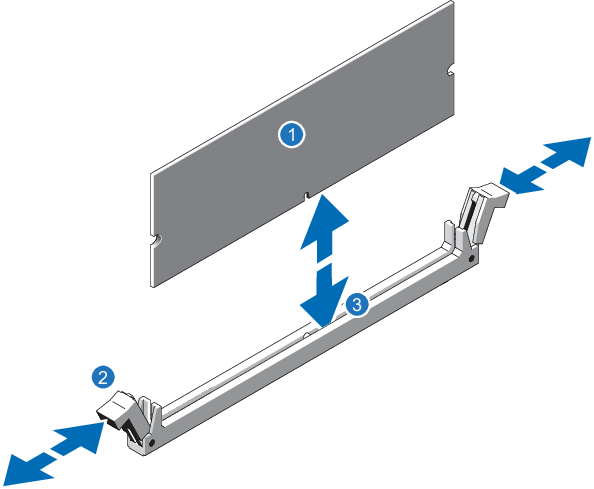
| Item | Description |
|---|---|
| 1 | Memory module |
| 2 | Ejector latch |
| 3 | Socket alignment tool |
DXi4700 Memory Removal Order
Note: Removing memory from the DXi4700 is only necessary if the system currently has 96 GB of memory.
| Current |
With DXi4700 |
Memory Installation |
|---|---|---|
|
96 GB All slots full |
128 GB | Remove 8 x 4 GB memory modules in slots A1-A4 and from slots B1-B4. |
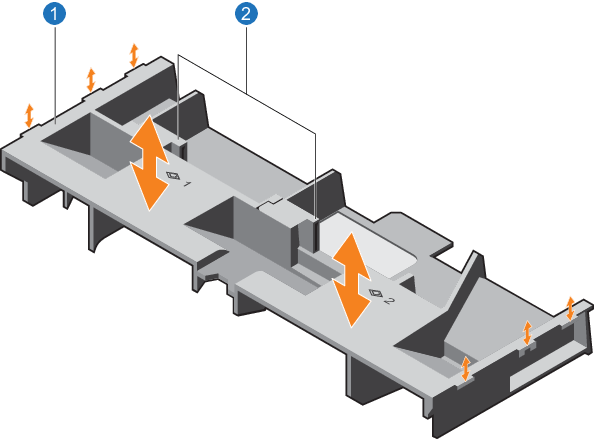
Figure 4: DXi Memory Slots
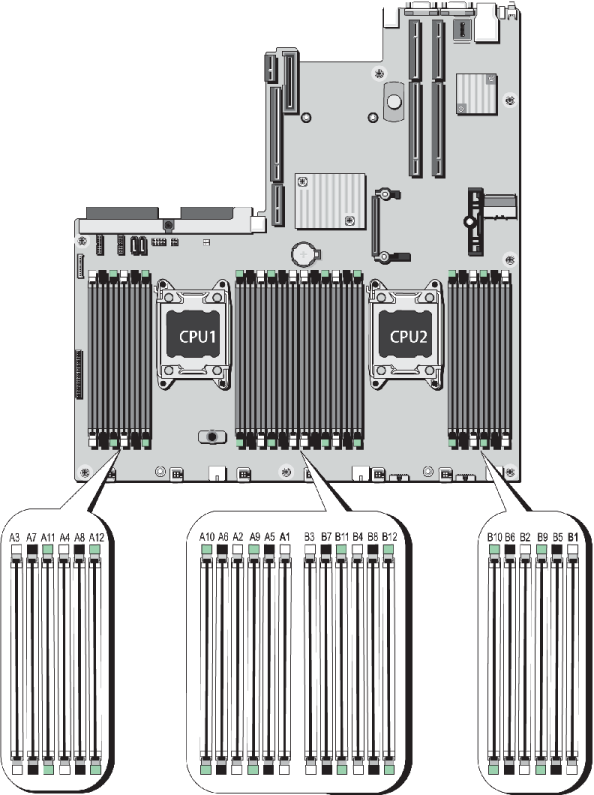
To install a memory module in the DXi Node:
Caution: Handle the memory modules by the card edges and avoid touching the components on the memory module.
- Align the memory module’s edge connector with the alignment key of the memory module socket, and insert the memory module in the socket.
- Press down on the memory module with your thumbs until the ejector latches snap into a locked position.
Note: The memory module socket has an alignment key that allows you to install the memory module in the socket in only one way.
DXi4700 Memory Installation Order
| Current |
With DXi4700 |
Memory Installation |
|---|---|---|
|
32 GB |
64 GB | Install 8 x 4 GB memory modules in slots A5-A8 and B5-B8. |
|
64 GB |
96 GB | Install 8 x 4 GB memory modules in slots A9-A12 and B9-B12. |
|
96 GB |
128 GB | Install 8 x 8 GB memory modules in slots A1-A4 and B1-B4. |
DXi6900 Memory Installation Order
| Current |
With DXi4700 |
Memory Installation |
|---|---|---|
|
128 GB |
256 GB | Install 8 x 16 GB memory modules in slots A5-a8 and B5-B8. |
Figure 5: DXi Memory Slots
To replace the Node cover and return the Node to the rack after completing the memory module installation:
- Replace the cooling-fan assembly:
- Align the cooling-fan assembly slots with the guide pins on the chassis.
- Slide the cooling-fan assembly into the chassis.
- Lock the cooling-fan assemble into the chassis.
- Replace the cooling shroud:
- Align the tabs on the cooling shroud with the securing slots on the chassis.
- Lower the cooling shroud into the chassis until it is firmly seated.
- Lift the latch on the cover.
- Place the cover onto the Node chassis and offset the cover slightly back so that it clears the chassis hooks and lays flush on the chassis.
- Push down the latch to move the cover into the closed position.
- Rotate the latch release lock in a clockwise direction to secure the cover.
- Pull the inner slide rails out of the rack until they lock into place.
- Locate the rear rail standoff on each side of the system and lower them into the rear J-slots on the slide assemblies.
- Rotate the Node downward until all the rail standoffs are seated in the J-slots.
- Push the Node inward until the lock levers click into place.
- Press the slide-release lock buttons on both rails and slide the Node into the rack.
- Reconnect all power, SAS, Ethernet, and Fibre Channel cables on the rear of the Node.
- If applicable, replace the front bezel. Insert the right side of the bezel into the slots on the right side of the Node, then snap the left side of the bezel into place.
Figure 6: Replacing the Cooling-Fan Assembly
For proper seating of the cooling shroud in the chassis, ensure that the cables inside the system are routed along the chassis.
Figure 7: Replacing the Node Cover
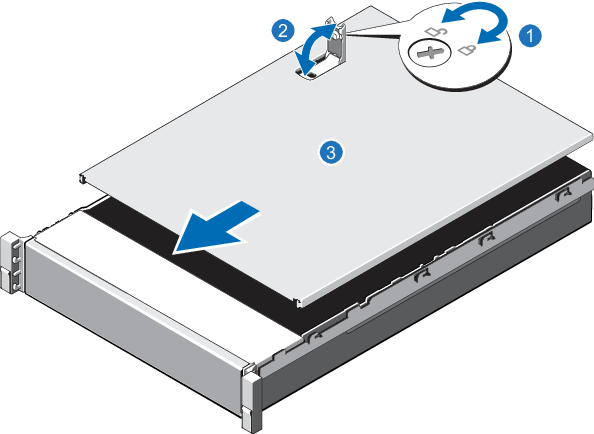
| Item | Description |
|---|---|
| 1 | Latch release lock |
| 2 | Latch |
| 3 | Node cover |
Figure 8: Installing the DXi4700 Node in the Rack

| Item | Description |
|---|---|
| 1 | Rear rail standoffs |
| 2 | Rear rail J-slots |
| 3 | Slide-release lock button |
| 4 | Lock lever |
| 5 | Inner slide rails |
To turn on the system:
-
Turn on the DXi4700 system components in the following order:
-
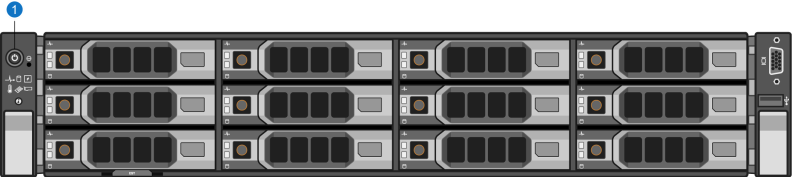
Turn on both power switches on the back of each Expansion module.. Wait 30 seconds for the Expansion modules to initialize. Verify on the front panel that the modules have power and there were no hard drive failures (Drive status indicator on hard drive blinks amber four times per second).
Figure 9: Expansion Module Power Switches

1 - Power Switches -
Press the power button on the front of the Node. Wait for the system to boot before continuing with the procedure. (This can take up to 30 minutes.)
Note: The system may reboot one or more times depending on the components that were installed. If all components are properly installed and cabled, the LEDs on all hard drives in the Node and the Expansion modules will be lit. (The top LED will be solid and the bottom LED will blink.)
Figure 10: Node Power Button
1 - Power Button -
To turn on the system, power on the DXi6900 system components in the following order:
- Turn on both power switches on the back of each Expansion module (EBOD). Wait until the seven segment display on the rear of the module displays 00 (approximately 1 minute).
- Turn on both power switches on the back of each Array module (RBOD). Wait until the seven segment display on the rear of the module displays 99 (approximately 3 minutes).
-
Press the power button on the front of the Node.. Wait for the system to boot before attempting to log on.
Note: The system can take up to 30 minutes to start up, depending on the amount of installed storage capacity.
The system is now ready for operation.
Figure 11: Powering on the DXi6900 Expansion Modules (EBODs)

| 1. Seven Segment Display | 2. Power Switches |
Figure 12: Powering on the DXi6900 Array Modules (RBODs)

| 1. Seven Segment Display | 2. Power Switches |
Figure 13: Powering on the DXi6900 Node
| 1. Power Switch |
Install the DXi4700 License
To enable DXi4700 functionality, a DXi4700 License Key must be installed on the DXi system. The appropriate DXi4700 License Certificate is provided by Quantum during a new product installation or product upgrade. This certificate will contain an authorization code.
To add a DXi4700 license key, perform the following steps:
- Open a Web browser on a computer with Internet access.
-
Enter http://www.quantum.com/licensekeys in the browser address box.
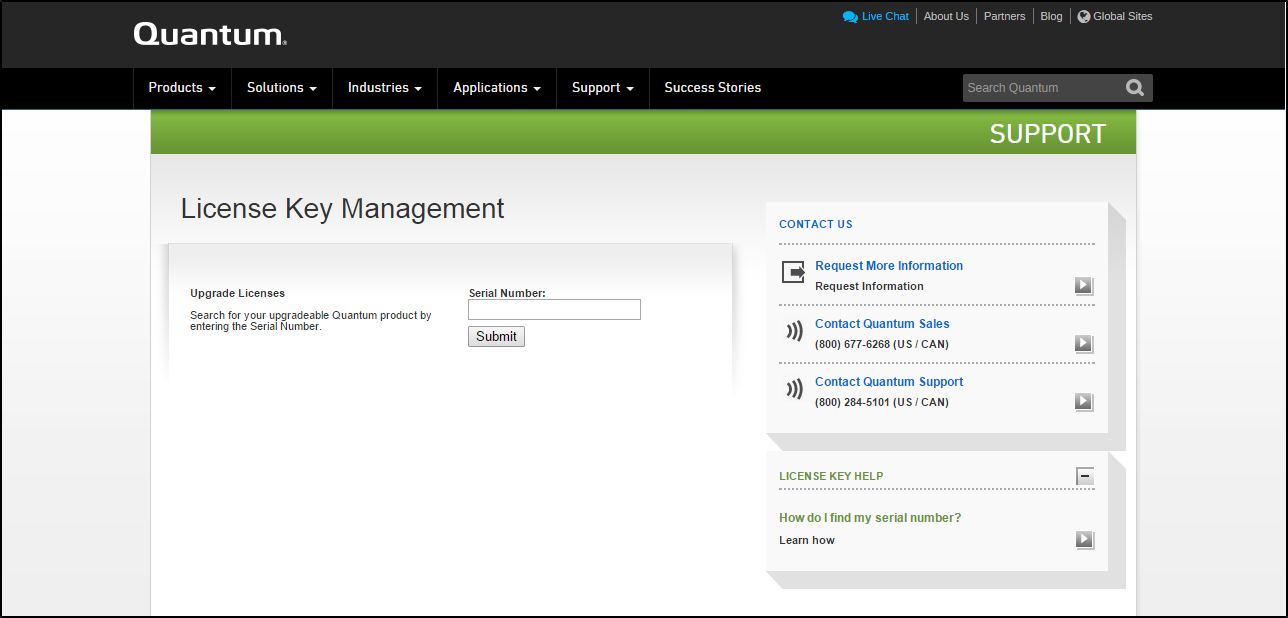
The License Key Management page displays.
Figure 14: License Key Management Page
-
Enter the DXi system serial number in the Serial Number box and click Submit.
The Licensed Feature page displays.
Note: The serial number displays on the License Keys page, above the New Key box.
-
Enter the authorization code (printed on the DXi4700 License Certificate) and click Get License Key.
The Licensed Feature page returns a license key. Print out or write down the license key, or save it to a text file.
- Access the DXi remote management console.
-
Click the Utilities menu, and then click the License Keys tab.
The License Keys page displays.
-
Enter the DXi4700 license key in the New Key box, and then click Add.
The DXi4700 license key is added to the system.
Create a NAS Share
You must create a Veeam NAS share to present the storage capacity of the DXi.
To add a
-
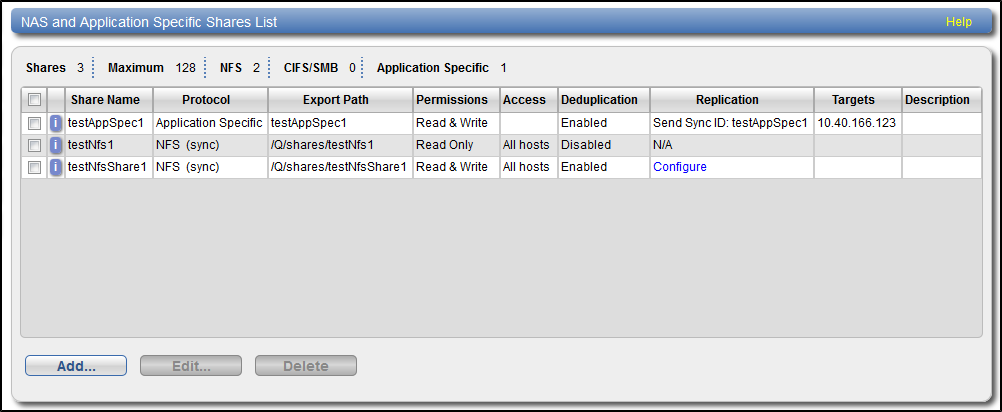
In the DXi remote management console, select Configuration > NAS. The NAS Summary page displays.
-
Click Add.
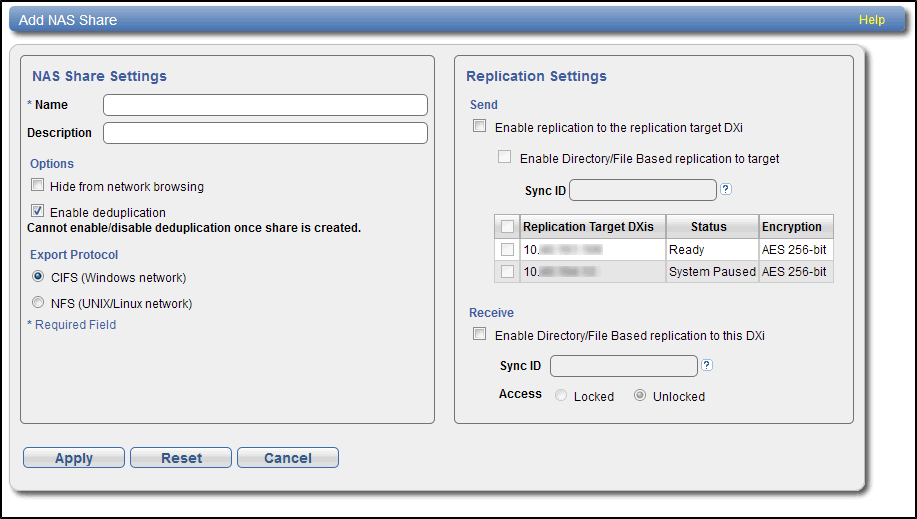
The Add NAS Share page displays.
-
Under NAS Share Settings, enter information about the share:
Name Enter the name of the DXi4700 NAS share.
Description (Optional) Enter a brief description of the share. Protocol Select the NFS option to use the share on a UNIX or Linux network.
Note: CIFS/SMB is not currently supported for Veeam NAS shares.
Hide from network browsing Do not select. This is for CIFS/SMB shares only.
Enable deduplication Select the check box. Veeam NAS shares must have deduplication enabled.
- Click Apply.
Enable Veeam on the DXi
Once the Veam license is installed and a VM NAS share created, enable DXi4700 on the DXi.
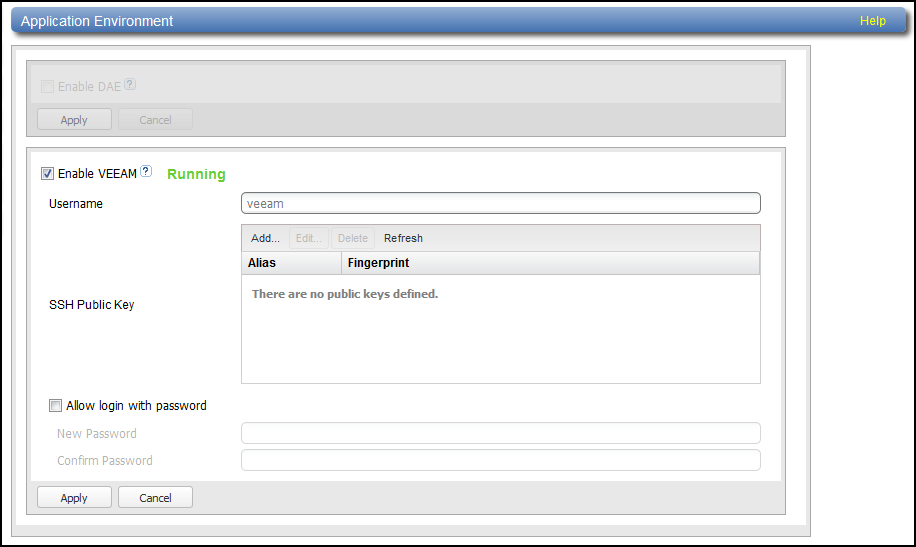
In the DXi remote management console, select Configuration > System > App Environment. The Application Environment page displays.
Enabling Veeam
- When enabling Veeam for the first time, a password will be required.
- Public keys cannot be configured until after Veeam has been enabled and the system has been rebooted.
To enable Veeam:
-
Select the Enable Veeam check box.
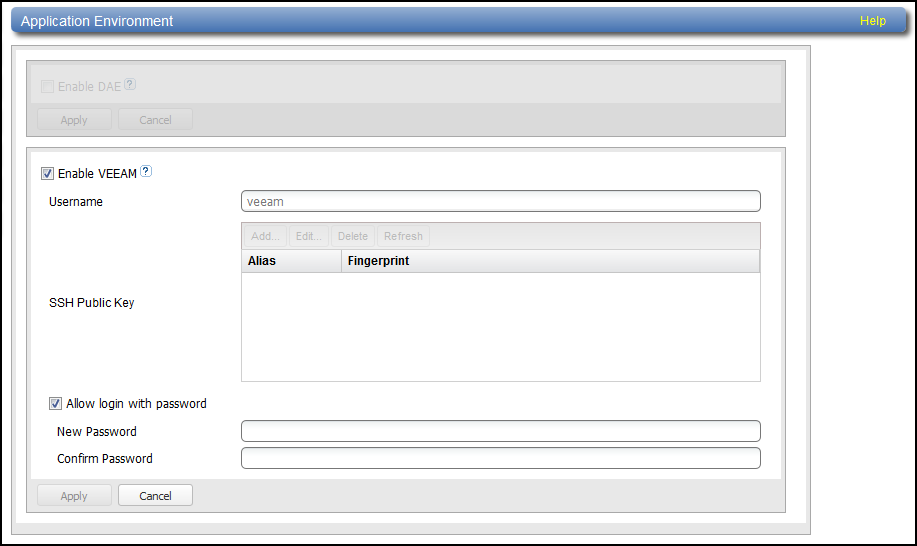
- Select the Allow login with password check box.
-
Enter the following information:
New Password Enter the new password.
Confirm Password Enter the new password again to confirm it. Additional Information
Passwords can be up to 32 characters. Alphanumeric characters and special characters are allowed.
-
Click Apply.
A dialog box appears stating that the system will require a reboot. Click Yes. The DXi will reboot and the DXi login screen will appear.
Note: The reboot takes up to 20 minutes to complete.
- Log back into the DXi.
-
Navigate back to the App Specific page (Configuration > System > App Specific). Veeam will now be enabled with a status of Running or Not Running.
Veeam Configuration
Once Veeam has been configured enabled on the DXi system, the Linux server within the Veeam Backup and Replication 9.5 software must be configured. Do the following on the Veeam Backup and Replication 9.5 server:
Additional Information
Prior to Veeam Backup and Recovery 9.5 Update 4, repositories for DXi were either created as shared folders (without VDMS support) or Linux Repositories (with VDMS support). With the release of Veeam 9.5 Update 4, you may now create deduplicating target repositories specifically for DXi if you have purchased the DXi VDMS license. The legacy repositories are completely operational and the data integrity and deuplication are unaffected, but we encourage you to create new repositories as DXi deduplication repositories in Veeam v9.5 Update 4.
If you created a Veeam Linux Repository for DXi in earlier versions of Veeam, then after upgrading to Veeam v9.5 U4 further changes to the Linux repository configuration are not allowed by Veeam. You may create a new deduplicating DXi repository and make configuration changes as needed. Your data in the legacy Linux repository will still be used by DXi deduplication to reduce the size of data you store on disk, so there will be no loss of data reduction by adding the new repository.
-
Select Backup Repositories.
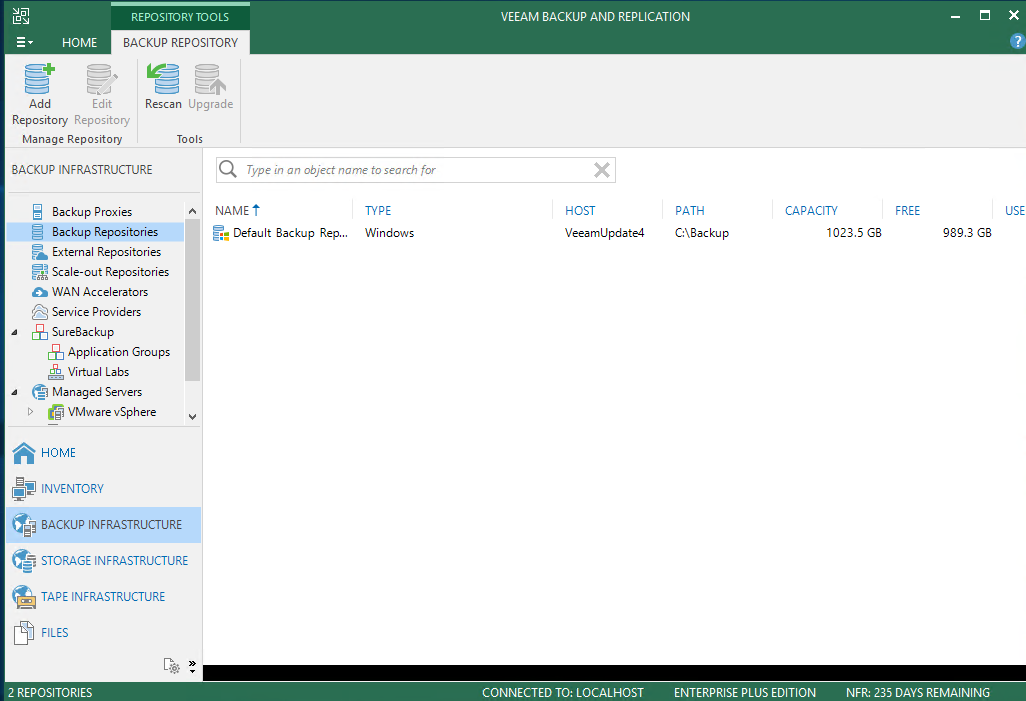
- Right-click on Backup Repositories and select Add Backup Repository.
-
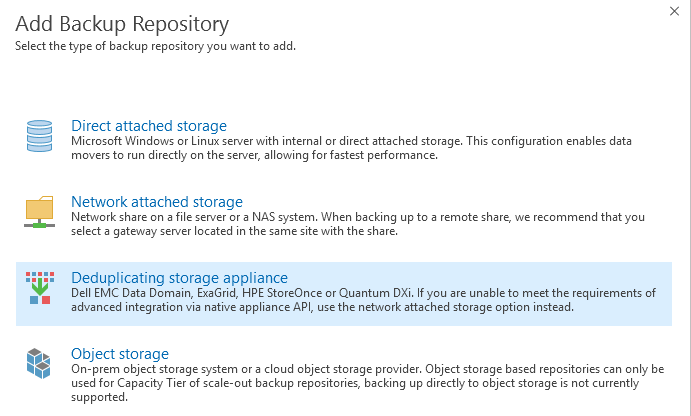
The Add Backup Repository dialog appears.
-
Select Deduplicating storage appliance.
The Deduplicating storage appliances dialog appears.
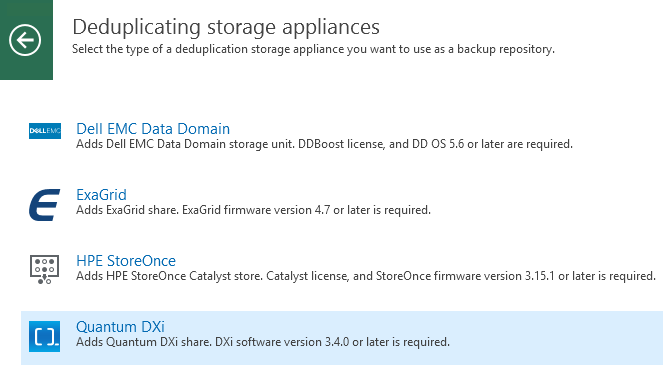
-
Select Quantum DXi.
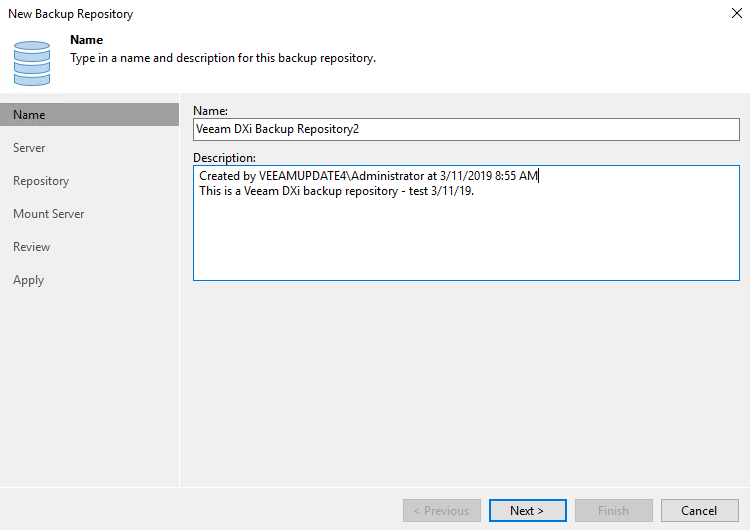
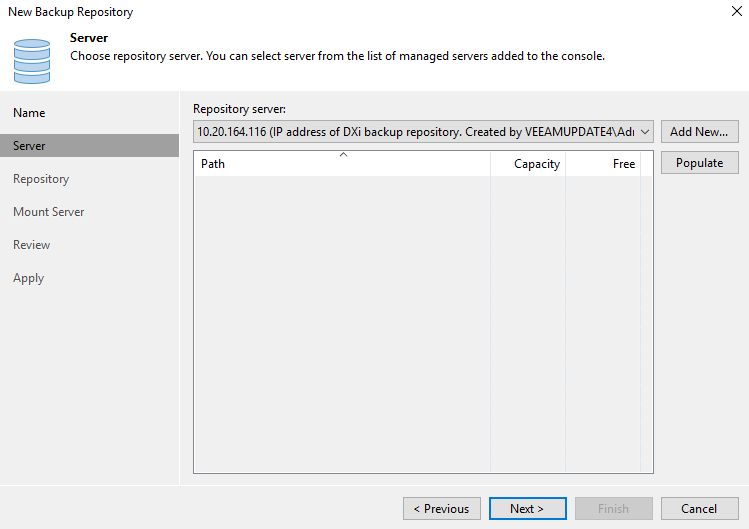
The New Backup Repository dialog appears.
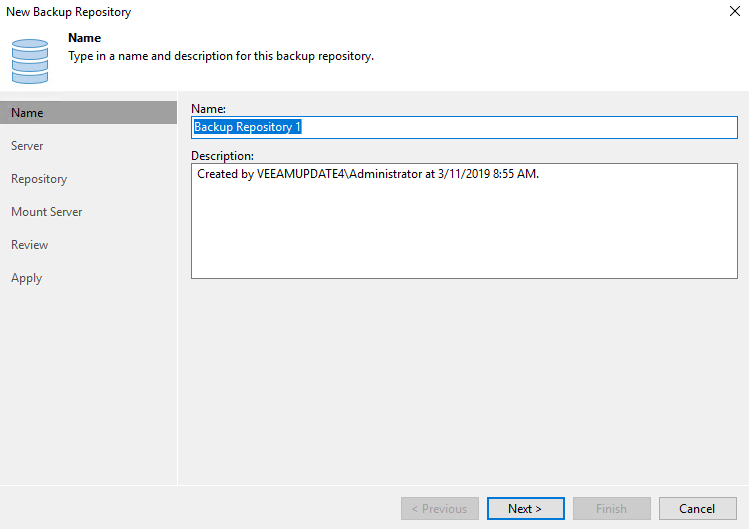
-
In the Name box, type a unique name for the new backup repository.
- In the Description box, type a unique description for the repository, then click Next.
-
Click Add New.
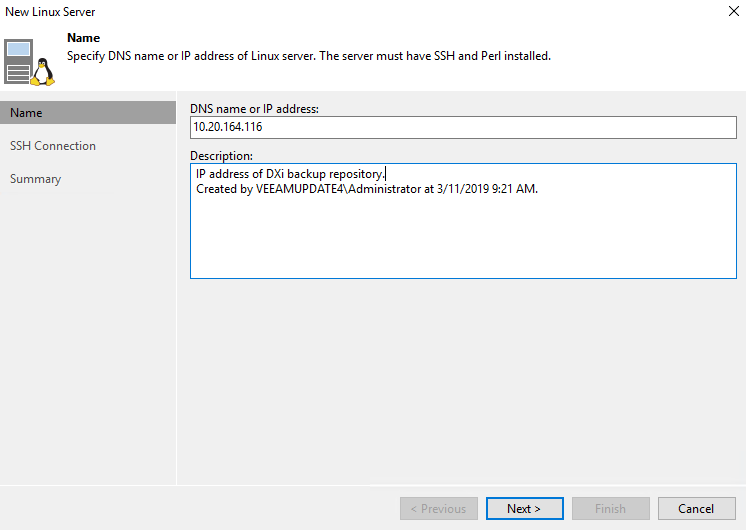
The New Linux Server dialog appears.
Note: If you are creating an additional repository to an existing DXi, you may employ an existing repository server here. If this is a new configuration you must add a new repository server.
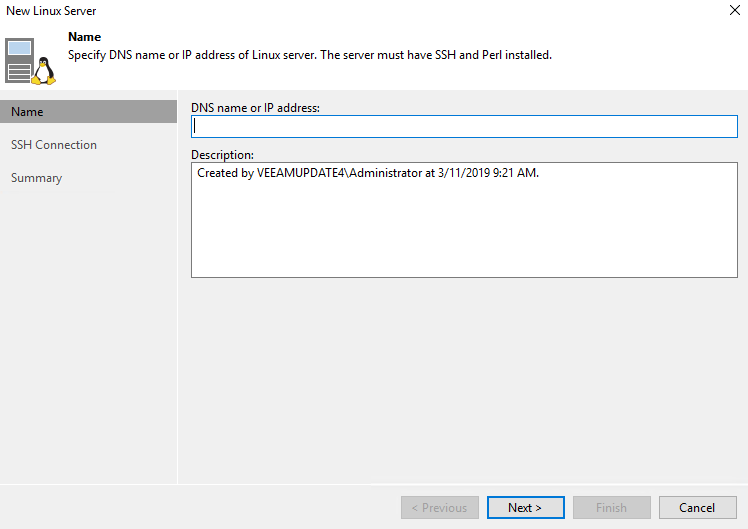
- In the DNS name or IP address box, type the DNS name or IP address of the server.
- In the Description box, type a unique description for the server, then click Next.
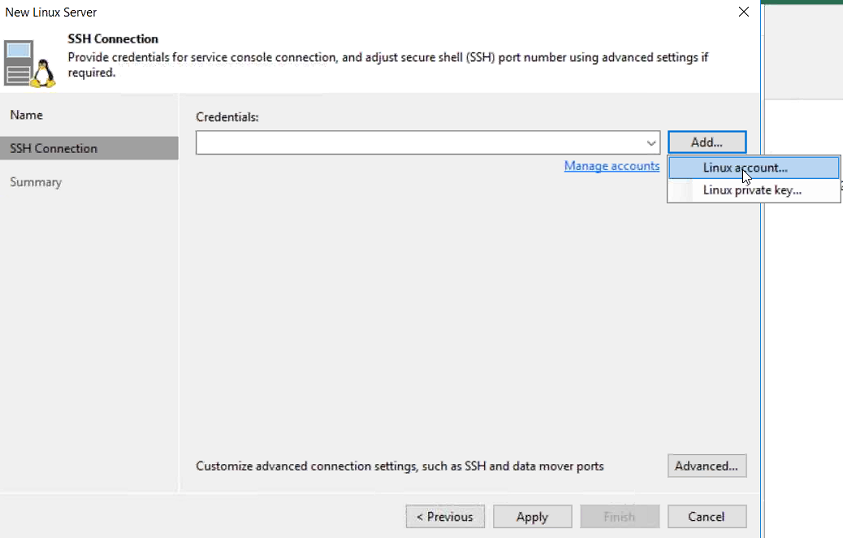
-
Click Add and select Linux Account from the dropdown.
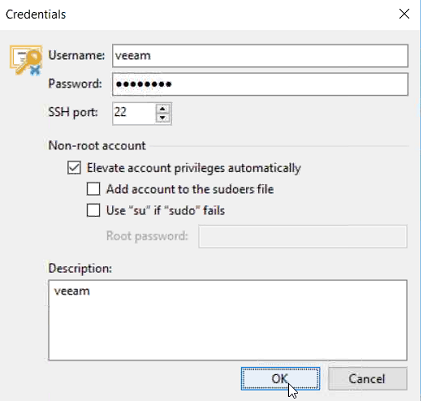
The Credentials dialog appears.
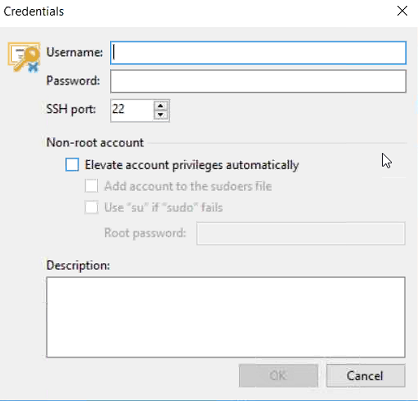
-
In the Username box, type Veeam (all lowercase).
-
In the Password box, type the password for the server.
-
Check the Elevate account privileges automatically box, then click OK.
WARNING: This box should be checked by default. If this box is not checked Veeam will misuse DXi resources during data protection operations and it will not perform as expected.
The New Linux Server - SSH Connection dialog reappears.
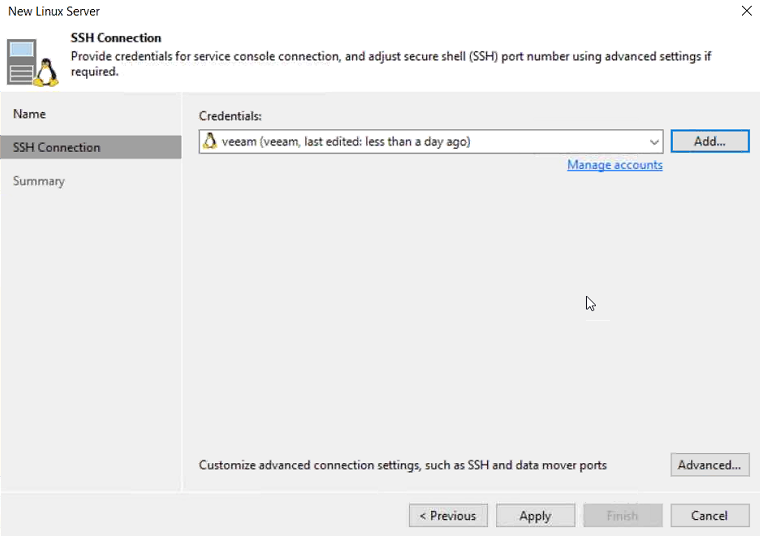
- Click Advanced.
-
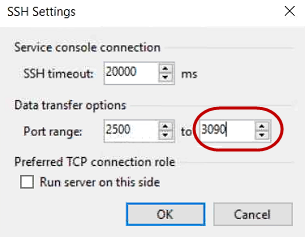
Under Data transfer options, change the top-end of the Port range from 5000 to 3090 and click OK to return to the SSH Connection dialog.
- Click OK to close the SSH Settings dialog box.
- Click Apply, then click Yes on the confirmation prompt.
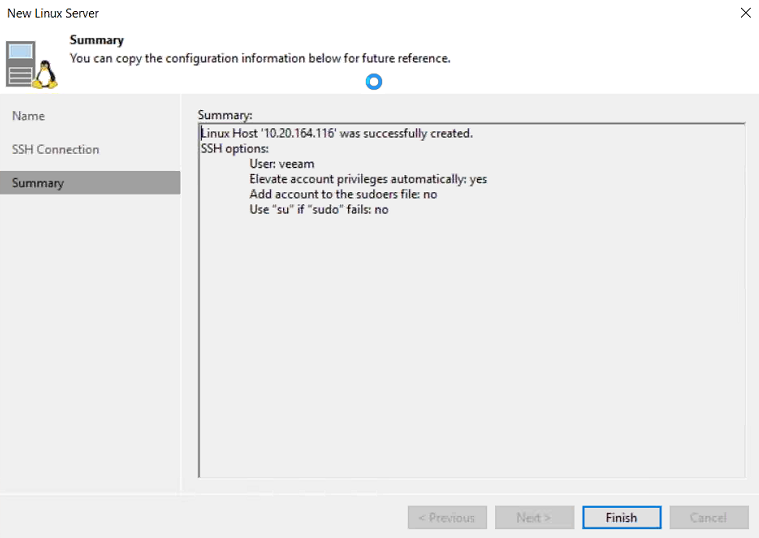
- Click Finish, then click Next at the New Backup Repository - Server dialog. The New Backup Repository - Repository dialog appears.
Click Advanced and confirm that only the following boxes are checked in the Storage Compatibility Settings dialog:
- Decompress backup data blocks before storing
- Use per-VM backup files
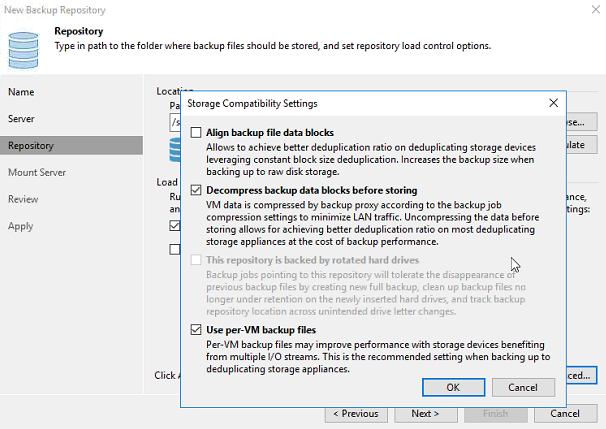
- Confirm that only the two checkboxes noted and shown above are checked, then click OK.
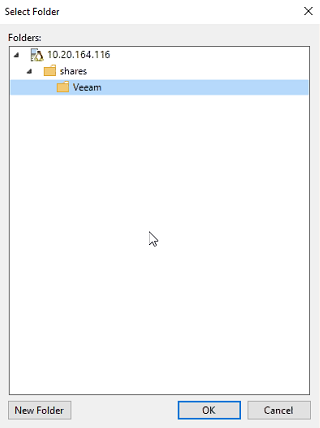
Under Location, next to the Path to folder box, click Browse.
In the Select Folder dialog, click the dropdown arrow to the left of the IP address, then click the dropdown arrow next to the Shares folder.
- With the Veeam folder highlighted, click OK.
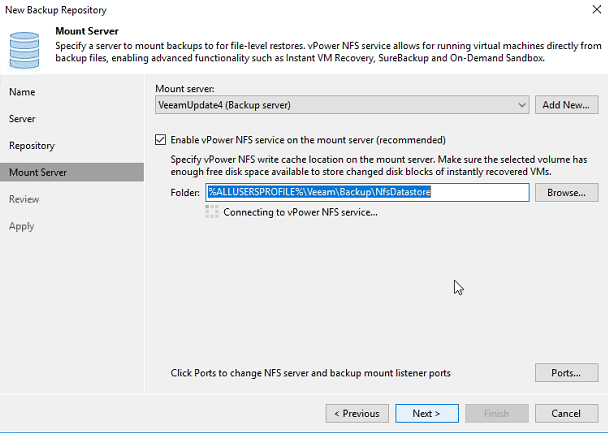
- Click Next, then click Next again at the New Backup Repository - Mount Server screen, to see the New Backup Repository - Review dialog.
- Click Apply to apply all new backup repository settings.
After Backup repository has been added successfully appears in the message list, click Finish to complete the process.
At the Veeam Backup and Replication 9.5 prompt that asks, Change the configuration backup location to the newly created repository? click Yes ONLY if you want to backup the Veeam software configuration to the new repository. Otherwise, click No.

The New Backup Repository - Server dialog appears.
For example, Server = DXi.
The New Linux Server - SSH Connection dialog appears, allowing Veeam to deploy the Veeam Data Mover Service on the DXi.
The SSH Settings dialog appears
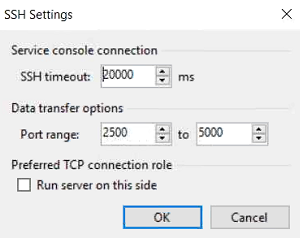
Note: The data transfer range of 2500 to 3090 is the port range allocated for Veeam. Other services use ports outside of this range.

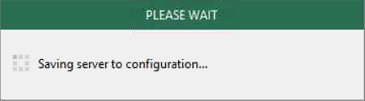
Note: A PLEASE WAIT message appears while the configuration is being saved.
When the configuration settings are saved in the system, the configuration summary appears.
Note: ONLY the two boxes checked in the above dialog should be checked by default. DO NOT change these settings.
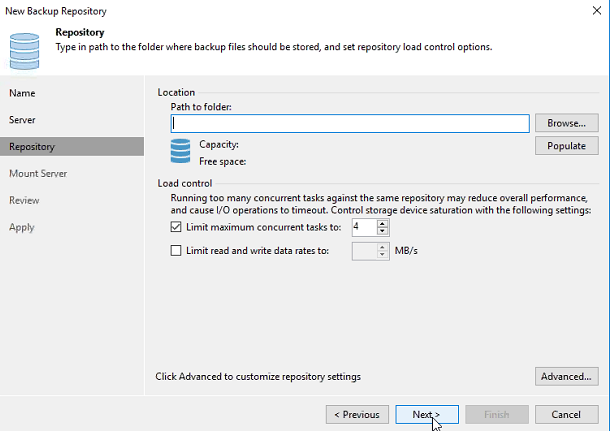
Note: The Location: Path to folder dropdown in the Repository dialog dropdown will display ONLY shares created by the user via DXi GUI. (See DXi4700 Veeam Installation.) It will display ALL your named NAS shares and you will need to identify the share you created in DXi Configuration - Create a NAS Share and use that share in this step.
Note: This may take a few minutes. Do not leave this dialog until the path appears in the box.
WARNING: DO NOT create new shares using the New Folder button OR ADD/MODIFY/DELETE FOLDERS in this dialog! These actions will incorrectly create/delete/modify shares and the system will not function correctly and will not deduplicate data. Any resulting system failures caused by creating or modifying shares outside of the Veeam software interface will not be supported by Quantum.
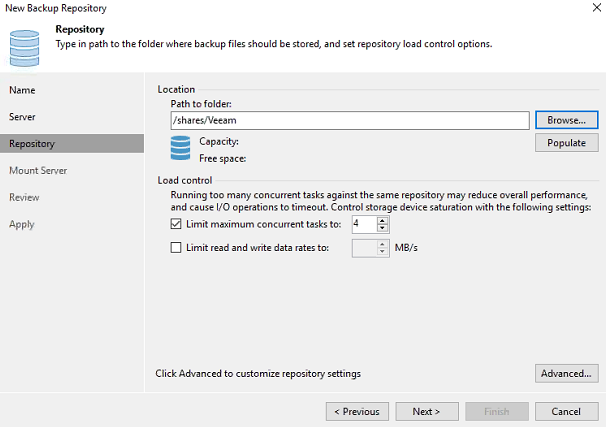
Note: For instructions on increasing the maximum concurrent job setting, see the DXi-Series Configuration and Best Practices Guide for Veeam Backup & Replication and DXi-Series Supplement - Best Practices for Optimizing Veeam v9.5 with DXi, both available from the Quantum Documentation Portal for your system. From the dropdown options at the top of the Documentation Center, select Best Practices for the DXi Best Practice Guides page.
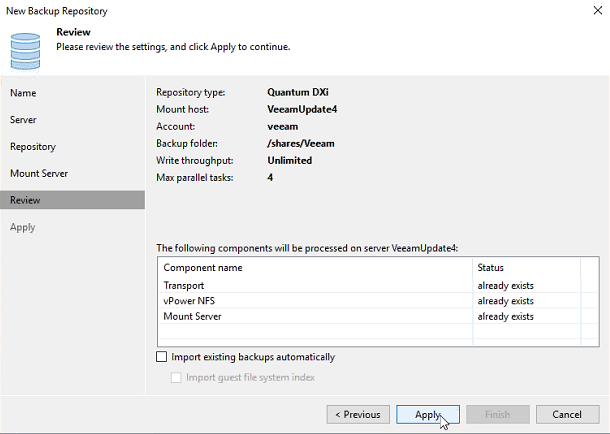
The New Backup Repository - Apply dialog appears. This screen populates with all saved settings, as the backup repository is created and saved as configured.
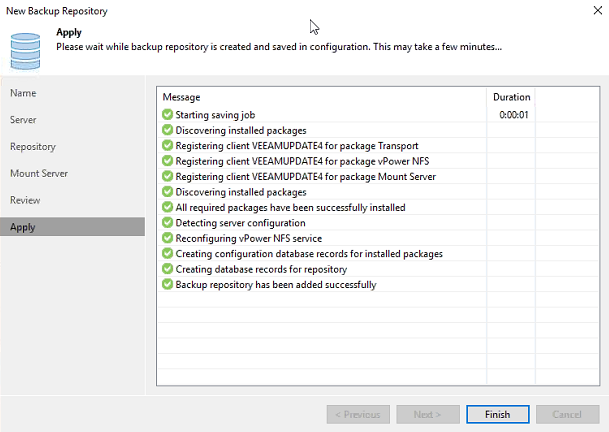
Note: In the message list, Backup repository has been added successfully appears last, to indicate that configuration has completed.
The repository is now ready for backup and restoration operations.
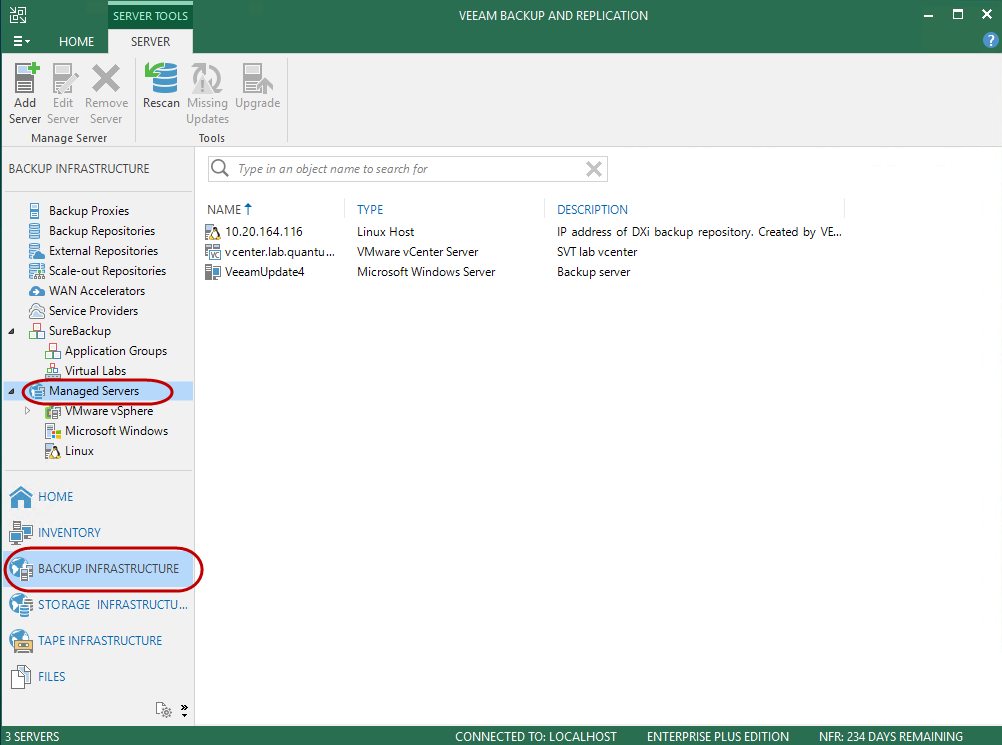
- Select Backup Infrastructure, then click Managed Servers.
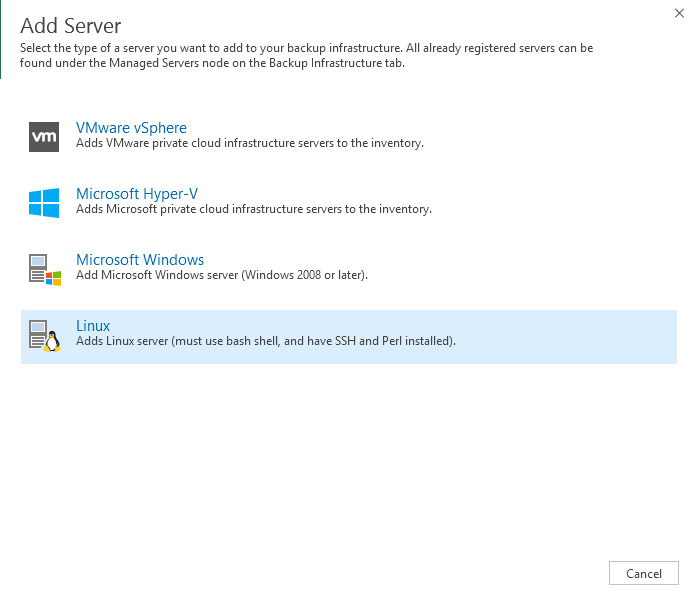
- On the Server tab at the top of the screen, click on Add Server.
- Select Linux. The New Linux Server dialog box appears.
- Enter the DNS or IP Address of the DXi system configured for Veeam.
- Click Next. The SSH Connection screen appears.
- Select Add > Linux Account.
- In the Username box, type Veeam (all lowercase).
- In the Password box, type the password for the server.
- Check the Elevate account privileges automatically box, then click OK.
- Select Advanced.
- Under Data transfer options, change the top-end (right-side box) of the Port range from 5000 to 3090.
- Click OK to close the SSH Settings dialog box.
- Click Apply, then click Yes on the confirmation prompt to close the New Linux Server - SSH Connection dialog box.
- Click Finish, then click Next at the New Backup Repository - Server dialog.
- Click Advanced and confirm that only the following boxes are checked in the Storage Compatibility Settings dialog:
- Decompress backup data blocks before storing
- Use per-VM backup files
- Confirm that only the two checkboxes noted and shown above are checked, then click OK.
- Under Location, next to the Path to folder box, click Browse.
- In the Select Folder dialog, click the dropdown arrow to the left of the IP address, then click the dropdown arrow next to the Shares folder.
- With the Veeam folder highlighted, click OK.
- Click Next, then click Next again at the New Backup Repository - Mount Server screen, to see the New Backup Repository - Review dialog.
- Click Apply to apply all new backup repository settings.
- After Backup repository has been added successfully appears in the message list, click Finish to complete the process.
- At the Veeam Backup and Replication 9.5 prompt that asks, Change the configuration backup location to the newly created repository? click Yes ONLY if you want to backup the Veeam software configuration to the new repository. Otherwise, click No.
The Add Server dialog box appears.
The Credentials dialog box appears.

WARNING: This box should be checked by default. If this box is not checked Veeam will misuse DXi resources during data protection operations and it will not perform as expected.
The credentials appear in the New Linux Server - SSH Connection screen.
The SSH Settings dialog appears.
Note: The data transfer range of 2500 to 3090 is the port range allocated for Veeam. Other services use ports outside of this range.
Note: A PLEASE WAIT message appears while the configuration is being saved.
When the configuration settings are saved in the system, the configuration summary appears.
The New Backup Repository - Repository dialog appears.
Note: ONLY the two boxes checked in the above dialog should be checked by default. DO NOT change these settings.
The Location: Path to folder box in the Repository dialog populates with /shares/Veeam.
Note: The Location: Path to folder dropdown in the Repository dialog dropdown will display ONLY shares created by the user via DXi GUI. (See DXi4700 Veeam Installation.) It will display ALL your named NAS shares and you will need to identify the share you created in DXi Configuration - Create a NAS Share and use that share in this step.
Note: This may take a few minutes. Do not leave this dialog until the path appears in the box.
WARNING: DO NOT create new shares using the New Folder button OR ADD/MODIFY/DELETE FOLDERS in this dialog! These actions will incorrectly create/delete/modify shares and the system will not function correctly and will not deduplicate data. Any resulting system failures caused by creating or modifying shares outside of the Veeam software interface will not be supported by Quantum.
The New Backup Repository - Apply dialog appears. This screen populates with all saved settings, as the backup repository is created and saved as configured.
Note: In the message list, Backup repository has been added successfully appears last, to indicate that configuration has completed.
The repository is now ready for backup and restoration operations.
Manage Veeam
Use the following commands to manage Veeam agent integration.
Note: The CLI Admin (cliadmin) account must be enabled on the DXi. If you do not have the password for this account, contact the DXi administrator.
This command returns the current Veeam agent settings.
Command
syscli --get veeam
Example output
Output data:
AE state = aeDaeRunning
Enabled = disabled
Password is = locked
This command enables or disables the Veeam agent.
Command
syscli --set veeam [--enable on|off] [--passwd lock|unlock] [--password <password>] [--sure]
Review the following attribute descriptions.
|
|
Enable access for the Veeam agent. Either the password or the key must be entered. The system will reboot if the enable state is changed. A password change does not require a reboot. |
|
|
If specified, the Veeam agent login will be enabled or disabled. If the state is changed, the system will reboot. |
|
|
Specifies if a password access is allowed. |
|
|
If the password is not specified, the command will prompt for the password and it will not be echoed. |
|
|
If specified, this command will execute immediately without asking for confirmation. |
|
|
If specified, the reboot will be deferred until a time the user forces a reboot. Note: This option is only available for DXi software versions 4.0.0 and later. |